
Okay, so confession time: there are certain recipes that just feel like sunshine on a plate, you know? The ones that make your kitchen smell like pure happiness and have everyone hovering around the oven, just waiting. For me, those are the moments that cooking is all about. And today, I’m SO excited to share one of my absolute, hands-down, all-time favorites with you: Bourbon Maple Bacon Cinnamon Rolls. If you’ve ever dreamed of a Cinnamon Roll that’s a little bit sweet, a little bit salty, and has a sophisticated kick of something special, then you’re going to fall head over heels for these. Imagine the warm, gooey center of a classic cinnamon roll, but then BAM! It’s elevated. This isn’t just a breakfast treat; it’s an experience. They’re kind of like a decadent upgrade to your everyday sweet roll, and honestly, they’re what I reach for when I need to make a weekend morning feel extra special, or when I just need a serious comfort food moment.
What are Bourbon Maple Bacon Cinnamon Rolls?
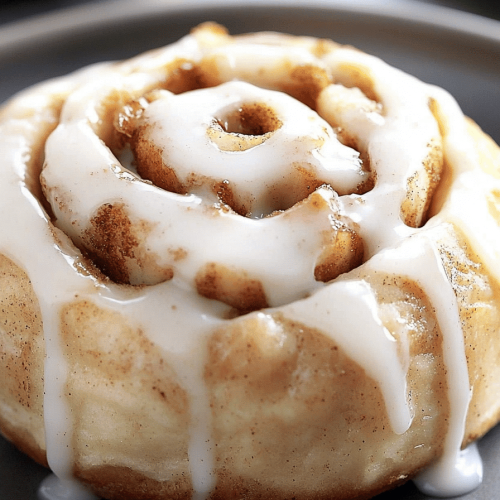
So, what exactly are we talking about here? Think of your beloved, classic Cinnamon Roll – that soft, pillowy dough, the swirl of cinnamon sugar, the sweet glaze… now, imagine infusing all of that with two of the most comforting flavors known to humankind: rich bourbon and smoky, salty bacon. That’s what these are. It’s not just a dash of bourbon thrown in; it’s a deliberate, delicious flavor that complements the maple and the bacon beautifully. And the bacon? Oh, the bacon! It’s candied to perfection, crisp yet chewy, and its savory punch cuts through the sweetness in the most delightful way. It’s essentially the ultimate indulgence, where familiar comfort meets a grown-up, slightly unexpected twist. It’s the kind of treat that makes you pause, take a bite, and just savor it. No fancy pastry chef skills required, I promise!
Why you’ll love this recipe?
Honestly, where do I even begin with why this recipe is a total keeper? First off, the FLAVOR. Oh, my goodness, the flavor! It’s this incredible symphony of sweet, savory, smoky, and a subtle boozy warmth that just makes your taste buds sing. The bourbon isn’t overpowering; it just adds this gorgeous depth that you can’t quite put your finger on at first, but you know it’s something special. Then there’s the bacon, candied with maple syrup, which adds this perfect salty crunch that balances the sweetness of the cinnamon swirl and the glaze. It’s seriously addictive. Beyond the taste, I love how surprisingly SIMPLE it is to pull these off. I know Cinnamon Rolls can seem intimidating, but this recipe breaks it down so nicely, and the results are always spectacular. You don’t need any fancy techniques. Plus, the ingredients are all pretty budget-friendly, especially if you grab bacon on sale. And versatility? Absolutely! While they’re divine for a lazy weekend brunch, I’ve also made these for potlucks, and they’re always the first thing to disappear. They feel fancy enough for guests but are genuinely comforting enough for a Tuesday morning when you just need a little pick-me-up. What I love most about these Bourbon Maple Bacon Cinnamon Rolls is that they take something so universally loved and give it this brilliant, unexpected elevation that makes you feel like you’re eating something truly unique and special.
How do you make Bourbon Maple Bacon Cinnamon Rolls?
Quick Overview
This recipe is all about building layers of flavor and texture. We start with a soft, pillowy yeast dough, which we’ll fill with a rich cinnamon-sugar mixture that’s been enhanced with a touch of bourbon and mixed with crispy, candied bacon. After rolling and slicing, they’ll bake up into glorious swirls, and then we finish them off with a decadent bourbon maple glaze. It might sound like a lot of steps, but I promise each one is straightforward and leads you closer to Cinnamon Roll perfection. The key is not to rush the dough-rising stages, but once that’s done, it’s pretty smooth sailing!
Ingredients
For the Dough:
You’ll want good quality ingredients here, as they really make a difference in the final texture. I usually go for whole milk for the richest dough, but any milk will work. Warm it up just right – too hot and you’ll kill the yeast, too cool and it won’t activate properly. Think bathwater temperature! The all-purpose flour is standard, just make sure it’s fresh. A touch of sugar feeds the yeast, and salt balances the sweetness. And of course, butter makes everything better, right?
- 1 cup warm milk (about 105-115°F)
- 2 ¼ teaspoons active dry yeast (one standard packet)
- ½ cup granulated sugar, divided
- 1 teaspoon salt
- ½ cup unsalted butter, melted and slightly cooled
- 2 large eggs, room temperature
- 4 to 4 ½ cups all-purpose flour, plus more for dusting
For the Filling:
This is where the magic really happens! The bourbon is my secret weapon here; it just adds this amazing depth that vanilla can’t touch. Don’t worry, the alcohol cooks off, leaving behind a wonderful warmth. And the bacon needs to be cooked until it’s nice and crispy before you chop it. I like using a good quality, thick-cut bacon for the best texture and flavor.
- ½ cup (1 stick) unsalted butter, softened
- 1 cup packed light brown sugar
- 2 tablespoons ground cinnamon
- 1 teaspoon ground nutmeg (optional, but lovely!)
- 2 tablespoons good quality bourbon
- 6 slices thick-cut bacon, cooked crisp and crumbled
- 2 tablespoons pure maple syrup
For the Glaze:
This glaze is the crowning glory. It’s simple but so effective. Using powdered sugar ensures a smooth, luscious texture. The bourbon and maple syrup tie it all together perfectly, echoing the flavors in the filling. If you want it a little thinner, just add a splash more milk or bourbon. Thicker? Add a bit more powdered sugar. Easy peasy!
- 1 ½ cups powdered sugar
- ¼ cup pure maple syrup
- 2 tablespoons bourbon
- 2-3 tablespoons milk or cream (for consistency)
Step-by-Step Instructions
Step 1: Preheat & Prep Pan
First things first, get your oven preheating to 375°F (190°C). While that’s warming up, grab a 9×13 inch baking pan. I like to grease mine generously with butter or baking spray. Some people like to line the bottom with parchment paper, which can make lifting them out a breeze, but a well-greased pan works just fine! This step is crucial because you want your beautiful rolls to come out of the pan easily after baking.
Step 2: Mix Dry Ingredients
In a large bowl, whisk together 1 cup of the all-purpose flour, ½ cup of the granulated sugar, and the salt. This just ensures everything is evenly distributed before we add the wet ingredients. It’s a small step, but it helps guarantee a consistent dough texture.
Step 3: Mix Wet Ingredients
In a separate, large bowl (or the bowl of your stand mixer, if you’re using one), combine the warm milk and the yeast. Let it sit for about 5-10 minutes until it gets foamy. This is called proofing the yeast, and it tells you your yeast is alive and ready to work its magic! Once foamy, stir in the melted butter, eggs, and the remaining ¼ cup granulated sugar. Whisk everything until it’s well combined.
Step 4: Combine
Now, gradually add the dry ingredients to the wet ingredients. Start with about half of the flour mixture, and then add the rest, mixing until just combined. If you’re using a stand mixer, use the dough hook on low speed. If mixing by hand, use a sturdy spoon or your hands. As the dough starts to come together, you’ll add the remaining flour, about ½ cup at a time, until a soft, slightly sticky dough forms. You might not need all 4 ½ cups, or you might need a touch more. The goal is a dough that pulls away from the sides of the bowl but is still a little tacky to the touch. Once it’s mostly formed, turn it out onto a lightly floured surface and knead for about 5-7 minutes until it’s smooth and elastic. I always find a good knead really makes the dough so much nicer to work with!
Place the dough in a lightly greased bowl, cover it with plastic wrap or a clean kitchen towel, and let it rise in a warm place for about 1 to 1 ½ hours, or until doubled in size. My go-to warm spot is in my oven, turned off, with the light on – it’s the perfect cozy environment for dough.
Step 5: Prepare Filling
While the dough is rising, let’s get that irresistible filling ready. In a medium bowl, combine the softened butter, Brown Sugar, cinnamon, and nutmeg (if using). Add the bourbon and mix until it forms a thick, spreadable paste. This is where that lovely bourbon scent starts to fill the air! In a separate small bowl, mix your crumbled, crispy bacon with the maple syrup. This will give the bacon a lovely sheen and a little extra sweetness.
Step 6: Layer & Swirl
Once the dough has doubled, punch it down gently to release the air. Turn it out onto a lightly floured surface. Roll the dough into a large rectangle, about 12×18 inches. Aim for an even thickness. Now, generously spread the cinnamon-bourbon butter mixture evenly over the dough, all the way to the edges. Then, sprinkle the maple-candied bacon crumbles all over the top of the butter mixture. Press them in gently so they adhere well. Starting from one of the long sides, tightly roll up the dough. Pinch the seam to seal it well. Use a sharp knife or dental floss (my favorite trick for clean cuts!) to slice the roll into 12 equal pieces. Place the cinnamon roll slices, cut-side up, into your prepared baking pan. Gently press them together; they’ll expand as they bake!
Cover the pan loosely with plastic wrap and let them rest for another 20-30 minutes while the oven finishes preheating. This second rise helps ensure those super soft, fluffy interiors.
Step 7: Bake
Pop that pan into your preheated oven and bake for 25-30 minutes, or until they are golden brown and the centers are cooked through. The exact time can vary depending on your oven, so keep an eye on them. If the tops start to brown too quickly, you can loosely tent them with foil. You want that beautiful caramelization, but not burnt edges!
Step 8: Cool & Glaze
Once they’re out of the oven, let them cool in the pan for about 10-15 minutes. This is important so they don’t fall apart when you glaze them. While they’re cooling, whisk together the powdered sugar, maple syrup, and bourbon for the glaze. Add the milk or cream, a tablespoon at a time, until you reach your desired drizzling consistency. It should be thick but pourable. Once the rolls have cooled slightly, generously drizzle the glaze over the warm cinnamon rolls. Watch that beautiful glaze drip down the sides – it’s pure magic!
Step 9: Slice & Serve
These Bourbon Maple Bacon Cinnamon Rolls are best served warm, right after the glaze has set a little. You can serve them directly from the pan, or use a spatula to lift them onto a serving platter. Dig in and enjoy the incredible combination of warm, gooey cinnamon, sweet maple, smoky bacon, and that hint of bourbon. It’s a flavor explosion you won’t forget!
What to Serve It With
These rolls are so decadent and satisfying, they really stand on their own as a star. But if you’re looking to round out a meal or add some complementary flavors, here are a few ideas from my kitchen:
For Breakfast: The most obvious, right? A perfectly brewed cup of coffee is non-negotiable, of course. I love a good medium roast with these. For a heartier breakfast, I sometimes serve them alongside some scrambled eggs or a simple fruit salad to add a fresh, bright contrast. My kids also love them with a glass of cold milk, and who am I to argue with that?
For Brunch: To make it feel a bit more elegant, serve them on a nice platter with a few fresh berries on the side – raspberries or blueberries are gorgeous. A mimosa or a simple sparkling cider pairs wonderfully, cutting through the richness. For a true brunch spread, consider adding some savory elements like crispy bacon (more bacon, always!) or mini quiches.
As Dessert: These make a surprisingly sophisticated dessert. Serve them warm with a small scoop of good quality vanilla bean ice cream. The contrast of warm cinnamon roll and cold ice cream is divine. A drizzle of extra maple syrup or a dollop of whipped cream wouldn’t hurt either!
For Cozy Snacks: Honestly, any time is a good time for these! On a chilly afternoon, a warm roll with a mug of tea or hot chocolate is pure comfort. They’re the perfect thing to have when you’re curled up with a good book or watching a movie. My family devours them as a special afternoon treat after school, and it always feels like a little celebration.
Top Tips for Perfecting Your Bourbon Maple Bacon Cinnamon Rolls
I’ve made these more times than I can count, and along the way, I’ve picked up a few tricks that really make a difference. These aren’t complicated, but a little attention to detail goes a long way to ensure perfect rolls every time.
Dough Consistency: The biggest variable in dough making is often the flour. Different flours absorb moisture differently, so don’t be afraid to adjust. If your dough feels too wet and sticky after adding the 4 cups of flour, add the remaining ½ cup a tablespoon at a time until it just pulls away from the bowl. Conversely, if it feels too stiff, add a touch more milk. A slightly sticky dough will yield softer rolls than an overly floured one.
Yeast Activation: Always, always check your yeast is active! That foamy layer after about 5-10 minutes is your sign of life. If it doesn’t foam, your yeast is dead, and your dough won’t rise. Start over with fresh yeast. Also, ensure your milk is warm, not hot. Too hot will kill it, too cool and it won’t get going.
Butter Temperature for Filling: For the filling, make sure your butter is *softened*, not melted. You want to be able to spread it evenly. If it’s too cold, it’ll tear the dough; too melted, and it’ll just soak in unevenly. Letting it sit out on the counter for about 30-45 minutes usually does the trick.
Bacon Crispness: Cook your bacon until it’s *really* crisp. This is important! If it’s too soft, it can make the filling greasy and won’t provide that satisfying textural contrast. I usually bake my bacon on a rack over a baking sheet for even cooking and crispiness.
Rolling Technique: When rolling out the dough, try to get it as even as possible. This ensures that all your cinnamon rolls are roughly the same size and bake evenly. Roll tightly but not so tight that you squeeze all the air out. When slicing, using unflavored dental floss is a game-changer for clean cuts without squishing the rolls. Just slide it under, cross the ends, and pull.
Don’t Over-Proof the Second Rise: The second rise is important for fluffiness, but don’t let them over-proof. They should look puffy and slightly increased in size, but not doubled again. If they over-proof, they might collapse in the oven.
Glaze Consistency: This is totally personal preference! I like my glaze thick enough to coat but still a little drippy. If you prefer a thinner glaze, add a bit more milk or bourbon. For a thicker glaze, add more powdered sugar. Whisk well after each addition to ensure it’s smooth.
Ingredient Swaps: If you don’t have bourbon, you can substitute it with rum, or even just use a teaspoon of pure vanilla extract in the filling for a more classic flavor. For the bacon, if you’re vegetarian, crispy fried shallots could offer a similar textural element, though the flavor will be different. If you can’t have dairy, you can try using plant-based butter and milk, though the richness might be slightly altered.
Storing and Reheating Tips
These Bourbon Maple Bacon Cinnamon Rolls are truly at their absolute best when they’re fresh and warm from the oven, but thankfully, they store and reheat beautifully, so you can enjoy them over a few days. I often make a batch on Saturday and still enjoy them on Monday!
Room Temperature: Once cooled, you can store them in an airtight container at room temperature for up to 2 days. They’ll remain wonderfully soft and gooey, especially if you haven’t overloaded on the glaze. They’re great for breakfast or an afternoon snack. Just remember, if your kitchen is particularly warm, it might be better to refrigerate them to prevent the glaze from getting too sticky.
Refrigerator Storage: For longer storage, place them in an airtight container or wrap the pan tightly with plastic wrap and then foil. They’ll keep well in the refrigerator for up to 4-5 days. The texture might firm up slightly, but that’s easily fixed with reheating. I find that they maintain their flavor really well when chilled.
Freezer Instructions: These also freeze exceptionally well, which is a lifesaver for busy weeks! Once they are completely cooled, you can freeze them in a single layer on a baking sheet until firm, then transfer them to a freezer-safe airtight container or heavy-duty freezer bag. They should last for up to 2-3 months. Make sure to label them with the date so you know how long they’ve been in there.
Glaze Timing Advice: If you plan to store them immediately, I often recommend glazing them *after* reheating if they’ve been refrigerated or frozen. This keeps the glaze fresh and prevents it from becoming too soggy. If they are going to be eaten within a day or two at room temperature, glazing them right after they cool a bit is perfect. For frozen rolls, I’ll often reheat them first, then whip up a fresh batch of glaze to pour over the warm rolls.
Reheating: The best way to reheat is gently! For room temperature or refrigerated rolls, pop them in a warm oven (around 300°F or 150°C) for 5-10 minutes, or until warmed through. You can also microwave them for about 15-30 seconds, but watch them closely to avoid making them tough. For frozen rolls, you can either thaw them overnight in the refrigerator and then reheat as above, or (my preferred method for speed!) reheat them directly from frozen in a 300°F (150°C) oven for about 15-20 minutes, then glaze.
Frequently Asked Questions
Final Thoughts
I truly hope you get a chance to try these Bourbon Maple Bacon Cinnamon Rolls soon. They’re one of those recipes that just brings me so much joy, both in making them and in sharing them. It’s that perfect blend of comforting familiarity with a delightful, sophisticated twist that makes them so special. They remind me that simple ingredients, when treated with a little care and imagination, can create something truly extraordinary. Whether you’re making them for a lazy Sunday brunch, a special occasion, or just because you deserve a treat, I’m confident they’ll become a favorite in your kitchen too. If you end up making them, please, please come back and let me know how they turned out! I love hearing your stories and seeing your creations. Your feedback helps me refine my recipes and inspires me to keep sharing the love. And if you enjoyed these, you might also love my [link to another recipe, e.g., “Spiced Pear and Pecan Scones”] or my [link to another recipe, e.g., “Salted Caramel Apple Crumble”]. Happy baking, everyone!
Bourbon Maple Bacon Cinnamon Rolls
Ingredients
Dough
- 2.25 teaspoons active dry yeast
- 1 cup warm milk (105-115°F)
- 0.25 cup granulated sugar
- 0.5 teaspoon salt
- 4 cups all-purpose flour, plus more for dusting
- 0.25 cup unsalted butter, softened
Filling
- 0.5 cup packed brown sugar
- 0.25 cup maple syrup
- 0.5 cup cooked and crumbled bacon
- 0.25 cup bourbon
- 1 tablespoon ground cinnamon
- 0.25 cup unsalted butter, softened
Glaze
- 4 ounces cream cheese, softened
- 0.25 cup maple syrup
- 1 cup powdered sugar
- 1 teaspoon bourbon
Instructions
Make the Dough
- In a large bowl, dissolve yeast and sugar in warm milk. Let stand for 5 minutes, until foamy.
- Add salt, egg, and melted butter. Mix well.
- Gradually add flour, mixing until a dough forms. Turn dough out onto a lightly floured surface and knead for 5-7 minutes, until smooth and elastic.
- Place dough in a greased bowl, turning to coat. Cover and let rise in a warm place for 1 hour, or until doubled in size.
Make the Filling & Assemble
- In a bowl, combine brown sugar, maple syrup, bacon, bourbon, cinnamon, and softened butter. Mix until well combined.
- Roll out the dough on a lightly floured surface into a 12x15 inch rectangle.
- Spread filling evenly over the dough. Roll up tightly, starting from a long side.
- Cut into 1.5-inch thick rolls and place in a greased baking dish.
- Cover and let rise for 30 minutes.
Bake and Glaze
- Preheat oven to 350°F (175°C). Bake for 20-25 minutes, or until golden brown.
- While rolls are baking, make the glaze: In a bowl, beat cream cheese, maple syrup, powdered sugar, and bourbon until smooth.
- Let rolls cool slightly before drizzling with glaze.


