There’s something about French Silk Pie that just wraps you up in a cozy, chocolatey hug. The first time I tasted it was when my aunt brought one over to a family gathering — it vanished before I even got seconds, and believe me, that’s saying something. It’s got this rich, silky mousse-like filling that’s pure heaven on a flaky crust, and it’s shockingly simple to whip up once you know the trick. Compared to classic chocolate cake or brownies, French Silk Pie feels like an indulgence without the heavy baking or fuss, yet it somehow manages to deliver a punch of luxury in every forkful. Whenever I bring this pie into the house, my kids literally beg for it (even after dinner), and the smell alone seems to pull everyone into the kitchen. If you’re even remotely a chocolate lover, this is the one dessert recipe you’ll want on speed dial for birthdays, celebrations, or that sudden sweet craving at midnight.
What is French Silk Pie?
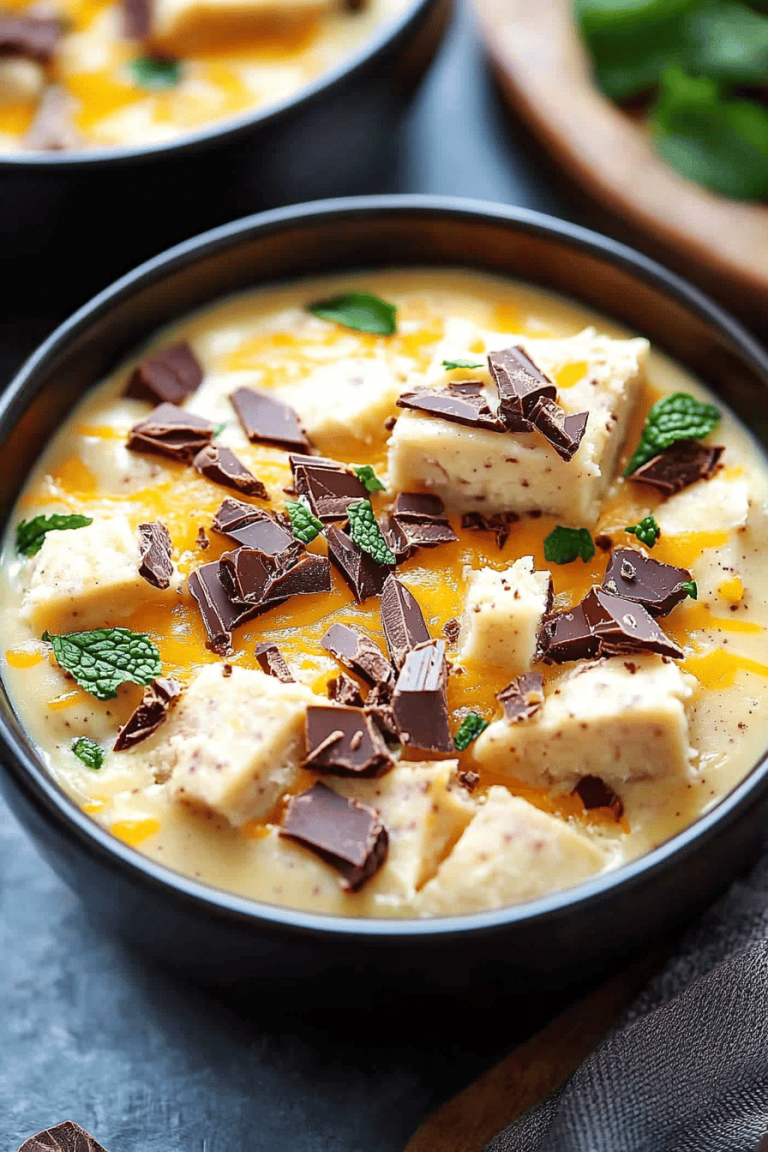
Think of French Silk Pie as the lovechild of chocolate mousse and a classic pie — it’s essentially a rich, creamy chocolate filling on a buttery crust, topped with a cloud of whipped cream. The name “French Silk” isn’t about intricate French pastry techniques but rather the silky, smooth texture of the chocolate filling. It’s luscious but light, with a velvety mouthfeel that just melts the moment it touches your tongue. Unlike cakey desserts, French Silk Pie relies on chilled chocolate mousse that’s firm but airy, making it feel almost like a special treat you didn’t sweat over. It’s approachable for home cooks, especially if you’ve had success with any mousse or pie crust before — no complicated layers or fancy decorations required. Basically, it’s your new go-to for a dessert that looks and tastes like you spent hours on it, when really, it’s ready in under an hour.
Why you’ll love this recipe?
What I love most about this French Silk Pie is how it nails indulgence without demanding all afternoon in the kitchen. First up: the flavor. It’s chocolate in its most luxurious form — rich but not overly sweet, with a deep cocoa flavor that feels just right. It’s the kind of dessert you can make and feel proud sharing because it’s genuinely impressive. Then there’s the simplicity — I always thought a chocolate mousse pie meant you had to be a professional chef or at least someone who loves staring at a mixer for hours. Nope! This recipe is straightforward, with no eggs to temper or awkward folding — just smooth, creamy goodness. It’s perfect when you want that wow factor but don’t want to bring out every tool in your kitchen.
The ingredients don’t break the bank either; you only need staples like good-quality chocolate, butter, sugar, and cream. I’ve seen recipes stuffed with fancy liqueurs or obscure extracts, but honestly, this one’s made with things you probably already have. What’s more, it’s incredibly versatile. You can jazz it up with a sprinkle of sea salt or a spoonful of espresso powder for depth, or keep it classic with a swirl of whipped cream and a dusting of cocoa. If you’re a fan of desserts like chocolate torte or a classic mousse, this pie feels like the indulgent cousin that pops up at family dinners and holidays, always stealing the spotlight. Honestly, I’ve made this countless times, and each tasting feels like a little celebration.
How do I make French Silk Pie?
Quick Overview
This pie might look fancy, but the magic happens in just a few smooth steps — melt, mix, chill, and serve. The key is using quality chocolate and whisking the batter just right so it’s silky but stable enough to slice. Unlike other pies, there’s no baking the filling itself, which saves you so much time and hassle. Once you’ve got the pie shell ready, you simply melt the chocolate with butter, mix in the sugar and a touch of vanilla, beat in heavy cream until it’s luscious, and then chill. After a couple of hours in the fridge to set, it’s ready for its whipped cream crown and a bit of chocolate garnish if you’re feeling fancy. I always do this when I want something sophisticated but effortless — trust me, it’s easier than making cookies!
Ingredients
For the Crust:
- 1 14 cups graham cracker crumbs or chocolate cookie crumbs (for extra chocolatey depth) (for extra chocolatey depth)
- 6 tablespoons unsalted butter, melted (make sure it’s nice and golden, not burnt)
- 2 tablespoons granulated sugar (to balance sweetness in crust)
For the Filling:
- 8 ounces good-quality semisweet or bittersweet chocolate, chopped (my go-to is 60-70% cocoa)
- ½ cup unsalted butter, softened (not melted!)
- 1 cup granulated sugar (for that signature silky sweetness)
- 3 large eggs, at room temperature (trust me, this makes the texture perfect)
- 1 teaspoon pure vanilla extract (because vanilla enhances chocolate like magic)
- ½ teaspoon salt (to counterbalance all the sweet)
For the Topping:
- 1 cup heavy whipping cream, chilled (cold cream whips up faster and fluffier)
- 2 tablespoons powdered sugar (to lightly sweeten the cream)
- Chocolate shavings or cocoa powder for garnish (optional but oh-so-pretty)
Step-by-Step Instructions
Step 1: Preheat & Prep Pan
Before anything else, preheat your oven to 350°F (175°C). Grab a 9-inch pie dish and if you’re making a graham cracker crust, mix those crumbs with melted butter and sugar until it resembles damp sand. Press this mixture evenly into the bottom and up the sides of the pan — I always use the bottom of a glass for a nice, firm press. Pop it into the oven for about 8 minutes to give it a little toast and set, then let it cool completely. This step really elevates the crust’s flavor and helps it hold together under that luscious filling.
Step 2: Mix Dry Ingredients
For the filling, you don’t get too many “dry” ingredients, but it’s good to have your sugar and salt measured out and ready. The sugar here dissolves into the butter and eggs to create that silky texture you’re craving. The salt is your secret weapon — just a pinch to keep the chocolate from becoming flat.
Step 3: Mix Wet Ingredients
This is where the magic starts. In a microwave-safe bowl or over a double boiler, gently melt the chopped chocolate until smooth, stirring every 20 seconds so it doesn’t seize. Set that aside to cool just slightly — you want it warm enough to stay liquid, but not hot or it’ll scramble the eggs later. Then beat your softened butter until creamy, add sugar, and mix well. Slowly add your eggs one at a time, beating after each addition, and stir in vanilla.
Step 4: Combine
Slowly pour the melted chocolate into the butter and egg mixture and mix just until smooth. Be gentle but thorough — you want to combine everything without overbeating, which can affect texture. It should look glossy and thick. When I first tried rushing this step, the filling came out grainy, so take your time here!
Step 5: Prepare Filling
Here’s the secret — the filling is actually more like a rich chocolate buttercream mousse. Once mixed, pour it into your cooled crust, smoothing the top with a spatula. If you want to add a little flair, swirl in a hint of espresso powder or some orange zest. The filling should be thick enough to hold its shape but soft enough to melt in your mouth.
Step 6: Layer & Swirl
I like to finish the pie with a beautiful swirl pattern before it chills to make it look extra special. Use the back of a spoon or a thin knife to spiral or create waves on the surface. This not only looks classy but helps the glaze or whipped topping cling nicely. Plus, it’s fun — my kids insist on helping with this part!
Step 7: Bake
This pie doesn’t technically bake after filling. The crust gets its heat treatment upfront, and the filling sets by chilling in the fridge for at least 4 hours, preferably overnight. This chilling helps develop that silky texture and makes it slice like a dream. If you can’t wait, a minimum of 3 hours works in a pinch, but seriously, patience pays off here.
Step 8: Cool & Glaze
Once the pie is firm, whip the cream with powdered sugar to soft peaks and spread it evenly over the top. Smooth it or pipe it for a fancier look. Then dust with cocoa powder or sprinkle chocolate shavings generously. I often sneak a few shavings myself before serving. The fresh cream adds a light, cool contrast to the dense chocolate — it’s the perfect balance.
Step 9: Slice & Serve
Use a sharp knife dipped in hot water (wiped dry between slices) for clean cuts. This neat slicing tip keeps those silky edges intact and the pie looking gorgeous on your plate. Serve it chilled, maybe with a scoop of vanilla ice cream or a raspberry garnish to add a pop of tartness. Watching everyone’s face as they take the first bite is one of my favorite kitchen moments.
What to Serve It With
For Breakfast: I know, French Silk Pie sounds wild for breakfast, but trust me here — a small slice with your morning coffee or a latte tastes decadent without feeling like too much. Try pairing it with a creamy cappuccino and fresh berries for a special weekend treat.
For Brunch: When friends are over, serve slices alongside fresh whipped cream and a fruit salad with citrus notes. A crisp sparkling rosé or a light dessert wine pairs beautifully, and it instantly turns your brunch into a celebration.
As Dessert: This is where French Silk Pie truly shines — after dinner, with a cup of espresso or a glass of robust red wine. I love to add a handful of toasted nuts or a drizzle of caramel sauce to bring in extra layers of flavor. It’s the perfect ending to any meal.
For Cozy Snacks: On those lazy Sunday afternoons, a small slice with a mug of hot chocolate or chai tea feels like a warm hug. My family and I sometimes eat this straight from the fridge with a spoon — no judgment.
This pie has wormed its way into various family traditions in my house — from birthdays to casual weekend treats. And every time I serve it, I’m reminded why it’s so beloved: it’s approachable, indulgent, and just plain delicious.
Top Tips for Perfecting Your French Silk Pie
Ingredient Prep: Make sure your eggs are at room temperature — cold eggs can cause the filling to seize or separate. I usually take them out 30 minutes ahead; it makes a huge texture difference.
Chocolate Quality: Don’t skimp here! A good-quality semisweet or bittersweet chocolate melts better and tastes far superior. I’ve tested everything from baking chips to bars, and bars always win the silky, smooth texture battle.
Mixing Advice: When beating your eggs and sugar with the butter, don’t rush. Incorporate air gently to avoid a dense filling. Overmixing can make the filling tough, so once combined with the melted chocolate, stop mixing.
Chilling Tricks: Chill at least 4 hours for firm slices, but overnight is best if you can wait. I learned this after several disappointing soft slices — patience is definitely rewarded.
Swirl Customization: You can mix in a teaspoon of instant espresso powder or a splash of liqueur (like Grand Marnier or Kahlua) into your filling for a grown-up twist. When swirling the top before chilling, get creative — a toothpick drag through the chocolate creates pretty feather patterns.
Egg Safety: This recipe uses raw eggs — if that concerns you, look for pasteurized eggs at your grocery or consider a quick tempering method with warm chocolate, but I always use fresh, good-quality eggs and have never had issues.
Glaze & Topping Variations: If you want to nix the whipped cream, dust with cocoa powder and finely chopped nuts or chocolate shards. Alternatively, a drizzle of salted caramel pairs wonderfully too.
I’ve made so many versions over the years — adding orange extract, swapping sugar for maple syrup, even swapping the crust for a gluten-free almond base — and each time, it’s magic. Just remember, the most important part is to enjoy and savor every bite.
Storing and Reheating Tips
Room Temperature: French Silk Pie is best kept chilled, but if you leave it out covered at room temp, aim to keep it no longer than 2 hours to keep that luscious texture intact.
Refrigerator Storage: Wrap the pie tightly with plastic wrap or cover with an airtight lid. Stored this way, it stays fresh for up to 5 days — though it rarely lasts that long in my house! Always bring it out 15 minutes before serving so the filling softens just a touch.
Freezer Instructions: You can freeze the pie (without whipped cream topping) by wrapping it tightly in plastic wrap and then foil. Freeze for up to 2 months. Thaw overnight in the fridge and add fresh whipped cream before serving for that fresh-from-the-kitchen feel.
Glaze Timing Advice: Add your whipped cream and garnish right before serving for the lightest texture. If you pre-glaze and freeze, the cream can get watery or separate. So, keep it separate if you plan ahead!
Frequently Asked Questions
Final Thoughts
French Silk Pie isn’t just another chocolate dessert — it’s a celebration of everything silky, smooth, and utterly satisfying about chocolate. Every time I serve it, I’m reminded why this recipe holds a special place in our family’s hearts. It’s the perfect balance between fancy and fuss-free, making it my go-to when I want to impress without stress. If you enjoy this, you might want to check out my take on chocolate mousse or shake up your dessert game with a classic chocolate ganache tart for a change of pace. I can’t wait to hear how yours turns out — drop me a comment or photo if you try it! Happy baking and indulging, friends!
French Silk Pie
Ingredients
Main Ingredients
- 24 count Oreos for crust, about 2 cups crushed
- 4 tablespoons butter melted for crust
- 8 ounces semi-sweet chocolate melted
- 4 large eggs
- 1.25 cups sugar divided
- 2 teaspoons vanilla extract
- 1 cup butter room temperature for filling
- 0.25 teaspoons salt
- 1 cup heavy whipping cream for folding into filling
- 3 tablespoons powdered sugar for whipping cream in filling
- 1 cup heavy whipping cream for topping
- 0.25 cup powdered sugar for topping
- 1 teaspoon vanilla extract for topping
- count chocolate curls for garnish
Instructions
Preparation Steps
- Preheat oven to 350°F. Grease a 9-inch pie pan with non-stick spray. Crush Oreos into fine crumbs using a food processor or blender, leaving the filling inside.
- Combine Oreo crumbs with melted butter. Press mixture evenly into the bottom and sides of the pie pan.
- Bake crust for 8-10 minutes, then set aside to cool completely.
- Melt the semi-sweet chocolate according to package instructions and set aside.
- In a saucepan, whisk eggs with 0.75 cup sugar. Cook over medium-low heat, whisking constantly, until the mixture reaches 160°F.
- Remove from heat and stir in melted chocolate and vanilla extract. Whisk until smooth. Transfer to another bowl and cool until just above room temperature (~20 minutes), stirring occasionally.
- In a large bowl, beat 1 cup room temperature butter with remaining 0.5 cup sugar and salt until light and fluffy, about 2-3 minutes.
- Gradually add cooled chocolate mixture to the butter mixture and combine well.
- Beat chocolate and butter mixture on high speed for 4 minutes until light and fluffy. Set aside.
- Whip 1 cup heavy cream with 3 tablespoons powdered sugar until stiff peaks form.
- Fold just under half of the whipped cream into the chocolate mixture. Then fold in the remaining whipped cream until fully combined.
- Pour filling into the prepared crust and smooth evenly. Chill for 5-6 hours or until firm.
- For the topping, whip 1 cup heavy cream with 0.25 cup powdered sugar and 1 teaspoon vanilla extract until stiff peaks form.
- Spread whipped cream topping evenly on the chilled pie and garnish with chocolate curls.
- Refrigerate pie until ready to serve. Best consumed within 4-5 days.