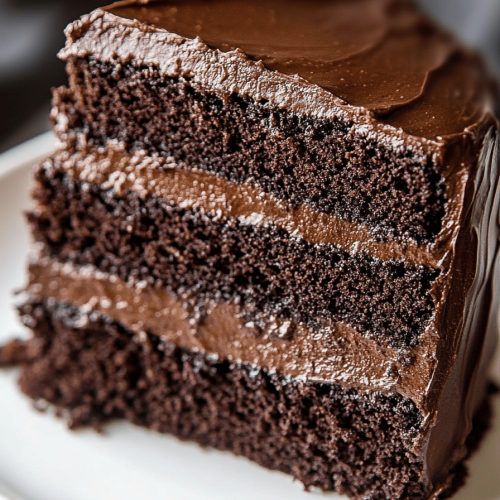
There’s something truly magical about the smell of a chocolate cake baking that takes me straight back to my childhood kitchen. My mom’s hands dusted with cocoa powder, the oven humming as the house filled with that warm, heavenly scent—it’s like a cozy hug you can eat. This chocolate cake isn’t just any dessert; it’s the one everyone asks for at birthdays and holidays, and honestly, it’s the recipe I reach for when I want to impress friends without making things complicated. It’s rich, moist, and so chocolatey your taste buds will be thanking you. And hey, if you’re thinking you need a complicated ganache or layers on layers of frosting, trust me, this cake sings beautifully on its own or with a simple glaze. If you’ve ever struggled with dry or overly dense chocolate cakes, this one’s a little miracle—I always do a happy dance when it comes out perfect.
What is chocolate cake?
Think of chocolate cake as life’s way of sprinkling a little joy into ordinary days. It’s essentially a sweet, baked dessert where cocoa or melted chocolate infuses the batter with that deep, irresistible flavor we all crave. Named simply because the cornerstone of the recipe is chocolate, it’s been a classic comfort food for ages—each culture has its take, but the basic idea is a moist, fluffy cake that balances sweetness and richness. I like to imagine it as the edible equivalent of cozying up with your favorite blanket and a warm drink. This recipe in particular embraces that—no fancy gadgets, just good ingredients mixed with love, creating a chocolate cake that feels homemade but tastes like a slice of heaven.
Why you’ll love this recipe?
What I adore about this chocolate cake (besides the fact that my kids ask for it on repeat) is how effortlessly it balances flavor and ease. First off, the flavor hits all the right notes. It’s deeply chocolatey without being bitter and has that almost fudgy undertone that makes it perfect for those last-minute dessert cravings. I’ve tried loads of chocolate recipes over the years, but this one packs that punch without needing a ton of extra ingredients or time. It’s my go-to when I want maximum tastiness with minimum fuss.
Secondly, the simplicity blew me away the first time I tried it. No complicated mixers or exotic ingredients—just pantry staples you’re likely to have on hand. The cost-efficiency is another win because we’re not talking fancy chocolates or pricey specialty flours. It’s a wallet-friendly cake that doesn’t skimp on the indulgence, making it perfect for any weeknight or special occasion.
Lastly, it’s ridiculously versatile. You can dress it up with whipped cream and berries, dunk a slice into your morning coffee, or keep it naked with just a dusting of powdered sugar. When I want to jazz it up for a party, I add a quick glaze or even mix in some chopped nuts. Honestly, this chocolate cake has become such a staple for my family—once you try it, you’ll see why it’s an all-time favorite in our household.
How do I make chocolate cake?
Quick Overview
This cake comes together in three easy steps: mixing your dry ingredients, incorporating the wet, and then baking it until it’s perfectly risen and moist inside. What really sets this method apart is how it combines simple ingredients for an incredibly tender crumb. I always say it’s one of those recipes where even if you’re a beginner, you’ll feel like a pro when it comes out just right. The process is quick, reliable, and doesn’t require fancy kitchen gadgets—just a bowl, a whisk, and a bit of love.
Ingredients
For the Main Batter:
- 1 and 3/4 cups all-purpose flour (I never substitute this for cake flour here because the texture depends on it!)
- 3/4 cup unsweetened cocoa powder (good quality will make a noticeable difference—Dutch processed or natural works fine)
- 1 and 1/2 teaspoons baking powder
- 1 and 1/2 teaspoons baking soda
- 1 teaspoon salt
- 2 cups granulated sugar (I like to keep it traditional, but you can scale back if you prefer less sweet)
- 2 large eggs (room temperature is best for full mixing!)
- 1 cup whole milk (I tested this with almond milk once and it gave it a lovely extra creaminess)
- 1/2 cup vegetable oil (keeps the cake moist and tender)
- 2 teaspoons vanilla extract (fresh vanilla makes a world of difference)
- 1 cup boiling water (I know it sounds odd but it intensifies the cocoa flavor)
For the Filling:
- Optional: 1/2 cup chocolate chips or chunks (for pockets of melty goodness)
- Or you can mix in some raspberry jam or even peanut butter for a twist
For the Glaze:
- 1 cup powdered sugar
- 3 tablespoons unsweetened cocoa powder
- 3 tablespoons melted butter
- 3-4 tablespoons milk (add until smooth and spreadable)
- A pinch of salt (to balance sweetness)
Step-by-Step Instructions
Step 1: Preheat & Prep Pan
Start by preheating your oven to 350°F (175°C). Grab a 9×13 inch pan or two 9-inch round pans—whichever you prefer. I always grease the pans with a little butter and then dust them lightly with cocoa powder instead of flour; it avoids a weird white residue on the cake edges and keeps everything perfectly chocolaty. This step matters more than you’d think; you want a smooth release that doesn’t mess with the cake’s texture.
Step 2: Mix Dry Ingredients
In a large bowl, sift together the flour, cocoa powder, baking powder, baking soda, and salt. If you don’t have a sifter, whisking thoroughly works too—just make sure it’s evenly combined so you don’t end up with clumps of baking soda or patches of flour. The mixture should look like a rich chocolatey dust, and it helps keep that cake crumb light and even.
Step 3: Mix Wet Ingredients
In another bowl, whisk together the sugar, eggs, milk, vegetable oil, and vanilla extract. You’re aiming for creamy, smooth consistency with no lumps. I learned the hard way that room temperature eggs make a difference; they blend so much quicker and create a batter that rises beautifully. Once smooth, the magic touch here is folding in the boiling water slowly—it might look thin and odd at first, but it wakes up the cocoa and results in that moist, tender crumb we all love.
Step 4: Combine
Pour the wet ingredients into the dry and gently mix using a folding motion. This step is where you want to be careful—not too much stirring or the cake can turn out tough. Just combine until you don’t see flour anymore. If you’re adding chocolate chips or a swirl of jam, gently fold them in now. The batter will be quite loose, but trust me, it’s supposed to be that way!
Step 5: Prepare Filling
If you want a surprise inside, adding chocolate chips or a thin layer of jam is perfect here. For peanut butter fans, try dolloping small spoonfuls and swirling them in lightly—it makes every bite a delightful surprise. Just keep the filling thin enough that it bakes through evenly.
Step 6: Layer & Swirl
Pour half the batter into the prepared pan, sprinkle or dollop your filling layer evenly, then pour the remaining batter on top. For a fun touch, grab a skewer or butter knife and swirl through the batter lightly to create a marbled effect—it’s decorative and tasty! Don’t over-swirl or the layers will blend together too much.
Step 7: Bake
Pop the pan into the middle rack of your oven and bake for about 30–35 minutes for round pans, or 35–40 minutes for a 9×13 pan. The best way to check doneness? Insert a toothpick in the center—it should come out mostly clean with a few moist crumbs, never wet batter. Ovens run hot or cold, so start checking 5 minutes before time is up to avoid overbaking. The smell alone is worth the wait!
Step 8: Cool & Glaze
Allow the cake to cool in the pan for about 15 minutes—this helps it firm up and makes it easier to handle. After that, move it to a wire rack if you can (or leave in pan if you’re pressed for time). While it cools, whip up the glaze by mixing powdered sugar, cocoa, melted butter, milk, and a pinch of salt until smooth. Once the cake is completely cool, pour and spread the glaze evenly on top. It sets beautifully and adds just the right touch of sweetness and shine.
Step 9: Slice & Serve
Use a sharp knife to slice your chocolate cake—and don’t be shy with those slices! It tastes wonderful slightly warmed or at room temperature. If you want to dress it up, add a dollop of whipped cream or fresh berries. This cake also pairs beautifully with a scoop of vanilla ice cream if you’re in dessert mode. The texture is so tender and moist, it practically melts on your tongue—and honestly, the glaze isn’t super thick, so it never overpowers the chocolate.
What to Serve It With
For Breakfast: This chocolate cake is surprisingly great alongside a steaming cup of coffee or hazelnut latte. I like to lightly toast a slice the next morning and spread some butter on it—kind of a guilty pleasure brunch hack. My kids also love it with a bit of peanut butter for dipping!
For Brunch: Plate it elegantly with fresh berries and a sprig of mint. Serving alongside a creamy chai latte or even a mimosa makes it feel special without fuss. I sometimes add a dusting of powdered sugar or a few chopped toasted nuts for texture.
As Dessert: Pair a slice with vanilla bean ice cream or a spoonful of fresh whipped cream. A drizzle of salted caramel or raspberry coulis can kick it up a notch. When friends come over, I love serving it with a rich, dark roast coffee or a small glass of red wine for adults.
For Cozy Snacks: Nothing beats breaking off a chunk when you’re curled up on the couch binge-watching your favorite show. A warm mug of milk or a cup of hot chocolate rounds it out perfectly. This cake always disappears in minutes during our weekend family snack times.
Top Tips for Perfecting Your Chocolate Cake
Zucchini Prep: (Okay, this recipe skips zucchini, but if you’re ever curious about sneaking veggies into chocolate cake, grating fresh zucchini and squeezing out moisture is key. Too much water can make your cake soggy, so a good wringing with a clean towel is what I do.)
Mixing Advice: Overmixing is the enemy here. I’ve learned that too much stirring lets gluten develop and makes the crumb tough. Mix just until the ingredients come together and no dry spots remain. The batter’s a little loose—don’t worry, that’s how it stays tender!
Swirl Customization: If you decide to swirl jams or peanut butter, use a light hand. Too much swirling, and your batter blends into a mess instead of a pretty marbled pattern. For a prettier look, try zigzagging instead of circular motions.
Ingredient Swaps: I tested versions using coconut oil in place of vegetable oil—it adds a hint of tropical flavor but keeps the moistness intact. Milk alternatives like almond or oat milk also work surprisingly well. Just stick with 1:1 ratios and adjust for consistency if needed.
Baking Tips: Don’t open the oven door until at least 25 minutes have passed, or your cake might sink. Position your racks in the center for even heat, and if your oven tends to bake hot, reduce the temperature by 10°F and extend the time slightly. Toothpick testing is your best friend!
Glaze Variations: Sometimes I add espresso powder to the glaze for a mocha twist, or a hint of cinnamon for warmth. If you prefer a thicker topping, simply use less milk or add more powdered sugar gradually. You can also spread softened cream cheese on top for a richer finish, though the simple glaze is my personal fave.
I learned these tweaks over many baking sessions—one of the most important is the boiling water step, which intensifies that cocoa flavor and keeps it moist. Trust me, I didn’t believe it at first either, but it works wonders!
Storing and Reheating Tips
Room Temperature: Store your cake covered loosely with foil or in a cake dome for up to 2 days. This keeps it moist without drying out. If it’s warm in your kitchen, I prefer popping it in the fridge to be safe.
Refrigerator Storage: Wrap the cake tightly with plastic wrap or use an airtight container. It will last 4-5 days, but remember, cold cake can firm up, so bringing it to room temperature before serving is best.
Freezer Instructions: This cake freezes beautifully—wrap slices or the whole cake tightly in plastic wrap then foil, and freeze for up to 3 months. To thaw, move it to the fridge overnight, then let it come to room temp before enjoying.
Glaze Timing Advice: If you plan to refrigerate or freeze the cake, I recommend glazing it after it has thawed or is at room temp. Glazing too early can cause condensation or make the glaze crack. For quick serving, glaze right after the cake cools.
Frequently Asked Questions
Final Thoughts
This chocolate cake recipe has honestly become a little treasure in my baking repertoire. It’s the kind of thing I make not just for celebrations but for those nights when I want to indulge a chocolate craving without fuss or running to the store. The way it smells while baking, the tender crumb that just dances on your tongue, and the joyful smiles it brings around the table—those moments are what make it so special to me. If you’re ever curious, I’d also recommend trying my homemade chocolate chip cookies or this rich chocolate mousse to pair with slices of this cake for the ultimate chocolate feast. Do me a favor and try it out, then come back and let me know what you thought—comments, tweaks, or any family spin-offs are always welcome. Happy baking and enjoy every chocolaty bite!
Coconut Chocolate Cake
Ingredients
Main Ingredients
- 2 cups all-purpose flour
- 2 cups granulated sugar
- 0.75 cup natural unsweetened cocoa powder
- 2 tsp baking soda
- 1 tsp salt
- 2 large eggs
- 1 cup milk
- 1 cup vegetable oil
- 1.5 tsp vanilla extract
- 1 cup hot water
- 2.5 cups unsalted butter, room temperature
- 10 cups powdered sugar
- 1 tbsp coconut extract
- 6 tbsp heavy cream plus additional as needed
- pinch of salt
- 1.5 cups sweetened shredded coconut
Instructions
Preparation Steps
- Preheat oven to 300°F. Prepare three 8-inch cake pans with parchment paper circles on the bottom and grease the sides.
- In a large bowl, whisk together flour, sugar, cocoa powder, baking soda, and salt.
- Add eggs, milk, and vegetable oil to the dry ingredients and mix until well combined.
- Stir vanilla into hot water, then pour into batter and mix until smooth; batter will be thin.
- Divide batter evenly among cake pans and bake for 30-33 minutes, or until a toothpick inserted comes out with a few crumbs.
- Cool cakes in the pans for 10 minutes, then transfer to wire racks to cool completely.
- Beat butter until smooth. Gradually add half the powdered sugar and mix until combined.
- Add coconut extract, 3 tablespoons heavy cream, and a pinch of salt; beat until fluffy.
- Slowly add remaining powdered sugar and mix. Add additional heavy cream as needed to achieve frosting consistency.
- Level the tops of the cakes with a serrated knife. Place the first layer on a serving plate and spread 1 cup of buttercream evenly on top.
- Add the second cake layer and spread another cup of buttercream over it.
- Top with the final cake layer and frost the entire outside of the cake smoothly.
- Immediately press shredded coconut onto the top and sides of the frosted cake.
- Pipe swirls of remaining buttercream on top if desired. Store cake in an airtight container; refrigerate after 24 hours.