There’s something about the aroma of freshly baked cookie bars wafting through the house that instantly takes me back to my childhood kitchen—mom bustling around, the timer ticking, and that warm, comforting smell wrapping around you like a soft blanket. I remember sneaking pieces before dinner, loving how these bars offered the same satisfying sweetness as classic cookies but with a smooth, chewy texture that’s so much easier to share and snack on. If you ever found yourself torn between making a batch of cookies or a quick bar, this recipe is your answer. It’s unbelievably simple, way less fussy with dough, and still hits every sweet spot in your taste buds. Trust me, these cookie bars have become my go-to for busy nights when I need something sweet but don’t want to pull out a dozen pans.
What is cookie bar?
Think of cookie bars as the cozy cousin of traditional cookies. Instead of scooping out little mounds of dough one by one, you pour a batter right into a baking pan, bake it all at once, and then slice it into bars or squares. It’s essentially a cookie in a cake-like format, but don’t let the word “cake” fool you — the texture leans chewy, gooey, and sometimes a little fudgy depending on what you throw in. The concept has roots in simple, crowd-pleasing desserts that are meant to be easy to make and share. Cookie bars let you have that comforting cookie flavor with less mess and fuss, perfect for when you want to whip something up quickly without sacrificing flavor. It’s one of those recipes you feel like you discovered a secret about — the joy of cookies minus the wait for batch after batch.
Why you’ll love this recipe?
What I love most about this cookie bars recipe is how it nails that balance between chewy and soft, with slightly crispy edges that add a little texture contrast. The flavor? Think buttery vanilla richness with just the right amount of brown sugar warmth—plus melty chocolate chips that surprise you with little pockets of molten goodness. It’s like a hug in dessert form.
And let me tell you, the simplicity of it is a lifesaver. Sometimes I just don’t have the patience for rolling cookie dough, chilling it, or scooping out cookie-by-cookie, especially on busy weekday evenings. This recipe lets you skip all that and just mix everything together, pop it into the oven, and relax while your kitchen fills with that irresistible scent that makes everyone come running.
Another thing—this treat won’t break the bank. All the ingredients are pantry staples you probably already have: flour, butter, sugar, eggs, and chocolate chips. No fancy add-ins are required, but it’s fun to jazz it up with walnuts or pecans if you like. Plus, cookie bars are so versatile! Serve them sliced for kids’ lunches, crumble over ice cream for a quick dessert, or even pack for picnics. It’s pretty much a dessert crowd-pleaser every time.
If you’re fascinated by desserts like blondies or brownies, this recipe sits beautifully in that same sweet spot, but with a little more cookie personality. I’ve made this countless times, and every single time it disappears in minutes—my kids actually ask for seconds, which is saying something coming from picky little eaters!
How do I make cookie bars?
Quick Overview
From start to finish, this cookie bars recipe is a breeze. You mix your dry ingredients in one bowl, whisk the wet in another, then gently combine them—no overmixing needed. Then you pour the batter into a greased or parchment-lined pan, pop it in the oven, and wait for that magical golden edge and gooey center. The whole process takes less than 15 minutes hands-on, which means more time savoring and less time fussing. I love how this method brings out rich flavors and soft textures every time without complicated steps.
Ingredients
For the Main Batter:
- 1 cup unsalted butter, melted and slightly cooled (I always use real butter for that rich flavor)
- 1 ½ cups packed brown sugar (light or dark brown sugar gives that caramel undertone)
- 2 large eggs at room temperature (helps with smoother mixing)
- 2 teaspoons pure vanilla extract (quality vanilla makes a difference—I swear by Madagascar bourbon)
- 2 cups all-purpose flour (freshly sifted if you want lighter bars)
- 1 teaspoon baking powder (for just a touch of lift)
- ½ teaspoon salt (balances sweetness perfectly)
For the Filling:
- 1 ½ cups chocolate chips or chunks (semisweet or mix milk and dark for variety)
- Optional: ½ cup chopped walnuts or pecans (toasted if you want extra depth)
For the Glaze:
- 1 cup powdered sugar
- 2-3 tablespoons milk or cream (start with less, add slowly for desired consistency)
- ½ teaspoon vanilla extract
I like my glaze smooth but a bit thick so it drapes over the bars without running off. Feel free to swap vanilla for almond or even a splash of bourbon for a grown-up twist.
Step-by-Step Instructions
Step 1: Preheat & Prep Pan
Preheat your oven to 350°F (175°C). Line a 9×13-inch baking pan with parchment paper, leaving some overhang on the sides—this makes lifting the bars out a breeze. If you don’t have parchment, just grease the pan generously, but the paper helps so much with clean edges and easy slicing.
Step 2: Mix Dry Ingredients
In a large bowl, whisk together the flour, baking powder, and salt until fully combined. This helps distribute the rising agent evenly so your bars bake up nicely without dense pockets. I always do a light sift before adding to keep everything airy.
Step 3: Mix Wet Ingredients
In another bowl, whisk the melted butter with brown sugar until smooth and shiny. Add the eggs one at a time, beating well after each addition, then stir in the vanilla extract. The mixture should feel rich and a little glossy—this is where the magic flavor base starts.
Step 4: Combine
Gently fold the dry ingredients into the wet just until everything is combined. The batter will be thick and sticky, so don’t overwork it or you’ll risk toughening the bars. Trust me, a few little streaks of flour here and there will bake out just fine.
Step 5: Prepare Filling
Fold in the chocolate chips and toasted nuts if using. If you want your bars packed with chocolate pockets, don’t be shy with the chips—add an extra handful if you like. For a twist, try folding in white chocolate or even a sprinkle of sea salt here.
Step 6: Layer & Swirl
Spread about half the batter evenly into the prepared pan using a rubber spatula. If you want a swirl effect, dollop spoonfuls of softened cream cheese or caramel on top before adding the remaining batter. Gently swirl with a butter knife for a marbled look that looks impressive but is so easy.
Step 7: Bake
Pop the pan into the oven and bake for 25 to 30 minutes. I check mine at 25 minutes by inserting a toothpick into the center—if it comes out with a few moist crumbs, it’s perfect. Overbaking can dry out the bars, so keep an eye on that golden edge and lightly set middle.
Step 8: Cool & Glaze
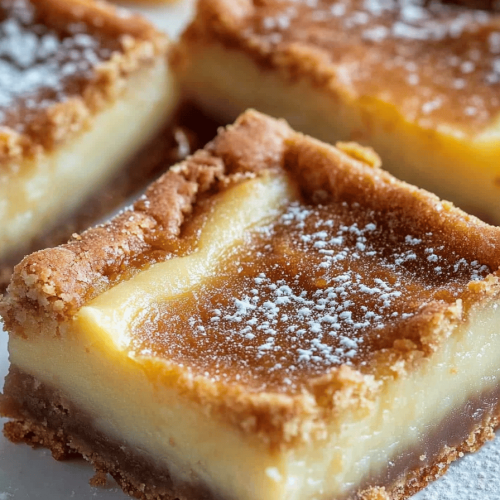
Allow the bars to cool completely in the pan on a wire rack. This is crucial because glazing when warm will melt it right off. Once cool, drizzle the glaze evenly over the top. If you’re in a hurry, pop the pan in the fridge for 10 minutes after glazing to help it set faster.
Step 9: Slice & Serve
Use the parchment paper overhang to lift the bars out and place them on a cutting board. Slice into squares or rectangles with a sharp knife, wiping the blade between cuts for clean edges. Serve at room temperature, maybe with a glass of cold milk or a cup of coffee for dunking—the combo is irresistible!
What to Serve It With
For Breakfast: These cookie bars are surprisingly great alongside a hot cup of coffee or latte. Add a smear of nut butter on top for a little protein boost and you’ve got a cozy start that feels like a treat but keeps you fueled.
For Brunch: Serve slices on small plates with fresh berries and a dollop of whipped cream or Greek yogurt. Pairing it with a light sparkling rosé or mimosa can make it feel fancy without the fuss.
As Dessert: Warm the bars slightly and serve with vanilla ice cream or drizzle with caramel sauce. A sprinkle of flaky sea salt really brings out the chocolate and balances the sweetness beautifully.
For Cozy Snacks: Just as they are, these bars become an excellent afternoon pick-me-up or an after-school snack. My kids insist on having them after soccer practice around 4 pm—the perfect little energy boost that’s not overly sugary.
At family gatherings, I like piling these cookie bars on a big wooden board with handfuls of nuts and small bowls of fruit for a make-your-own dessert board. It always sparks conversations and gets eaten up fast. I swear, everyone asks for the recipe!
Top Tips for Perfecting Your Cookie Bars
Chocolate Prep: Use good-quality chips or chunk chocolate, and if possible, chop some bars of real chocolate for pockets of melted yum. I learned that chopped chocolate melts better and gives random bursts rather than uniform chips.
Mixing Advice: Don’t overmix once you add the flour—this one’s a biggie. Overworking develops the gluten and leads to dense, tough bars. I always gently fold with a spatula and stop when I barely see dry spots.
Swirl Customization: When adding swirls of cream cheese or caramel, use quick, shallow motions with a butter knife to avoid blending everything too much. The goal is those pretty marbled patterns that make you smile before you even take a bite.
Ingredient Swaps: I’ve tried swapping half the butter for coconut oil, which adds a subtle tropical note and makes the bars a little less rich—great if you want something lighter. Also, using dark brown sugar instead of light increases the depth of flavor. For a twist, swap half the flour with oat flour to add chewiness and a slight nuttiness.
Baking Tips: Oven temperatures vary, so keep an eye after 20 minutes. Position your rack in the middle for even heat, and if your edges brown too fast, loosely tent the pan with foil to prevent over-browning while the center finishes baking.
Glaze Variations: You can swap vanilla glaze for a quick chocolate drizzle or lemon glaze for a bright, tangy contrast. Just add lemon zest to powdered sugar and lemon juice, and drizzle over cooled bars for a refreshing change. Also, glazing is optional, but it does add a nice visual and flavor touch.
One lesson I learned the hard way: don’t try to speed up cooling by refrigerating hot bars—it changes the texture. Patience pays off here.
Storing and Reheating Tips
Room Temperature: Keep cookie bars in an airtight container or wrapped tightly in plastic wrap for up to 3 days. They maintain their chewy texture beautifully at room temp and will still smell like fresh-baked heaven when you open the container.
Refrigerator Storage: Store bars in an airtight container or wrapped in foil to keep them fresh for up to a week. Cold bars are firmer, so I like to bring them to room temperature before serving or give them a few seconds in the microwave to soften.
Freezer Instructions: These bars freeze really well! Wrap tightly in plastic wrap and then foil to prevent freezer burn. Freeze for up to 3 months. When ready, thaw overnight in the fridge or at room temperature for a few hours. Reheat gently if you want that fresh-baked warmth.
Glaze Timing Advice: Add glaze only after the bars have fully cooled, especially if you plan to freeze portions. Frozen bars with glaze can get sticky or lose the perfect drizzle look. I usually glaze right before serving if freezing.
Frequently Asked Questions
Final Thoughts
These cookie bars are one of those recipes that have quietly settled into the fabric of my kitchen routine, all while surprising me each time with how quickly they disappear. The combination of ease, flavor, and that perfect chewy texture keeps me coming back. Whether you need a quick after-school snack, a thoughtful potluck contribution, or just a little “treat yourself” moment, these bars really deliver payoffs far beyond the simple steps.
If you give them a try, I’d love to hear how you customize yours or what little tweaks make the recipe truly your own. Don’t be shy—leave a comment, share your rating, or tell me your secret add-ins. Happy baking and enjoy every gooey, sweet bite!
Whopper Cookie Bars
Ingredients
Main Ingredients
- 0.75 cup butter flavored Crisco
- 2 Tbsp milk
- 1.25 cup light brown sugar packed
- 1 large egg
- 0.25 cup malted milk powder
- 1.5 cups all-purpose flour
- 0.5 tsp kosher salt
- 0.75 tsp baking soda
- 12 oz milk chocolate morsels
- 14 oz sweetened condensed milk 1 can
- 0.25 cup Ovaltine chocolate malt powder
- 12 oz Whoppers candies slightly chopped
Instructions
Preparation Steps
- Preheat oven to 375 degrees F.
- In a large mixing bowl, beat Crisco, milk, and brown sugar until combined. Add egg and beat until fully incorporated. Slowly beat in malted milk powder, flour, salt, and baking soda.
- Press cookie dough into a large baking sheet with one inch sides (about 15.5 x 10 inches). Bake for 18-20 minutes until browned. Remove from oven.
- Meanwhile, in a large saucepan over low heat, warm sweetened condensed milk. Add milk chocolate morsels and stir until smooth. Remove from heat and whisk in Ovaltine powder. Pour mixture evenly over baked crust.
- Place Whoppers candies in a large resealable plastic bag. Lay bag on a cutting board and gently hit 2-3 times with a pan to crush slightly, leaving some pieces whole. Press Whoppers candies evenly over fudge layer.
- Refrigerate bars for at least 2 hours or overnight to set. Cut into squares and enjoy!