
There are some dishes that just feel like a warm hug, aren’t there? The kind that instantly transport you back to your mom’s kitchen, or a favorite childhood memory. For me, that dish is Chicken Parmesan. It’s not just a meal; it’s an experience. I remember the first time I tried to make it on my own, years ago, feeling a mix of excitement and sheer panic. I’d watched my grandmother make it a hundred times, but doing it myself felt like a whole different ballgame. Fast forward through a few slightly-too-soggy breading incidents and a couple of questionable sauce experiments (don’t ask!), and I’ve landed on *the* recipe. The one that gets rave reviews from my notoriously picky kids, the one my husband requests for his birthday every single year, and the one that makes even a Tuesday night feel a little bit special. It’s that perfect balance of crispy, golden chicken, tangy marinara, and gooey, melted cheese that just screams comfort. If you’ve ever thought Chicken Parmesan was too fussy or too complicated, stick with me, because this version is surprisingly straightforward and absolutely worth every single second.
What is chicken parmesan?
So, what exactly is Chicken Parmesan, beyond being a dish that fills your home with the most incredible aromas? At its heart, it’s a simple concept: breaded chicken cutlets, pan-fried to golden perfection, then baked with a rich marinara sauce and a generous blanket of mozzarella and Parmesan cheese until it’s bubbly and glorious. Think of it as a classic Italian-American comfort food superstar. It’s often served over a bed of spaghetti, but honestly, it’s so good you could eat it all on its own. The name itself, “Chicken Parmesan,” tells you the main players: chicken, obviously, and Parmesan cheese, which is crucial for that nutty, salty depth. It’s a dish that’s loved across generations, and while there are countless variations, the core remains the same: deliciousness. It’s the kind of food that makes people gather around the table, sharing stories and laughter, and that’s what I truly love about it.
Why you’ll love this recipe?
What are some of the reasons why I love this particular recipe for Chicken Parmesan?flavor. Oh, the flavor! We’re talking about chicken that’s incredibly juicy and tender on the inside, with a coating that’s perfectly crisp and seasoned. The marinara sauce is bright and flavorful, not too sweet, and the cheese… well, the cheese is just perfection. It gets wonderfully melty and slightly browned on top, creating those irresistible strings when you pull a piece away. Then there’s the simplicity. I know, I know, “breaded and fried” can sometimes sound intimidating, but I’ve streamlined this process so much over the years that it’s genuinely manageable, even on a weeknight. I’ve learned a few tricks that make it way less messy and much quicker. Plus, it’s incredibly cost-efficient. Chicken breast is usually pretty affordable, and the other ingredients are pantry staples. You get so much bang for your buck with this dish, and it feels like a restaurant-quality meal without the restaurant price tag. And the versatility! While it’s phenomenal over pasta, I’ve also served it on crusty Italian bread for amazing sandwiches, chopped over a big salad for a hearty lunch, or even just with a side of roasted veggies for a lighter take. What I love most about this recipe, though, is how it consistently brings smiles to my family’s faces. It’s pure, unadulterated comfort food that just makes everyone happy.
How do I make Parmesan Chicken?
Quick Overview
Making this Chicken Parmesan is surprisingly straightforward once you break it down. We’ll start by getting our chicken prepped and ready for its delicious coating. Then, it’s a simple three-step breading process that ensures maximum crispiness. While the chicken is frying to a beautiful golden brown, we’ll get our sauce simmering. Finally, it all comes together in the oven for a magical melty, bubbly finish. It sounds like a lot, but I promise, each step is quick and easy. The key is having everything prepped and ready to go before you start frying, which makes the whole process flow beautifully. You’ll be amazed at how quickly you can create this crowd-pleasing dish!
Ingredients
For the Chicken Cutlets:
2 lbs boneless, skinless chicken breasts (about 2-3 large breasts)
1 cup all-purpose flour
2 large eggs
1 cup Panko breadcrumbs (these are my absolute favorite for extra crunch!)
½ cup grated Parmesan cheese (use the good stuff, it really makes a difference!)
1 teaspoon garlic powder
½ teaspoon dried oregano
Salt and freshly ground black pepper, to taste
Olive oil or vegetable oil, for frying
For the Marinara Sauce:
2 tablespoons olive oil
1 medium onion, finely chopped
2-3 cloves garlic, minced
1 (28 ounce) can crushed tomatoes (San Marzano if you can find them, they’re sweeter!)
1 teaspoon dried basil
½ teaspoon dried oregano
Pinch of red pepper flakes (optional, for a little warmth)
Salt and freshly ground black pepper, to taste
For Topping:
1 ½ cups shredded mozzarella cheese
½ cup grated Parmesan cheese
Step-by-Step Instructions
Step 1: Preheat & Prep Pan
First things first, let’s get that oven preheating to 400°F (200°C). While it’s warming up, grab a large, oven-safe skillet or a 9×13 inch baking dish. If you’re using a baking dish, you can lightly grease it with a little olive oil or cooking spray. This step is crucial because we want everything to be ready to go as soon as the chicken is fried and sauced!
Step 2: Mix Dry Ingredients
Grab three shallow dishes or pie plates. In the first one, add the all-purpose flour. In the second, whisk together the eggs until they’re well combined – this is our egg wash. In the third dish, combine the Panko breadcrumbs, ½ cup of grated Parmesan cheese, garlic powder, dried oregano, and a good pinch of salt and pepper. Give it all a good stir so the seasonings are evenly distributed throughout the breadcrumbs. This mixture is where all the flavor magic happens for our crispy coating!
Step 3: Mix Wet Ingredients
Now, let’s get our simple marinara sauce started. Heat the 2 tablespoons of olive oil in a medium saucepan over medium heat. Add the chopped onion and sauté until it’s softened and translucent, about 5-7 minutes. Stir in the minced garlic and cook for another minute until fragrant – be careful not to burn it! Pour in the crushed tomatoes, add the dried basil, oregano, and red pepper flakes (if using). Season with salt and pepper. Bring the sauce to a simmer, then reduce the heat to low, cover, and let it gently bubble away while we work on the chicken. This allows the flavors to meld beautifully.
Step 4: Combine
This is where we prepare our chicken. Pat the chicken breasts dry with paper towels (this helps the breading stick better). If your chicken breasts are very thick, you can either pound them to an even ½-inch thickness using a meat mallet or the bottom of a heavy pan, or slice them horizontally into thinner cutlets. This ensures even cooking. Now, working one piece at a time, dredge a chicken cutlet in the seasoned flour, tapping off any excess. Then, dip it into the egg wash, letting any excess drip off. Finally, press the chicken into the Panko and Parmesan mixture, making sure it’s completely coated on both sides. Place the breaded cutlets on a clean plate or wire rack and repeat with the remaining chicken. My trick here is to not overcrowd the plate, so you don’t end up with a clumpy mess!
Step 5: Prepare Filling
The “filling” for Chicken Parmesan is really the sauce and the cheese! While we’ve been prepping the chicken, our marinara sauce has been simmering and developing wonderful flavor. Taste it and adjust seasonings if needed. It should be rich and savory. For the topping, make sure your mozzarella and remaining Parmesan cheese are shredded or grated and ready to go. This is the gooey, cheesy goodness that makes this dish so irresistible!
Step 6: Layer & Swirl
Now for the assembly! If you’re using an oven-safe skillet, you’ll actually fry the chicken in that first (we’ll get to that in the next step!). If you’re using a baking dish, spoon a thin layer of your marinara sauce on the bottom of the prepared dish. Arrange the breaded chicken cutlets on top of the sauce in a single layer. Don’t overcrowd the dish; give them a little breathing room. Spoon more marinara sauce over the top of each chicken cutlet, making sure to cover most of the surface. Finally, generously sprinkle the shredded mozzarella cheese and the remaining ½ cup of grated Parmesan cheese over the sauce-covered chicken. Get it all nice and covered!
Step 7: Bake
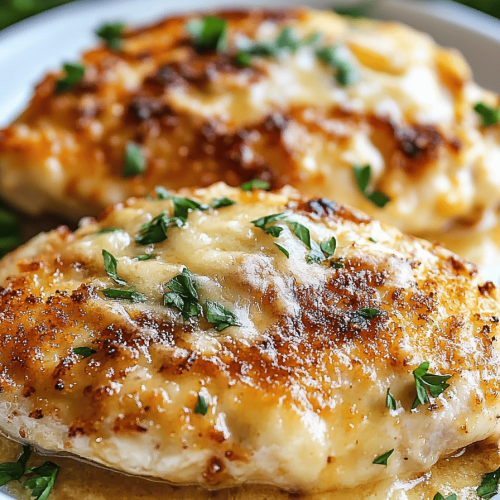
Here’s where the magic happens! Carefully place your baking dish (or oven-safe skillet) into the preheated oven. Bake for 20-25 minutes, or until the chicken is cooked through and the cheese is melted and bubbly and starting to turn golden brown in spots. The exact time will depend on the thickness of your chicken cutlets. You want to see that gorgeous, melty, slightly browned cheese and ensure the chicken is cooked all the way. If it’s not quite golden enough for your liking, you can pop it under the broiler for a minute or two, but watch it VERY closely to prevent burning!
Step 8: Cool & Glaze
Once it’s out of the oven and looks absolutely divine, resist the urge to cut into it immediately! Let your Chicken Parmesan rest for about 5-10 minutes. This is crucial for a few reasons: it allows the juices in the chicken to redistribute, making it more tender and moist, and it lets the cheese settle just a bit, so it doesn’t all slide off when you slice it. The sauce will also thicken slightly. The “glaze” here is essentially the melted cheese and sauce on top, so no separate glaze is needed, but this resting period is key to achieving that perfect bite.
Step 9: Slice & Serve
After its little rest, you can slice your Chicken Parmesan into portions. If you cooked it in a skillet, you might need to carefully transfer it to a platter or individual plates first. It slices beautifully into wedges or rectangles. I love to serve it with a side of spaghetti tossed with a little extra marinara sauce, or with a fresh green salad and some crusty bread for soaking up any extra sauce. Garnish with a sprinkle of fresh parsley if you have it – it just adds a lovely touch of color and freshness. Get ready for the compliments!
What to Serve It With
Oh, the possibilities are endless once you’ve got this glorious Chicken Parmesan ready to go! My absolute favorite way to serve it, and the way my kids always request it, is over a bed of perfectly cooked spaghetti or linguine, tossed with a bit of extra marinara sauce. It’s classic for a reason! But don’t stop there. For a slightly lighter take, a big, vibrant green salad with a zesty vinaigrette is fantastic. The fresh, crisp greens cut through the richness of the chicken and cheese beautifully. If you’re feeling a bit more adventurous, try serving it on toasted crusty Italian bread for an epic Chicken Parm sandwich – seriously, game changer! And if you’re looking for something beyond pasta, roasted broccoli, garlic mashed potatoes, or even some simple sauteed zucchini are wonderful companions. For a truly Italian experience, don’t forget some warm, crusty bread on the side for dipping up every last bit of that delicious sauce. It’s all about what makes *you* happy and what you’re craving!
Top Tips for Perfecting Your Chicken Parmesan
Over the years, I’ve learned a few things that can take your Chicken Parmesan from good to absolutely phenomenal. Let’s dive into some of my best tips and tricks to ensure yours turns out perfectly every time. When it comes to the chicken, pounding it to an even thickness is non-negotiable for me. It guarantees that the chicken cooks through at the same rate as the breading gets golden and crispy. Don’t skip this! For that perfect crispiness, I swear by Panko breadcrumbs. They’re lighter and airier than regular breadcrumbs, creating an amazing crunch that holds up beautifully. Make sure your oil is hot enough before frying; a medium-high heat is ideal. If the oil isn’t hot enough, the breading will soak up too much oil and become greasy. A good way to test is to drop a tiny bit of breading into the oil – it should sizzle immediately. When it comes to the sauce, don’t rush the simmering process. Letting it bubble gently for at least 20-30 minutes allows the flavors to deepen and meld beautifully. Taste and adjust seasoning as you go! I’ve learned that a little pinch of sugar can sometimes balance out the acidity of the tomatoes, so don’t be afraid to add a tiny bit if your sauce tastes too tart. And for that irresistibly cheesy topping, use a good quality mozzarella that melts well. If you’re not a fan of provolone, stick with mozzarella and Parmesan, but sometimes a little provolone mixed in adds an extra layer of deliciousness. Finally, let it rest! I know it’s tempting to dive right in, but giving it that 5-10 minute rest after baking is key to getting perfect, juicy slices without all the cheese sliding off. Trust me on this one!
Storing and Reheating Tips
One of the best things about Chicken Parmesan is that it’s just as delicious, if not more so, as leftovers! Once it has cooled completely, you’ll want to store it properly to maintain that delicious texture. If you have any left (which is rare in my house!), I usually store it in an airtight container in the refrigerator for up to 3-4 days. Make sure it’s cooled down to room temperature before sealing the container to prevent condensation from making the breading soggy. When it comes to reheating, the oven is your best friend! Pop individual portions or the whole dish (if you have enough leftovers to fill it) into a preheated oven at around 350°F (175°C) for about 10-15 minutes, or until heated through and the cheese is melty again. This method helps to revive that crispy coating. If you’re in a real pinch for time, you can reheat it in the microwave, but the breading won’t be as crispy. A quick tip for reheating: if the breading seems a little soft, you can pop it under the broiler for a minute or two at the end, just watch it carefully! For freezing, I recommend freezing individual portions wrapped tightly in plastic wrap and then in foil, or in a freezer-safe container. It should keep well in the freezer for about 2-3 months. Thaw overnight in the refrigerator before reheating as directed.
Frequently Asked Questions
Final Thoughts
There you have it, my friends – my tried-and-true recipe for Chicken Parmesan. It’s a dish that’s brought so much joy and deliciousness to my table, and I truly hope it does the same for yours. It’s more than just a recipe; it’s a collection of memories, a testament to simple ingredients coming together to create something truly special. The way the chicken gets that perfect golden crunch, the rich aroma of the marinara filling your kitchen, and that irresistible blanket of melted cheese – it’s pure comfort food magic. Don’t be intimidated by the steps; each one is designed to be straightforward and rewarding. I can’t wait for you to experience the joy of serving this to your loved ones and seeing those happy faces. If you give this recipe a try, please let me know how it turns out in the comments below! I’d also love to hear about any of your own family twists or favorite ways to serve it. Happy cooking, and even happier eating!
Chicken Parmesan
Ingredients
Main Ingredients
- 4 pieces boneless, skinless chicken breasts about 8 oz each, sliced in half lengthwise to make 8 pieces
- 0.75 cup seasoned breadcrumbs
- 0.25 cup grated Parmesan cheese
- 2 tablespoons butter melted, or substitute with olive oil
- 0.75 cup part-skim mozzarella cheese shredded
- 1 cup marinara sauce
- spray cooking spray for baking sheet and top of chicken
- to taste basil or parsley optional for garnish
Instructions
Preparation Steps
- Preheat oven to 450°F. Lightly spray a large baking sheet with cooking spray.
- In a bowl, combine seasoned breadcrumbs and grated Parmesan cheese. In another bowl, melt the butter.
- Brush melted butter onto the chicken pieces, then dip each into the breadcrumb mixture, coating well. Place coated chicken on the baking sheet.
- Lightly spray more cooking spray on top of the breaded chicken pieces and bake in the oven for 25 minutes.
- Remove chicken from oven, spoon about 1 tablespoon marinara sauce over each piece, then top each with 1.5 tablespoons shredded mozzarella cheese.
- Return to oven and bake 5 more minutes, or until cheese is melted and bubbly.
- Optionally garnish with fresh basil or parsley before serving.


