You know those nights? The ones where everyone’s tired, the fridge looks suspiciously bare, and the thought of making anything remotely complicated feels like climbing Mount Everest in flip-flops? Yeah, those nights. For years, I struggled with what to make that was healthy, satisfying, and wouldn’t involve me standing over a hot stove for an hour. Then, a friend shared this baked chicken breast recipe with me, and honestly, it’s been a game-changer. It’s so ridiculously simple, yet the flavor is anything but. It’s the kind of dish that makes you feel like you’ve accomplished something truly special, even when you’ve barely had time to brush your teeth. It’s become my absolute go-to, the recipe I pull out when I need a win, and the one my family requests most often. Forget dry, bland chicken; this baked chicken breast is juicy, flavorful, and has this amazing savory crust that just makes you want more. It’s like a hug in a meal, and honestly, who doesn’t need more hugs, especially when it comes to dinner?
What is the recipe for Baked Chicken Breast?
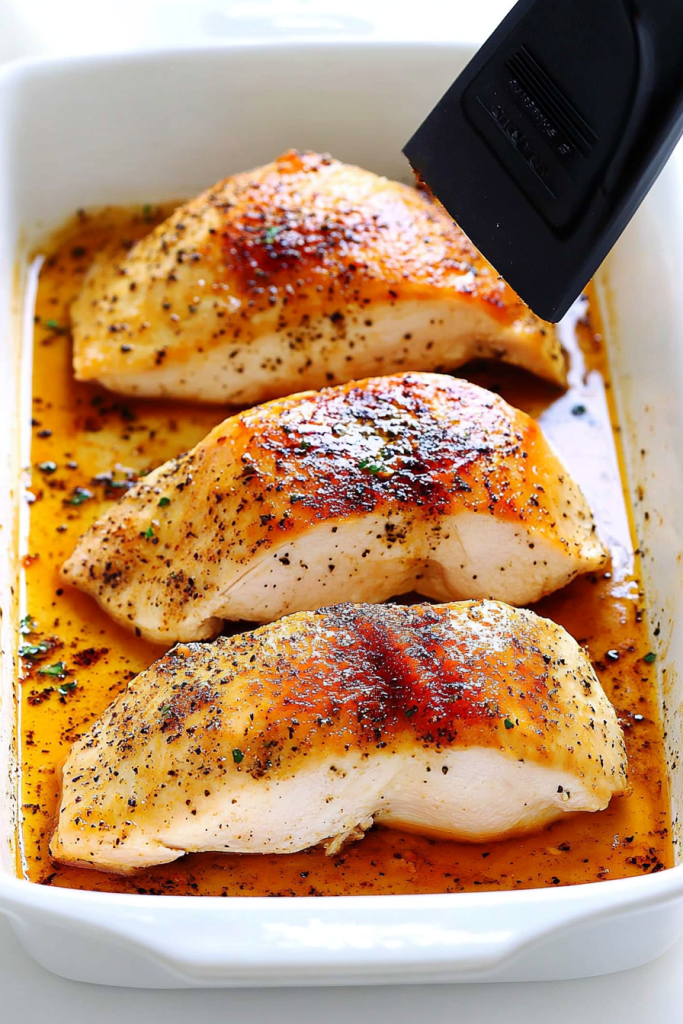
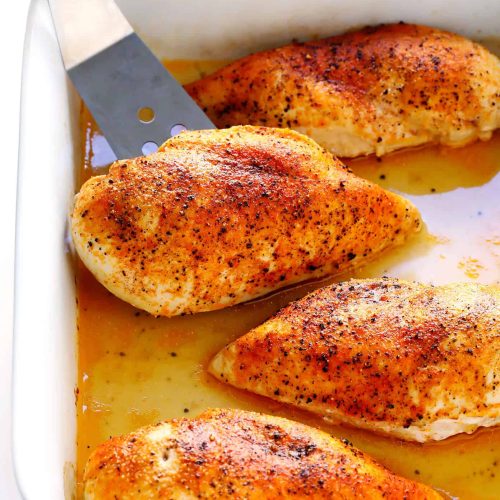
So, what exactly is this magical Baked Chicken breast situation? Think of it as your ultimate weeknight hero. It’s not a complicated marinade, not a fussed-over braise, but a straightforward approach to making chicken breasts incredibly delicious and moist. It’s essentially a perfectly seasoned and oven-roasted chicken breast that gets a beautiful, slightly crisp exterior while staying wonderfully tender and juicy inside. The magic comes from a few simple techniques and a blend of spices that wake up the chicken without overpowering it. It’s the kind of recipe that makes you wonder why you ever settled for anything less. It’s comfort food at its finest, elevated just enough to feel special, but still totally weeknight-friendly. It’s the answer to the question, “What’s for dinner?” that I’ve been trying to find for ages.
Why you’ll love this recipe?
Let me tell you, this Baked Chicken breast recipe is the real deal, and there are so many reasons why it’s earned a permanent spot in my recipe rotation. First off, the flavor is just out of this world. We’re talking savory, aromatic, and perfectly balanced. It’s got this incredible depth that makes you think it took hours to prepare, but it really doesn’t. Then there’s the simplicity, which is a huge win for me. You literally toss it all together and let the oven do the work. It’s a lifesaver on busy nights when you’re juggling a million things. And let’s not forget how budget-friendly it is! Chicken breasts are usually a pretty affordable protein, and the seasonings are all pantry staples. This recipe proves you don’t need fancy ingredients to create something truly delicious and impressive. What I love most is its versatility. You can serve this with pretty much anything – roasted veggies, a big salad, rice, pasta, you name it. It’s the kind of dish that fits seamlessly into any meal. It’s like my go-to pasta bake, but for protein. It’s reliable, delicious, and always a crowd-pleaser, which is exactly what I look for in a staple recipe.
How do I make Baked Chicken Breast?
Quick Overview
This recipe is all about simplicity and maximum flavor with minimal effort. We’re talking about a quick seasoning mix, a short bake time, and a result that’s far superior to your average baked chicken breast. The key is in how we prepare the chicken and the spice blend, ensuring it stays incredibly juicy and flavorful from the first bite to the last. It’s the kind of meal that feels like a treat but is built for your everyday life. You’ll be amazed at how easy it is to get restaurant-quality results right in your own kitchen.
Ingredients
For the chicken breasts:
You’ll need about 4 boneless, skinless chicken breasts, roughly the same size. I always try to get them as uniform as possible so they cook evenly. If yours are super thick, you might want to pound them slightly to an even thickness – it really helps with cooking time and juiciness. Just lay them between two sheets of parchment paper or plastic wrap and give them a gentle whack with a meat mallet or even the bottom of a heavy pan.
For the Savory Seasoning Blend:
Here’s where the magic happens! You’ll need 1 tablespoon of smoked paprika (this gives it that gorgeous color and a hint of smokiness), 1 teaspoon of garlic powder, 1 teaspoon of onion powder, 1 teaspoon of dried oregano, 1/2 teaspoon of salt, and 1/4 teaspoon of black pepper. You can absolutely play with this! Sometimes I add a pinch of cayenne for a little kick, or a little bit of dried thyme if I have it. The key is to get a good, even coating on the chicken.
For the Optional Glaze (highly recommended!):
This is what takes it from great to absolutely spectacular. You’ll need 2 tablespoons of melted butter or olive oil, 1 tablespoon of honey or maple syrup, and a squeeze of fresh lemon juice. This glaze adds a beautiful sheen and a subtle sweetness that complements the savory spices perfectly. It’s so easy to whip up while the chicken is baking.
Step-by-Step Instructions
Step 1: Preheat & Prep Pan
First things first, preheat your oven to 400°F (200°C). While it’s heating up, grab a baking dish or a rimmed baking sheet. I usually line my baking sheet with parchment paper for super easy cleanup – trust me, it’s a lifesaver! If you’re using a baking dish, you don’t necessarily need to grease it, but a light spray of cooking oil or a tiny bit of butter won’t hurt and can prevent any sticking. Make sure your chicken breasts are patted dry with paper towels; this helps the seasonings stick and get a nice sear.
Step 2: Mix Dry Ingredients
In a small bowl, combine all the dry seasonings: smoked paprika, garlic powder, onion powder, oregano, salt, and black pepper. Give them a good whisk with a fork or a mini whisk until everything is well combined. You want to make sure the salt and pepper are evenly distributed so you don’t get any surprise bland spots. I always do this step first so all the dry ingredients are ready to go when I need them.
Step 3: Mix Wet Ingredients (for Glaze, if using)
If you’re opting for that delicious glaze, now’s the time to prep it. In a small bowl, whisk together the melted butter or olive oil, honey or maple syrup, and a good squeeze of fresh lemon juice. The lemon juice cuts through the richness of the butter and the sweetness of the honey, creating a perfectly balanced glaze. It smells amazing even at this stage!
Step 4: Coat the Chicken
Now for the fun part! Place your dried chicken breasts in a bowl or directly onto your prepared baking sheet. Sprinkle the seasoning blend generously over both sides of the chicken. Use your hands to rub the seasonings all over, making sure each piece is thoroughly coated. Don’t be shy with the spices; you want a nice, even layer. This is what gives the chicken its beautiful color and incredible flavor, so make sure you get into all the nooks and crannies.
Step 5: Arrange for Baking
Arrange the seasoned chicken breasts in a single layer on your baking sheet or in your dish. If you’re using a baking dish, leave a little space between them so they can roast rather than steam. If you’re using a baking sheet, try to make sure they aren’t touching too much. This allows the hot air to circulate around them, helping them to get that nice golden-brown exterior we’re aiming for.
Step 6: Bake to Perfection
Pop that baking sheet into your preheated oven. Bake for about 20-25 minutes. The exact time will depend on the thickness of your chicken breasts. You’re looking for an internal temperature of 165°F (74°C) when you check with a meat thermometer. I usually insert the thermometer into the thickest part of the breast. If you don’t have a thermometer, you can also check by cutting into the thickest part; the juices should run clear and the meat should be opaque all the way through.
Step 7: Glaze and Finish (Optional but Recommended!)
About 5 minutes before the chicken is done baking, carefully brush the glaze all over the top of each chicken breast. This is when the magic really happens – the glaze will caramelize slightly in the oven, creating a beautiful, slightly sticky, and incredibly flavorful coating. Pop it back into the oven for those final 5 minutes to let the glaze do its thing. Watch it closely though, as the honey/maple syrup can burn if left too long.
Step 8: Rest is Best
Once the chicken reaches the perfect temperature and has that gorgeous glaze, carefully remove it from the oven. This is a crucial step, so don’t skip it! Let the chicken rest on the baking sheet or a cutting board for at least 5-10 minutes before slicing. This allows the juices to redistribute throughout the meat, ensuring every bite is incredibly moist and tender. If you cut it too soon, all those delicious juices will run out onto the plate, leaving you with dry chicken. I know it’s tempting to dive in, but trust me, the wait is worth it!
Step 9: Slice and Serve
After resting, you can slice the chicken breasts against the grain into nice, thick slices. This makes them look beautiful and is also the best way to ensure tenderness. Serve them up immediately and watch everyone’s faces light up. The aroma alone is enough to get people to the table!
What to Serve It With
This baked chicken breast is so wonderfully versatile, it truly pairs with almost anything you can dream up! For a quick and healthy breakfast, I love serving it sliced over a bed of wilted spinach with a poached egg on top. It’s hearty and satisfying, giving you a great start to the day. For a classic brunch spread, think about pairing it with some roasted sweet potatoes, a fresh fruit salad, and maybe even some fluffy pancakes on the side – it’s a perfect addition that adds a savory element to your sweet favorites. When I’m craving something for dessert, it might sound a little odd, but a small portion of this chicken, perhaps with a very light drizzle of the glaze and a side of a slightly sweet couscous or a light rice pilaf, can actually be quite satisfying. It satisfies that savory craving you sometimes get after a sweet meal. And for those cozy, no-fuss evenings when you just want comfort, this chicken is a dream. Serve it alongside a big, vibrant green salad, some steamed broccoli, or even some creamy mashed potatoes. I’ve also found it’s fantastic tucked into wraps or pitas with some shredded lettuce and a dollop of Greek yogurt. My family’s favorite is with roasted asparagus and a side of quinoa – simple, nutritious, and always a hit. I’ve even used leftovers cold in sandwiches the next day, and they were still amazing!
Top Tips for Perfecting Your Baked Chicken Breast
I’ve made this baked chicken breast more times than I can count, and over the years, I’ve picked up a few tricks that really make a difference. For the chicken itself, always, always pat it dry. Seriously, it’s such a simple step but it’s crucial for getting that lovely, slightly crisp exterior instead of just steamed chicken. Also, try to get your chicken breasts as close to the same thickness as possible. If one is significantly thicker than the others, it will likely take longer to cook, and you risk overcooking the thinner ones. A gentle pound with a meat mallet (between parchment paper, of course!) is your best friend here. When it comes to the seasoning blend, don’t be afraid to adjust it to your liking. I’ve experimented with adding a pinch of smoked paprika for extra depth, or even a bit of dried rosemary when I’m feeling fancy. The smoked paprika is non-negotiable for me, though; it gives it that gorgeous color and a subtle, delicious smokiness that’s just unbeatable. If you’re using the glaze, and I really, really hope you do, keep an eye on it in the last few minutes of baking. The honey or maple syrup can go from perfectly caramelized to burnt pretty quickly, and burnt sugar is nobody’s friend. A quick brush is all you need. And the resting period? It’s non-negotiable! I know it’s hard to wait when your kitchen smells this good, but letting the chicken rest for at least 5 to 10 minutes is the absolute key to super juicy chicken. It allows all those delicious juices to redistribute back into the meat, rather than escaping onto your cutting board. I’ve definitely learned this lesson the hard way after cutting into chicken too soon and ending up with a dry disappointment!
Storing and Reheating Tips
This baked chicken breast is fantastic for meal prep, which is why I love it so much! Once it’s cooled completely, you can store it in an airtight container. At room temperature, it’s best to consume it within two hours, just like any other cooked chicken. For refrigerator storage, it will keep well for about 3 to 4 days. Just make sure it’s sealed tightly to prevent it from drying out. I usually slice or dice it right after it cools, making it super easy to grab for lunches or to toss into salads or stir-fries during the week. If you plan on freezing it, make sure to wrap it well. You can wrap individual breasts tightly in plastic wrap, then place them in a freezer bag or an airtight container. It should stay good in the freezer for about 2 to 3 months. When you’re ready to reheat, the best way is usually in the oven at a lower temperature (around 325°F or 160°C) for about 10-15 minutes, or until heated through. You can also gently reheat it in a skillet over medium-low heat with a splash of broth or water to help keep it moist. For the glaze, I often make a little extra and keep it in a separate small container in the fridge. If reheating frozen chicken, thaw it overnight in the refrigerator first, then reheat as usual, adding a bit of the fresh glaze at the end if you like. Reheating in the microwave is also an option, but be careful not to overcook it, as it can dry out quickly. Just heat in short bursts until warm.
Frequently Asked Questions
Final Thoughts
So there you have it – my absolute favorite way to make baked chicken breast. It’s a recipe born out of necessity, perfected through trial and error, and now, a true staple in my kitchen. I truly believe this recipe will make your weeknights so much easier and tastier. It’s proof that simple ingredients and a little bit of love can create something truly spectacular. If you’re looking for other easy weeknight dinners, I’ve got a killer recipe for sheet pan sausage and peppers that you might also love. Give this baked chicken breast a try, and I can’t wait to hear what you think! Let me know in the comments how yours turns out, or if you have any fun variations you’d like to share. Happy cooking, everyone!
Baked Chicken Breast
Ingredients
Main Ingredients
- 1.5 pounds Chicken Breasts
- 1 tablespoon Olive Oil
- 1 teaspoon Salt
- 0.5 teaspoon Black Pepper
- 0.5 teaspoon Garlic Powder
- 0.5 teaspoon Paprika
Instructions
Preparation Steps
- Preheat oven to 400°F (200°C).
- In a bowl, combine olive oil, salt, pepper, garlic powder, and paprika.
- Place chicken breasts in a baking dish and rub with the seasoning mixture.
- Bake for 25-30 minutes, or until the internal temperature reaches 165°F (74°C).
- Let rest for 5 minutes before serving.


