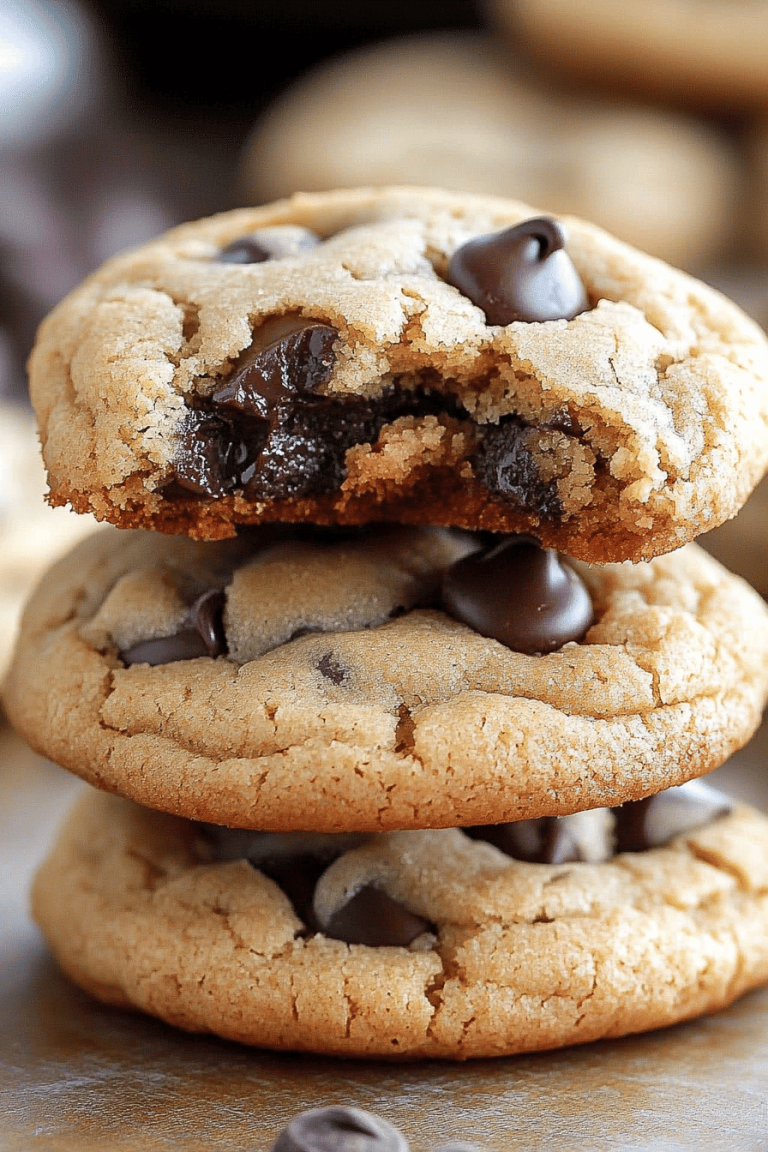
The moment the oven starts to warm and the kitchen fills with the soft scent of vanilla and fading chocolate, I’m flooded with memories of weekend baking with family. This version of healthy Chocolate Chip Cookies is my favorite balance of cozy nostalgia and smart adjustments. Think of it as the kid-friendly classic you can feel good about: no heavy butter overload, a little oats for chew, almond flour for a tender crumb, and just enough sweetness to satisfy a chocolate craving without tipping into dessert-for-dinner territory. It’s basically the grown-up cousin of your favorite Toll House cookies, but with a quieter, more wholesome vibe. I’ve baked these countless times, and what I love most is how forgiving they are—if I overbake by a minute, they still stay chewy instead of turning rock hard. This is the kind of recipe that disappears at my house in minutes, and my kids actually ask for seconds. It’s a lifesaver on busy nights, when I want something comforting yet not indulgent. And yes, the smell alone brings everyone to the kitchen like a magnet.

What is healthy chocolate chip cookie?
Healthy Chocolate Chip Cookies are a kinder, gentler take on the classic treat. Think of them as cookies that still deliver that familiar chewy bite and melty chocolate, but with ingredients chosen to balance flavor and nutrition. The name itself is a little open-ended because there isn’t a single standard formula for “healthy.” For me, it means swapping in honest fats (like a touch of coconut oil or olive oil), adding oats and almond flour for texture, using less refined sugar, and embracing a little yogurt or applesauce to keep the dough moist without relying solely on butter. It’s essentially a portable bratwurst of flavor for the dessert world—no, not a bratwurst—okay maybe a better analogy: Think of it as a made-for-home-cooks cookie that travels well, tastes like a treat, and respects your weeknight schedule. The concept is simple: use pantry staples you already own, lean on texture from oats, and finish with dark chocolate chips so every bite feels indulgent without being heavy. If you’re chasing a quick, reliable batch that kids, friends, and coworkers will ask for again and again, this is your go-to.
Why you’ll love this recipe?
What I love most about this healthy Chocolate Chip Cookies recipe is its balance. It’s not trying to be a health fad; it embraces real ingredients that taste like a proper cookie. Here are the big wins, straight from my kitchen:
- Flavor: The vanilla, a touch of cinnamon sometimes, and the deep chocolate notes come through in a way that feels familiar and comforting. The cookies stay intriguingly chewy rather than dry, thanks to the applesauce or mashed banana and the oats.
- Simplicity:What are some of the best recipes for one bowl mix?
- Cost-efficiency: What is the best way to measure cost-efficiency? These cookies use affordable staples like oats, flour (almond or all-purpose), and a handful of chips. You can tailor them to what you already have without feeling like you’re compromising.
- Versatility: Want to go vegan or dairy-free? Swap a flax egg for the egg, use plant-based butter or coconut oil, and you’re still golden. Prefer a gluten-free version? Almond flour and oats are a solid base—and the texture still stays wonderfully soft.
- Make-ahead friendly: The dough behaves beautifully in the fridge for up to 3 days or can be frozen in portions for a quick bake later. This is a real lifesaver when I’m stocking the freezer for busy weeks.
Beyond the practicality, this recipe carries a sense of warmth. It’s the kind of cookie you can hand to a tired coworker or a hungry kid and hear the delighted “mmm” in response. It’s a tiny ritual that says, “I’ve got you,” without saying a word. And yes, I’ve tested it with almond milk in place of dairy milk in the batter, and it actually made the dough a touch creamier in texture—proof that small tweaks can elevate the whole batch. If you’re a cinnamon lover, a pinch of cinnamon in the dry mix is a cozy twist you’ll want to try. It’s not flashy; it’s honest. It’s home baked into every bite.
How to Make Healthy Chocolate Chip Cookies
Quick Overview
This healthy chocolate chip cookies process is straightforward and forgiving. You’ll whisk dry ingredients, mix wet ingredients, combine, and portion into scoops. The optional swirl filling adds a little surprise in the center, but you can skip it for a classic, kid-approved cookie. The key to achieving that chewy interior and lightly crisp edge lies in not overbaking and letting the cookies rest on the sheet for a couple of minutes before transferring them to a rack. It’s basically a streamlined, no-stress bake that yields soft centers with a gentle bite and a chocolatey finish. If you’re new to healthier sweets, you’ll find the texture surprisingly close to a traditional cookie, which is half the battle won right there.
Ingredients
For the Main Batter:
- 1 cup Almond Flour (finely ground for a tender crumb)
- 1 cup old-fashioned rolled oats, finely pulsed to break them down a bit but not completely into flour
- 1/2 cup coconut sugar or light brown sugar
- 1/4 teaspoon baking soda
- 1/4 teaspoon fine salt
- 1/4 cup melted coconut oil (or use light olive oil for a different note)
- 1/2 cup unsweetened applesauce or mashed ripe banana (adds moisture and a touch of natural sweetness)
- 1 large egg or 1 flax egg (1 tablespoon ground flaxseed mixed with 3 tablespoons water)
- 1 teaspoon vanilla extract
- 1/2 cup dark chocolate chips (70% cacao or higher)
- Optional: 1/4 cup chopped walnuts or pecans for a little crunch
For the Filling:
- 1/4 cup creamy almond butter or peanut butter
- 1 tablespoon maple syrup or honey (optional, for a sweeter swirl)
For the Glaze:
- 1/4 cup dark chocolate chips
- 1 teaspoon coconut oil (to thin the glaze)
- Optional: a pinch of flaky sea salt for finishing
Step-by-Step Instructions
Step 1: Preheat & Prep Pan
Preheat your oven to 350°F (175°C). Line a baking sheet with parchment paper or a silicone mat. I like to give the sheet a light spray of oil if I’m not using parchment, just to ensure the cookies don’t stick, but parchment is my go-to for easy cleanup. This is where the magic starts to happen—the moment the dough hits the sheet, the promise of a golden edge and a chewy center begins to materialize. If you’re dividing and freezing the dough, you can portion out mounds on the sheet and freeze them individually before transferring to a bag; bake from frozen, adding a few extra minutes.
Step 2: Mix Dry Ingredients
In a medium bowl, whisk together the almond flour, oats, coconut sugar, baking soda, and salt. This dry blend is the backbone of the cookies, giving structure and that subtle nuttiness. A gentle whisk is enough; you’re not looking for a fancy aeration, just even distribution. The oats still have some chew in them, which is exactly what you want for a cookie that feels wholesome but indulgent at the same time.
Step 3: Mix Wet Ingredients
In a separate bowl, whisk the melted coconut oil, applesauce (or mashed banana), egg (or flax egg), and vanilla until smooth. The moisture from the applesauce keeps the cookies soft, while the oil helps prevent them from drying out. If you’re using a flax egg, give it a quick whisk and let it sit for a couple of minutes so it thickens and mimics the texture of a real egg. You’ll notice the mixture has a glossy finish that tells you the fats and sugars are emulsifying nicely—this matters for that glossy, just-baked look.
Step 4: Combine
Pour the wet mixture into the dry and stir until just combined. Don’t overmix; a few stray flour pockets are okay. Overmixing can lead to tougher cookies, and we’re aiming for a soft bite here. If you’re adding nuts, fold them in now. Gently fold in the chocolate chips last, reserving a few to press on top if you like the look of a more chocolate-laden surface after baking.
Step 5: Prepare Filling
If you’re curious about a little surprise in the middle, combine the almond butter with maple syrup (or honey) until smooth. Scoop a teaspoon in the center of a small dough ball, then cover with another ball and seal the edges. You’ll get a little hidden center that melts into the cookie as it bakes. If you’d rather skip the filling, simply portion dough and bake as usual; the cookies will be deliciously satisfying without the extra swirl.
Step 6: Layer & Swirl
For a prettier presentation or extra flavor, gently flatten each dough ball into a disk. Place a small spoonful of the almond butter filling in the middle, then fold the dough around it and roll back into a ball. If you want visual drama, you can swirl the filling a few times with a toothpick after sealing, creating a marbled effect as the cookies bake. This step is optional but fun—my kids love watching the swirl become a little hidden treasure inside the cookie.
Step 7: Bake
Scoop dough onto the prepared sheet, spacing about 2 inches apart. Bake for 9–11 minutes, until the edges look set and the centers still appear slightly underdone. They’ll firm up as they cool. Oven temps vary, so if your oven tends to run hot, pull them at 9 minutes and test with a light touch—the cookies should be barely soft in the middle. If you prefer a crisper edge, bake a minute longer. The goal is that perfect balance where the cookie is chewy through the center with just a whisper of crisp around the rim.
Step 8: Cool & Glaze
Allow the cookies to rest on the sheet for 5 minutes, then transfer to a wire rack to finish cooling. While they’re cooling, melt the glaze ingredients in a small bowl set over warm water or in 15-second bursts in the microwave, stirring between intervals until smooth. Drizzle a fine thread of glaze over the cookies for a glossy finish and a touch of extra chocolatey sweetness. If you’d rather skip the glaze, a light dusting of powdered sugar or a quick sprinkle of flaky sea salt works beautifully and keeps the focus on the cookie itself.
Step 9: Slice & Serve
There’s something satisfying about letting a cookie rest a few minutes before you bite into it. The resting period lets flavors settle and makes the cookie easier to handle. Take in the aroma—the vanilla, the cocoa, the warmth of the bake. A single cookie is wonderful, but I’m often cutting them in half to show that soft interior and to pair with a dollop of yogurt or a scoop of vanilla ice cream for a mini dessert plate. My favorite way to serve these is still warm with a glass of cold milk and a friend nearby to share a story or two. Trust me on this one… it’s a mood that never fails to lift the evening.
What to Serve It With
Healthy chocolate chip cookies shine in many moments. Here are a few ideas that pair well with the cookies and fit different occasions:
For Breakfast: A cup of coffee or a warm almond milk latte, a plate of cookies with sliced strawberries, and a quick yogurt drizzle. The cookies are sturdy enough to dunk without falling apart, and the oats give a gentle chew that feels right for morning appetite.
For Brunch: Layered on a tray with fresh berries, a few sprigs of mint, and a light mascarpone dip. The contrast of creamy, bright flavors with the fudgy cookie bite makes for a playful addition to a late-morning spread.
As Dessert: Serve with vanilla ice cream or a spoonful of whipped cream and a drizzle of extra glaze. A few raspberries on top bring a pop of tart brightness that elevates the chocolate.
For Cozy Snacks: Warm from the oven with a mug of tea or hot chocolate. This is the moment the filling swirls catch the light and the aroma lingers in the living room, inviting a slow evening of conversation and simple comfort.
We often pair these cookies with small family rituals—a stack next to a pot of tea during a story night, or a plate shared after homework time while we chat about projects and plans. The small rituals matter as much as the taste; that’s part of why this recipe has earned a steady spot in my kitchen rotation. And if you’re feeding little ones who are picky, you can even tuck a few oats in for texture they’ll quietly notice, and you’ll quietly celebrate.
Top Tips for Perfecting Your Healthy Chocolate Chip Cookies
Here are practical, kitchen-tested tips that take this recipe from good to I-can’t-stop-eating-them:
Oat Prep: Give the oats a quick pulse in a processor or blender to break them down a bit, but don’t go all the way to flour. A little coarse texture adds chew and helps the cookies stay moist. If you’re gluten-free, this step is especially helpful for a tender crumb.
Mixing Advice: Mix until just combined. Overmixing can develop gluten or toughen the dough, especially if you’re using a flour blend. A few streaks of flour are fine—you want a shaggy, cohesive dough, not a paste.
Swirl Customization: If you’re into patterns, lay a small swirl of almond butter filling on top of half the dough balls before sealing with another ball. Or, press a few chocolate chips into the tops for a fudgy, glossy look. It’s all about what makes you smile when you bake.
Ingredient Swaps: The beauty of this recipe is its adaptability. Swap applesauce for yogurt for a slightly tangy note, or replace almond flour with another nut flour if you’re not nuts about almonds. If you’re avoiding refined sugar, try coconut sugar or a blend with monk fruit; you may need to adjust sweetness by taste as you go.
Baking Tips: If your oven runs hot, rotate the sheet halfway through to ensure even browning. If you’re baking multiple sheets, switch racks for uniform bake. If edges brown too quickly, reduce the oven temperature by 25°F and extend the bake by 1–2 minutes. It’s a tiny adjustment that keeps the cookies from drying out.
Glaze Variations: For a different flavor profile, swap half of the glaze with a peanut butter drizzle or a light orange zest glaze for a bright finish. You can also simply dust with a light cocoa powder for a more bakery-like finish without adding extra sweetness.
These tips have saved me countless times—they’re the practical notes I’d share with a friend who’s stepping into the kitchen for the first time with a big bag of chocolate chips and a craving for something comforting, yet smart. I’ve learned to trust texture over time: the way the dough feels when you lift a scoop, the way the edges look when they’re ready, the way a cool surface gives a little resistance before the first bite. It’s all part of the joy of baking, and it’s what makes this healthy chocolate chip cookies recipe feel like a little piece of home you can take with you anywhere.
Storing and Reheating Tips
Storing cookies correctly is the difference between a soft, fresh-baked feel and a dry, crumbly texture. Here’s how I keep these cookies tasty for as long as possible:
Room Temperature: In an airtight container, layered with parchment between layers to prevent sticking, for up to 4 days. If you’re planning to snack on them across a few days, this is a great window to enjoy the cookies at their best. Keep them away from heat and sunlight to preserve the chocolate’s sheen and prevent the oils from turning rancid.
Refrigerator Storage: They’ll stay fresh for about a week in a covered container. The chill can intensify the flavor and keep the oat texture pleasantly chewy. Let them sit at room temperature for a few minutes before tasting for the best mouthfeel.
Freezer Instructions: Freeze baked cookies in a single layer on a tray, then transfer to a freezer-safe bag or container. They’ll keep for up to 3 months. Thaw at room temperature for 15–20 minutes or warm gently in the oven for a few minutes to restore that just-baked softness.
Glaze Timing Advice: If you’re freezing, you can glaze after thawing for the freshest finish. For best results, apply glaze to cookies that are fully cooled to avoid a dull surface and to maintain a glossy look. If you’re storing unglazed, glaze after thawing to maintain a crisp glaze edge rather than a soggy underside.
Personally, I love the flexibility of this approach. It means I can bake a big batch on a Sunday, split them up for the week, and still have that comforting chocolate hit on a busy Tuesday night when everyone’s tired but craving something sweet.
Frequently Asked Questions
Final Thoughts
If you’re chasing cookies that feel both comforting and a touch healthier, this is the batch you’ll reach for again and again. The almond flour keeps things tender, the oats lend a satisfying chew, and the dark chocolate chips carry that classic punch you associate with a truly good cookie. It’s not about chasing perfection at every bite; it’s about balance, flavor, and the little rituals that make baking worth coming back to. I’ve made these with every member of my family in mind—friends who pop by unannounced, kids who beg for “just one more,” and coworkers who need a quick, satisfying treat. The result is the same: a warm, glossy cookie that tastes like home. If you try this, please tell me how you adjusted it—your tweaks might become the next family favorite. Happy baking! And if you’re enjoying this, I’d love to hear your variations in the comments, and don’t forget to rate the recipe so others can find their perfect bite, too.
Now, go grab a cup of coffee, set a timer for a few minutes, and let the kitchen fill with that irresistible aroma. Healthy chocolate chip cookies aren’t just a snack; they’re a small daily celebration you can feel good about sharing with the people you love. Please drop a note in the comments about your favorite swap or swirl—I’m listening and I’m rooting for your batch to turn out beautifully chewy and deeply chocolatey.