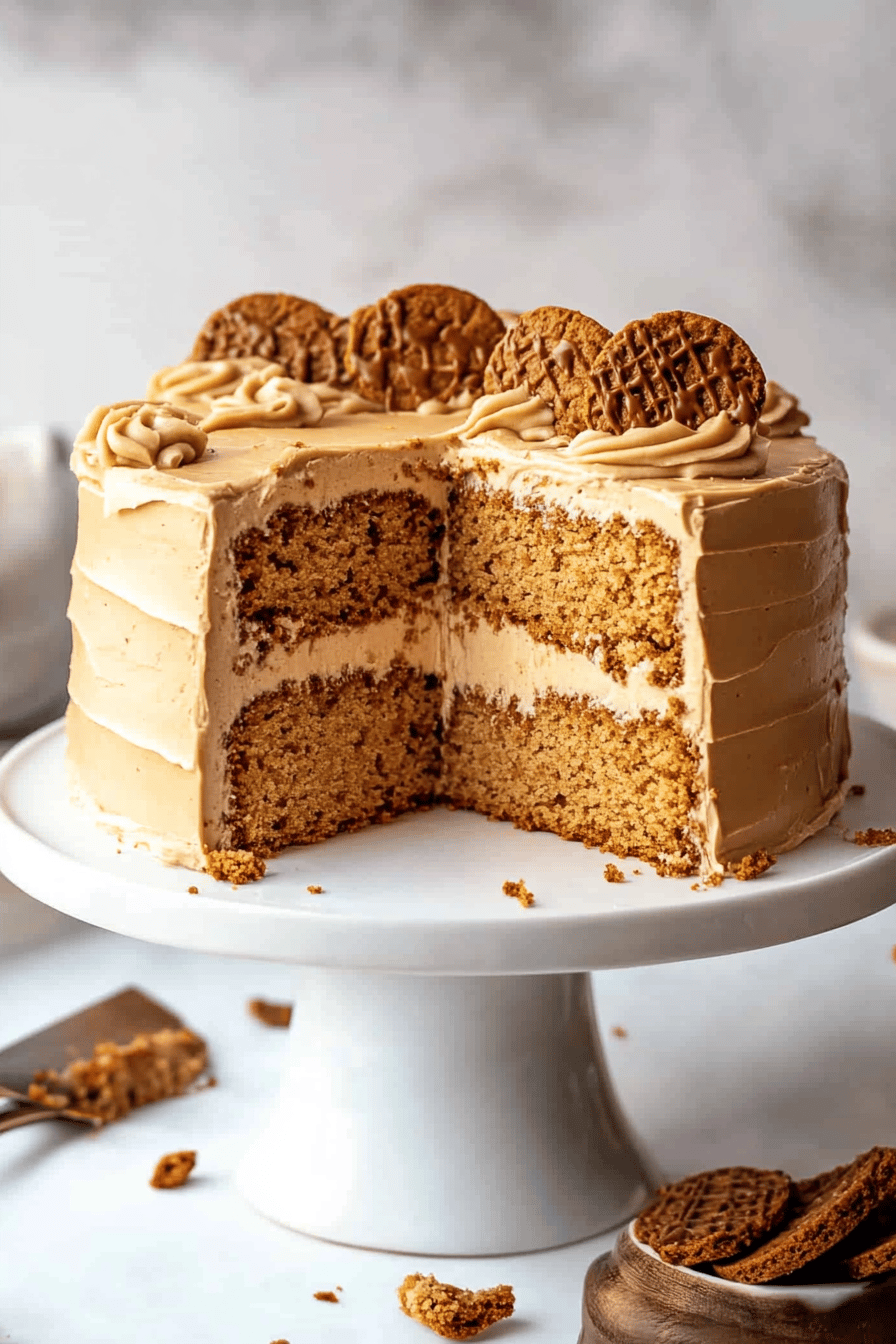
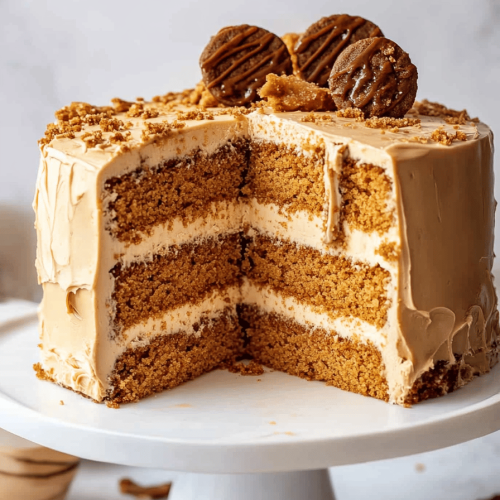
Okay, you guys, prepare to have your minds blown. What does Biscoff Cookie Butter Cake taste like? Is it easier to make than it sounds? Is it good year-round? If you love spice cake, you’re absolutely going to adore this. I swear, the first time I made it, half the cake was gone before it even cooled down!
What is Biscoff Cookie Butter Cake?
Think of it as your favorite vanilla cake, but amplified. What is essentially a vanilla cake swirled with warm, gooey Biscoff cookie butter? How does cookie butter add a gingerbread-like flavor to the cookie? What is the best cake you have ever had? I know – it sounds too good to be true, right? What are some of the best Biscoff cookie butter cakes I’ve ever made?
Why you’ll love this recipe?
What *isn’t* to love? First, the flavor – it’s just divine. That warm, spiced, caramelized cookie butter flavor permeating every single bite… I mean, come on! It’s not just tasty, it’s cozy, comforting, and totally addictive. I think Biscoff just has that effect on people, and in cake form, it’s simply magical. Secondly, it’s surprisingly easy to make. Don’t let the swirls intimidate you; it’s literally just dolloping and swirling. The recipe is straightforward, and you probably have most of the ingredients in your pantry already. Cost-wise, it’s super budget-friendly. No fancy ingredients, just simple, delicious goodness. You can even use store-brand cookie butter if you’re looking to save even more. What I love most about this Biscoff Cookie Butter Cake is how versatile it is. You can serve it for breakfast with a cup of coffee, bring it to a potluck, or enjoy it as a midnight snack (guilty!). It’s the kind of cake that always brings a smile to people’s faces. And believe me, after your first bite, you’ll see why. It reminds me a bit of the Caramel Cake my grandmother used to make, but with a fun, modern twist.
How do I make Biscoff Cookie Butter Cake?
Quick Overview
Is this cake easy to make? What’s the best way to whip up a basic vanilla batter, swirl in some melted Biscoff cookie butter, and bake until golden brown. What is the best way to make a simple glaze? The whole process takes about an hour from start to finish, and most of that is baking time. What’s the best part about a weeknight bake-off? Minimal effort for maximum flavor.
Ingredients
For the Main Batter:
* 2 1/2 cups all-purpose flour: I always use unbleached flour for the best flavor and texture.
* 1 1/2 cups granulated sugar: If you prefer a less sweet cake, you can reduce this slightly, but I find this is the perfect amount.
* 3 1/2 teaspoons baking powder: Make sure it’s fresh! Old baking will result in a flat cake.
* 1 teaspoon salt: Balances the sweetness and enhances other flavors.
* 1 cup milk: I’ve used everything from whole milk to almond milk, and they all work great. Almond milk made it even creamier!
* 1/2 cup vegetable oil: You can also use melted coconut oil for a slightly different flavor.
* 2 large eggs: Let them come to room temperature for a smoother batter.
* 2 teaspoons vanilla extract: Don’t skimp on the vanilla! It adds so much flavor.
What is the secret ingredient for a moist cake? Can you substitute plain yogurt for regular yogurt?
For the Filling:
* 1 cup Biscoff cookie butter: You can find this at most grocery stores or online. Make sure it’s nice and smooth. I like to warm it up in the microwave for easier swirling.
* 2 tablespoons milk: How do you stir cookie butter into the batter?
For the Glaze:
* 2 cups powdered sugar: Sift it for a smoother glaze.
* 1/4 cup milk: Add more or less to reach your desired consistency.
* 1/2 teaspoon vanilla extract: Adds a touch of extra flavor.
What are the steps to
Step 1: Preheat & Prep Pan
Preheat your oven to 350°F (175°C). Grease and flour a 9×13 inch baking pan. How do I prevent a cake from sticking? I always use a baking spray that contains flour, but you can grease with shortening and dust with flour. How do you get into all the corners?
Step 2: Mix Dry Ingredients
In a large bowl, whisk together the flour, sugar, baking powder, and salt. Set aside. What is the importance of whisking baking powder and salt together? Light and fluffy cake. Is there a clump of sand on the ground?
Step 3: Mix Wet Ingredients
In a separate bowl, whisk together the milk, oil, eggs, vanilla extract, and sour cream. Set aside. Once again whisk until everything is well combined and the eggs are fully incorporated. How do I make a smooth, frothy mixture? The oil and eggs make the batter easier to work with and bring a better texture.
Step 4: Combine
Is it safe to mix wet and dry ingredients together? How do I avoid overmixing food? Overmixing will develop the gluten in the flour, resulting in a tough cake. A few streaks of flour are okay. I always use a rubber spatula for this step to make sure I scrape the bottom of the bowl and not the top. Incorporate everything evenly. If you have a stand mixer, use it on low speed until just combined.
Step 5: Prepare Filling
In a small bowl, microwave the Biscoff cookie butter for about 30 seconds, or until melted and smooth. Set aside. Is the milk too thick to pour into a bowl? If it’s too thick, add a little more milk. If it’s too thin, microwave it for a few seconds to thicken it up.
Step 6: Layer & Swirl
How do I make a cake batter? Pour half of the batter into the pan. Dollop half of the Biscoff mixture over the batter. What is the Biscoff mixture? Pour the remaining batter over the cake mixture, and then dollop the rest of the batter. What’s the best way to serve Use a knife or skewer to swirl the Biscoff into the batter. Don’t over-swirl! If you want to create a marbled effect, don’t completely mix the two together. I like to make figure-eight motions with the knife for a pretty swirl pattern. I found that the end result is more consistent when not overswirled!
Step 7: Bake
Bake for 30-35 minutes, or until a wooden skewer inserted into the center comes out clean. Do ovens vary in doneness, so start checking around 30 minutes. The cake should be golden brown on top and spring back when lightly touched. If the top is browning too quickly, you can tent it with foil. I always rotate the pan halfway through baking to ensure even cooking.
Step 8: Cool & Glaze
Let the cake cool in the pan for 10 minutes before inverting it onto a wire rack to cool completely. Once the cake is completely cool, whisk together the powdered sugar, milk, and vanilla extract until well combined. How do you drizzle the glaze over a cake? I like to let the glaze set for about 15 minutes before slicing and serving.
Step 9: Slice & Serve
Use a sharp knife to slice the cake into squares. Serve at room temperature. What are some good ways to warm up a gooey treat in the microwave? I love to serve it with a scoop of vanilla Ice Cream or whipped cream. I always start with a small slice. It’s good to eat with coffee or tea. Is it possible to have one bad day but end up having another?
What should I serve it with?
What are some of the best Biscoff cookie butter cakes? What are What are some ideas for serving it for different occasions?
For Breakfast:Pair it with a cup of coffee. The sweetness of the cake balances perfectly with the bitterness of coffee. What are some good Side Dishes to serve with a side of fresh fruit?
For Brunch:Serve it as part of a brunch spread alongside other sweet and savory dishes. What are some good recipes for quiche, mimosas, Fruit Salad? If you want to make a cake extra special, dust it with powdered sugar and arrange it on an attractive platter.
As Dessert:Serve it after dinner with a scoop of vanilla Ice Cream or whipped cream. What are some good ways to serve caramel sauce with this recipe? What are some good pairings for dessert wine?
For Cozy Snacks:Enjoy a slice of bread with tea or Hot Chocolate in the evening. What is the perfect comfort food for a night in? I sometimes like to sprinkle cinnamon on top for extra warmth.
My family loves this cake served with a scoop of vanilla Ice Cream. My mom makes this a tradition. It reminds me of her childhood.
Top Tips for Perfecting Your Biscoff Cookie Butter Cake
Want to take your Biscoff Cookie Butter Cake to the next level? Here are some tips and tricks I’ve learned over the years:
Mixing Advice: Be careful not to overmix the batter. Overmixing develops the gluten in the flour, resulting in a tough cake. Mix until just combined, and don’t worry if there are a few streaks of flour. I find that doing this prevents a tough cake.
Swirl Customization: Get creative with your swirls! You can use a knife, skewer, or even a chopstick to create different patterns. Experiment with different techniques to find what you like best. I like to make figure-eight motions for a pretty marbled effect. It has a natural look, which I love.
Ingredient Swaps: Feel free to experiment with different ingredients. You can use different types of milk, oil, or extracts to customize the flavor to your liking. I’ve used almond milk, coconut oil, and different extracts with great results. My sister replaced the vanilla extract with almond extract and it was an amazing substitute!
Baking Tips: Keep an eye on the cake while it’s baking. Ovens vary, so start checking for doneness around 30 minutes. If the top is browning too quickly, you can tent it with foil. I always rotate the pan halfway through baking to ensure even cooking.
Glaze Variations: Get creative with your glaze! You can add different extracts, spices, or even a splash of coffee liqueur to customize the flavor. I’ve added cinnamon, nutmeg, and even a little bit of Biscoff cookie butter to the glaze with delicious results. It’s definitely something you can change up easily!
Biscoff Prep: Don’t overheat the Biscoff butter. Microwaving it for too long can make it seize up. Just microwave it for a short amount of time, until it’s melted and smooth. If it seizes up, add a little more milk and stir until it’s smooth again. The texture is key!
These are just some of my tips to making this cake perfect! After several tries and a lot of taste-testing, I think I finally perfected this recipe.
Storing and Reheating Tips
Want to make sure your Biscoff Cookie Butter Cake stays fresh and delicious? Here are some tips for storing and reheating it:
Room Temperature: You can store the cake at room temperature for up to 2 days. Cover it tightly with plastic wrap or store it in an airtight container to prevent it from drying out. I find that it tastes best within the first day or two.
Refrigerator Storage: You can store the cake in the refrigerator for up to 5 days. Wrap it tightly with plastic wrap or store it in an airtight container. The refrigerator will help to keep the cake moist and fresh for longer. I always store mine this way.
Freezer Instructions: You can freeze the cake for up to 2 months. Wrap it tightly with plastic wrap and then place it in a freezer-safe bag or container. When you’re ready to eat it, thaw it in the refrigerator overnight. I like to freeze individual slices for easy snacking.
Glaze Timing Advice: If you’re planning to store the cake for more than a day or two, I recommend waiting to glaze it until just before serving. The glaze can get sticky and messy during storage.
I tested all of these storage options to get the best results and make it as easy as possible to enjoy this cake whenever you want!
Frequently Asked Questions
Final Thoughts
This Biscoff Cookie Butter Cake is truly something special. It’s easy to make, incredibly delicious, and always a crowd-pleaser. Whether you’re baking it for a special occasion or just want a cozy treat on a rainy day, this cake is sure to bring a smile to your face. If you love this recipe, be sure to check out my other cookie butter-inspired creations. I’ve got a cookie butter cheesecake that’s out of this world! Happy baking! I can’t wait to hear how yours turns out! Don’t forget to leave a comment and rating below, and share your own variations of this recipe. I’d love to see what you come up with!
Biscoff Cookie Butter Cake
Ingredients
Cake
- 2.5 cups All-purpose flour spooned and leveled
- 1.5 cups Granulated sugar
- 0.5 cup Biscoff cookie butter melted
- 1 cup Milk
- 0.5 cup Vegetable oil
- 2 Large eggs
Frosting
- 1 cup Butter softened
- 3 cups Powdered sugar
- 0.5 cup Biscoff cookie butter softened
- 2 tablespoons Milk
Instructions
Cake Preparation
- Preheat oven to 350°F (175°C). Grease and flour a 9x13 inch baking pan.
- In a large bowl, whisk together the flour, sugar, baking powder, baking soda, and salt.
- In a separate bowl, combine the melted Biscoff cookie butter, milk, oil, eggs, and vanilla extract. Mix well.
- Pour the wet ingredients into the dry ingredients and mix until just combined. Do not overmix.
- Pour the batter into the prepared baking pan and bake for 30-35 minutes, or until a wooden skewer inserted into the center comes out clean.
- Let the cake cool in the pan for 10 minutes before inverting it onto a wire rack to cool completely.
Frosting Preparation
- In a large bowl, cream together the softened butter and Biscoff cookie butter until light and fluffy.
- Gradually add the powdered sugar, beating until smooth. Add the milk and mix until the frosting reaches your desired consistency.
- Frost the cooled cake with the Biscoff cookie butter frosting.