You know those dishes that just instantly transport you back to your childhood kitchen? The ones that smell like pure comfort and taste like unconditional love? For me, those are the golden-brown, perfectly crisp breaded pork chops. Seriously, my mom used to make these for us on a Sunday afternoon, and the aroma would fill the whole house, making us kids practically vibrate with anticipation. They’re so much more satisfying and way less fussy than a fancy restaurant dish, but somehow they feel just as special. If you’re looking for a meal that’s both incredibly delicious and surprisingly straightforward, you’ve landed in the right spot. These aren’t just any breaded pork chops; they’re the ones that disappear from the plates in minutes, the ones that even my pickiest eaters devour without complaint. I’ve tweaked this recipe over the years, learned a few tricks (and a few mistakes!), and now I’m so excited to share my absolute favorite way to make them with you.
What are Breaded Pork Chops?
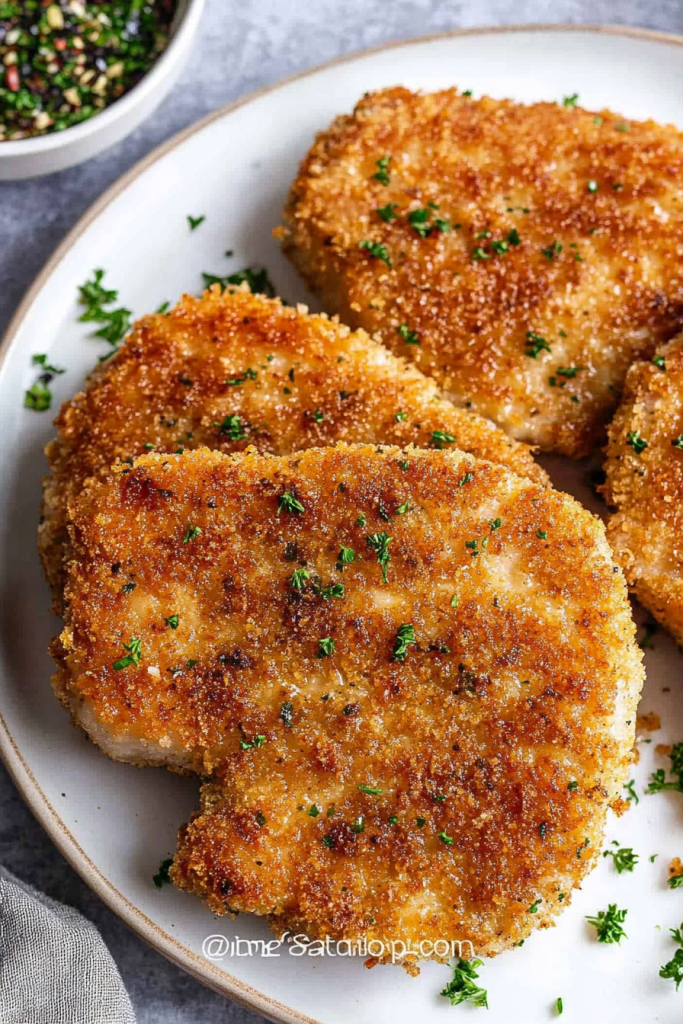
So, what exactly are these glorious breaded pork chops we’re talking about? At its heart, it’s simple: succulent pork chops that get a delicious, crispy coating thanks to a classic breading process. Think of it as a cozy hug for your pork chop, where the breadcrumbs become this amazing golden-brown shell that locks in all the juicy goodness inside. We’re not talking about a super-thick, heavy breading here, but one that’s just right – perfectly seasoned and wonderfully crunchy. It’s that satisfying texture contrast that makes these so addictive. They’re a classic for a reason, a comfort food staple that feels both rustic and refined, all at once. It’s the kind of dish that makes a weeknight feel like a weekend, and a weekend feel truly special.
Why you’ll love this recipe?
Honestly, there are so many reasons why this recipe has earned a permanent spot in my family’s rotation. First and foremost, the flavor is just out of this world. The pork stays incredibly juicy and tender on the inside, while the exterior is this symphony of crispy, seasoned perfection. It’s got that savory, slightly salty bite that just makes you want more. But it’s not just about the taste! What I love most about this recipe is its sheer simplicity. It’s honestly a lifesaver on those busy weeknights when you want something wholesome and satisfying without spending hours in the kitchen. I’ve made this so many times, and it never, ever fails to impress. Plus, it’s surprisingly budget-friendly! Pork chops are usually quite affordable, and the rest of the ingredients are pantry staples. This means you can whip up a restaurant-quality meal without breaking the bank. And the versatility? Oh my goodness. We’ll get into serving suggestions later, but these breaded pork chops are just as happy on a casual weeknight as they are at a family gathering. They stand on their own, or they play beautifully with so many sides. If you love my What is the best fried chicken recipe?What are some of the best pork chops?
How to Make Breaded Pork Chops
Quick Overview
Making these delightful breaded pork chops is a straightforward three-step process: prep, bread, and cook. We start by getting our pork chops ready, then give them a delightful coating using a simple flour, egg, and breadcrumb mixture. Finally, we cook them until they’re golden brown and perfectly crisp. The real magic lies in the little details, like ensuring your breadcrumbs are the right texture and not overcrowding the pan, which I’ll share with you. It’s a process that’s forgiving enough for beginners but yields results that even seasoned cooks will be proud of. You’ll be amazed at how quickly this comes together!
Ingredients
For the Pork Chops:
* 4-6 Boneless Pork chops, about 3/4-inch thick. I usually look for center-cut chops because they tend to be the most tender and cook evenly. If you can only find bone-in, that’s totally fine too, just adjust cooking time slightly. Aim for chops that aren’t super thick, as they’ll cook faster and be less prone to drying out.
For the Breading Station:
* 1 cup all-purpose flour. This is our base for adherence.
* 2 large eggs. Whisked well, these are the glue that holds everything together.
* 1 tablespoon milk or water. I sometimes add a splash of milk to the eggs, it just makes the coating a little richer and helps the breadcrumbs stick better, but water works just fine.
* 1 1/2 cups Panko breadcrumbs. This is my secret weapon for ultimate crispiness! Panko gives you that extra crunch that regular breadcrumbs just can’t match. If you don’t have Panko, regular dried breadcrumbs will work, but you might want to add a little extra seasoning to them.
* 1 teaspoon salt. Don’t skip this! It enhances all the other flavors.
* 1/2 teaspoon Black Pepper. Freshly ground is always best.
* 1/2 teaspoon garlic powder. Adds a subtle savory depth.
* 1/2 teaspoon paprika. For a little color and a hint of smokiness. You can use sweet or smoked paprika here, both are delicious.
* Optional: A pinch of cayenne pepper if you like a little heat, or some dried Italian herbs for an extra layer of flavor.
For Frying:
* About 1/2 cup vegetable oil or canola oil. You need enough to come up about halfway on the sides of your pork chops. Olive oil can work in a pinch, but vegetable oil has a higher smoke point and is usually more budget-friendly for frying.
Step-by-Step Instructions
Step 1: Preheat & Prep Pan
First things first, let’s get everything ready. You’ll want to place a large, heavy-bottomed skillet (cast iron is my absolute favorite for this!) over medium-high heat. Add your oil and let it heat up while you prepare the pork chops. You’re looking for it to be shimmering but not smoking. A good test is to drop a tiny bit of breadcrumb in – if it sizzles immediately, you’re good to go. While the pan heats, you can also preheat your oven to 375°F (190°C). This is for keeping the chops warm if you’re cooking them in batches. If you have a wire rack set inside a baking sheet, that’s perfect for holding the breaded chops before they hit the pan, and also for after they come out to keep them crisp.
Step 2: Mix Dry Ingredients
Now, let’s set up our breading station. In a shallow dish or a pie plate, combine the flour, salt, pepper, garlic powder, and paprika (and any other dry seasonings you’re using). Give it a good whisk or stir with a fork until everything is well combined. This seasoned flour is going to be the first layer that helps the egg stick to the pork chops.
Step 3: Mix Wet Ingredients
In a second shallow dish, crack your eggs. Add the tablespoon of milk or water. Whisk this mixture vigorously with a fork until the yolks and whites are completely blended and a little frothy. This is your binder! Make sure there are no streaks of yolk or white left.
Step 4: Combine
In a third shallow dish, place your Panko breadcrumbs. If you’re using plain dried breadcrumbs, now’s the time to add any extra herbs or seasonings you desire directly into the breadcrumbs. You want this breadcrumb mixture to be flavorful on its own!
Step 5: Prepare Filling
This step isn’t really about a filling in the traditional sense, but it’s about preparing the pork chops themselves. Pat your pork chops thoroughly dry with paper towels. This is a crucial step! Moisture is the enemy of crispiness. The drier the surface of the pork chop, the better the breading will adhere, and the crispier it will get. You can trim any excess fat from the edges if you like, but I usually leave a little bit because it adds flavor as it cooks.
Step 6: Layer & Swirl
Now for the fun part – the breading! Take one pork chop at a time. First, dredge it lightly in the seasoned flour, making sure to coat all sides. Gently shake off any excess flour. Next, dip it into the egg wash, letting any excess drip back into the dish. Finally, press the egg-coated chop firmly into the Panko breadcrumbs, ensuring it’s completely coated. Gently press down to help the crumbs adhere. Place the breaded chop onto your prepared wire rack. Repeat this process with all the pork chops. I like to do all the breading before I start frying, as it makes the process much smoother.
Step 7: Bake
Carefully place the breaded pork chops into the hot oil, making sure not to overcrowd the pan. You want to give them plenty of space so they can fry and get crispy, not steam. I usually cook 2-3 chops at a time depending on the size of my skillet. Cook for about 4-5 minutes per side, until they’re a beautiful golden brown and the coating is crisp. The exact time will depend on the thickness of your chops and the heat of your oil. Once they’re nicely browned on both sides, you can transfer them to your preheated oven (on the wire rack over a baking sheet) to finish cooking through while you cook the remaining chops. You’re looking for an internal temperature of 145°F (63°C) for perfectly cooked, juicy pork. Use a meat thermometer – it’s your best friend for not overcooking!
Step 8: Cool & Glaze
Once all the pork chops are cooked and have reached that perfect internal temperature, you can remove them from the oven. Let them rest on the wire rack for just a few minutes. This resting period is important – it allows the juices to redistribute throughout the meat, making them extra tender and moist. They’re already incredible as is, but if you’re feeling fancy, a little drizzle of something… but for these, the crispy coating is really the star. The Panko breadcrumbs will stay wonderfully crisp if they have a chance to cool slightly on a rack.
Step 9: Slice & Serve
These breaded pork chops are absolutely divine served immediately, while they’re still warm and the coating is at its absolute crispiest. You can serve them whole, or if you prefer, slice them into strips for easier eating, especially for kids. The satisfying crunch of the coating combined with the tender, juicy pork is just pure magic. Trust me, the whole family will be reaching for seconds!
What to Serve It With
Oh, the possibilities are endless when it comes to pairing these glorious breaded pork chops! They’re so versatile, truly. For a cozy breakfast, imagine them alongside some perfectly scrambled eggs and maybe some home fries. It’s a hearty start to the day that feels like a treat. For brunch, I love serving them with a dollop of my homemade apple sauce (the tartness cuts through the richness beautifully!) and a side of roasted sweet potatoes. It feels a little more elevated, you know? As a dessert, well, they’re not really a dessert, but sometimes I’ll serve them as a lighter protein alongside a vibrant salad and maybe some crusty bread for dinner. They’re also fantastic for just a casual, comforting snack. I often serve them with a big bowl of creamy mashed potatoes – that’s a classic for a reason! My kids also absolutely love them with some steamed green beans or simple roasted broccoli. Honestly, anything that complements that crispy, savory goodness works. My grandma used to serve them with a side of pickled beets, and that sweet and tangy contrast was surprisingly fantastic!
Top Tips for Perfecting Your Breaded Pork Chops
Over the years, I’ve picked up a few little tricks that take these breaded pork chops from good to absolutely spectacular. First, about the pork chops themselves: don’t be tempted to use super thin chops. While they cook fast, they can dry out so easily. Aim for that 3/4-inch thickness, and seriously, pat them *bone dry* with paper towels. I can’t stress this enough. If they’re wet, the flour won’t stick, and you won’t get that amazing crunch. When it comes to the breading, Panko is king for crispiness, but if you can’t find it, finely ground regular breadcrumbs will do. Just make sure your breadcrumb mixture is well-seasoned; the pork chop itself isn’t super seasoned yet at this stage, so the breading needs to carry a lot of the flavor. I learned this lesson the hard way after one batch of bland breading! When you’re frying, don’t overcrowd the pan. This is probably the most common mistake people make. If you cram too many chops in, the oil temperature drops, and instead of frying, they end up steaming and getting soggy. Cook in batches! Use enough oil, and keep it at a steady medium-high heat. If it gets too hot, the breadcrumbs will burn before the pork is cooked through. If it’s not hot enough, they’ll absorb too much oil. I’ve found that medium-high on my stove is the sweet spot. Once they’re out of the pan, let them rest for a few minutes on a wire rack, not on a solid plate. The rack allows air to circulate, keeping the bottom from getting soggy. If you’re making a big batch, pop them into a 375°F oven on that wire rack to keep them warm and crispy while you finish frying the rest. It’s a game-changer! For ingredient swaps, if you’re out of eggs, you can use a mixture of milk and a little bit of Dijon mustard as your binder – it works surprisingly well and adds a subtle tang. And for seasoning, feel free to get creative! A little sprinkle of dried rosemary or thyme in the flour or breadcrumbs can add a lovely herbal note. I’ve even experimented with adding a touch of grated Parmesan cheese to the Panko for an extra layer of savory flavor, and it was divine!
Storing and Reheating Tips
Now, if by some miracle you have leftovers (which is rare in my house!), storing them properly is key to keeping them enjoyable. For room temperature, I wouldn’t leave them out for more than two hours, as that’s generally the safe limit for cooked foods. If you’re storing them for a day or two, refrigerator storage is your best bet. Make sure they’ve cooled down a bit before placing them in an airtight container. They’ll typically stay good in the fridge for about 3-4 days. The biggest challenge with leftovers is that the crispy coating can lose some of its crunch. My go-to reheating method is in a hot oven or a toaster oven. Spread the pork chops out on a baking sheet (preferably lined with parchment paper or on a wire rack) and reheat at around 350°F (175°C) for about 8-10 minutes, or until heated through and the coating is re-crisped. Avoid the microwave if you can – it tends to make the coating tough and soggy. If you need to freeze them, let them cool completely. Then, wrap each chop individually in plastic wrap, followed by a layer of aluminum foil or a freezer bag. They’ll keep well in the freezer for up to 2-3 months. Thaw them overnight in the refrigerator before reheating them using the oven method. For the glaze, if you’re serving them cold or as part of a salad, you might want to add a drizzle of your favorite sauce just before serving. But if you’re reheating for a hot meal, it’s best to add any sauces after reheating to preserve that glorious crispiness.
Frequently Asked Questions
Final Thoughts
So there you have it – my absolute favorite way to make breaded pork chops! I truly hope this recipe brings as much joy and deliciousness to your table as it does to mine. It’s a recipe that proves you don’t need fancy ingredients or complicated techniques to create something truly memorable and comforting. The combination of tender pork and that irresistibly crispy, seasoned coating is just pure magic. It’s the kind of meal that brings people together, sparking conversation and happy sighs with every bite. If you give these breaded pork chops a try, please, please let me know how they turn out! I’d love to hear about your experience, any little twists you added, or what your family thought. Leave a comment below – I read every single one! And if you’re looking for more comforting and family-friendly recipes, be sure to check out my other favorites, like my One-Pan Roasted Chicken and Vegetables. Happy cooking!


