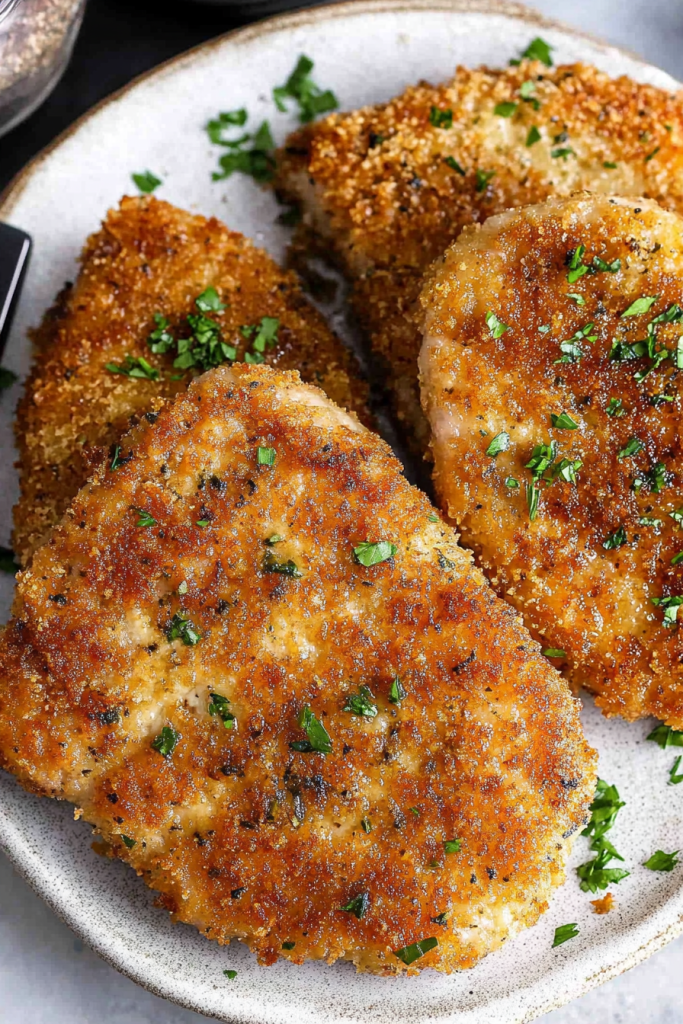
Oh, you know those nights. The ones where you’re staring into the fridge, utterly uninspired, with just enough time to throw something together before everyone starts asking “What’s for dinner?” for the hundredth time. On those nights, my mind always, always goes to these breaded pork chops. They’re not fancy, not complicated, but they are pure comfort food. They have that perfect crispy, golden-brown crust that gives way to a juicy, tender interior, and honestly, they taste like a hug on a plate. I’ve tried a million ways to make pork chops over the years, from braised to grilled, but there’s something about a well-made breaded pork chop that just hits different. It’s reminiscent of childhood dinners, the kind where you’d sneak a bite of the golden crust before your mom even put the plate down. If you’re thinking these sound like your grandma’s classic pork chops, you’re not far off, but I’ve tweaked a few things over the years that I think make them even better. They’re a lifesaver on busy nights, and my kids? Well, they ask for these breaded pork chops all the time, which, let’s be honest, is the highest compliment a home cook can receive.
What are Crispy Breaded Pork Chops?
So, what exactly are we talking about here? Think of them as the ultimate upgrade to a simple Pork Chop. We’re taking tender cuts of pork, giving them a flavorful coating, and frying them until they’re irresistibly golden and crunchy. It’s essentially a classic breading technique, but done with a little bit of love and a few personal touches that make all the difference. It’s not just about throwing some breadcrumbs on meat; it’s about building layers of flavor and texture. The simplicity is key – it’s essentially a few steps of dipping and frying, but the result is so much more satisfying than the sum of its parts. This isn’t about fussy ingredients or complicated techniques. It’s about taking humble pork chops and transforming them into something truly special, something that feels a bit like a treat even though it’s made with everyday goodness.
Why you’ll love this recipe?
Honestly, there are so many reasons why I keep coming back to this breaded pork chop recipe, and I just know you’re going to love it too. First off, let’s talk about that FLAVOR. The exterior is unbelievably crispy, a delightful contrast to the juicy, tender pork inside. It’s seasoned beautifully, so every bite is a burst of savory goodness. It’s not just crunchy; it’s *flavorful* crunchy. Then there’s the SIMPLICITY. I’m always on the hunt for recipes that deliver maximum flavor with minimum fuss, and this one nails it. You don’t need to be a gourmet chef to make these. The steps are straightforward, and the prep is manageable, even on a weeknight. It’s the kind of meal that makes you feel accomplished without breaking a sweat. What I also adore is how COST-EFFECTIVE it is. Pork chops are usually pretty budget-friendly, and the breading ingredients are pantry staples. You get a restaurant-quality meal at a fraction of the price. Plus, they are SO VERSATILE. I’ll get to more serving ideas later, but you can dress these up or down depending on your mood or what you have on hand. They’re perfect for a casual family dinner, but you could easily serve them for guests too. Compared to, say, a complicated roast or a time-consuming stew, these breaded pork chops are a weeknight warrior. They’re quick, delicious, and always a crowd-pleaser. My absolute favorite thing, though? It’s that feeling of satisfaction when you pull them out of the pan, perfectly golden, and know you’ve made something truly delicious that everyone will devour.
How do I make crispy breaded pork chops?
Quick Overview
Here’s the gist: we’ll take our Pork Chops, give them a good dredge through seasoned flour, then dip them in a creamy egg mixture, and finally coat them generously with seasoned breadcrumbs before pan-frying them to golden perfection. It’s a classic three-step breading process that guarantees that amazing crispiness we’re after. The key is to make sure each layer adheres well, creating a beautiful, even crust. It’s surprisingly quick, and the payoff is immense.
Ingredients
For Pork Chops: For the Pork Chops: For the Pork Chops: For the Pork Chops:
You’ll want about 4 to 6 bone-in or Boneless Pork chops, about ¾ to 1 inch thick. I find the bone-in ones have a bit more flavor, but either works beautifully. Look for good quality pork; it really makes a difference. If you can find center-cut chops, even better! For freshness, I usually check the date and make sure they look nice and pink, not greyish.
For the Dredging Station:
We’ll need about 1 cup of all-purpose flour for the first layer. To season it, I add 1 teaspoon of salt, ½ teaspoon of black pepper, and a good pinch of garlic powder. You can totally play with this – a little paprika or onion powder in the flour is lovely too!
For the Egg Wash:
This is our glue! You’ll need 2 large eggs, whisked together with about 2 tablespoons of milk (any kind works, even water in a pinch, but milk makes it a little richer). Some people add a splash of hot sauce here for a little kick, which I sometimes do if I’m feeling adventurous.
For the Breading:
I prefer using plain or Italian-style breadcrumbs for this. About 1.5 to 2 cups should be plenty. I like to season these too, so I add another ½ teaspoon of salt, ¼ teaspoon of pepper, and maybe some dried parsley or a pinch of dried thyme. Panko breadcrumbs are fantastic for extra crispiness if you have them!
For Frying:
You’ll need about ¼ to ½ cup of a neutral oil with a high smoke point, like vegetable oil, canola oil, or even some light olive oil. You want enough to come about ¼ inch up the sides of your pan.
Step-by-Step Instructions
Step 1: Preheat & Prep Pan
Get your skillet ready. You want a nice, heavy-bottomed skillet, cast iron is my absolute favorite for this because it holds heat so well. Add your oil to the skillet and place it over medium-high heat. We want the oil to be hot but not smoking – when a tiny breadcrumb sizzles instantly when dropped in, you’re good to go. While the oil heats up, it’s a good time to pat your pork chops dry with paper towels. This helps the breading stick better. You don’t want any excess moisture on the surface.
Step 2: Mix Dry Ingredients
In a shallow dish or a pie plate, whisk together the flour, salt, pepper, and garlic powder. Give it a good mix so all those seasonings are evenly distributed throughout the flour. This seasoned flour is your first layer of flavor and helps create a base for the egg wash to adhere to.
Step 3: Mix Wet Ingredients
In another shallow dish, whisk your eggs and milk together until they’re well combined and slightly frothy. Make sure there are no streaks of egg white left. This is what’s going to hold the breadcrumbs onto the pork chops.
Step 4: Combine
Now, let’s get the breadcrumbs seasoned. In a third shallow dish, combine your breadcrumbs with any additional seasonings you like – maybe a little more salt and pepper, or some dried herbs. Give it a good stir. Now, take one pork chop at a time and first dredge it thoroughly in the seasoned flour, making sure to coat all sides and shake off any excess. Then, dip it into the egg wash, letting any excess drip back into the dish. Finally, press it firmly into the seasoned breadcrumbs, ensuring it’s completely coated. I like to do this with my hands, really pressing the crumbs in to create a nice, thick coating. Place the breaded chops on a clean plate or a wire rack while you bread the rest. It’s okay if they sit for a few minutes before frying; the coating will hold.
Step 5: Prepare Filling
This step isn’t applicable for this specific breaded pork chop recipe, but sometimes I think about how to make things *even* better. Perhaps a quick marinade before breading? Or maybe a little sprinkle of parmesan cheese in the breadcrumbs? For these, we’re keeping it classic and focused on the perfect crispy exterior.
Step 6: Layer & Swirl
This step is also more relevant for things like cakes or brownies. For our breaded pork chops, the “layering” is all about how we place them in the pan. Don’t overcrowd the skillet! You want enough space between each chop so they fry evenly and get nice and crispy, not steamy. Cook them in batches if necessary. Swirling isn’t really part of this process, but you’ll be swirling them in the oil as they cook to ensure even browning.
Step 7: Bake
Since we’re pan-frying these, there’s no baking involved in the traditional sense. Once your oil is hot and your chops are breaded, carefully place 2-3 pork chops into the hot skillet, making sure not to overcrowd. Let them fry undisturbed for about 4-6 minutes per side, depending on their thickness. You’re looking for a deep golden-brown color and a nice crispy crust. You can carefully peek underneath with a spatula to check the color. Once they’re golden brown on the first side, flip them and cook the other side for another 4-6 minutes, or until cooked through. The internal temperature should reach 145°F (63°C) when checked with a meat thermometer inserted into the thickest part, avoiding the bone.
Step 8: Cool & Glaze
Once cooked, remove the pork chops from the skillet and place them on a wire rack set over a baking sheet. This is super important! It allows air to circulate around the chops, keeping the bottom crispy and preventing them from getting soggy. Don’t stack them! As for glaze, these are usually served as-is, but if you wanted to add a little something, a drizzle of honey or a light pan sauce right at the end could be lovely, though not traditional for this style.
Step 9: Slice & Serve
Let the pork chops rest for about 5 minutes before serving. This is crucial for keeping them juicy! They’re best served hot, straight from the pan, with that beautiful crispy coating. You can serve them whole, or if you’re feeling fancy, slice them into strips. The aroma alone will have everyone gathering in the kitchen.
What to Serve It With
These breaded pork chops are so wonderfully versatile! For a classic BREAKFAST, imagine them alongside some fluffy scrambled eggs and crispy hash browns. It’s a weekend brunch that feels incredibly indulgent without much effort. For BRUNCH, they’re fantastic served with a fresh green salad, some roasted cherry tomatoes, and maybe a dollop of apple sauce or a quick cranberry relish. It’s elegant enough for guests but still relaxed. As a main course for DINNER, they pair beautifully with creamy mashed potatoes, steamed green beans, or a simple side of roasted broccoli. The crispy exterior is just begging to soak up any sauce or gravy you might have. For something a bit different, try them with a vibrant coleslaw and some baked beans for a barbecue-inspired meal. They’re also surprisingly good as a COZY SNACK – think of them as elevated chicken tenders, perfect for dipping in your favorite sauce. My family loves them with a side of sweet potato fries, it’s a winning combination every single time. I’ve even seen people use them in sandwiches, sliced thinly and tucked into a crusty roll with some pickled onions. The possibilities are really endless!
Top Tips for Perfecting Your Breaded Pork Chops
I’ve made these breaded pork chops more times than I can count, and along the way, I’ve picked up a few tricks that make all the difference. For the PORK CHOPS themselves, make sure they’re not too thin. If they’re under an inch thick, they tend to cook too quickly and can dry out before they get nicely browned. If yours are thicker, you might need to adjust the cooking time slightly, or even give them a few minutes in a warm oven after frying to ensure they’re cooked through without burning the breading. When it comes to MIXING, the key is to not overwork the flour or breadcrumbs. Just get everything coated nicely. For the breading process, pressing the breadcrumbs firmly onto the pork chops is a game-changer. It ensures a thick, even coating that will stay put during frying and get super crispy. If you want a really substantial crust, you can double-dip: flour, egg, breadcrumbs, then egg again, and breadcrumbs again. Trust me, it’s worth the extra effort for that ultimate crunch! For FRYING, don’t be tempted to overcrowd the pan. It lowers the temperature of the oil, and instead of frying, your chops will steam, resulting in a soggy coating. Cook them in batches if you have to; your crispy chops will thank you. And that wire rack for draining? It’s not optional! It’s the secret to keeping that gorgeous crust intact. If you’re using oil, make sure it’s hot enough before adding the chops. A good sizzle is what you’re after. If you’re worried about the internal temperature, a meat thermometer is your best friend. Aim for 145°F (63°C) for perfectly cooked, juicy pork. A slight pinkness in the center is totally fine and desirable for tender pork!
Storing and Reheating Tips
Okay, so if by some miracle you have leftovers (which is rare in my house!), storing them properly is key to maintaining that delicious crispiness. For ROOM TEMPERATURE storage, it’s really best not to leave them out for more than two hours, especially if it’s warm. They’re definitely best eaten fresh. If you need to refrigerate them, let them cool completely first on a wire rack. Then, place them in an airtight container or wrap them tightly in plastic wrap and then foil. They’ll keep well in the REFRIGERATOR for about 3-4 days. The breading might soften a bit, but they’ll still be tasty. For FREEZER INSTRUCTIONS, this is where you need to be careful about maintaining that crisp. Once completely cool, wrap each pork chop individually and tightly in plastic wrap, then place them in a freezer-safe bag or container. They can stay frozen for up to 2-3 months. To REHEAT, the best method is in the oven. For refrigerated chops, bake them at around 375°F (190°C) for about 10-15 minutes, or until heated through. For frozen chops, you might need to add a few extra minutes, and it’s okay to put them in from frozen, just keep an eye on them. Avoid the microwave if you can, as it tends to make them a bit rubbery and soft. Some people swear by air fryers for reheating these too, and I’ve had good luck with that – just a few minutes at a moderate temperature until crisp again.
Frequently Asked Questions
Final Thoughts
There you have it – my absolute favorite way to make breaded pork chops. It’s a recipe that feels like a warm hug, simple enough for a busy Tuesday but special enough for a Sunday supper. The combination of that perfectly crisp crust and tender, juicy pork is just unbeatable. It’s a classic for a reason, and I hope you’ll give it a try and see why it’s such a staple in my kitchen. It’s the kind of meal that brings people together, sparks conversation, and leaves everyone feeling satisfied and happy. If you love this recipe, you might also enjoy my simple pan-seared chicken or my foolproof baked salmon – they’re in a similar vein of being easy, delicious, and crowd-pleasing. I can’t wait to hear what you think! Let me know in the comments below how yours turned out, or if you’ve tried any fun variations. Happy cooking!


