Oh, breaded pork chops! Just saying the words brings back so many memories. I can practically smell them now – that comforting, savory aroma filling my grandma’s kitchen on a Sunday afternoon. Growing up, these were the ultimate comfort food, a dish that signaled pure happiness. And you know what? They still do! If you’re anything like me, you’ve probably tried your fair share of pork chop recipes, some great, some… well, let’s just say they ended up in the compost bin. But this one? This is the one. It’s the recipe I turn to when I need something that’s guaranteed to impress, yet is surprisingly simple to pull off. It’s got that perfect crispy coating that gives way to the most tender, juicy pork imaginable. Forget those dry, bland pork chops of the past; these are a game-changer. Honestly, if you could bottle the essence of a perfect home-cooked meal, it would probably smell a lot like these breaded pork chops.
What are Breaded Pork Chops?
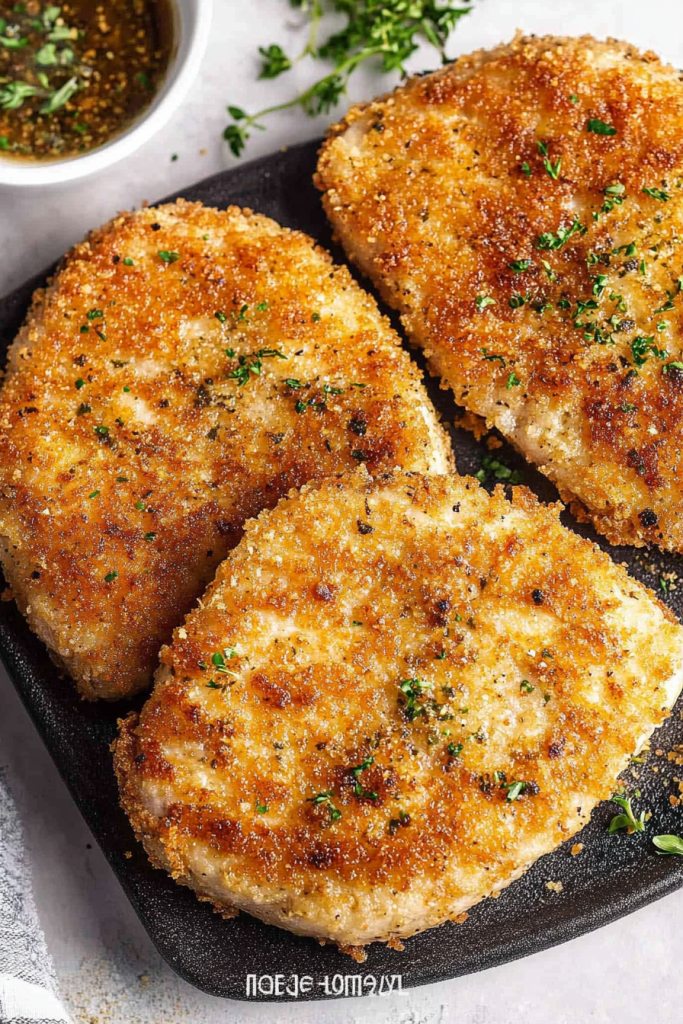
So, what exactly are we talking about when we say “breaded pork chops“? At its heart, it’s simple: a juicy pork chop that’s been coated in a delicious, crispy breading and then cooked to golden perfection. Think of it as the most satisfying hug for your taste buds. We’re not talking about a super-fussy, restaurant-style breading here, though it certainly holds its own. This is more about achieving that ultimate crunch and flavor that just makes you close your eyes in delight. The beauty of this particular recipe is that it elevates the humble pork chop into something truly special. It’s the kind of dish that makes you feel like you’ve really accomplished something in the kitchen, even if it was one of the easiest meals you’ve ever made. It’s essentially a weeknight warrior and a weekend showstopper all rolled into one!
Why you’ll love this recipe?
There are so many reasons why this breaded Pork Chop recipe has earned a permanent spot in my recipe rotation, and I just know you’re going to fall in love with it too. First off, the flavor is just out of this world. We’re talking about a savory, well-seasoned crust that’s perfectly golden brown and crispy, encasing incredibly tender and juicy pork. It’s a symphony of textures and tastes that just works. And don’t even get me started on the aroma that fills your kitchen while it’s cooking – it’s pure magic. Secondly, and this is a huge one for me, is the simplicity. I know that sometimes “breaded” can sound intimidating, conjuring up images of complicated dredging stations and messy frying. But I promise you, this recipe is designed for real life. It’s straightforward, doesn’t require any fancy equipment, and it’s honestly a lifesaver on busy weeknights when you still want something delicious and wholesome. Plus, the ingredients are super budget-friendly! You probably already have most of them in your pantry right now. This recipe is also incredibly versatile. While I love it just the way it is, you can totally switch up the seasonings in the breading to suit your mood. Want a little kick? Add some paprika or a pinch of cayenne. Craving something herby? Throw in some dried rosemary or thyme. It’s a fantastic base that you can really make your own. What I love most about this is that it takes a relatively inexpensive cut of meat and transforms it into a meal that feels like a real treat, without breaking the bank. It’s a win-win-win!
How do I make a breaded pork chop?
Quick Overview
This recipe is all about building layers of flavor and achieving that perfect crispy exterior. We’ll start by prepping our Pork Chops, then move on to creating a simple yet incredibly effective breading mixture. The key is in the gentle handling and the perfectly seasoned coating. You’ll then pan-fry these beauties until they’re a glorious golden brown and cooked through to juicy perfection. It’s a process that’s incredibly rewarding and yields results that are just astounding for how little effort they require. Trust me, the aroma alone will have everyone gathering in the kitchen!
Ingredients
For the Main Dish:
4 bone-in or boneless pork chops, about 1-inch thick (I always find bone-in gives a little extra flavor and stays juicier, but boneless work wonderfully too!)
1 cup all-purpose flour
2 large eggs, lightly beaten
1 ½ cups panko breadcrumbs (these give the best crunch, but regular breadcrumbs work in a pinch!)
1 teaspoon salt, plus more to taste
½ teaspoon Black Pepper, plus more to taste
½ teaspoon garlic powder
½ teaspoon onion powder
¼ teaspoon paprika (smoked paprika adds a lovely depth!)
4-6 tablespoons vegetable oil or olive oil, for frying
For Extra Flavor (Optional but Highly Recommended!):
1 tablespoon grated Parmesan cheese (mixed into the breadcrumbs for a salty, umami boost)
1 teaspoon dried Italian seasoning or dried parsley (for a fresh, herby note)
Step-by-Step Instructions
Step 1: Preheat & Prep Pan
First things first, let’s get our cooking station ready. You’ll want to grab a large, heavy-bottomed skillet – cast iron is my absolute favorite for this because it heats so evenly and gives the most incredible crust. Place it over medium-high heat. Add your oil. We want enough oil to generously coat the bottom of the pan, about ¼ inch deep. Let that oil heat up while we get our pork chops ready. You’re looking for it to shimmer, but not smoke. If you drop a tiny bit of breadcrumb in, it should sizzle immediately.
Step 2: Mix Dry Ingredients
Now, for the star of the show – the breading! Grab three shallow dishes or pie plates. In the first one, we’ll put the flour. In the second, crack your eggs and whisk them up with a fork until they’re just combined. In the third dish, this is where the magic happens! Combine your panko breadcrumbs with the salt, pepper, garlic powder, onion powder, and paprika. If you’re feeling fancy, this is also where you can mix in that optional grated Parmesan cheese and dried herbs. Give it all a good stir with a fork until everything is evenly distributed. This ensures every bite of your pork chop is perfectly seasoned!
Step 3: Prepare Pork Chops
Take your pork chops and pat them completely dry with paper towels. This is a crucial step, folks! Moisture is the enemy of crispiness. You want that breading to adhere beautifully, and dry chops are the key. If you’re using thicker chops, you might want to gently pound them to an even ½-inch thickness. This helps them cook more evenly. You can do this by placing them between two pieces of plastic wrap and using a meat mallet or even a rolling pin.
Step 4: Dredge the Pork Chops
Okay, here’s where we do the classic three-step dredge. First, take a pork chop and coat it thoroughly in the flour, making sure to shake off any excess. Next, dip it into the beaten eggs, letting any excess drip back into the dish. Finally, press the egg-coated chop firmly into the breadcrumb mixture. Make sure it’s completely covered, pressing down gently so the crumbs stick well. Repeat this process for all your pork chops. Lay them out on a clean plate or a wire rack while you heat the pan.
Step 5: Cook Until Golden
Once your oil is hot and shimmering, carefully place the breaded pork chops into the skillet. Don’t overcrowd the pan! You want to give them enough space to cook evenly and get crispy. You’ll probably only be able to fit two at a time, depending on the size of your pan. Cook them for about 3-5 minutes per side, or until they are a beautiful golden brown and the internal temperature reaches 145°F (63°C) on an instant-read thermometer. The exact time will depend on the thickness of your chops and the heat of your pan. If they’re browning too quickly, turn the heat down slightly.
Step 6: Drain and Rest
Once they’re perfectly golden and cooked through, carefully remove the pork chops from the skillet and place them on a wire rack set over a baking sheet. This allows any excess oil to drip away, keeping them nice and crispy. If you don’t have a wire rack, you can use a plate lined with paper towels, but the wire rack really is the secret to maintaining that crunch. Let them rest for about 5 minutes before serving. This resting period is super important as it allows the juices to redistribute throughout the meat, making them even more tender and flavorful.
Step 7: Serve and Enjoy!
And there you have it! Your incredible, crispy, juicy breaded pork chops are ready to be devoured. Serve them hot and watch everyone dive in. The sound of that crunch when they take their first bite is music to my ears.
What to Serve It With
These breaded pork chops are so versatile, they can truly grace any table and fit into any meal. For a classic breakfast, I love serving them with a couple of perfectly fried eggs and some crispy home fries. It’s a hearty start to the day that feels incredibly indulgent. If you’re planning a weekend brunch, these fit right in! Imagine them alongside a fresh fruit salad, some fluffy scrambled eggs, and maybe a dollop of hollandaise sauce for an extra touch of elegance. They also make a surprisingly satisfying dessert for a casual get-together – not in the sweet sense, of course, but as a decadent, savory main course that guests will rave about. For those cozy, “I just want something comforting” nights, I can’t think of anything better. They pair beautifully with creamy mashed potatoes, a side of steamed green beans, or even a simple apple sauce for that classic diner feel. We often have them with a big green salad and some roasted root vegetables during the fall. It’s a meal that feels both rustic and refined, perfect for any occasion you want to make a little more special. My family also loves them piled onto toasted brioche buns with a bit of slaw for an amazing sandwich!
Top Tips for Perfecting Your Breaded Pork Chops
Over the years, I’ve learned a few tricks that I think make all the difference when it comes to achieving pork chop perfection. Let’s dive into some of my favorite tips and lessons learned from countless batches in my kitchen:
Pork Chop Selection: Don’t shy away from bone-in chops if you can help it. The bone adds flavor and insulation, keeping the meat incredibly moist. Aim for chops that are at least ¾ inch thick, ideally closer to 1 inch. Thinner chops tend to cook too fast and can dry out easily. If you only have thinner ones, just keep a very close eye on them and reduce the cooking time. For boneless, look for ones with a good amount of marbling.
The Breading Station Setup: Using three separate shallow dishes or wide bowls is key for an even coating. Make sure your flour is seasoned well, as this is the first layer of flavor. Don’t skip the step of shaking off excess flour; too much can lead to a gummy coating. For the eggs, a little splash of milk or water can make them a bit more fluid and easier to coat with. And for the breadcrumbs, panko is my absolute go-to. The large flakes create an unparalleled crispiness. If you’re using regular breadcrumbs, you might find the coating a little denser.
Achieving Maximum Crispiness: Patting the pork chops completely dry is non-negotiable. Seriously, this is probably the most important tip for getting that shatteringly crisp crust. Moisture on the chop will prevent the flour from sticking properly, leading to a less-than-ideal coating. Also, ensure your oil is hot enough before you add the chops. If the oil isn’t hot, the breading will soak up oil and become greasy instead of crispy. You want to hear that immediate sizzle when the chop hits the pan.
Don’t Crowd the Pan: I know it’s tempting to try and cook all four chops at once, but please, resist the urge! Overcrowding the pan lowers the temperature of the oil, leading to soggy, pale pork chops rather than beautifully golden and crispy ones. Cook them in batches, and if you have the space, keep the cooked ones warm on a wire rack over a baking sheet in a low oven (around 200°F or 95°C) while you cook the rest.
Temperature is Key: Invest in a good instant-read thermometer. It’s a game-changer for ensuring your pork is cooked perfectly – safe but not overcooked. For pork chops, you’re looking for an internal temperature of 145°F (63°C). They’ll continue to cook a bit as they rest. I’ve learned this the hard way, overcooking many a pork chop before I got my trusty thermometer!
Resting Matters: Just like with a steak, letting your breaded pork chops rest for a few minutes after cooking is crucial. It allows the juices to redistribute throughout the meat, making each bite incredibly moist and tender. If you cut into them immediately, all those delicious juices will run out onto the plate.
Ingredient Swaps & Additions: Feel free to experiment with the breadcrumb mixture! For a bit of zing, add a pinch of cayenne pepper or some smoked paprika. For a more herbaceous flavor, dried rosemary or thyme works wonders. You can even add a tablespoon of nutritional yeast for a cheesy, umami flavor if you’re dairy-free. When it comes to the oil, vegetable, canola, or even a light olive oil are all great options. Just avoid extra virgin olive oil, as it has a lower smoke point and can impart a stronger flavor than you might want here.
Storing and Reheating Tips
One of the best things about these breaded pork chops is that they reheat surprisingly well, making them fantastic for leftovers. Here’s how I usually handle them:
Room Temperature: Honestly, I don’t recommend leaving them out for too long. Food safety is important! They’re best enjoyed fresh, but if you have a meal planned and aren’t serving them immediately, a short time on the counter (no more than an hour or two) is usually fine, especially if they’re just cooked and still warm.
Refrigerator Storage: Once they’ve cooled down a bit, store any leftovers in an airtight container in the refrigerator. I usually find they’re still good for about 2-3 days. The key to keeping them as crisp as possible upon reheating is to allow them to cool completely before sealing the container. This prevents excess condensation from making the breading soggy.
Freezer Instructions: If you know you won’t be eating them within a few days, freezing is a great option. Let the cooked pork chops cool completely. Then, wrap each one individually in plastic wrap, followed by a layer of aluminum foil or place them in a freezer-safe bag. This double-wrapping helps prevent freezer burn. They should keep well in the freezer for up to 2-3 months. Make sure to label them with the date!
Reheating Guidance: The absolute best way to reheat breaded pork chops and get that crispiness back is in a single layer on a baking sheet in a preheated oven at around 375°F (190°C). For refrigerated leftovers, this usually takes about 10-15 minutes. For frozen ones, thaw them overnight in the refrigerator first, then reheat as you would refrigerated leftovers. Microwaving is the fastest method, but it tends to make the breading soft and chewy, which is a shame. If you must microwave, do so for short intervals and try to crisp them up in a toaster oven or skillet afterwards.
Glaze Timing Advice: If you’re planning to serve these with a sauce or glaze, I always recommend serving it on the side. Pouring glaze directly onto the breaded chops before storing will make them soggy, no matter how carefully you store them. Keep the sauce separate and warm it up just before serving.
Frequently Asked Questions
Final Thoughts
There you have it – my absolute favorite way to make breaded pork chops. It’s a recipe that’s been tried, tested, and loved by my family for years, and I truly hope it becomes a go-to for you too. The combination of that irresistible crispy coating and the perfectly juicy pork is something that just never gets old. It’s proof that you don’t need a complicated recipe or fancy ingredients to create a meal that feels incredibly special and satisfying. Whether you’re looking for a weeknight dinner that’s surprisingly easy, or a crowd-pleaser for your next get-together, these breaded pork chops deliver every single time. They’re a comforting classic that just hits all the right notes. Give them a try, and I’m almost certain you’ll be hooked! I’d love to hear how yours turn out – let me know in the comments below how you served them or any fun variations you tried. Happy cooking!


