You know those days, right? The ones where the craving hits hard, you *really* want something sweet and comforting, but the thought of pulling out every single measuring cup and bowl feels like climbing Everest? Yeah, those days are all too familiar in my kitchen. It’s why I’ve become a bit of a wizard with cake mix. And today, I’m spilling the beans on my absolute favorite shortcut recipe: cake mix cookie bars. Forget complicated recipes that promise the world and deliver a mess. These bars are the answer to your sweet tooth prayers, a true lifesaver on busy weeknights, and honestly, they’re so good my kids ask for them literally all the time. They taste like they’ve been slaved over for hours, but the secret is, they’re built on the humble, magical cake mix. If you love classic Chocolate Chip Cookies but want something that takes a fraction of the effort, you are going to adore these.
What is cake mix cookie bars?
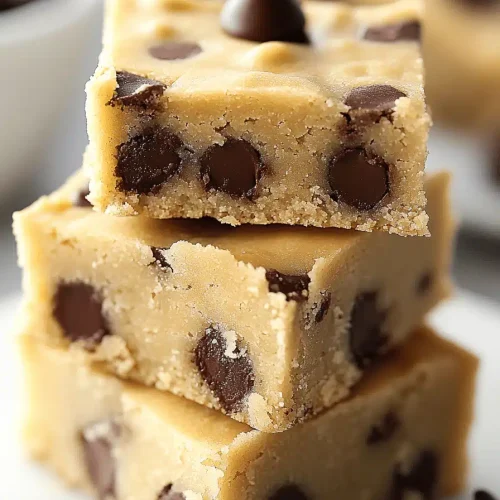
So, what exactly are cake mix Cookie Bars? Think of them as the ultimate mashup between soft, chewy cookies and a fuss-free bar. We start with a simple cake mix – usually yellow or vanilla, though I’ve had fun experimenting with others! – and transform it into a delicious cookie dough. Instead of scooping out individual cookies, we press this dough into a pan, often with a delightful filling swirled in, and bake it all together. The result is a perfectly soft, chewy, gooey bar that has all the comforting flavors of your favorite cookie but with none of the individual shaping. It’s essentially a super-easy, cut-and-serve cookie that’s perfect for sharing (or not, no judgment here!). It’s the kind of dessert that feels incredibly special without demanding a whole afternoon in the kitchen.
Why you’ll love this recipe?
Oh, where do I even begin with why this recipe is my go-to? First off, the **flavor** is just incredible. You get that rich, buttery, sweet cookie taste, and when you add a yummy filling, it takes it to a whole new level. My personal favorite is a gooey Chocolate Chip or a cream cheese swirl, but I’ve got other ideas brewing! Then there’s the **simplicity**. Seriously, if you can stir ingredients together, you can make these. It’s so forgiving, which is a huge plus in my book. For busy parents like me, or honestly, anyone who just needs a quick treat, this is a game-changer. It’s also incredibly **cost-efficient**. Cake mix is super affordable, and the other ingredients are pantry staples. You get a big batch of deliciousness for very little dough. And the **versatility**! These bars are amazing on their own, but they’re also fantastic for potlucks, bake sales, or just a spur-of-the-moment craving. They’re similar to blondies or brownies in their bar form, but with that unmistakable cookie flavor. What I love most about this recipe is that it delivers maximum deliciousness with minimum effort. It’s the kind of magic that makes you feel like a baking superstar, even on your most tired days.
How do I make cake mix cookie bars?
Quick Overview
Making these cake mix Cookie Bars is ridiculously simple. We’re talking about mixing a few core ingredients into a dough, pressing most of it into a baking pan, adding your chosen filling, topping with the rest of the dough, and baking until golden and irresistible. The whole process, from mixing to baking, is remarkably fast. It’s designed for ease, meaning you can whip these up when that sweet craving strikes unexpectedly or when you need a crowd-pleasing dessert without the fuss. It’s a foolproof method that almost always turns out perfectly chewy and delicious.
Ingredients
For the Main Batter:
1 box (15.25 oz) yellow or vanilla Cake Mix: This is your magical base! Make sure it’s a standard size box. I usually go for yellow cake mix because it has a lovely subtle sweetness and a great golden color, but vanilla works beautifully too. If you find a fun flavored one, like funfetti, go for it! It’s like a party in a pan.
2 large eggs: These bind everything together and add richness. Make sure they’re at room temperature if you can – it helps everything emulsify better.
1/2 cup (1 stick) unsalted butter, melted: Melted butter is key for that chewy texture. Use good quality butter for the best flavor. You can also use salted butter if that’s what you have, just know it might make them a tad saltier, which I actually love!
1 teaspoon vanilla extract: Even though the cake mix has vanilla, a little extra really boosts the flavor and makes them smell divine while baking. Don’t skip this!
For the Filling:
1/2 cup chocolate chips: Milk chocolate, semi-sweet, dark chocolate – whatever your heart desires! Mini chips disperse nicely, but regular ones are great too. You could even do white chocolate chips or a mix.
OR 4 oz cream cheese, softened: For a tangy, creamy swirl. Make sure it’s truly soft, or it won’t swirl well.
OR 1/4 cup peanut butter: For a nutty, decadent layer.
(Optional: 2 tablespoons granulated sugar + 1/2 teaspoon cinnamon for a spiced swirl)
For the Glaze (Optional but Highly Recommended!):
1 cup powdered sugar: Sifted, if you want it super smooth, though I often skip this step and just whisk it well.
2-3 tablespoons milk (or heavy cream for extra richness): Start with 2 tablespoons and add more as needed to reach your desired drizzling consistency.
1/2 teaspoon vanilla extract: For a touch of extra flavor.
Step-by-Step Instructions
Step 1: Preheat & Prep Pan
First things first, get your oven preheated to 350 degrees Fahrenheit (175 degrees Celsius). This is pretty standard for most baking, and it ensures the bars bake evenly. Then, grab an 8×8 or 9×9 inch baking pan. I prefer an 8×8 for slightly thicker, chewier bars, but a 9×9 will work too, just make them a little thinner. Line the pan with parchment paper, leaving some overhang on the sides. This is my absolute favorite trick for easy removal. Seriously, it makes getting the bars out a breeze, no sticking, no drama. Just pull on the parchment paper and lift them right out! You can also grease and flour the pan if you don’t have parchment, but I find this is the best way.
Step 2: Mix Dry Ingredients
This recipe is so forgiving, you don’t really have a separate “dry ingredients” step because it’s all in the cake mix! So, we’re going to start by putting the entire box of cake mix into a large mixing bowl. Make sure you scrape out every last bit – no one wants to miss out on that cake mix magic. I like to give it a quick whisk with a fork, just to break up any clumps, but it’s not strictly necessary.
Step 3: Mix Wet Ingredients
In a separate medium bowl (or a large measuring cup), whisk together the melted butter, eggs, and vanilla extract until they are well combined. You’ll see it come together into a nice, smooth mixture. The melted butter is what gives these bars that signature chewy texture, so don’t skimp on it! Make sure your eggs aren’t straight from the fridge if you can help it; room temperature eggs incorporate better.
Step 4: Combine
Now, pour the wet ingredients into the bowl with the cake mix. Using a sturdy spoon or a spatula, mix everything together until just combined. Be careful not to overmix! You’ll see it start to form a thick dough, almost like cookie dough. A few streaks of dry cake mix are totally fine; overmixing will develop the gluten too much and can make your bars tough instead of wonderfully tender. It should look shaggy but come together when you press it.
Step 5: Prepare Filling
This is where you get to customize! If you’re using chocolate chips, just have them ready. If you’re doing a cream cheese swirl, take your softened cream cheese and beat it with a fork until smooth. You can add a tablespoon of sugar and a tiny splash of vanilla to it if you like. For a peanut butter swirl, just have your peanut butter ready. For the spiced swirl, mix the sugar and cinnamon together. Having your filling prepared before you start layering makes the process so much smoother.
Step 6: Layer & Swirl
Take about two-thirds of your cookie dough mixture and press it evenly into the bottom of your prepared baking pan. It might be a little sticky, so you can lightly grease your hands or use a piece of parchment paper to help press it down. Now, sprinkle your chosen filling evenly over this base layer. If you’re doing chocolate chips, just scatter them. If you’re swirling cream cheese or peanut butter, dollop spoonfuls over the chocolate chips (or directly onto the dough if you’re not using chips) and then use a knife or a skewer to gently swirl it through the dough. Don’t over-swirl, or you’ll lose the distinct layers. Finally, crumble or spread the remaining one-third of the cookie dough evenly over the top. Don’t worry if it’s not perfectly covered; some gaps are fine and can lead to lovely crispy bits!
Step 7: Bake
Pop the pan into your preheated oven. Bake for about 25-35 minutes. The exact time will depend on your oven and the size of your pan. You’re looking for the edges to be golden brown and set, and the center to look mostly set, maybe just slightly soft. A toothpick inserted into the center should come out with moist crumbs attached, not wet batter. Remember, these bars will continue to set up as they cool, so it’s better to underbake slightly than overbake them if you want that gooey texture. I always start checking around the 25-minute mark.
Step 8: Cool & Glaze
This is probably the hardest part – waiting! Let the bars cool completely in the pan on a wire rack. This is crucial for them to set properly and for easy cutting. If you try to cut them while they’re hot, they’ll likely fall apart. Once they’re totally cooled, you can whip up the glaze if you’re using it. Whisk together the powdered sugar, 2 tablespoons of milk, and vanilla until smooth. If it’s too thick, add a tiny bit more milk, a teaspoon at a time, until it’s pourable but not watery. Drizzle it over the cooled bars. The glaze adds a lovely touch of sweetness and visual appeal.
Step 9: Slice & Serve
Once the glaze has set a bit (or if you skipped the glaze!), use the parchment paper overhangs to lift the entire block out of the pan onto a cutting board. Then, using a sharp knife, slice the bars into your desired size. I usually cut them into 16 squares, but you can go bigger or smaller. Serve them at room temperature for the best chewy texture. They are absolutely heavenly on their own, but a scoop of vanilla ice cream alongside is pure bliss!
What to Serve It With
These cake mix cookie bars are so wonderfully versatile, they fit into almost any meal or occasion. For **Breakfast**, imagine these warm with a cup of strong coffee or a soothing cup of tea. They’re a bit more decadent than a muffin, but the cake mix base makes them feel totally at home at the breakfast table, especially if there’s a lazy weekend vibe going on. For **Brunch**, they’re a fantastic addition to a spread. You can cut them into smaller, bite-sized pieces for a party platter, perhaps alongside some fresh fruit or yogurt parfaits. They add a sweet, comforting element that everyone will gravitate towards. As **Dessert**, of course, they shine! Serve them slightly warm with a scoop of vanilla bean ice cream melting into the gooey center – it’s a match made in heaven. A drizzle of extra chocolate sauce or a dusting of powdered sugar can make them feel even more special. And for **Cozy Snacks**, these are simply unbeatable. They’re perfect for an afternoon pick-me-up with a glass of cold milk, or a late-night treat when you need something sweet without the commitment of baking a whole pie. My family tradition is to have these after Sunday dinner, especially when we have unexpected guests – they always disappear so fast!
Top Tips for Perfecting Your Cake Mix Cookie Bars
I’ve made these cake mix cookie bars more times than I can count, and I’ve picked up a few tricks along the way that I think you’ll find super helpful. When it comes to the base **batter**, the key is not to overmix. Once you add the wet ingredients to the cake mix, just stir until it’s *barely* combined. A few dry streaks are fine! Overmixing develops the gluten too much and can lead to tougher bars, and we definitely want that soft, chewy texture. Make sure your butter is truly melted and your eggs are at room temperature for the best emulsion. For the **swirl customization**, if you’re using cream cheese or peanut butter, make sure it’s softened to room temperature. This makes it much easier to swirl and create those beautiful ribbons of flavor without tearing through the dough. If you’re swirling something like jam, warm it slightly so it’s more fluid. My personal favorite **ingredient swap** is using a chocolate cake mix with white chocolate chips – it’s a decadent combination that’s always a hit! You could also try adding a handful of chopped nuts or dried fruit to the dough if you like. For **baking tips**, remember that ovens can vary. Start checking your bars around the minimum baking time suggested. They should look set around the edges and just slightly soft in the center. They will continue to bake a little as they cool, so it’s better to pull them out a minute or two early than to overbake them into dryness. A toothpick test is your friend here; it should come out with moist crumbs, not completely clean (which means they’re likely overbaked) or wet batter. When it comes to the **glaze variations**, I sometimes add a pinch of salt to the glaze if I’ve used unsalted butter in the bars, to really balance the sweetness. For a different flavor, try adding a teaspoon of lemon zest or a bit of almond extract to the glaze. And if you want a thicker, almost frosting-like glaze, just use less liquid and whisk it until it’s smooth and spreadable!
Storing and Reheating Tips
The best part about these cake mix cookie bars is that they actually store incredibly well, which makes them perfect for making ahead. For **room temperature storage**, if you’ve got leftover bars (which is rare in my house!), I recommend keeping them in an airtight container. They’ll stay wonderfully chewy and delicious for about 2-3 days. Make sure they are completely cooled before storing, especially if they have glaze on them, to prevent sogginess. If you’ve got a particularly warm kitchen, you might want to store them in the fridge. For **refrigerator storage**, place the cooled bars in an airtight container or wrap them tightly in plastic wrap. They’ll keep well for up to a week. I find that the texture remains excellent, and they’re still super chewy. When you want to serve them from the fridge, you can enjoy them cold (which is delightful on a hot day!) or let them sit at room temperature for about 15-30 minutes to soften up a bit. If you happen to have an abundance and want to save them for longer, **freezer instructions** are your best friend. Cut the cooled bars into individual servings and wrap each one tightly in plastic wrap, then place them in a freezer-safe bag or airtight container. They can be frozen for up to 2-3 months. To thaw, simply remove them from the freezer and let them thaw at room temperature, or warm them gently in a low oven or microwave. Regarding **glaze timing advice**, if you plan to freeze the bars, I highly recommend glazing them *after* they’ve thawed. Glaze can sometimes become sticky or change texture when frozen and thawed, so adding it fresh upon serving ensures the best look and taste.
Frequently Asked Questions
Final Thoughts
Honestly, these cake mix cookie bars are one of my all-time favorite recipes. They prove that you don’t need a million fancy ingredients or hours of your time to create something truly delicious and comforting. They’re the perfect example of how a little kitchen magic can turn a simple cake mix into a show-stopping treat. Whether you need a quick dessert for unexpected company, a treat for a bake sale, or just a little something to brighten your afternoon, these bars deliver. They’re wonderfully chewy, packed with flavor, and so satisfying. I hope you love making them as much as my family and I love devouring them! If you give them a try, I’d be absolutely thrilled to hear how they turn out for you, and I especially love hearing about any fun variations you come up with. Please feel free to leave a comment below and share your experience, or even rate the recipe! Happy baking, and may your cookie bar adventures be delicious!
Cake Mix Cookie Bars
Ingredients
Main Ingredients
- 1 box Cake mix
- 0.5 cup Vegetable oil
- 2 large Eggs
- 1 cup Chocolate chips
Instructions
Preparation Steps
- Preheat oven to 350°F (175°C). Grease and flour a 9x13 inch baking pan.
- In a large bowl, combine cake mix, oil, and eggs. Mix until well combined.
- Stir in chocolate chips.
- Spread batter evenly in the prepared pan.
- Bake for 20-25 minutes, or until a toothpick inserted into the center comes out clean.
- Let cool completely before cutting into bars.


