
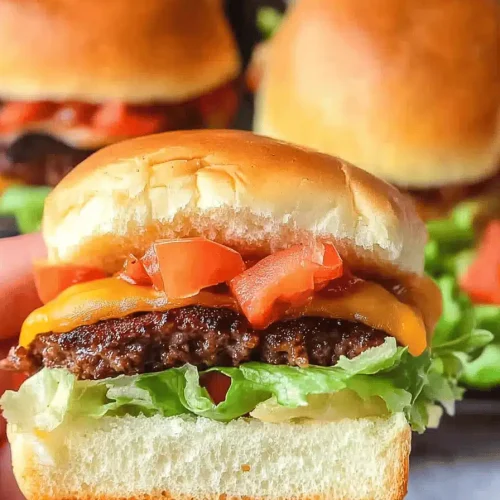
Oh, these cheeseburger sliders! Honestly, if I could only pick one appetizer to bring to a potluck for the rest of my life, it would probably be these. They’re just… perfect. There’s something so wonderfully satisfying about taking a classic, beloved comfort food like a cheeseburger and shrinking it down into these adorable, bite-sized parcels of joy. They remind me so much of game nights at our old house, piled high on a platter, or those impromptu weeknight dinners when the kids *really* wanted something fun but I didn’t have much time. They’re like a mini party in your mouth, and trust me, they disappear faster than you can say “more, please!” Forget those fancy, complicated appetizers; these cheeseburger sliders are the real deal for a reason. If you love a good burger, you’re going to adore these little guys. They’re truly a lifesaver!
What Are Cheeseburger Sliders?
So, what exactly are cheeseburger sliders? Think of them as miniature cheeseburgers, but with a few twists that make them incredibly easy to make in batches and incredibly delicious. Instead of individual patties, we’re talking about a whole layer of savory Ground Beef mixed with cheese and seasonings, all tucked into soft, fluffy slider buns. It’s like a savory casserole met a burger and they had the cutest, tastiest baby. The beauty is in their simplicity and how they deliver that quintessential cheeseburger flavor without all the fuss of forming and frying dozens of tiny patties. They’re less about the individual burger experience and more about that collective, comforting taste of a really good cheeseburger, amplified by the soft bun and the melty cheese.
Why you’ll love this recipe?
There are so many reasons why this cheeseburger slider recipe has earned a permanent spot in my recipe rotation, and I just know you’re going to feel the same way. First off, the flavor is absolutely spot on. You get that rich, savory beef, the tangy meltiness of the cheese (I’m partial to a sharp cheddar, but we’ll get to that!), all seasoned perfectly and hugged by a soft, slightly sweet bun. It’s pure comfort food magic. Then there’s the sheer simplicity. Seriously, this is one of those recipes that feels like a gourmet achievement but is actually ridiculously easy. It’s perfect for those nights when you’re pressed for time but still want to serve something special. And let’s talk budget-friendliness! Using Ground Beef and basic pantry staples makes this incredibly cost-effective, especially when you consider how many sliders you get from one batch. Plus, they are SO versatile. Serve them at a football game, a birthday party, or even just for a fun family dinner. They always impress! Honestly, what I love most is the reaction they get. Seeing people’s eyes light up when they take that first bite? Priceless. They truly stand out because they offer that classic burger satisfaction in such a fun, easy-to-eat format.
How to Make Cheeseburger Sliders
Quick Overview
Making these cheeseburger sliders is a breeze! We’ll sauté some onions, mix them with seasoned Ground Beef and plenty of cheese, then nestle that delicious mixture into slider buns, brush them with a buttery garlic topping, and bake until golden and bubbly. The whole process is surprisingly quick, making it ideal for weeknights or last-minute entertaining. You’ll be amazed at how little effort it takes to get such big flavor!
Ingredients
For the Savory Filling:
1 tablespoon olive oil
1 medium yellow onion, finely chopped
1 ½ pounds ground beef (80/20 is great for flavor!)
1 teaspoon salt, or to taste
½ teaspoon Black Pepper, or to taste
1 teaspoon garlic powder
½ teaspoon onion powder
1 teaspoon Worcestershire sauce (my secret weapon for depth!)
1 cup shredded sharp cheddar cheese (or a blend of cheddar and Monterey Jack)
½ cup shredded mozzarella cheese (for extra stretchiness)
For the Buns & Topping:
1 (12-count) package slider buns or dinner rolls
½ cup (1 stick) unsalted butter, melted
2 cloves garlic, minced
1 teaspoon dried parsley flakes
Optional: A few dashes of your favorite hot sauce mixed into the beef for a kick!
Step-by-Step Instructions
Step 1: Preheat & Prep Pan
Start by preheating your oven to 375°F (190°C). Grab a 9×13 inch baking dish. You don’t need to grease it; the buttery topping will prevent sticking.
Step 2: Sauté the Onions
Heat the olive oil in a large skillet over medium heat. Add the finely chopped onion and cook until it’s softened and translucent, about 5-7 minutes. I like them to be really soft, almost sweet, so I’m patient with this step. They add a wonderful sweetness and depth that you just can’t get raw.
Step 3: Cook the Beef
Add the ground beef to the skillet with the onions. Break it up with a spoon and cook until it’s browned. Drain off any excess grease – this is important for texture and to avoid a greasy slider. Once drained, stir in the salt, pepper, garlic powder, onion powder, and Worcestershire sauce. Give it a good mix.
Step 4: Add the Cheese
Remove the skillet from the heat. Stir in both the shredded cheddar and mozzarella cheeses. Keep stirring until the cheese is mostly melted and combined with the beef mixture. It will be gooey and delicious. If you’re adding a dash of hot sauce, now’s the time!
Step 5: Prepare the Buns
While the beef mixture is still warm, carefully slice the slider buns horizontally with a serrated knife. I usually keep them intact as one piece for each row, rather than separating them into individual halves, which makes layering easier.
Step 6: Assemble the Sliders
Spread the beef and cheese mixture evenly over the bottom halves of the slider buns in the baking dish. Make sure to get it all the way to the edges. Place the top halves of the buns gently over the filling. Don’t press down too hard just yet.
Step 7: Make the Buttery Topping
In a small bowl, whisk together the melted butter, minced garlic, and dried parsley. This is where so much of the magic happens for the crust! It makes the tops of the buns so wonderfully flavorful and golden brown.
Step 8: Brush and Bake
Generously brush the buttery garlic mixture over the tops of the slider buns. This is what gives them that irresistible, toasted flavor. Cover the baking dish tightly with aluminum foil. Bake for 15 minutes. Then, remove the foil and bake for another 5-10 minutes, or until the tops are golden brown and the cheese is bubbly and melted throughout. You want them to look irresistible!
Step 9: Rest and Serve
Let the sliders rest for about 5 minutes before slicing them into individual portions. This helps them hold their shape. Serve them warm and watch them disappear!
What to Serve It With
These cheeseburger sliders are so versatile, they really do fit in anywhere! For a relaxed breakfast or brunch, I love serving them alongside some fresh fruit salad or a simple green salad with a light vinaigrette. They’re surprisingly satisfying and feel a bit more special than just toast. For a fun brunch gathering, imagine these piled high with a little side of crispy tater tots or sweet potato fries – pure decadence! As a dessert? Well, they aren’t exactly dessert, but for a “dessert” course at a super casual gathering, they can be a savory interlude. Think of them as a “cheeseburger course” before actual dessert. And for those cozy snack times, especially on game days or movie nights, they are absolutely perfect. I’ll often pair them with my homemade dill pickle chips or a big bowl of coleslaw. My family also loves them with a side of baked beans; it’s like a mini BBQ feast right at home. Honestly, I’ve even had them at backyard BBQs where they’re served alongside grilled corn on the cob and watermelon – a perfect summer spread!
Top Tips for Perfecting Your Cheeseburger Sliders
After making these cheeseburger sliders more times than I can count, I’ve picked up a few tricks that I think really elevate them. For the onion, make sure to chop it really fine. If you have a food processor, a quick pulse can do the trick. This ensures the onion is incorporated smoothly into the beef without large, overwhelming chunks. When it comes to the ground beef, 80/20 is my go-to. The little bit of fat makes the mixture so much more flavorful and moist. If you use super lean beef, your sliders might end up a bit dry, so I always recommend that ratio. Don’t be shy with the Worcestershire sauce; it adds a depth of umami that really makes the beef taste more “beefy.” For the cheese, using a good sharp cheddar really makes a difference. It has a tanginess that cuts through the richness. I sometimes mix in a bit of Monterey Jack for extra creaminess and melt. If you’re not a fan of cheddar, a good Gruyere or even a Provolone can work, but cheddar is classic for a reason! When you’re assembling, try to spread the meat mixture as evenly as possible across the bottom buns. This ensures every slider gets a good amount of filling. And for that buttery topping? Don’t skimp! Brush it on generously, right to the edges of the buns. This creates that beautiful golden-brown crust and infuses the buns with garlicky goodness. I learned the hard way that not covering them tightly with foil initially can lead to the tops burning before the inside is heated through, so make sure that foil seals well. If your buns start browning too quickly, just tent them loosely with foil.
Storing and Reheating Tips
These sliders are best served fresh, but they do store remarkably well, which is a huge bonus! If you have any leftovers (which is rare in my house!), you can store them at room temperature for up to 2 hours. After that, I’d definitely pop them in an airtight container in the refrigerator. They’ll stay good in the fridge for about 2-3 days. The topping might soften a bit, but the flavor will still be there. For freezing, I recommend waiting to add the buttery topping until you’re ready to reheat. You can wrap the assembled, un-topped sliders tightly in plastic wrap, then in foil, and freeze them for up to 1-2 months. When you’re ready to reheat, let them thaw in the refrigerator overnight. Then, brush with the melted butter mixture and bake at 350°F (175°C) for about 15-20 minutes, or until heated through and golden. If reheating smaller portions from the fridge, you can pop them in a toaster oven or a regular oven at 350°F (175°C) for about 10 minutes, or until warm and delicious. Microwaving is an option too, but they can sometimes get a bit soft, so I usually opt for the oven for the best texture.
Frequently Asked Questions
Final Thoughts
So there you have it – my go-to recipe for the most delightful cheeseburger sliders. They’re a testament to how simple ingredients, treated with a little love, can create something truly spectacular. I hope you give these a try, especially if you’re looking for a crowd-pleasing dish that’s as fun to make as it is to eat. They truly bring a smile to everyone’s face, and that’s what cooking is all about for me. If you love these, you might also enjoy my recipe for Mini Meatball Subs or our family-favorite Buffalo Chicken Dip – they’re all winners when it comes to easy entertaining! I can’t wait to hear how yours turn out, or if you’ve discovered your own favorite slider variations. Please leave a comment below and share your thoughts, or even a star rating if you enjoyed them!
Cheeseburger Sliders
Ingredients
Main Ingredients
- 1.5 pound Ground beef
- 0.5 teaspoon Salt
- 0.25 teaspoon Black pepper
- 1 tablespoon Olive oil
- 12 slider buns Slider buns
- 12 slices Cheddar cheese
- 0.5 cup Ketchup
- 0.25 cup Mustard
- 0.25 cup Pickle slices
Instructions
Preparation Steps
- In a bowl, combine ground beef, salt, and pepper. Mix gently.
- Heat olive oil in a skillet over medium heat.
- Form the beef mixture into 12 small patties.
- Cook patties for 3-4 minutes per side, or until cooked through.
- Place a slice of cheese on each patty during the last minute of cooking.
- Toast the slider buns.
- Assemble the sliders with ketchup, mustard, pickles, and the cheeseburger patties.


