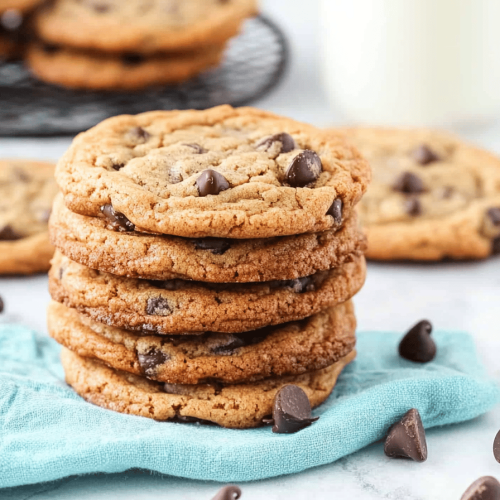
There are some recipes that just feel like a warm hug, aren’t there? This Chocolate Chip Cookie recipe is one of those for me. It’s the kind of cookie that transports you straight back to your grandma’s kitchen, or that feeling of pure bliss when you pull a perfectly baked batch out of the oven. I’ve tried SO many chocolate chip cookie recipes over the years, from the super thin and crispy ones to the cakey giants, but this one… this one is the ultimate. It strikes that perfect balance: wonderfully chewy in the middle, slightly crisp on the edges, and bursting with chocolatey goodness in every single bite. My family devours them so fast, I often have to double the batch! It’s honestly my go-to whenever I need a little pick-me-up, a sweet treat to share, or even just a distraction from a crazy busy day. You know, those days where you just need something reliable and utterly delicious? This is it. Forget those complicated recipes that call for chilling dough for days or using obscure ingredients; this is the real deal, and it’s surprisingly simple.
What are chocolate chip cookies?
So, what exactly makes this particular Chocolate Chip cookie recipe so special? Think of it as the goldilocks of cookies: not too thin, not too thick, just right. It’s essentially a classic chocolate chip cookie, but with a few little tweaks that, trust me, make all the difference. The name is simple because the cookie is honest. It’s the kind of cookie you dream about when you’re craving something sweet after dinner or need a little boost during an afternoon slump. It’s not trying to be fancy or avant-garde; it’s just pure, unadulterated cookie perfection. It’s the kind of recipe that doesn’t intimidate you when you look at the ingredients list or the steps. It’s the perfect vehicle for your favorite chocolate chips (and I have strong opinions on those, which I’ll get to later!).
Why you’ll love this recipe?
There are so many reasons why this recipe has earned a permanent spot in my recipe binder – and why I know it will in yours too! First and foremost, the flavor is just out of this world. The combination of brown sugar and granulated sugar gives them that perfect caramel-y depth, while good quality vanilla extract really makes the chocolate sing. And the texture! Oh my goodness, the texture. They’re gloriously chewy in the center with those delightful little crispy edges that give you the best of both worlds. They’re also surprisingly easy to whip up, which is a lifesaver on busy weeknights. Seriously, you can have warm cookies ready in under an hour from start to finish. And talk about cost-effective! The ingredients are all pantry staples, making this a budget-friendly indulgence that feels incredibly decadent. They’re also wonderfully versatile. While I adore them plain, you can totally switch up the chocolate chips, add nuts, or even sprinkle them with a little sea salt on top for an extra pop of flavor. What I love most about this recipe is its reliability. It’s the one I turn to when I know I need a guaranteed win, whether it’s for a bake sale, a potluck, or just because the cookie craving hits HARD. If you’ve ever made my What are some other cookie recipes?What are some of the best chocolate chip cookies?
How to Make These Chocolate Chip Cookies
Quick Overview
The beauty of this recipe lies in its straightforward approach. We’ll cream our butter and sugars, add our eggs and vanilla, then gently mix in the dry ingredients. The magic happens with the chocolate chips and a quick bake to golden perfection. It’s a simple, no-fuss process that delivers phenomenal results every time. You really can’t mess this up, and that’s part of why I love it so much!
Ingredients
For the Cookie Dough:
We start with good quality unsalted butter, softened to room temperature. This is crucial for proper creaming. You’ll need about 1 cup (2 sticks). Make sure it’s not melted, just soft enough that your finger leaves an indentation easily. For the sugars, we’re using a mix of granulated sugar and packed light brown sugar. The brown sugar is key for that lovely chewiness and a hint of caramel flavor. I usually go for 3/4 cup granulated and 1 cup packed light brown sugar. Always pack your brown sugar into the measuring cup firmly! Then comes the eggs – two large ones, at room temperature. This helps them emulsify better with the butter and sugar. And for that unmistakable cookie aroma and flavor, a generous 2 teaspoons of pure vanilla extract. Don’t skimp on this! For the dry ingredients, we’ll whisk together 2 1/4 cups of all-purpose flour, 1 teaspoon of baking soda (this is what gives them their lift and spread), and 1/2 teaspoon of salt to balance the sweetness. And of course, the star of the show: chocolate chips! I’m partial to a mix of semi-sweet and dark chocolate chips, about 1.5 to 2 cups total. But feel free to use milk chocolate, chunks, or even White Chocolate!
Step-by-Step Instructions
Step 1: Preheat & Prep Pan
First things first, let’s get our oven preheating to 375 degrees Fahrenheit (190 degrees Celsius). This ensures it’s nice and hot when your Cookie Dough is ready to go. Then, line your baking sheets with parchment paper. This is a lifesaver for easy cleanup and ensures your cookies don’t stick. You can also use silicone baking mats if you have them.
Step 2: Mix Dry Ingredients
In a medium bowl, whisk together your all-purpose flour, baking soda, and salt. Give it a good whisk until everything is evenly combined. This step is important because it ensures the leavening agents and salt are distributed evenly throughout the dough, which prevents pockets of saltiness or uneven rising.
Step 3: Mix Wet Ingredients
In a large bowl, using an electric mixer (handheld or stand mixer with paddle attachment), cream together the softened butter, granulated sugar, and packed light Brown Sugar until light and fluffy. This usually takes about 2-3 minutes. You’ll see the mixture become paler in color and increase in volume. Next, beat in the eggs, one at a time, making sure to scrape down the sides of the bowl after each addition. Then, stir in the vanilla extract.
Step 4: Combine
Gradually add the dry ingredients to the wet ingredients, mixing on low speed just until combined. Be careful not to overmix here! Overmixing develops the gluten in the flour too much, which can lead to tough cookies. Stop mixing as soon as you no longer see streaks of flour. It’s okay if there are a few tiny lumps. Just gently fold in your chocolate chips with a spatula or wooden spoon until they’re evenly distributed.
Step 5: Prepare Filling
This step is usually for more involved recipes, but for these classic chocolate chip cookies, the “filling” is simply the magnificent chocolate chips we just folded in!
Step 6: Layer & Swirl
No layering or swirling needed for these classic beauties. We’re going for that perfect chocolate chip cookie look!
Step 7: Bake
Drop rounded tablespoons of dough onto your prepared baking sheets, leaving about 2 inches of space between each cookie to allow for spreading. I like to use a cookie scoop for uniform size. Bake for 9-11 minutes, or until the edges are golden brown and the centers still look slightly soft and underbaked. They will continue to set up as they cool. Ovens can vary, so keep an eye on them, especially the first time you make them!
Step 8: Cool & Glaze
Once baked, let the cookies cool on the baking sheets for about 5 minutes. This is crucial for them to firm up. Then, carefully transfer them to a wire rack to cool completely. For these cookies, there’s no glaze needed, but if you wanted to get fancy, a drizzle of melted chocolate or a simple dusting of powdered sugar could be lovely!
Step 9: Slice & Serve
These are best served warm, with a tall glass of milk, of course! You can slice them right off the wire rack, or let them cool completely for easier handling.
What to Serve It With
These chocolate chip cookies are pretty much perfect on their own, but here are some of my favorite ways to enjoy them! For a perfect breakfast treat, I love having one (or two!) with a hot cup of coffee. The richness of the cookie complements the bold flavor of the coffee so well. For a more elevated brunch situation, I’ll plate a couple alongside some fresh fruit salad and maybe even a little yogurt parfait. They add a touch of sweetness and fun to the spread. As a dessert, they’re classic. Serve them warm with a scoop of vanilla bean ice cream for a truly indulgent experience. The contrast of the warm cookie and cold ice cream is just divine. And for those cozy snack times? That’s when they truly shine. I’ll grab one (or three) with a glass of cold milk while I’m curled up with a good book. It’s pure comfort. My family also has a tradition of making a batch on the first snow day of the year – it just feels like the ultimate cozy indulgence.
Top Tips for Perfecting Your Chocolate Chip Cookies
I’ve learned a thing or two about making chocolate chip cookies over the years, so here are my tried-and-true tips to help you achieve cookie perfection. When it comes to the butter, I always stress that it needs to be softened, not melted. If it’s melted, your cookies will spread too much and won’t have that nice chewy center. For the sugars, don’t skip the brown sugar! It’s non-negotiable for that signature chewiness and moistness. I also learned early on that using room temperature eggs is a game-changer for the texture. They incorporate so much better into the batter. When you’re mixing the dry and wet ingredients, my biggest piece of advice is: DO NOT OVERMIX. As soon as you don’t see dry flour, stop. Overmixing is the culprit behind tough cookies. For the chocolate chips, I really do love a mix of different types – it adds complexity to the flavor. Feel free to experiment with chunks, mini chips, or even chopped-up chocolate bars. For baking, ovens can be tricky! I’ve found that lining my baking sheets with parchment paper is essential for even baking and easy cleanup. Also, pay attention to the doneness cues: slightly soft centers are what you’re aiming for, as they’ll continue to bake on the hot pan after you pull them out. If you’re ever unsure if they’re done, a quick test is to gently press the center of a cookie; if it springs back slightly, they’re ready. If you’re looking to make these ahead, you can totally freeze the dough balls! Just scoop them onto a lined baking sheet, freeze until firm, then transfer to a freezer-safe bag. Bake from frozen, adding a minute or two to the baking time. And a little secret? A tiny pinch of flaky sea salt sprinkled on top of the cookies right after they come out of the oven elevates the chocolate flavor like you wouldn’t believe!
Storing and Reheating Tips
Proper storage is key to keeping these delicious cookies tasting fresh. At room temperature, they’ll stay wonderfully chewy for about 3-4 days if stored in an airtight container. Make sure they’ve cooled completely before storing, otherwise, they can get a bit soggy. If you happen to have any leftovers (which is rare in my house!), you can refrigerate them for up to a week. They might firm up a bit in the fridge, but they’re still delicious. To reheat, you can pop them in a warm oven (around 300°F or 150°C) for a few minutes until they’re warm and gooey again. For longer storage, freezing is your best friend. You can freeze the baked cookies in a single layer on a baking sheet until they’re solid, then transfer them to a freezer-safe bag or container for up to 3 months. Thaw them at room temperature. If you freeze the dough balls, as I mentioned earlier, you can bake them straight from frozen. I usually avoid glazing these cookies for storage, as glazes can become sticky or melt over time. It’s best to glaze them just before serving if you choose to do so.
Frequently Asked Questions
Final Thoughts
Honestly, there’s nothing quite like the joy of biting into a warm, perfectly chewy chocolate chip cookie. This recipe has become my absolute favorite because it’s just so reliably wonderful. It’s the kind of recipe that makes you feel like a baking pro, even if you’re a complete beginner. The balance of flavors, the irresistible texture, and the sheer happiness it brings to my family – it’s why I keep coming back to it again and again. If you’re a fan of classic cookies, I think you’ll adore this one. For those of you who love a good baking project, you might also enjoy my other cookie recipes or my favorite cake recipes. I truly hope you give this chocolate chip cookie recipe a try. I can’t wait to hear what you think, and I’d love to see your creations! Happy baking, and may your cookie jars always be full!
Chocolate Chip Cookies
Ingredients
Main Ingredients
- 2.25 cups All-purpose flour
- 1 teaspoon Baking soda
- 1 teaspoon Salt
- 1 cup Unsalted butter softened
- 0.75 cup Granulated sugar
- 0.75 cup Brown sugar packed
- 1 teaspoon Vanilla extract
- 2 Large eggs
- 2 cups Chocolate chips
Instructions
Preparation Steps
- Preheat oven to 375°F (190°C). Line baking sheets with parchment paper.
- In a bowl, whisk together flour, baking soda, and salt.
- In a separate bowl, cream together butter, granulated sugar, and brown sugar until light and fluffy.
- Beat in vanilla extract and eggs one at a time.
- Gradually add the dry ingredients to the wet ingredients, mixing until just combined.
- Stir in chocolate chips.
- Drop by rounded tablespoons onto prepared baking sheets.
- Bake for 9-11 minutes, or until golden brown.
- Let cool on baking sheets for a few minutes before transferring to a wire rack to cool completely.