Oh, where do I even begin with this chocolate chip dessert pizza? It feels like just yesterday I was a kid, sneaking cookies from the jar and wishing I could have one giant, glorious cookie for dessert. Well, folks, this is pretty darn close! It’s the stuff childhood dreams are made of, but made with grown-up taste buds in mind. Honestly, when I first tried a version of this, I was skeptical. A pizza… for dessert? But one bite, and I was hooked. It’s got that perfect balance of sweet, gooey, and slightly chewy that just sings. If you love Chocolate Chip Cookies, you are going to absolutely adore this. It’s my go-to when I need a showstopper that’s surprisingly simple, or honestly, just when I have a serious craving that only a massive chocolatey treat can fix. It’s like a giant, shareable, warm chocolate chip cookie that you can slice into wedges. What’s not to love, right?

What is a chocolate chip dessert pizza?
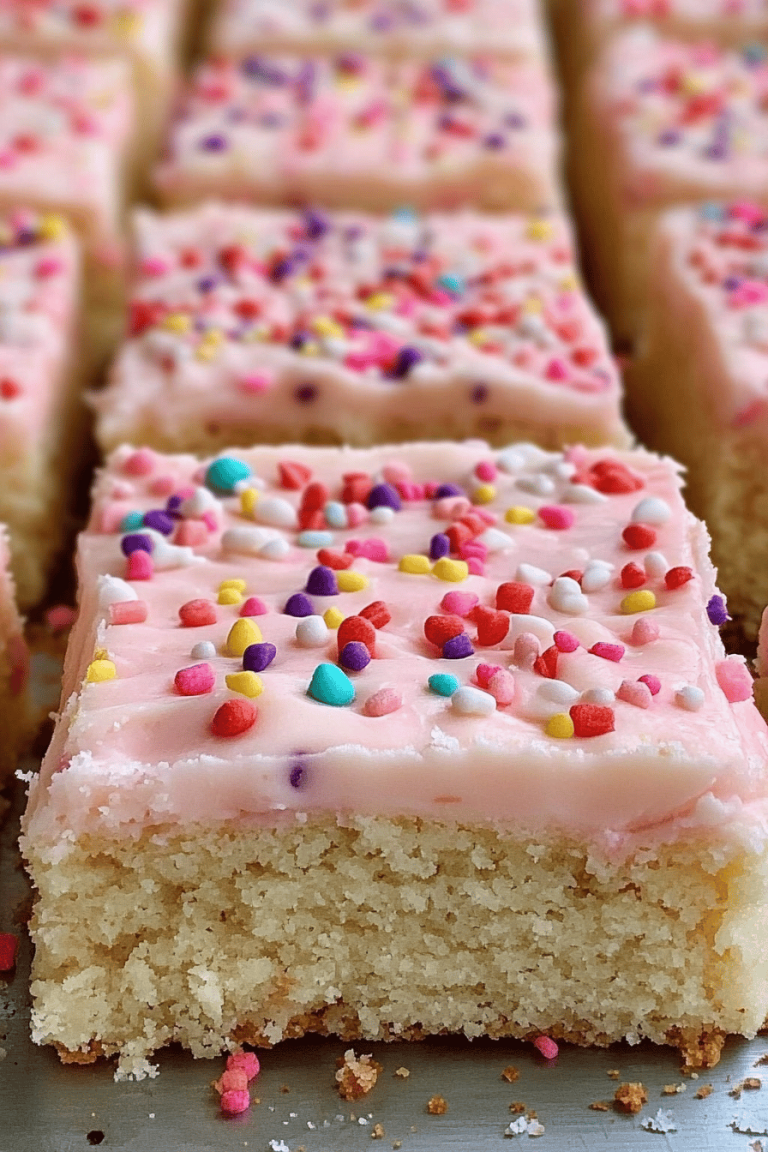
So, what exactly is this magical creation we’re talking about? Think of it as the best of both worlds: the comforting, familiar flavors of a classic Chocolate Chip Cookie, baked into a convenient, sliceable pizza format. It’s not a savory pizza with sweet toppings; it’s a sweet treat from crust to topping. We’re talking about a soft, slightly chewy cookie base, generously studded with pockets of melted chocolate chips, and often finished with a light, sweet glaze or frosting that just ties it all together. It’s essentially a giant, shareable, warm chocolate chip cookie, but structured like a pizza, making it super fun and easy to serve. It’s the kind of dessert that brings smiles to faces, from the youngest family members to the oldest. It’s pure joy in every slice!
Why you’ll love this recipe?
I know you’re going to love this Chocolate Chip dessert pizza. I’m not kidding. I’m obsessed. I’m obsessed. Iflavor is out of this world. We’re talking about rich, buttery cookie dough, loaded with plenty of semi-sweet chocolate chips that get all melty and gooey when baked. That first bite, with the warm chocolate oozing out and the tender cookie base, is pure bliss. It’s decadent without being overly rich, which is a tough balance to strike! And let’s talk about simplicity. I’ve made plenty of elaborate desserts that look amazing but take hours. This one is a lifesaver. The batter comes together in minutes, and before you know it, you’ve got this incredible dessert ready to go. It’s perfect for those busy weeknights when you need something sweet but don’t have a lot of time, or for last-minute get-togethers. Plus, it’s so cost-efficient. Most of the ingredients are pantry staples, so you likely have everything you need on hand right now. You don’t need fancy or expensiveversatility! I’ll get to more ideas later, but you can customize it so easily. Add different kinds of chips, a swirl of caramel, a sprinkle of sea salt – the possibilities are endless! What I love most about this recipe, though, is the reaction it gets. It’s always a crowd-pleaser, and seeing everyone’s eyes light up when it comes out of the oven never gets old. It’s way more fun than a regular cookie, and it feels more special than a store-bought cake, but it’s just as easy as making a batch of cookies from scratch. It’s truly the best of all worlds.
How to Make Chocolate Chip Dessert Pizza
Quick Overview
Making this Chocolate Chip dessert pizza is surprisingly straightforward. You’ll mix up a simple cookie dough batter, spread it into a round pan, swirl in some extra goodies if you like, and bake it until it’s golden and delicious. Then, a quick glaze or frosting and it’s ready to slice and enjoy! The whole process, from start to finish, takes less time than you’d expect for such a show-stopping dessert. It’s all about simple steps that yield incredibly delicious results.
Ingredients
For the Main Batter:
You’ll need softened unsalted butter – about a cup, or two sticks. Make sure it’s truly softened, not melted, for the best texture. Then, we’ll use a mix of granulated sugar and light Brown Sugar for that classic cookie flavor and perfect chewiness. I usually go for about 3/4 cup granulated and 1/2 cup packed light brown sugar. For richness and binding, grab one large egg and a teaspoon of pure vanilla extract – don’t skimp on the vanilla, it makes a huge difference! All-purpose flour is our base, about 2 and 1/4 cups. A teaspoon of baking soda for leavening, and half a teaspoon of salt to balance the sweetness. And of course, the star of the show: about 2 cups of your favorite chocolate chips. I love semi-sweet, but a mix of dark and milk chocolate is divine!
For the Filling:
This is where you can have some fun! I often reserve about 1/2 cup of extra chocolate chips to press into the top before baking, or even stir in some chopped nuts like walnuts or pecans if you’re feeling it. Some people love to dollop small spoonfuls of chocolate or peanut butter and swirl them in, but for this basic recipe, just extra chocolate chips are fantastic. You can also add a sprinkle of flaky sea salt over the top after baking, which really makes the chocolate pop!
For the Glaze:
A simple glaze really elevates this dessert pizza. You’ll need about 1 cup of powdered sugar. Then, a few tablespoons of milk or cream (heavy cream makes it extra rich!). Start with 2-3 tablespoons and add more only if needed to reach your desired drizzling consistency. A tiny splash of vanilla extract in the glaze is lovely too. If you want a chocolate glaze, you can melt some chocolate chips with a touch of butter or coconut oil.
Step-by-Step Instructions
Step 1: Preheat & Prep Pan
First things first, let’s get that oven preheating to 375 degrees Fahrenheit (190 degrees Celsius). While it’s warming up, grab your 9 or 10-inch round pizza pan or a springform pan. I like to grease it really well with butter or non-stick cooking spray, and then I often line the bottom with a circle of parchment paper. This just ensures your beautiful dessert pizza slides out like a dream. You can even sprinkle a little flour or cocoa powder on the greased surface if you’re worried about sticking.
Step 2: Mix Dry Ingredients
In a medium-sized bowl, whisk together your all-purpose flour, baking soda, and salt. Giving them a good whisk ensures that the baking soda and salt are evenly distributed, so you don’t get any weird salty or dense spots in your pizza. Just a quick, thorough mix is all you need here.
Step 3: Mix Wet Ingredients
Now, in a larger bowl, cream together your softened butter, granulated sugar, and light brown sugar. You want to beat this until it’s light and fluffy, which usually takes a couple of minutes with an electric mixer, or a bit longer if you’re doing it by hand. Then, beat in your egg and vanilla extract until everything is well combined and smooth. This is the base of that glorious cookie flavor!
Step 4: Combine
Gradually add the dry ingredients to the wet ingredients, mixing on low speed (or by hand) until just combined. Be careful not to overmix! Overmixing can make your dessert pizza tough. Stop as soon as you don’t see any streaks of flour. Then, gently fold in about 1 and 1/2 cups of your chocolate chips. Save the rest for pressing into the top later!
Step 5: Prepare Filling
If you’re using extra chocolate chips for topping, just have them ready. If you’re doing a swirl, like caramel or a different kind of chocolate sauce, make sure it’s at a consistency that can be swirled easily. For this basic recipe, just make sure those extra chocolate chips are handy!
Step 6: Layer & Swirl
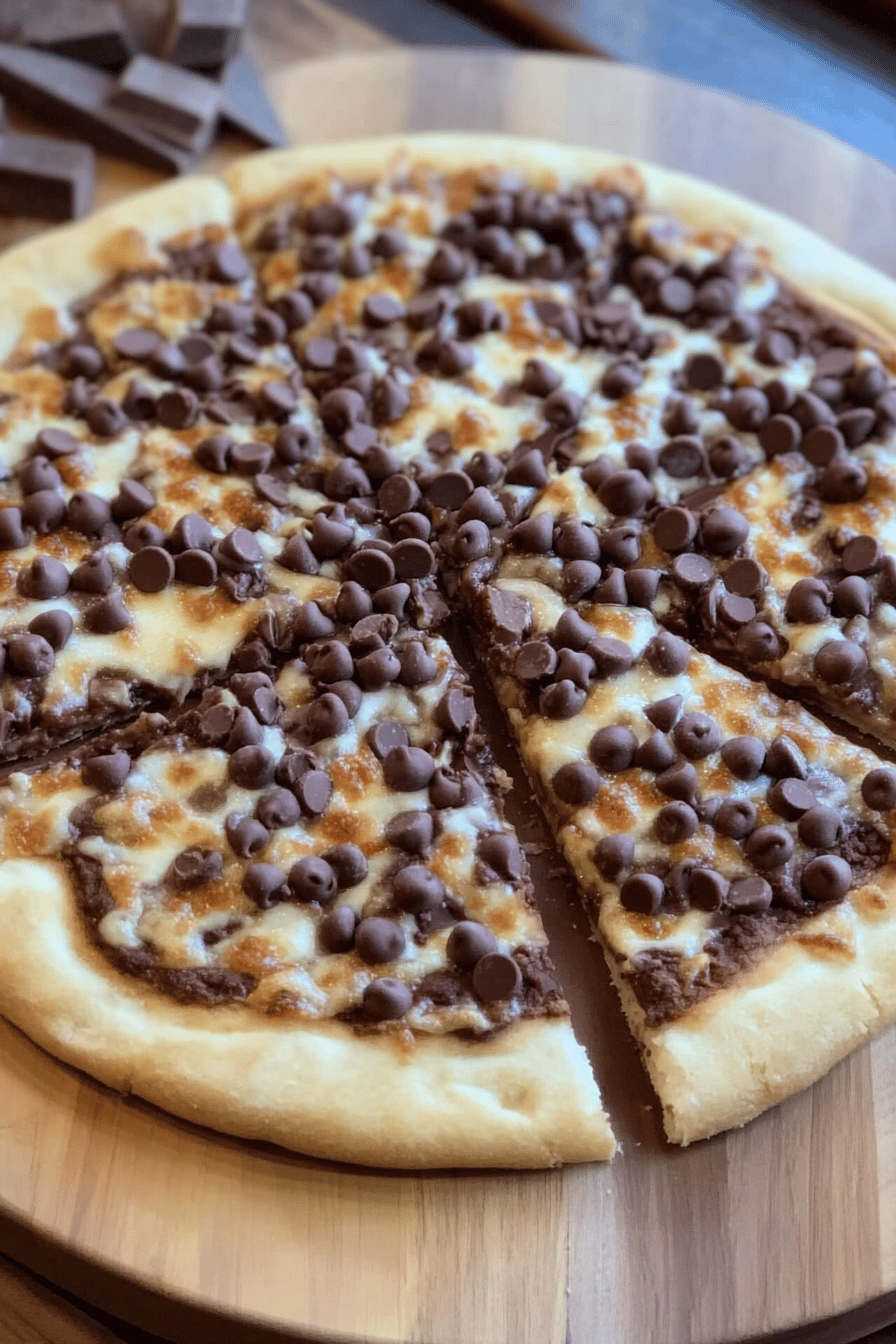
Spoon the cookie dough batter into your prepared pizza pan. Use a spatula or your hands (lightly greased or floured) to gently press and spread the dough evenly across the bottom of the pan, forming a pizza crust shape. It doesn’t have to be perfectly round, a rustic look is charming! If you want to swirl in anything extra, now’s the time to dollop it on and gently swirl with a knife. Then, press those remaining chocolate chips and any other toppings you like onto the surface of the dough.
Step 7: Bake
Pop that pizza into your preheated oven. Bake for about 18-25 minutes. The baking time can vary depending on your oven, so keep an eye on it. You’re looking for the edges to be golden brown and the center to be set but still slightly soft. It shouldn’t look raw in the middle. A toothpick inserted near the center should come out with moist crumbs, not wet batter.
Step 8: Cool & Glaze
Once it’s baked to perfection, carefully remove the pizza from the oven and let it cool in the pan on a wire rack for about 10-15 minutes. This is crucial! It needs a little time to firm up. While it’s cooling, whisk together your powdered sugar, milk (or cream), and vanilla for the glaze until smooth. You want it thick enough to drizzle but thin enough to spread. Once the pizza has cooled slightly, drizzle the glaze all over the top. Don’t worry about making it perfect; a rustic drizzle is part of its charm!
Step 9: Slice & Serve
Let the glaze set for a few minutes, and then you can carefully remove it from the pan (if using a springform) or cut it right in the pizza pan. Slice it up into wedges like you would a regular pizza, or use cookie cutters for fun shapes! Serve it warm – that’s when the chocolate is extra melty and gooey. Enjoy!
What to Serve It With
This chocolate chip dessert pizza is so versatile, it’s not just for after dinner! I love serving it in different ways depending on the occasion. For breakfast, especially on a weekend, a warm slice with a good cup of coffee is pure indulgence. It feels like a special treat to start the day. My kids absolutely love it this way, calling it their “special breakfast pizza.” For brunch, I’ll often present it on a nice platter, maybe with a dollop of whipped cream or a side of fresh berries to cut through the sweetness. It looks so impressive and always gets rave reviews. As a more formal dessert, I might serve it with a scoop of vanilla bean ice cream, or a drizzle of raspberry sauce. The contrast of the warm pizza and cold ice cream is divine! And for those cozy, late-night snacks when you just need something comforting, a small warm slice with a glass of cold milk is absolutely perfect. It’s the ultimate comfort food. I’ve even served it with a drizzle of salted caramel sauce, which my husband raves about. Trust me, no matter how you serve it, it’s a guaranteed hit!
Top Tips for Perfecting Your Chocolate Chip Dessert Pizza
I’ve made this chocolate chip dessert pizza more times than I can count, and over the years, I’ve picked up a few tricks that really help ensure it turns out perfectly every single time. For instance, when it comes to the butter for the batter, softened butter is key. If it’s too cold, you won’t get that light, fluffy creaming stage, and if it’s melted, your cookies will spread too much and be greasy. Just leave it on the counter for about an hour before you start. When you’re mixing the dough, really heed the “just combined” advice. I know it’s tempting to keep mixing when you’re not sure, but overmixing develops the gluten in the flour, leading to a tougher, less tender dessert pizza. Stop when you barely see any dry flour. For the swirl customization, if you’re adding things like caramel or a peanut butter mixture, don’t go too heavy or it can make the center underbaked. A little goes a long way. I’ve learned that pressing extra chocolate chips into the surface right before baking gives you those gorgeous, melty pockets that everyone loves. When it comes to baking, ovens can be tricky! If your oven tends to run hot, consider reducing the temperature by about 10-15 degrees Fahrenheit or shortening the bake time slightly. The best indicator of doneness is usually the edges being golden brown and the center looking set. I’ve also found that using a pizza pan with a slightly raised edge helps contain the dough and makes it easier to slice. For the glaze, it’s all about consistency. Start with less liquid and add more a teaspoon at a time until it’s perfect for drizzling. Too thin and it runs off; too thick and it’s hard to spread. If you make it too thin, don’t panic – just whisk in a bit more powdered sugar! And a little pro tip from my kitchen to yours: a sprinkle of flaky sea salt over the chocolate chips before baking or over the glaze after it sets? Absolutely magical. It balances the sweetness and makes the chocolate flavor sing. I also sometimes use a mix of different chocolate chips – semi-sweet, milk, and dark – for a more complex chocolate flavor. Don’t be afraid to experiment a little!
Storing and Reheating Tips
This chocolate chip dessert pizza is best enjoyed fresh and warm, but it does store reasonably well. If you happen to have any leftovers (which is rare in my house!), you can store it at room temperature for up to two days, as long as it’s covered tightly. I usually use plastic wrap or a cake dome to keep it fresh. If it’s particularly warm in your kitchen, or if you’ve added any dairy-based glaze, I’d recommend popping it in the refrigerator. In the fridge, it will keep well for about 3-4 days. Store it in an airtight container or wrap it well. When you’re ready to enjoy leftovers from the fridge, the best way to reheat it is gently in the oven or a toaster oven at around 300 degrees Fahrenheit for about 5-10 minutes, just until warmed through and the chocolate is melty again. You can also microwave it for short bursts, but be careful not to overheat it, as it can become tough. If you want to freeze portions for later, I recommend slicing it into individual wedges first. Wrap each slice tightly in plastic wrap, then in aluminum foil or place them in a freezer-safe bag. It should keep well in the freezer for up to 2-3 months. To thaw, let it sit at room temperature for a bit or reheat as described above. For the glaze timing, if you know you’ll be storing leftovers, it’s often best to apply the glaze *after* reheating, or to glaze only the slices you plan to eat immediately. This helps prevent the glaze from getting sticky or gummy during storage, especially if you’re refrigerating or freezing.
Frequently Asked Questions
Final Thoughts
There you have it – my absolute favorite chocolate chip dessert pizza recipe! It’s more than just a dessert; it’s a memory maker, a way to bring joy to any occasion, and honestly, just a super delicious treat that’s incredibly easy to make. I love that it looks impressive but is so forgiving for home bakers of all levels. Whether you’re serving it at a party, for a family movie night, or just because you’re craving something sweet, this pizza never disappoints. It’s got that wonderful balance of tender cookie base and gooey, melty chocolate that just makes you happy. If you enjoy this recipe, you might also love my Classic Chocolate Chip Cookie Bars or my Easy No-Bake Brownies. They’re in a similar vein of comforting, crowd-pleasing sweets! I really hope you give this chocolate chip dessert pizza a try. It’s become a cherished recipe in my home, and I have a feeling it might just become one in yours too. I can’t wait to hear how yours turns out! Let me know in the comments if you tried it and what your favorite variations are. Happy baking!

Chocolate Chip Dessert Pizza
Ingredients
Main Ingredients
- 1 package pizza dough
- 0.5 cup butter melted
- 0.75 cup brown sugar packed
- 1 teaspoon vanilla extract
- 1 cup chocolate chips
Instructions
Preparation Steps
- Preheat oven to 375°F (190°C). Roll out pizza dough.
- Brush dough with melted butter and sprinkle with brown sugar.
- Bake for 12-15 minutes, or until crust is golden brown.
- Remove from oven and sprinkle with chocolate chips.
- Drizzle with vanilla extract.