Oh, these peanut butter cookies! If there’s one recipe that brings me straight back to my childhood kitchen, it’s this one. My Grandma Eleanor used to make these every Saturday, and the house would just fill with the most incredible aroma. It wasn’t just the sweet, nutty scent; it was the promise of a warm, slightly chewy cookie that would melt in your mouth. We’d hover around the cooling rack like little vultures, and she’d always sneak us a still-warm one (or two!). They’re different from those super-crispy, thin peanut butter cookies you sometimes find, and definitely not like a fancy bakery cookie. These are home. These are comfort. These are, quite honestly, the best peanut butter cookies I’ve ever had. If you’ve ever tried to make your own peanut butter cookies and ended up with something… less than stellar, trust me, this is the one. It’s the perfect balance of soft, chewy, and ridiculously peanut buttery.
What are the best peanut butter cookies?
So, what exactly makes these “the best ever”? Think of them as the ultimate upgrade to your classic peanut butter cookie. They’re not too thin, not too thick. They have that satisfying chew in the center, a little bit of crispness around the edges, and an intense, unadulterated peanut butter flavor that will make your taste buds sing. They’re made with simple, everyday ingredients you probably already have in your pantry. The “secret” isn’t some exotic spice or complicated technique; it’s really about the balance of fats, sugars, and that crucial peanut butter-to-flour ratio. They’re the kind of cookies that make you feel like you’ve accomplished something truly special, even if you’re just whipping them up on a Tuesday afternoon because a craving hit. They’re essentially happiness in cookie form, with that iconic criss-cross pattern on top that just screams “peanut butter cookie!”
Why you’ll love this recipe?
Honestly, where do I even begin? First off, the flavor is absolutely unreal. It’s pure, unadulterated peanut butter bliss. Not too sweet, not too bland, just a perfect symphony of nutty goodness that coats your tongue. And the texture? Oh my gosh. They’re wonderfully soft and chewy in the middle, with just the slightest hint of crispness on the edges. It’s that perfect bite that makes you want to immediately reach for another. What I love most about this recipe, though, is its sheer simplicity. You don’t need any fancy equipment or hard-to-find ingredients. Everything is pretty standard, which means you can likely whip these up without even needing a trip to the grocery store. They’re surprisingly forgiving, too! I’ve definitely had my share of baking mishaps over the years (don’t even get me started on the time I used salt instead of sugar in a batch of brownies!), but these Peanut Butter Cookies always turn out beautifully. Plus, they’re incredibly budget-friendly. Flour, sugar, eggs, butter, peanut butter – all pantry staples that won’t break the bank. And let’s talk versatility! While they’re divine on their own, they’re also fantastic dipped in milk, crumbled over ice cream, or even used as a base for a killer ice cream sandwich. They’re my go-to for bake sales, potlucks, or just when I need a little pick-me-up after a long day. Compared to other cookies, like your basic chocolate chip or sugar cookies, these peanut butter ones just have that extra punch of flavor and comfort that nothing else can match.
How do you make the best peanut butter cookies?
Quick Overview
This recipe is wonderfully straightforward. We’ll start by creaming our butter and sugars together until light and fluffy, then incorporate the Peanut Butter. Next, we’ll add in the eggs and vanilla. In a separate bowl, we’ll whisk together our dry ingredients. Then, we’ll gently combine the wet and dry ingredients, being careful not to overmix. After that, we’ll roll the dough into balls, press them down slightly, and give them that signature criss-cross pattern with a fork. They bake up quickly, and before you know it, you’ll have a batch of warm, gooey peanut butter cookies ready to devour. It’s truly that simple!
Ingredients
For the Cookie Dough: For the Cookie Dough: For the Cookie Dough: For the Cookie Dough: For the Cookie Dough: For
– 1 cup (2 sticks) unsalted butter, softened: Make sure your butter is truly softened, not melted. This is key for achieving that light and fluffy texture when creaming. If you forget to take it out ahead of time, you can always cut it into small cubes and let it sit for about 15-20 minutes. I always use unsalted so I can control the salt content myself, but if you only have salted, just omit the extra salt in the dry ingredients.
– 3/4 cup granulated sugar: This helps with sweetness and also contributes to that lovely crisp edge.
– 3/4 cup packed light brown sugar: The brown sugar is crucial for that chewy texture and adds a lovely caramel note. Pack it down into your measuring cup to ensure you get the right amount.
– 1 cup creamy Peanut Butter: Use your favorite creamy peanut butter! Natural peanut butter can sometimes make the cookies a bit more crumbly, so a standard commercial creamy peanut butter like Jif or Skippy tends to work best for this recipe’s texture. Make sure it’s at room temperature.
– 2 large eggs: These bind everything together and add richness. Make sure they’re at room temperature too; it helps them incorporate more smoothly into the batter.
– 1 teaspoon pure vanilla extract: Vanilla adds a depth of flavor that complements the peanut butter beautifully. Don’t skip this!
– 2 ½ cups all-purpose flour: This forms the structure of our cookies. Spoon and level your flour; don’t scoop directly from the bag as you’ll end up with too much.
– 1 teaspoon baking soda: This is our leavening agent, helping the cookies to rise just a bit and become tender.
– ½ teaspoon salt: Balances out the sweetness and enhances the peanut butter flavor. If you’re using salted peanut butter, you might want to reduce this to ¼ teaspoon or omit it entirely.
Step-by-Step Instructions
Step 1: Preheat & Prep Pan
Get your oven preheated to 375°F (190°C). This is a pretty standard baking temperature and works perfectly for these cookies. While the oven is heating up, line a couple of baking sheets with parchment paper. Parchment paper is a lifesaver here – it prevents sticking and makes cleanup a breeze. I find that using two baking sheets means one can be in the oven while you’re preparing the next batch, speeding things up considerably!
Step 2: Mix Dry Ingredients
In a medium-sized bowl, whisk together the all-purpose flour, baking soda, and salt. Whisking them together ensures that the leavening agent and salt are evenly distributed throughout the flour. This is a small step, but it’s really important for consistent cookies. You want everything to be well combined, with no pockets of baking soda or salt. I usually whisk for about 30 seconds to a minute until it looks uniform.
Step 3: Mix Wet Ingredients
In a large bowl, using an electric mixer (a stand mixer with a paddle attachment or a hand mixer), cream together the softened butter, granulated sugar, and packed light brown sugar. Beat this on medium-high speed for about 2-3 minutes, until it’s light, fluffy, and pale in color. This step incorporates air into the dough, which is vital for a tender cookie. Then, add in the creamy peanut butter and mix until well combined. Scrape down the sides of the bowl as needed. Next, add the eggs, one at a time, beating well after each addition. Finally, stir in the vanilla extract. Make sure everything is thoroughly combined.
Step 4: Combine
Gradually add the dry ingredients to the wet ingredients, mixing on low speed until just combined. Be careful not to overmix here! Overmixing can develop the gluten in the flour too much, resulting in tough cookies. Stop mixing as soon as you no longer see streaks of dry flour. It’s okay if there are a few tiny lumps. I usually finish mixing by hand with a spatula to make sure I don’t overdo it.
Step 5: Prepare Filling
This step is actually done during Step 3 in this specific recipe since the peanut butter is part of the main dough. The beauty of these peanut butter cookies is that the peanut butter *is* the star and is integrated right into the dough itself, rather than being a separate filling. This ensures that peanut butter flavor permeates every single bite, which is exactly what we want!
Step 6: Layer & Swirl
Now for the fun part: shaping! Drop rounded tablespoons of dough onto the prepared baking sheets, leaving about 2 inches between each cookie to allow for spreading. I use a medium cookie scoop, which gives me nice, uniform cookies. Once the dough balls are on the sheet, take a fork and gently press down on each one, creating a criss-cross pattern. You can do this one direction, then the other, to make the classic peanut butter cookie look. If the fork sticks, dip it in a little sugar or run it under hot water briefly. This pressing not only creates the iconic look but also helps the cookies bake evenly.
Step 7: Bake
Bake for 9-11 minutes, or until the edges are lightly golden brown and the centers still look slightly soft. They will continue to set up as they cool. Ovens can vary, so start checking them around the 8-minute mark. You want them to look *just* set, not firm all the way through, for that perfect chewy texture. I usually pull them out when the centers look a tiny bit underbaked. This is key for chewy cookies!
Step 8: Cool & Glaze
Let the cookies cool on the baking sheets for 5 minutes before transferring them to a wire rack to cool completely. This allows them to firm up enough to move without falling apart. If you want a glaze, you can mix powdered sugar with a tiny bit of milk or water and a splash of vanilla until you reach your desired consistency. Drizzle it over the cooled cookies or dip them. I usually glaze them only after they’ve cooled completely, so the glaze doesn’t melt off.
Step 9: Slice & Serve
Once cooled (and glazed, if you opted for that!), your amazing peanut butter cookies are ready to be enjoyed! They are best served at room temperature. You can also enjoy them slightly warm if you can’t wait, but be careful, the glaze will be melty! Slice them in half or just take a big bite. They are perfect for dunking in a cold glass of milk.
What to Serve It With
These peanut butter cookies are so versatile, they fit into almost any occasion! For a cozy breakfast, they’re just divine alongside a strong cup of coffee or a mug of hot tea. Imagine a quiet morning, the newspaper spread out, and one of these warm, chewy cookies to start your day. They make a lovely addition to a brunch spread, perhaps alongside some fresh fruit salad or a delicate pastry. I love to serve them on a pretty platter with a few berries scattered around. As a dessert, they’re pure magic. They’re fantastic on their own, of course, but I also love to pair them with a scoop of vanilla bean ice cream for an impromptu ice cream sandwich, or even crumble them over a warm brownie. My family’s favorite dessert tradition is to have these with a glass of milk after dinner, especially on a chilly evening. For casual snacks, they are unbeatable. Whether you’re packing them for a picnic, a school lunchbox, or just enjoying one with a glass of milk on the couch while you binge-watch your favorite show, they’re always a hit. I’ve found they pair wonderfully with a glass of cold milk (obviously!), but also with a rich hot chocolate or even a sweet, fruity iced tea.
Top Tips for Perfecting Your Peanut Butter Cookies
I’ve made these peanut butter cookies more times than I can count, and over the years, I’ve picked up a few tricks that I think really elevate them from good to absolutely spectacular. First off, when it comes to the peanut butter, make sure you’re using a good quality, creamy peanut butter. While natural peanut butters are great for some things, they can sometimes make the dough too oily or crumbly. A classic, processed creamy peanut butter like Jif or Skippy is what I’ve found works best for that classic, consistent texture we’re going for. Always use softened butter, never melted. Melted butter can make cookies spread too much, resulting in a thin, crispy cookie, and we want that lovely chewy center here! Creaming the butter and sugars together until it’s light and fluffy is also non-negotiable. This step incorporates air, which is crucial for both texture and rise. Don’t rush it! For the flour, spoon it into your measuring cup and level it off with a straight edge. Scooping directly from the bag can pack in too much flour, leading to dry, dense cookies. When you combine the wet and dry ingredients, mix only until *just* combined. Seriously, stop as soon as you don’t see any dry flour. Overmixing develops gluten, which can make your cookies tough. A few little streaks of flour are fine; they’ll incorporate as the dough rests. For that iconic criss-cross pattern, make sure your fork tines are slightly greased or dipped in a bit of flour or sugar if they start sticking to the dough. It’s a small detail, but it adds so much to the classic look. If you’re ever worried about your oven’s temperature being off, an oven thermometer is a cheap but invaluable tool. I learned that lesson the hard way with some very sad, pale cookies once! And for the bake time, watch them closely. The edges should be lightly golden, but the centers should still look a little soft and underdone when you pull them out. They will continue to bake and firm up on the hot baking sheet. If you’re feeling adventurous and want to mix things up, you can add in some chocolate chips, chopped peanuts, or even a sprinkle of sea salt on top before baking. I’ve also experimented with different nut butters – almond butter is pretty good, though it changes the flavor profile slightly. My absolute favorite variation, though, is to add about half a cup of mini chocolate chips to the dough. It’s like a peanut butter and chocolate dream come true!
Storing and Reheating Tips
Proper storage is key to keeping these peanut butter cookies tasting as fresh and delicious as possible. Once they’ve completely cooled on the wire rack, you can store them at room temperature in an airtight container. They’ll stay delightfully chewy and soft for about 3-4 days if stored properly. If you plan on glazing them, I highly recommend waiting until they’ve cooled completely and you’re ready to serve or store them. Applying the glaze to warm cookies can make it melt and become a sticky mess. For longer storage, you can definitely refrigerate them. Pop them into an airtight container or a resealable bag, and they should be good for up to a week. They might lose a *tiny* bit of their chewiness in the fridge, but they’ll still be delicious. To revive them, just pop one in the microwave for about 10-15 seconds on a low power setting – it’ll be like they just came out of the oven! If you know you won’t get through them all within a week, the freezer is your best friend. You can freeze the baked and cooled cookies in a single layer on a baking sheet until solid, then transfer them to a freezer-safe bag or container. They’ll keep beautifully for up to 3 months. Thawing is simple: just let them come to room temperature for an hour or two, or pop them in the microwave for a quick refresh. I’ve also found that freezing the dough balls before baking works wonderfully. Just place them on a baking sheet, freeze until firm, then transfer to a freezer bag. You can bake them directly from frozen, adding a minute or two to the baking time. If you choose to glaze, it’s best to do that *after* thawing and reheating, so the glaze stays nice and neat.
Frequently Asked Questions
Final Thoughts
There you have it – my absolute favorite recipe for peanut butter cookies! These are more than just cookies to me; they’re little bites of nostalgia, comfort, and pure joy. They’re simple enough for a weeknight craving but special enough for any gathering. I truly believe that everyone deserves to experience a cookie this good. They’re proof that sometimes, the most classic recipes, made with a little bit of love and attention, are truly the best. If you love these peanut butter cookies, I think you might also enjoy my recipe for Classic Chocolate Chip Cookies or my Fudgy Brownies. They all share that same homemade goodness. Give these peanut butter cookies a try, and I promise, your kitchen will smell amazing, and your taste buds will thank you. I can’t wait to hear what you think, and I’d absolutely love it if you shared your own tips or any delicious variations you come up with in the comments below! Happy baking!
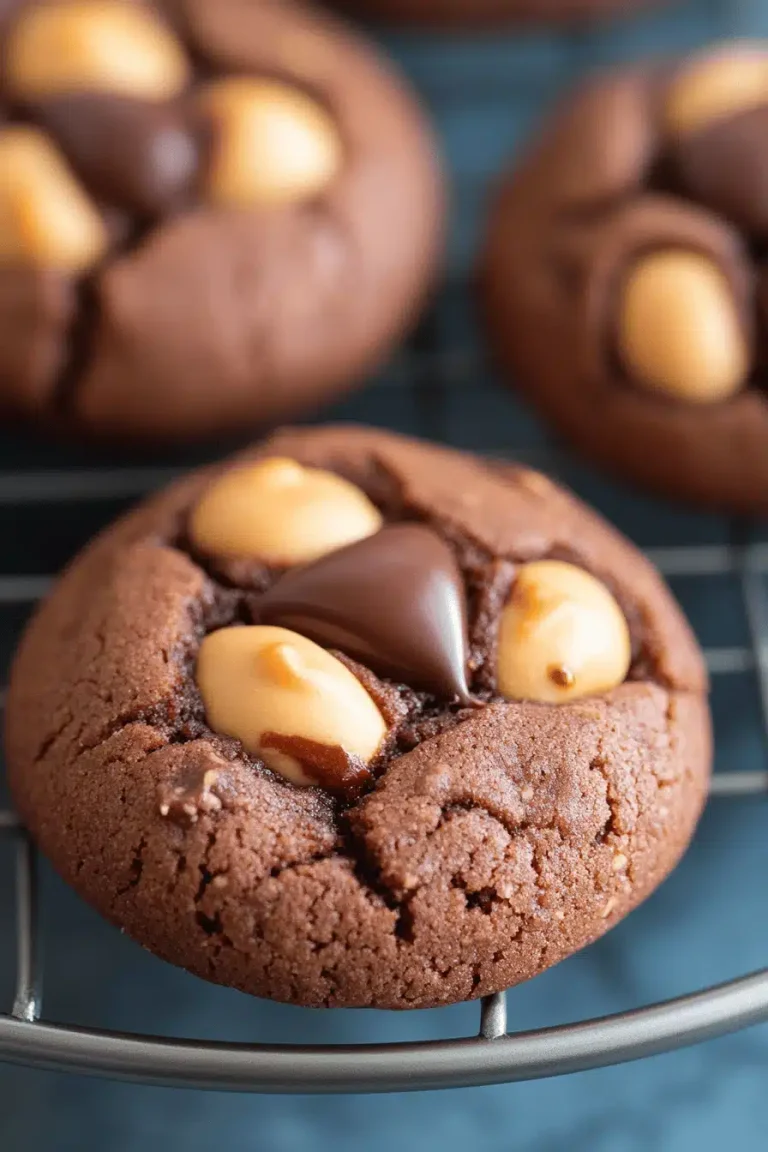
Peanut Butter Chocolate Chunk Cookies
Ingredients
Main Ingredients
- 0.75 cup Unsalted Butter cold, cut into cubes
- 1 cup Light Brown Sugar packed
- 0.25 cup Granulated Sugar
- 1 large Egg room temperature
- 1 large Egg Yolk room temperature
- 2 teaspoons Vanilla Extract
- 2.25 cups All-Purpose Flour
- 0.5 cup Dutch-Processed Cocoa Powder
- 1 teaspoon Kosher Salt
- 1 teaspoon Baking Powder
- 0.5 teaspoon Baking Soda
- 0.75 cup Semi-Sweet Chocolate Chunks
- 0.75 cup Milk Chocolate Chips
- 0.75 cup Peanut Butter Chips
Instructions
Preparation Steps
- Preheat oven to 400°F (204°C). Line two baking sheets with parchment paper.
- Using a stand mixer with the paddle attachment, combine cold butter, brown sugar, and granulated sugar. Beat on medium speed until creamy.
- Add the egg and egg yolk and mix until combined.
- Add the vanilla extract and continue mixing until combined.
- In a medium bowl, whisk together flour, cocoa powder, salt, baking powder, and baking soda.
- With the mixer on low, gradually add the flour mixture to the wet ingredients. Mix until mostly incorporated.
- Add the chocolate chunks, chocolate chips, and peanut butter chips. Mix just until the flour is fully incorporated.
- Shape the dough into 8 large balls and place 4 on each prepared baking sheet, spacing them evenly. Gently flatten each ball.
- Bake for 12-13 minutes, or until edges are set. The centers will look slightly underbaked.
- Let the cookies cool on the baking sheet for 10 minutes. Then, transfer to a wire rack to cool completely.