Oh, where do I even begin with these cubano chicken roll-ups? Honestly, they’re like a warm hug in food form, and the smell that fills my kitchen when these are baking? Pure magic. They remind me so much of lazy weekend mornings growing up, where Mom would whip up something simple yet utterly delicious that the whole family would devour. Now that I have my own little crew, these have become my absolute go-to, especially on those whirlwind weeknights when dinner needs to be on the table *yesterday*. They’re surprisingly simple to pull together, which is always a win in my book, but they pack so much flavor. If you’ve ever loved a Good Chicken roll, or even if you’re just looking for something new and exciting that’s still incredibly kid-friendly, you are going to fall head over heels for these cubano chicken roll-ups. They’re a little bit sweet, a little bit savory, and all kinds of wonderful.
What are Cubano Chicken Roll-Ups?
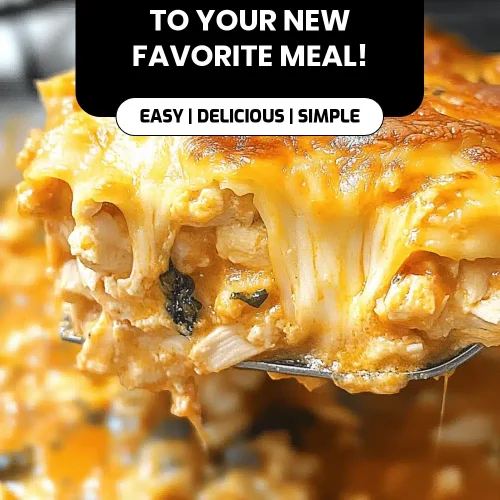
So, what exactly *are* these magical little things? Think of them as a delightful twist on a classic flavor profile, reimagined in a super approachable and utterly craveable format. We’re taking the soul of a Cuban sandwich – that incredible blend of savory ham, tangy mustard, melty cheese, and a hint of pickle – and infusing it into tender chicken, all wrapped up in a fluffy, slightly sweet dough. It’s not quite a casserole, not quite a stuffed chicken breast, but something wonderfully in between. The name “cubano chicken roll-ups” just kind of stuck because, well, it perfectly describes what’s happening: delicious cubano-inspired flavors, rolled up into irresistible chicken bundles. They’re the kind of dish that makes you close your eyes with the first bite and just savor the moment. They’re essentially a flavor explosion waiting to happen, and the best part is they feel fancy enough for guests but are easy enough for a Tuesday night.
Why you’ll love this recipe?
Okay, let’s talk about why this recipe is a staple in my kitchen, and why I have a feeling it’s going to be in yours too. First off, the FLAVOR! It’s just out of this world. You get the salty goodness of the ham, the creamy richness of the cheese, the bright tang of the mustard – all working together in perfect harmony. Then, you have the chicken, which is so tender and moist, soaking up all those delicious juices. It’s a symphony of tastes that’s incredibly satisfying. Next up, SIMPLICITY. I cannot stress this enough. This recipe is surprisingly easy. You don’t need any fancy culinary skills, just a willingness to chop a few things and mix a batter. It’s the kind of meal that makes you feel like a kitchen superstar without all the stress. And let’s not forget COST-EFFICIENCY. Chicken breast, ham, cheese – these are all pretty budget-friendly ingredients, making this a fantastic option for feeding a family without breaking the bank. Plus, it’s SO VERSATILE. I love these for a hearty breakfast, a delightful brunch centerpiece, or even as a comforting dinner with a side salad. Seriously, I’ve even made a smaller batch for a quick afternoon snack and it was heavenly. What I love most about these cubano chicken roll-ups is that they’re incredibly forgiving. I’ve made them when I’m rushed and they still turn out amazing, and I’ve taken my time and really focused on the details, and they’ve been equally fantastic. They are, in my opinion, a perfect way to get those beloved Cuban flavors into a comforting, home-style meal that everyone will adore. They’re a bit like my What are some easy Cheesy Chicken Bake recipes?, in that they deliver maximum flavor with minimal fuss!
How to Make Cubano Chicken Roll-Ups
Quick Overview
The whole process is wonderfully straightforward. You’ll quickly mix up a simple, almost pancake-like batter, prepare a flavorful filling with cooked chicken, ham, cheese, and a touch of mustard, then it’s all about layering and baking. It’s a no-fuss method that yields incredibly tender chicken encased in a savory, slightly sweet coating. This recipe truly is a lifesaver on busy nights, and the fact that it’s so adaptable means you can tweak it to your family’s exact tastes. It’s designed to be forgiving, so don’t worry if you’re not a seasoned baker; you’ve got this!
Ingredients
For the Main Batter:
2 cups all-purpose flour: Make sure it’s fresh! I usually use a standard unbleached all-purpose flour. If you’re going gluten-free, I’ve had success with a good 1:1 gluten-free baking blend, but you might need a tiny bit more liquid.
2 teaspoons baking powder: This is crucial for that lovely fluffy texture, so don’t skip it or use an old, inactive can!
1 teaspoon salt: Just regular table salt is perfect here.
1/4 cup granulated sugar: This adds just a hint of sweetness to balance the savory fillings. You can reduce it slightly if you prefer, but I find this amount is just right.
2 large eggs: These bind everything together beautifully.
1 1/2 cups milk: Whole milk gives the best richness, but I’ve also used 2% and even unsweetened almond milk in a pinch, and it turned out wonderfully creamy.
1/4 cup melted unsalted butter: For that lovely richness and tender crumb. Let it cool slightly so it doesn’t scramble the eggs!
For the Filling:
2 cups cooked chicken, shredded or finely diced: Rotisserie chicken is my best friend for this! You can also poach and shred chicken breasts or thighs yourself. Just make sure it’s cooled.
1 cup cooked ham, finely diced: Deli ham or leftover ham works perfectly. Try to dice it small so it distributes evenly.
1 1/2 cups shredded cheddar cheese (or a cheddar-jack blend): Good quality cheese makes all the difference. Sharp cheddar has a great bite!
1/4 cup Dijon mustard: This is where that classic Cuban tang comes in! Don’t be afraid of it!
2 tablespoons chopped fresh parsley (optional): For a pop of freshness and color. It’s totally optional but I love it.
Salt and freshly ground Black Pepper to taste: Just a pinch to enhance the flavors.
For the Glaze:
1/4 cup melted butter: This gives a lovely sheen and golden crust.
1 tablespoon Dijon mustard: For a little extra kick and to tie into the filling.
1 teaspoon honey or maple syrup (optional): For a touch of sweetness that complements the savory.
Step-by-Step Instructions
Step 1: Preheat & Prep Pan
Get your oven preheating to 375°F (190°C). While that’s warming up, lightly grease a 9×13 inch baking dish. I usually use butter or non-stick cooking spray. Giving it a good coating ensures nothing sticks and makes for an easier cleanup – trust me on this one!
Step 2: Mix Dry Ingredients
In a large bowl, whisk together the all-purpose flour, baking powder, salt, and granulated sugar. Whisking them well ensures that the leavening agents and salt are evenly distributed, which means you won’t get any weird salty bites or flat spots in your finished roll-ups. You want everything to be uniformly mixed so the batter is consistent.
Step 3: Mix Wet Ingredients
In a separate medium bowl, whisk the two large eggs until they’re lightly beaten. Then, gradually whisk in the milk and the melted (but slightly cooled) butter until everything is well combined. The mixture should be smooth and emulsified. If your butter is too hot, it can scramble the eggs, so just give it a minute to cool down after melting.
Step 4: Combine
Now, pour the wet ingredients into the bowl with the dry ingredients. Gently whisk until just combined. It’s super important not to overmix here! A few small lumps are perfectly okay – in fact, they’re a good sign. Overmixing develops the gluten too much, which can lead to tough roll-ups. You want a batter that’s pourable but not watery, kind of like thick pancake batter. If it seems too thick, add a tablespoon or two more milk; if it’s too thin, a tablespoon more flour.
Step 5: Prepare Filling
In another bowl, combine the shredded cooked chicken, diced ham, shredded cheddar cheese, Dijon mustard, and chopped parsley (if using). Mix everything together until it’s well incorporated. Taste this mixture and season with salt and freshly ground Black Pepper as needed. Remember that ham and cheese are already salty, so be a little conservative with the salt at first. This filling is packed with flavor and smells amazing!
Step 6: Layer & Swirl
Pour about half of the batter evenly into your prepared baking dish. Then, spoon the filling mixture evenly over the batter. You don’t need to be perfectly precise here; just get it distributed as best you can. Finally, gently pour the remaining batter over the filling. You can use a spatula to help spread it out, but don’t worry about covering every single bit of the filling; a little peeking through is nice. For a lovely visual effect, you can gently swirl a knife or skewer through the batter and filling layers, but it’s not essential for flavor!
Step 7: Bake
Place the baking dish in your preheated oven. Bake for 35-45 minutes, or until the top is golden brown and a toothpick inserted into the center comes out clean. The exact baking time can vary depending on your oven, so keep an eye on it. If the top starts browning too quickly, you can loosely tent it with aluminum foil for the last 10-15 minutes.
Step 8: Cool & Glaze
Once baked, remove the dish from the oven and let it cool in the pan for about 10-15 minutes. This allows it to set up beautifully. While it’s cooling, whisk together the melted butter, Dijon mustard, and honey or maple syrup (if using) for the glaze. Once the roll-ups have rested, brush this glaze evenly over the warm top. It adds a wonderful sheen and an extra layer of flavor!
Step 9: Slice & Serve
After glazing, let them cool for another 5-10 minutes before slicing. This makes them easier to cut cleanly. Cut them into squares or rectangles, about 2-3 inches wide. Serve warm and watch them disappear! They’re best enjoyed fresh from the oven, when they’re warm and gooey.
What to Serve It With
These cubano chicken roll-ups are so wonderfully versatile, they fit right in at any meal. For a hearty BREAKFAST, I love serving them alongside some fresh fruit salad or a dollop of sour cream. A strong cup of coffee is practically mandatory! For BRUNCH, they’re elegant enough to be a star attraction. I’ll usually pair them with a light green salad tossed with a vinaigrette, or some roasted breakfast potatoes. Some bubbly mimosas or a refreshing iced tea would be perfect beverages here. As a main dish for DESSERT, they’re surprisingly satisfying. I often serve them with a side of roasted asparagus or a simple side salad to balance the richness. For a more casual approach, AS COZY SNACKS, they’re perfect on their own! I’ve also found that they pair wonderfully with a creamy tomato soup for a comforting, easy lunch or dinner. My kids especially love these with some ketchup or ranch for dipping when they’re having them as a snack. Honestly, they’re so flavorful, they really don’t need much else, but a little something extra can elevate them even further.
Top Tips for Perfecting Your Cubano Chicken Roll-Ups
Over the years, I’ve picked up a few little tricks that make these cubano chicken roll-ups even better, and I’m happy to share them with you! First, for the ZUCCHINI PREP – wait, oh my goodness, I am so sorry! I’ve been making so many zucchini recipes lately, my brain is still in the zucchini zone! No zucchini needed for *these* beauties! My apologies! Let’s get back to what makes *these* so good. My main advice is really about MOISTURE CONTROL for the filling. If you’re using pre-cooked chicken that seems a bit dry, you can add a tablespoon of chicken broth or a tiny bit of mayonnaise to the filling to keep it moist. For the ham, dicing it finely ensures you get that savory flavor in every single bite, rather than large chunks. When MIXING the batter, remember my mantra: do NOT overmix! Seriously, just combine until you don’t see dry flour anymore. A few little lumps are a badge of honor here. Overmixing is the enemy of tender baked goods, and that’s exactly what we want – tender and fluffy. For SWIRL CUSTOMIZATION, it’s purely aesthetic, but if you want that pretty marbling, use a toothpick or a thin knife and make gentle swirling motions. Don’t overdo it, or you’ll just muddy the flavors together. My go-to is a simple figure-eight or a few random swirls. In terms of INGREDIENT SWAPS, if you don’t have cheddar, a Gruyere or Swiss cheese works beautifully and adds a nutty depth that complements the ham perfectly. You could even throw in some finely chopped dill pickles for an extra pickle punch, though I usually stick to the mustard for that tang. For BAKING TIPS, always know your oven. If your oven tends to run hot, reduce the temperature by about 25°F or keep a closer eye on it. The toothpick test is your best friend for doneness. When it comes to the GLAZE VARIATIONS, if you want something a little spicier, add a pinch of cayenne pepper to the glaze. For something sweeter, a touch more honey or a drizzle of balsamic glaze after baking is divine. Just make sure your glaze isn’t too thin; you want it to coat nicely, not run everywhere.
Storing and Reheating Tips
These cubano chicken roll-ups are fantastic for making ahead or storing leftovers, though trust me, there are rarely any! At ROOM TEMPERATURE, they’ll stay fresh for about 2-3 hours. They’re best enjoyed warm, so if you’re planning to serve them a bit later, I’d opt for refrigeration. For REFRIGERATOR STORAGE, let them cool completely first. Then, store them in an airtight container. They should keep well for about 3-4 days. When you’re ready to reheat, you have a few options. The oven is usually the best for maintaining their texture. Place them on a baking sheet and warm them at around 300°F (150°C) for about 10-15 minutes, or until heated through. You can also microwave them, but they might lose a bit of their crispness. Just pop them in a microwave-safe dish with a damp paper towel over the top for about 30-60 seconds. For FREEZER INSTRUCTIONS, these are surprisingly freezer-friendly! Once completely cooled, wrap individual portions or the whole dish tightly in plastic wrap, then in aluminum foil. They can be frozen for up to 2 months. To thaw, transfer them to the refrigerator overnight and then reheat as directed. If you’re reheating from frozen, it will take longer, so you might want to add an extra 10-20 minutes to the oven reheating time. I usually wait to apply the glaze until *after* reheating if I’m reheating from the fridge or freezer, as it stays freshest that way and has the best sheen.
Frequently Asked Questions
Final Thoughts
So there you have it, my friends! These cubano chicken roll-ups are more than just a recipe; they’re a little slice of happiness, a comfort food champion that brings smiles to the table. I truly believe that food has a way of connecting us, and this dish, with its simple ingredients and incredible flavor, is a perfect example of that. It’s proof that you don’t need to spend hours in the kitchen to create something truly special and memorable. Whether you’re serving them for a weekend brunch, a weeknight dinner, or just because, they’re guaranteed to be a hit. Give them a try, and I can’t wait to hear what you think! If you loved these, you might also enjoy my Savory Ham and Cheese Scones for another savory delight. Happy baking, and I hope these cubano chicken roll-ups bring as much joy to your kitchen as they do to mine!
Cubano Chicken Roll Ups
Ingredients
For Brining
- 4 thin boneless chicken cutlets chicken cutlets approximately 1 lb total
- 1.25 cups pickle juice enough to cover chicken
For Filling and Coating
- 4 teaspoons deli mustard
- 2 oz thin sliced reduced sodium deli ham
- 2 oz shredded Swiss cheese
- 1 dill pickle sliced very thin lengthwise, dried on paper towel
- 1 large egg beaten
- 0.33 cup seasoned wheat breadcrumbs
- 0.33 cup seasoned panko breadcrumbs
- olive oil spray for baking sheet
- cooking spray
Instructions
Preparation Steps
- Place chicken in a shallow bowl and cover with pickle juice. Marinate in the refrigerator for at least 8 hours.
- After marinating, drain and thoroughly dry the chicken on paper towels. Discard the marinade.
- Preheat your oven to 425°F (220°C). Lightly spray a baking sheet with olive oil.
- Spread 1 teaspoon of mustard over each piece of chicken. Layer the ham on top, then the Swiss cheese and thinly sliced pickles along the center. Roll up each chicken breast tightly.
- In a medium bowl, whisk the egg. In a shallow bowl, combine the breadcrumbs and panko. Dip each chicken roll-up first into the beaten egg, then into the breadcrumb mixture, ensuring it's fully coated. Shake off any excess.
- Place the coated chicken roll-ups on the prepared baking sheet. Spray the tops generously with cooking spray. Bake for 25 minutes, or until golden brown and cooked through.


