Oh, apple pie. It’s one of those desserts that just screams comfort, isn’t it? For me, it’s tied to so many memories – cozy autumn evenings, the smell wafting through the house while I did my homework, and even helping my grandma roll out pie crust when I was just tall enough to see over the counter. But let’s be honest, sometimes you want all that apple-cinnamon goodness without the fuss of a full-blown pie. That’s where these apple Pie Bars come in. They’re my absolute go-to when I’m craving something sweet, a little bit nostalgic, and surprisingly easy to whip up. Think of them as the best parts of apple pie – the tender apples, the warm spices, the buttery crust – all in a perfectly portioned, no-stress bar. Honestly, they’re a lifesaver on busy weeknights and a guaranteed hit at any potluck. Forget complicated lattice work; these apple pie bars are your new best friend.
What are Apple Pie bars?
So, what exactly *are* apple Pie Bars? In my mind, they’re the ultimate shortcut to apple pie perfection. Instead of a traditional double-crust pie, we’re talking about a buttery, shortbread-like base and topping that encases a gooey, spiced apple filling. It’s essentially a deconstructed apple pie that bakes up into neat, easy-to-serve bars. The name itself is pretty straightforward, but the magic is in how it delivers that classic apple pie experience in a format that’s much more forgiving and less time-consuming. There’s no tricky crimping, no worrying about a soggy bottom crust. You get all the comforting flavors and textures you love, just in a more approachable package. It’s the kind of dessert that feels homemade and special, but truly anyone can make it, even if you’re not a seasoned baker.
Why you’ll love this recipe?
There are so many reasons why these apple pie bars have earned a permanent spot in my recipe rotation, and I just know you’re going to fall in love with them too. First off, the flavor profile is absolutely divine. We’re talking tender, slightly tart apples mingling with warm cinnamon, nutmeg, and a hint of Brown Sugar. It’s that classic apple pie taste that’s both comforting and incredibly satisfying. Then there’s the simplicity – and this is HUGE for me. The crust comes together in minutes, and the filling is just a matter of tossing apples with spices. No fancy equipment needed, just a bowl and a spoon. Plus, they’re remarkably budget-friendly. Apples are usually on sale, and the other ingredients are pantry staples. You get so much deliciousness for very little cost! What I love most, though, is their versatility. They’re perfect for breakfast, a midday snack, or even a simple dessert. Unlike a pie that needs a fork and plate every time, you can just pick one up and go. They remind me of the “dump cakes” or crumbles I loved as a kid, but with a much more refined texture and flavor. They’re also incredibly forgiving. If your apples aren’t perfectly uniform or your spice mix is a little off, it still turns out wonderfully. It’s a recipe that truly works, every single time.
How do I make Apple Pie bars?
Quick Overview
Making these Apple Pie bars is remarkably straightforward. You’ll start by creating a simple buttery crust that serves as both the base and the crumble topping. Then, you’ll toss your apples with spices and a touch of sweetness for the filling. Finally, it’s a matter of layering it all into a pan and baking until golden and bubbly. The beauty of this method is that you don’t need to pre-bake the crust or chill it extensively. It’s designed to be rustic and forgiving, giving you that homemade charm without any of the stress. It’s the kind of recipe that makes you feel like a baking rockstar with minimal effort.
Ingredients
For the Main Batter (Crust & Crumble):
You’ll need all-purpose flour – about 2 cups should do it. Make sure it’s fresh! A good quality all-purpose flour is key here. Then we have the unsalted butter, around 1 cup (2 sticks), softened. Softened is important, not melted. And for that perfect sweetness and richness, we’ll use ¾ cup of granulated sugar and ½ cup of packed light Brown Sugar. A pinch of salt is essential to balance out all the sweetness, maybe ½ teaspoon. And for a touch of warm flavor that complements the apples, 1 teaspoon of ground cinnamon.
For the Filling:
This is where the star ingredient shines: apples! I usually go for about 4-5 medium apples, a mix of sweet and tart is best for complexity. My favorites are Honeycrisp or Gala for sweetness and Granny Smith for that delightful tartness. You can absolutely use just one kind if that’s what you have on hand. You’ll also need another ½ cup of packed light brown sugar, 1 tablespoon of all-purpose flour to help thicken the juices, 1 teaspoon of ground cinnamon, and a ½ teaspoon of ground nutmeg. If you have it, a tiny pinch of ground cloves or allspice adds an extra layer of warmth. A squeeze of fresh lemon juice (about 1 tablespoon) is a secret weapon that brightens up the apple flavor and prevents them from browning too quickly.
For the Glaze (Optional but Highly Recommended!):
This glaze is super simple and adds a lovely finishing touch. You’ll need about 1 cup of powdered sugar, and then 1-2 tablespoons of milk or cream. You can also use a little bit of apple cider or even lemon juice for a different flavor profile. Just a tiny splash of vanilla extract (about ½ teaspoon) makes a difference. The key here is to start with a small amount of liquid and add more until you reach your desired drizzling consistency. We want it thick enough to coat but thin enough to drizzle nicely.
Step-by-Step Instructions
Step 1: Preheat & Prep Pan
First things first, let’s get that oven ready. Preheat it to 375°F (190°C). Now, grab an 8×8 or 9×9 inch baking pan. You can use parchment paper to line it, leaving some overhang on the sides. This makes lifting the bars out so much easier later. If you don’t have parchment, just grease the pan really well with butter or non-stick spray. Trust me, this step is worth it!
Step 2: Mix Dry Ingredients
In a large bowl, whisk together the 2 cups of all-purpose flour, ¾ cup granulated sugar, ½ cup light brown sugar, ½ teaspoon salt, and 1 teaspoon cinnamon for the crust. Make sure everything is well combined. This ensures even distribution of flavors throughout the crust.
Step 3: Mix Wet Ingredients
Add the softened butter to the dry ingredients. Now, this is where your hands (or a pastry blender) come in handy. You want to work the butter into the flour mixture until it resembles coarse crumbs. Some larger pea-sized pieces of butter are okay; they’ll melt and create those lovely tender pockets.
Step 4: Combine
Take about two-thirds of this crumbly mixture and press it evenly into the bottom of your prepared baking pan. This forms your base crust. Reserve the remaining one-third for the crumble topping.
Step 5: Prepare Filling
While the oven is preheating, grab your apples. Peel, core, and chop them into bite-sized pieces. I like them about ½ inch thick. In a separate bowl, toss the chopped apples with ½ cup light brown sugar, 1 tablespoon flour, 1 teaspoon cinnamon, ½ teaspoon nutmeg, and the lemon juice. Give it a good mix so all the apples are coated.
Step 6: Layer & Swirl
Pour the apple filling evenly over the crust in the pan. Then, sprinkle the reserved crumb mixture evenly over the top of the apples. You can gently press it down if you like, or leave it a bit more rustic. This is your crumble topping!
Step 7: Bake
Pop the pan into your preheated oven. Bake for about 35-45 minutes, or until the topping is golden brown and the apple filling is bubbling around the edges. You can test for doneness by gently poking an apple piece with a fork – it should be tender.
Step 8: Cool & Glaze
This is the hardest part: waiting! Let the bars cool in the pan on a wire rack for at least 30 minutes. While they’re cooling, whisk together the powdered sugar, 1 tablespoon of milk (or your chosen liquid), and vanilla extract for the glaze. Add more liquid a teaspoon at a time if needed, until you get a smooth, drizzly consistency. Drizzle this over the slightly cooled bars.
Step 9: Slice & Serve
Once the bars are completely cool (or mostly cool, if you can’t resist!), use the parchment paper overhang to lift them out of the pan onto a cutting board. Slice them into squares. I usually get 9 or 12 bars depending on how thick I cut them. Enjoy!
What to Serve It With
These apple pie bars are incredibly versatile, which is another reason I adore them. They’re not just for dessert! For breakfast, I love serving them warm with a strong cup of coffee. They have that comforting, spiced flavor that’s just perfect to start the day. I sometimes even add a dollop of plain Greek yogurt on top for a little extra protein. For a more elegant brunch, I’ll slice them a bit neater, maybe arrange them on a platter with some fresh berries and a sprig of mint. A mimosa or a sparkling cider pairs beautifully. As a dessert, they’re fantastic on their own, of course, but they’re also amazing served warm with a scoop of vanilla bean ice cream or a dollop of freshly whipped cream. The contrast of the warm, spiced bars with cold, creamy ice cream is just heavenly. And for those cozy, no-reason-to-celebrate-but-still-want-a-treat moments, these are your go-to. Grab a bar, curl up on the couch with a mug of hot tea or mulled cider, and just enjoy. My family has a tradition of having these on the first chilly day of fall, and it’s become something we all look forward to.
Top Tips for Perfecting Your Apple Pie Bars
Over the years, I’ve picked up a few tricks that I think really elevate these apple pie bars from good to absolutely outstanding. For the apples, really try to use a mix of varieties if you can. It adds so much depth to the flavor – something sweet and something a bit tart really balances out the richness. When you’re prepping the apples, don’t stress about perfectly uniform pieces. A little variation in size is fine and actually adds to the rustic charm. Make sure to toss them with that tablespoon of flour; it’s crucial for preventing a watery filling. For the crust, the key is not to overwork the butter. You want it to be crumbly, almost like wet sand. If you mix it too much, you’ll end up with a tough crust. My kids always want to help, and their eager little hands sometimes overmix, so I try to guide them! When it comes to the crumble topping, don’t be afraid to leave some larger lumps of butter in there. Those will melt and create little pockets of buttery goodness. For the swirl, there’s no ‘wrong’ way to do it, but I like to make sure the topping is spread fairly evenly so you get that nice crunch with every bite. Baking time can vary, so keep an eye on your oven. If the top is browning too quickly but the apples aren’t tender yet, you can loosely tent the pan with foil. And for the glaze, patience is a virtue! Let the bars cool a bit before drizzling. If they’re too hot, the glaze will just melt into nothingness. If it’s too thick, add a tiny bit more liquid. It’s all about finding that perfect drizzling consistency. I once tried using a different type of flour for the crust, and while it was okay, the texture wasn’t quite the same – stick with all-purpose for the best results. These are the little things that, through trial and error (and plenty of delicious batches!), have made this recipe a winner in my kitchen.
Storing and Reheating Tips
These apple pie bars are so good, you might actually have leftovers – which is a rare occurrence in my house! If you do, don’t worry, they store beautifully. For room temperature storage, they’ll keep well for about 1-2 days if they’re covered loosely. I usually just pop them in an airtight container or cover the baking pan with plastic wrap. They’re still delicious at room temperature, especially if you’re grabbing one for an afternoon snack. If you want to keep them for longer, the refrigerator is your best bet. They’ll stay fresh in an airtight container in the fridge for up to 5 days. When you’re ready to enjoy them again, you can eat them cold, or I highly recommend warming them up slightly. Just pop a bar or two in a toaster oven or a regular oven at around 300°F (150°C) for about 5-10 minutes until they’re warmed through. It brings back that fresh-baked smell and taste! If you want to freeze these beauties, they freeze exceptionally well. Make sure they’ve cooled completely. Then, wrap individual bars or the whole pan tightly in plastic wrap, followed by a layer of aluminum foil. They’ll keep in the freezer for up to 2-3 months. To thaw, just transfer them to the refrigerator overnight, and then warm them up as desired. For the glaze, I generally recommend adding it *after* cooling and before serving. If you’re freezing, you can add the glaze after thawing and warming, or omit it before freezing and glaze them once they’re ready to eat. That way, the glaze stays nice and fresh!
Frequently Asked Questions
Final Thoughts
There you have it – my go-to recipe for the most wonderfully comforting and surprisingly simple apple pie bars. They’re the perfect balance of sweet, tart, and spiced, with a buttery, tender crust that just melts in your mouth. What I love most is how they bring that homemade pie feeling without all the fuss. They’re forgiving, adaptable, and truly a treat for any occasion. If you’re a fan of classic apple flavors, I really hope you’ll give these a try. They’re a recipe that I know and love, and I’m excited for you to experience the joy of making and tasting them. If you do bake them, please tell me what you think in the comments below! I’d love to hear how they turn out, what apples you used, or any fun variations you tried. Happy baking, and I hope these apple pie bars become a favorite in your kitchen too!
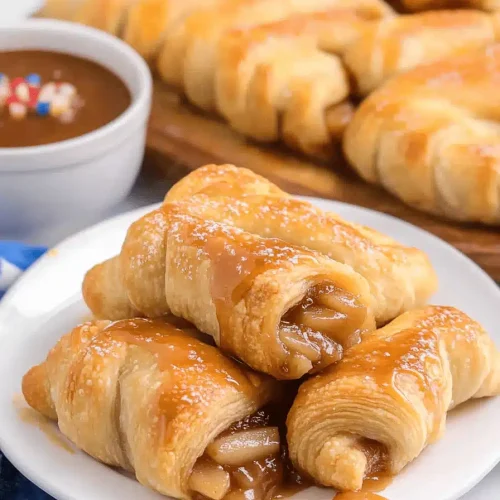
apple pie bars
Ingredients
Crust Ingredients
- 0.5 cup Unsalted Butter, melted
- 0.25 cup Granulated Sugar
- 1 teaspoon Vanilla Extract
- 0.25 teaspoon Salt
- 1 cup All-Purpose Flour
Apple Filling Ingredients
- 2 large Apples, peeled and thinly sliced Granny Smith and/or Pink Lady
- 2 tablespoons All-Purpose Flour
- 2 tablespoons Granulated Sugar
- 1 teaspoon Ground Cinnamon or to taste
- 0.5 teaspoon Ground Ginger optional
- 0.125 teaspoon Ground Nutmeg or to taste
Crumble Topping Ingredients
- 0.5 cup Light Brown Sugar, packed
- 0.5 cup All-Purpose Flour
- 0.5 cup Old-Fashioned Rolled Oats not quick cook or instant
- 6 tablespoons Unsalted Butter, softened
- 0.75 cup Salted Caramel Sauce homemade or store-bought
Instructions
Crust
- Preheat oven to 300°F (150°C) and line an 8x8 inch baking pan with parchment paper, leaving overhang.
- In a medium bowl, whisk together melted butter, granulated sugar, vanilla, and salt.
- Stir in flour until combined. Press mixture into the bottom of the prepared pan and bake for 15 minutes.
Apple Filling
- In a large bowl, combine sliced apples, flour, sugar, cinnamon, ginger (if using), and nutmeg.
Crumble Topping
- In a medium bowl, combine flour, brown sugar, and softened butter. Use a fork to cut the butter into the dry ingredients until a crumbly texture forms.
Assembly & Baking
- Increase oven temperature to 350°F (175°C). Spread apple filling evenly over the warm crust.
- Sprinkle crumble topping evenly over the apple filling. Bake for 30-35 minutes, or until the topping is golden brown.
Cooling & Serving
- Let bars cool in the pan on a wire rack for at least 2 hours, or overnight. Drizzle with salted caramel sauce before serving.