Oh, where do I even begin with divinity candy? It feels like forever ago, but I can still vividly remember my grandma’s kitchen, the air thick with the sweet, intoxicating aroma of sugar and something truly magical happening on the stovetop. She’d always make this divinity candy around the holidays, and it was like edible ambrosia, a little piece of heaven in every bite. It’s one of those old-school confections that just doesn’t get enough love these days, overshadowed by the fancier chocolates and elaborate cakes. But honestly? This divinity candy is deceptively simple and oh-so-rewarding. It’s got this delicate, cloud-like texture and a sweetness that’s pure joy, without being cloying. Think of it as the elegant, understated cousin to fudge, but with a unique airy quality that’s completely its own. If you’ve ever had a craving for something sweet but don’t want the fuss of baking a whole pie, this is your answer. Seriously, get ready to impress yourself and everyone you know with this absolute gem.
What is Divinity Candy?
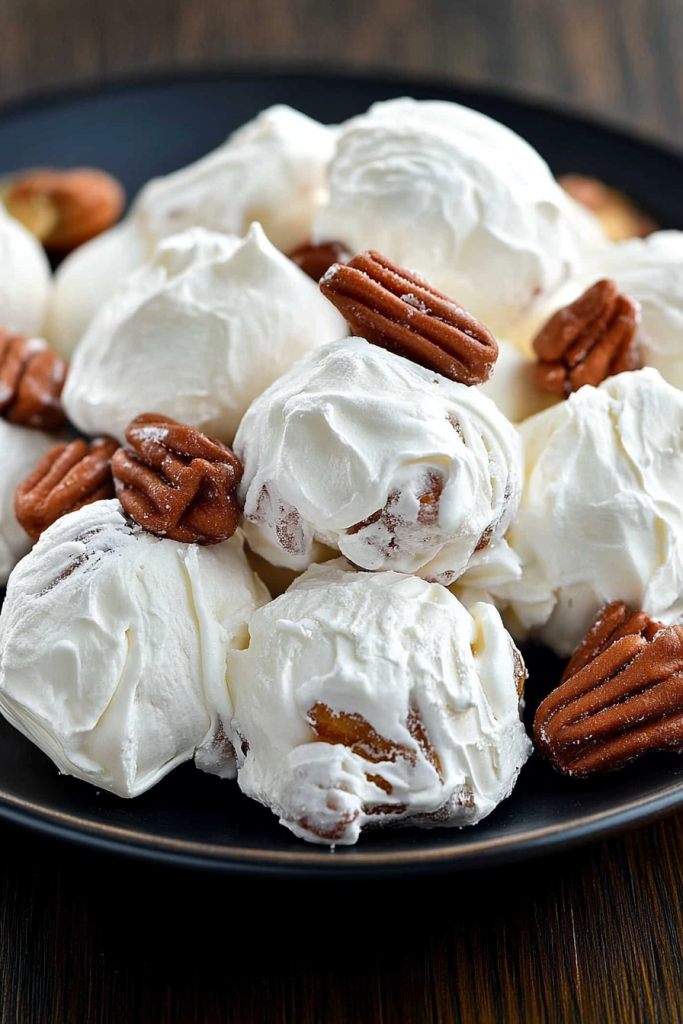
So, what exactly is this delightful confection I’m so smitten with? At its heart, divinity candy is a type of nougat. But it’s not like the chewy, sticky kind you find in a candy bar. This is something else entirely – it’s light, airy, and almost melts in your mouth. The name itself, “divinity,” really captures it, doesn’t it? It suggests something divine, something almost heavenly. It’s made from a cooked sugar syrup, usually with corn syrup to prevent crystallization, which is then whipped with egg whites. The magic happens as it cools, creating this incredibly fluffy, marshmallow-like texture. It’s smooth, sweet, and wonderfully airy. The traditional way to make it is quite simple, relying on precise sugar temperatures and careful whipping to achieve that signature ethereal feel. It’s not a complicated bake, more of a careful confectionary dance, but the result is so worth it. It’s like a sweet whisper on your tongue.
Why you’ll love this recipe?
There are so many reasons why this divinity candy recipe has become a staple in my kitchen, and I just know you’re going to fall in love with it too. First off, the flavor is just incredible. It’s a pure, unadulterated sweetness that’s clean and satisfying. It’s not overly rich, so you can enjoy a few pieces without feeling weighed down. And the texture! Oh my goodness, the texture is what truly sets it apart. It’s so light and airy, almost like a sweet cloud. It crumbles delicately on your tongue, leaving behind that wonderful sweet flavor. What I also adore about this recipe is its simplicity. Once you get the hang of cooking the sugar syrup to the right temperature, the rest is a breeze. It truly is a lifesaver when you need a quick, impressive treat. Plus, it’s incredibly cost-effective! The ingredients are basic pantry staples, so you don’t need to break the bank to make a beautiful batch. And the versatility is fantastic. While I adore the classic plain version, you can easily jazz it up with nuts, a touch of vanilla, or even some citrus zest. It’s perfect for holiday platters, teacher gifts, or just a spontaneous sweet craving. It’s the kind of candy that makes people ask, “Wow, you made this?!” I’ve tried many candy recipes over the years, but this divinity candy always stands out because of its unique texture and how surprisingly easy it is to achieve that perfect, melt-in-your-mouth result. It’s less finicky than some fudges and far more elegant than basic cookies.
How do I make Divinity Candy?
Quick Overview
Making this divinity candy is all about getting that sugar syrup just right and then whipping it into fluffy perfection with egg whites. You’ll cook a sugar and corn syrup mixture to a specific temperature, then slowly drizzle it into whipped egg whites while continuing to beat. This process creates that signature airy, nougat-like texture. It’s a bit of a hands-on process, requiring constant beating as it cools, but it’s truly achievable for any home cook. The key is temperature and patience, and the reward is a batch of impossibly light, sweet candy that’s simply divine.
Ingredients
For the main candy base: Candy: Candy: Candy: Candy: Candy: Candy: Candy: Candy: Candy: Candy: Candy: Candy: Candy
3 cups granulated sugar: Make sure it’s good quality, as it’s the star of the show. I always go for brands I trust for consistent results.
1 cup light corn syrup: This is crucial for preventing the sugar from crystallizing and ensuring that smooth, creamy texture. Don’t skip it!
1/2 cup water: Just enough to get the sugar dissolved and cooking properly.
2 large egg whites, room temperature: This is where the airiness comes from! Make sure they’re at room temperature for the best volume when whipping.
For Flavoring & Texture (Optional but Recommended):
1 teaspoon vanilla extract: A classic for a reason! It adds a lovely warmth and depth to the sweetness.
1/2 cup chopped pecans or walnuts (optional): If you love a little crunch with your soft candy, this is your moment. Toasting them lightly first really brings out their flavor!
For Preparing Your Pan:
Wax paper or parchment paper: You’ll need to line your pan to prevent sticking. Parchment paper is my preference; it’s just a little easier to work with.
Step-by-Step Instructions
Step 1: Preheat & Prep Pan
First things first, let’s get everything ready so we can move quickly once the magic starts happening. Line an 8×8 inch baking pan with wax paper or parchment paper, making sure to leave a little overhang on the sides. This overhang is going to be your best friend when it comes time to lift the candy out. If you’re using parchment, I like to gently grease it with a tiny bit of cooking spray or softened butter, just to be extra sure nothing sticks. Set this prepared pan aside. Now, get your egg whites ready. In a clean, dry bowl (seriously, any speck of grease will ruin your egg whites!), whisk your two large egg whites until they form soft peaks. You’re not looking for stiff peaks here, just that gentle mound that holds its shape for a second.
Step 2: Mix Dry Ingredients
This step is more about combining the sugar and liquid to get them ready for cooking. In a medium saucepan (a heavy-bottomed one is best for even heating), combine the granulated sugar, light corn syrup, and water. Give it a good stir with a wooden spoon or whisk to help the sugar dissolve. Make sure there are no sugar granules clinging to the sides of the pan before you turn on the heat; you can wipe them down with a damp pastry brush if needed. This little step is key to preventing crystallization later.
Step 3: Mix Wet Ingredients
In your clean mixing bowl, ensure your egg whites are ready to go. As mentioned in Step 1, you want them whipped to soft peaks. This is crucial because as the hot syrup cooks, we’ll be adding it slowly to these whipped whites. Having them at the right stage means they can incorporate the heat without scrambling and will whip up into that characteristic fluffy texture as they cool.
Step 4: Combine
Now for the slightly nerve-wracking but oh-so-important part! Place the saucepan with your sugar mixture over medium heat. Cook, stirring only until the sugar dissolves. Once it’s clear and simmering, stop stirring and let it boil. You’ll need a candy thermometer for this. Clip it to the side of the pan, making sure the bulb is submerged in the syrup but not touching the bottom. You want to reach a temperature of 240°F (115°C), which is the firm-ball stage. This takes patience, and you really need to watch it. While the syrup is cooking, start whipping your egg whites on medium-high speed in your stand mixer (or with a hand mixer) until they form soft peaks. Once the syrup reaches 240°F, carefully remove it from the heat. Let it sit for just a moment, then very, very slowly, in a thin, steady stream, pour the hot syrup into the bowl with the whipped egg whites. Be extremely careful here; hot syrup can cause serious burns. Continue beating the mixture on medium-high speed as you pour. This is where the magic happens – the hot syrup cooks the egg whites and, as it cools, it creates that airy, divinity texture.
Step 5: Prepare Filling
If you’re adding nuts or any other optional flavorings, this is the time to get them ready. For nuts, give them a light toast in a dry skillet over medium heat until fragrant, then let them cool slightly before chopping. This step really elevates their flavor and texture. If you’re adding vanilla, have it measured out and ready to go, as it will be added in the next step.
Step 6: Layer & Swirl
Keep beating the divinity mixture on medium-high speed until it starts to become very thick, glossy, and holds stiff peaks. This can take about 5-8 minutes. You’ll notice it’s starting to lose its high sheen and becomes more opaque. This is when you’ll stir in your vanilla extract and, if using, your chopped nuts. Work quickly now, as divinity sets up fast! Drop spoonfuls of the mixture onto your prepared pan. You can also try to spread it a bit with an offset spatula, but don’t fuss too much; a rustic look is part of its charm. Some people like to make little swirls or mounds; just do what feels natural and pretty to you. The goal is to get it into the pan before it becomes too firm to handle.
Step 7: Bake
Actually, there’s no baking involved in making divinity candy! It’s a no-bake confection. Once you’ve dropped or spread the mixture onto your prepared pan, you just let it sit and set at room temperature. This usually takes a few hours, or even overnight. Don’t try to rush it by putting it in the fridge, as condensation can make it sticky. Just let it do its thing!
Step 8: Cool & Glaze
As mentioned, divinity candy is a no-bake treat, so it doesn’t require cooling in an oven. Once you’ve dropped your mounds onto the parchment-lined pan, you simply let it sit at room temperature to set up. This can take anywhere from 2 to 4 hours, or even longer depending on your humidity. You’ll know it’s ready when it’s firm to the touch and no longer sticky. Resist the urge to refrigerate it, as the moisture can make it gummy. Once it’s fully set, you can carefully lift it out using the parchment paper overhang and cut it into squares or break it apart into rustic pieces.
Step 9: Slice & Serve
Once your divinity candy has set firm (give it at least 2-3 hours at room temperature), it’s time to enjoy! You can gently lift the entire slab out using the parchment paper overhang and then cut it into squares with a sharp knife. Alternatively, you can just break it apart into more free-form, rustic pieces. It’s best served at room temperature. For a little extra something, you can drizzle melted chocolate over the tops or dip the bottoms in chocolate before they set, but honestly, it’s perfect just as it is.
What to Serve It With
Divinity candy is so wonderfully versatile; it’s not just for special occasions! For breakfast, I love to have a piece or two with my morning coffee. The light sweetness is just enough to complement the richness of a dark roast, and it feels like such a luxurious start to the day. Think of it as a little sweet treat that doesn’t overpower your taste buds before you’ve even had your first meal. For a more elaborate brunch spread, divinity candy makes a beautiful addition to a dessert table. Its elegant, airy appearance adds a touch of sophistication. I often arrange it alongside fruit platters or mini quiches. It provides a nice contrast in texture and flavor. As a dessert, it’s a fantastic palate cleanser after a hearty meal. Served on a small, pretty plate with a doily, it’s simply divine. It also pairs wonderfully with a lighter, fruit-based dessert, like a berry crumble or lemon tart, offering a different kind of sweetness. And for those cozy snack moments, when you just need a little something sweet without the effort of baking, divinity candy is my go-to. It’s perfect with a cup of tea in the afternoon or a glass of milk before bed. My kids especially love it as a special after-school treat. We’ve even had family traditions where we’d make a big batch for movie nights and just let everyone grab a piece as they pleased. It’s the kind of candy that makes simple moments feel a little more special.
Top Tips for Perfecting Your Divinity Candy
I’ve made my fair share of divinity candy over the years, and let me tell you, I’ve learned a few things along the way that can make all the difference. When it comes to the egg whites, freshness matters, but room temperature is king! Make sure your eggs are not straight from the fridge; let them sit out for about 30 minutes. This allows them to whip up to their maximum volume, which is crucial for that airy texture. Also, and I cannot stress this enough, make sure your bowl and whisk are *spotlessly* clean and dry. Any trace of fat or water will prevent your egg whites from whipping properly, and you’ll end up with a flat, dense candy instead of that heavenly fluff. When you’re cooking the sugar syrup, resist the urge to stir it constantly once it starts boiling. Stirring can encourage crystallization. Use a candy thermometer and trust it! Getting that precise temperature of 240°F is non-negotiable for the right texture. If it’s too low, it won’t set properly; too high, and it can become too hard or grainy. And when you’re adding the hot syrup to the egg whites, pour it in a *very* slow, thin stream. Pouring too fast can cook the egg whites and ruin the texture. Don’t be tempted to speed up the beating process too much; medium-high speed is ideal. You want to beat it until it’s thick, glossy, and just starting to lose its shine – that’s your cue that it’s ready to be dropped. If you add nuts, I’ve found that lightly toasting them beforehand makes a HUGE difference in flavor. It brings out their natural oils and adds a wonderful depth. For ingredient swaps, while traditional divinity is made with egg whites, some daring cooks have experimented with aquafaba (the liquid from a can of chickpeas) for a vegan version, though results can vary greatly and it’s a trickier process. If you find your divinity is a little sticky, it might be due to humidity. Sometimes, just letting it sit a bit longer at room temperature can help. And if it’s too firm, your syrup might have been slightly overcooked. For glaze variations, a simple drizzle of melted semi-sweet chocolate or a thin swirl of colored candy melts can add a festive touch, especially for holidays. I also love adding a tiny pinch of salt to the sugar mixture to balance the sweetness. Trust me on this one; it really enhances the flavors!
Storing and Reheating Tips
Storing divinity candy properly is key to keeping its delightful texture. Since it’s an airy, delicate confection, it’s best stored at room temperature. I usually place my cut pieces in an airtight container, making sure they aren’t packed too tightly. Layering them between sheets of wax paper or parchment paper is a good idea, especially if you’ve made a larger batch. At room temperature, divinity candy typically stays fresh and delicious for about 1 to 2 weeks, as long as it’s kept in an airtight container and away from heat and humidity. Humidity is the enemy of divinity, so avoid storing it in steamy kitchens or damp areas. If you live in a very humid climate, you might find it gets a little sticky faster, so shorter storage times might be necessary. Refrigerator storage isn’t ideal for divinity candy. The cold and moisture can cause condensation, leading to a sticky, gummy texture, which completely ruins that signature airy melt-in-your-mouth quality. So, unless it’s extremely hot, I really advise against it. For freezer instructions, it’s a similar story. While you *can* freeze divinity candy, it’s not the best option for maintaining its quality. If you absolutely must freeze it, wrap individual pieces tightly in plastic wrap, then place them in an airtight freezer container or bag. It can last for about 1 to 2 months in the freezer, but the texture may change slightly upon thawing. To thaw, let the frozen pieces come to room temperature *gradually* in their packaging before unwrapping. This helps minimize condensation. For glaze timing advice, if you’ve added a chocolate drizzle or coating, store it the same way: airtight container at room temperature. The chocolate acts as a bit of a barrier. If you plan to store divinity for longer than a week or so, and you’ve added nuts, keep in mind that the nuts can go stale faster, so it’s always best to enjoy it fresh!
Frequently Asked Questions
Final Thoughts
Honestly, if you’re looking for a sweet treat that feels special but is surprisingly approachable, you really can’t go wrong with this divinity candy. It’s a taste of nostalgia, a delicate confection that proves simple ingredients can create something truly magical. The way it just melts in your mouth, leaving behind that pure, sweet flavor, is something you just don’t find in many other candies. It’s elegant enough for your fanciest dessert platter but comforting enough for a quiet moment with a cup of tea. I hope you’ll give it a try and experience that little bit of kitchen magic for yourself. If you enjoy this recipe, you might also love exploring other classic no-bake candies or old-fashioned fudge recipes. They share that same comforting, homemade feel. I can’t wait to hear what you think and how your divinity candy turns out! Don’t be shy about sharing your own variations or any tips you discover. Happy candy making!
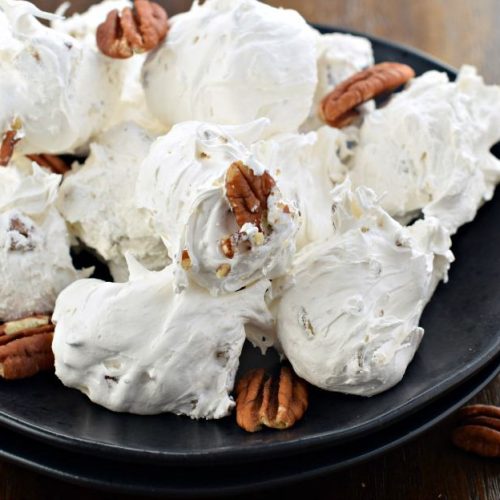
Divinity Candy
Ingredients
Main Ingredients
- 2 cup granulated sugar
- 0.5 cup light corn syrup
- 0.25 cup water
- 2 large egg whites
- 0.25 teaspoon salt
- 1 teaspoon vanilla extract
- 1 cup chopped pecans or walnuts
Instructions
Preparation Steps
- In a medium saucepan, combine the sugar, corn syrup, and water. Cook over medium heat, stirring until the sugar dissolves. Clip a candy thermometer to the side of the pan.
- Continue to cook, without stirring, until the syrup reaches 250°F (soft-ball stage).
- While the syrup is cooking, in a separate, clean bowl, beat the egg whites and salt until stiff, glossy peaks form.
- Once the syrup reaches 250°F, remove it from the heat. Slowly drizzle the hot syrup into the beaten egg whites, beating constantly with an electric mixer. Be careful to avoid splashing.
- Continue to beat until the mixture thickens and loses its shine, about 5-7 minutes. It should be thick enough to hold its shape.
- Stir in the vanilla extract and nuts.
- Drop spoonfuls of the mixture onto parchment paper or wax paper. Let them cool completely before serving.


