I still remember the first whiff of this dish curling through Grandma’s kitchen—the way the tortilla edges browned just a touch and the kitchen filled with a mellow, chili-sweet perfume. It’s funny how a single pan can feel like a hug after a long day. This version of chicken enchiladas is the kind that makes weeknights feel doable and Sunday nights feel celebratory all at once. It’s got that cozy comfort you crave, but it’s also bright with a kiss of lime and cilantro. I’ve served these next to a big green salad and a pot of rice more times than I can count, and my family still requests it with the same triad of enthusiasm: “more sauce, please,” “the cheese is perfect,” and “these smell amazing.” If you’ve got kids climbing onto stools at the counter or a roommate who swears they hate cilantro until they smell it blooming in the pan, you’ll find a home here. This chicken enchiladas recipe is a bit like a favorite cardigan—familiar, warm, and endlessly adaptable. It’s also incredibly forgiving on busy nights, which is why I reach for it when I’m short on time but still want something deeply satisfying. The smell alone can bring everyone to the kitchen, and I’ve learned a trick or two along the way that makes it even better each time.
What is chicken enchiladas?
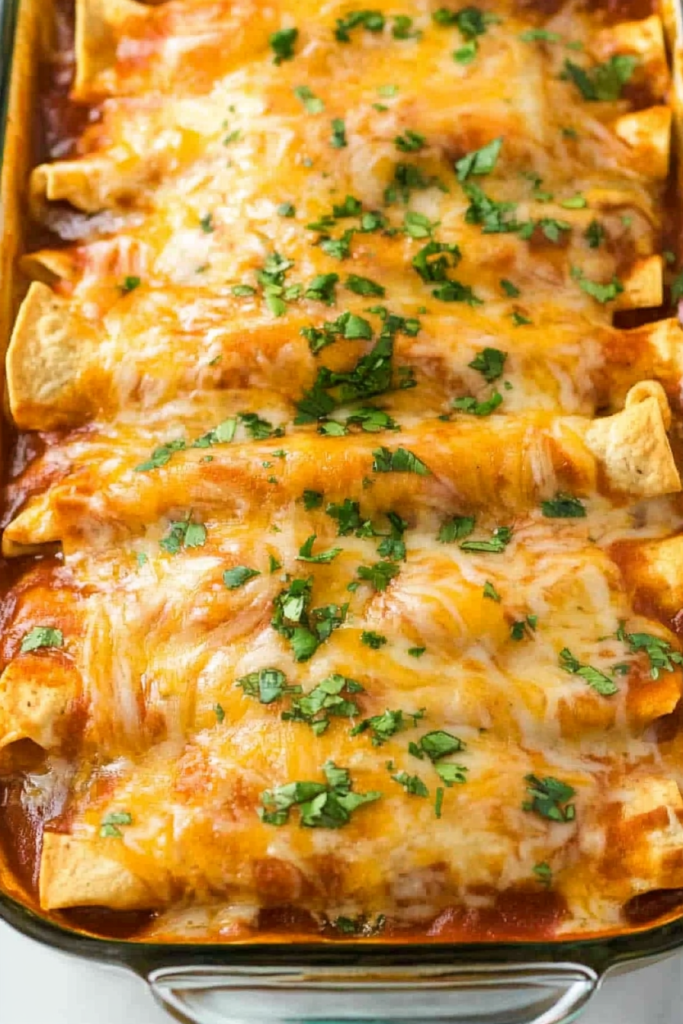
Think of chicken enchiladas as tender tortillas rolled around a savory filling, tucked into a casserole of sauce, and finished with a blanket of melted cheese. It’s essentially comfort food with a little bit of party glow—perfect for family dinners, friendly potlucks, or when you want a make-ahead meal that still tastes like you spent all afternoon in the kitchen. The name “enchiladas” comes from the Mexican Spanish verb enchilar, meaning to season with chile sauce, and that’s the heart of this dish: tortillas hug a warm, zesty chicken filling, then soak up a glossy, chili-laced sauce that makes every bite sing. My version leans into that classic balance—creamy, a touch tangy from lime, and nicely seasoned without being sharp. It’s a dish that travels well, reheats beautifully, and somehow tastes better when you make it for a crowd.
Why you’ll love this recipe?
What I love most about this chicken enchiladas is how versatile it feels without ever becoming fussy. It’s got a crowd-pleasing flavor that isn’t shy about its warmth, and you can tailor it to what you’ve got in the fridge. Here are a few reasons this one stays in heavy rotation:
- Flavor: The enchilada sauce brings a balanced tang, a hint of smokiness, and a gentle warmth that doesn’t overwhelm the chicken. The creamy finish from the batter-based sauce keeps every bite lush and comforting.
- Simplicity:Is it easy to assemble a chicken breast?
- Cost-efficiency: What is the best way to measure cost-efficiency? A rotisserie chicken or leftovers become a star here, turning inexpensive ingredients into a casserole that feels special. A little cheese, a can of enchilada sauce, and some tortillas go a long way.
- Versatility: This recipe plays nicely with what you have—swap in corn tortillas or use leftover vegetables, add black beans for heft, or spike the heat with ancho chili powder. It’s forgiving and forgiving is joy on busy nights.
What I love most about this dish is that it tastes like a warm kitchen memory—family chatter, the clink of forks, and that lingering aroma that says “you’re home.” If you’ve liked my other Mexican-inspired dinners, like beef enchiladas or a quick chicken tinga, you’ll feel right at home with this one. It’s not just dinner; it’s a moment that invites everyone to the table.
How to Make Chicken Enchiladas
Quick Overview
Here’s the quick version: you’ll whip up a creamy, flexible batter that doubles as a sauce, toss in a flavorful chicken filling, roll everything into tortillas, and bake it until the tops blister with melted cheese. The magic is in layering and a gentle bake that keeps the tortillas tender but not soggy. You’ll finish with a glossy glaze that ties the whole dish together and a sprinkle of fresh cilantro for brightness. It’s approachable, forgiving, and deeply satisfying—the kind of dish you can proudly bring to the table on a weeknight and still feel like you earned it.
Ingredients
For the Main Batter:
– 8 oz cream cheese, softened
– 1 cup sour cream
– 1/2 cup whole or 2% milk
– 1 cup shredded cheddar or Monterey Jack
– 1/2 cup grated queso fresco (optional but magical)
– 1 small can (4 oz) green chiles, drained (optional for extra brightness)
For the Filling:
– 4 cups cooked chicken, shredded (rotisserie works great)
– 1 small onion, finely chopped
– 2 cloves garlic, minced
– 1 cup corn kernels (fresh or frozen), thawed
– 1 cup black beans, rinsed and drained (optional)
For the Glaze:
– 2 cups red enchilada sauce (homemade or good quality from a can)
– 1/2 cup sour cream or Greek yogurt, thinned slightly with a splash of milk
– 1/2 cup shredded cheese for topping (extra Monterey Jack or a sharp cheddar works well)
– 1/4 tsp ground cumin and a pinch of sugar to balance acidity
Step-by-Step Instructions
Step 1: Preheat & Prep Pan
Heat your oven to 375°F (190°C). Lightly oil a 9×13-inch baking dish and have a wide, shallow bowl ready for dipping tortillas into the sauce. If you want a crispier edge, you can brush the edges of the tortillas with a touch of oil before rolling.
Step 2: Mix Dry Ingredients
In a small bowl, whisk together 2 tablespoons flour, 1/2 teaspoon cumin, 1/4 teaspoon chili powder, and a pinch of salt. This little dry blend helps thicken the batter and keeps flavors evenly distributed as it bakes.
Step 3: Mix Wet Ingredients
In a separate bowl, blend the softened cream cheese, sour cream, and milk until silky. Stir in the shredded cheese and green chiles if you’re using them. A few smooth scoops of this batter will become the creamy backbone of your enchiladas.
Step 4: Combine
Gently fold the dry mixture into the wet mixture until just combined. You want a smooth, pourable consistency that coats the back of a spoon but isn’t runny. If it feels too thick, splash in a little more milk; if too thin, whisk in a touch more cream cheese.
Step 5: Prepare Filling
In a skillet over medium heat, sauté the onion in a little oil until translucent. Add the garlic and cook 30 seconds more until fragrant. Stir in the shredded chicken, corn, beans (if using), and a pinch of salt and pepper. Warm through so the filling is vibrant but not dry. A squeeze of lime here adds a zesty lift if you like.
Step 6: Layer & Swirl
Dip each tortilla quickly into the main batter—the idea is to lightly coat, not soak through. Spoon a generous line of filling down the center, roll tightly, and place seam-side down in the baking dish. When you’ve lined the dish, pour a portion of the glaze over the rolls and drizzle a few spoonfuls of the remaining batter along the top for a marbled, cozy finish. If you love a glossy look, reserve a little glaze to dribble over after baking.
Step 7: Bake
Pour the remaining glaze over the assembled enchiladas. Cover with foil and bake for 20 minutes, then remove the foil and bake an additional 10 minutes, until the sauce is bubbling and the tops are lightly browned and cheese is melted. If you like a crisper texture, you can broil for the last 1–2 minutes, watching carefully so the cheese doesn’t burn.
Step 8: Cool & Glaze
Let the pan rest for about 5–10 minutes after you pull it from the oven. This gives the sauce a chance to set a touch and makes slicing easier. If you saved some glaze, whisk in a bit more sour cream and drizzle across the top for a creamy, tangy finish that clings to each piece.
Step 9: Slice & Serve
Slice into portions with a sharp knife. I like eight generous squares for a standard 9×13 pan. Finish with a sprinkle of chopped cilantro, a squeeze of lime, and a dusting of extra cheese if you’ve got it. Serve with a simple avocado salad, a lime wedge, and a scoop of Mexican rice or black beans. The first bite will carry that familiar, comforting warmth and a brightness from the lime that makes it feel fresh every time.
What to Serve It With
Chicken enchiladas are forgiving companions to a lot of sides, depending on the vibe you’re after:
For Breakfast: A light, bright tomato and herb salsa on the side, plus a couple of fried eggs or a soft-scrambled pile. You can even roll up leftovers into a breakfast burrito with a spoonful of salsa Verde and a few fresh herbs for color and crunch.
For Brunch: A lively avocado-corn salad, some grilled peppers, and a pitcher of mocktail salsa agua fresca. A little cilantro-lime yogurt dip is a perfect, tangy counterpoint to the richness.
As Dessert: Okay, not for dessert, but consider a small scoop of mango salsa or a light citrus sorbet between bites to cleanse the palate if you’re serving these at a late-night gathering.
For Cozy Snacks: Warm, wrap-and-share fun. Cut into smaller squares, serve with extra sauce for dipping, and enjoy with friends as you catch up on the couch. It’s comforting, shareable, and just the right amount of indulgent.
In our family, this dish often doubles as a “make-ahead winner.” I’ll assemble, refrigerate overnight, and bake the next evening. It travels well, feeds a crowd, and somehow tastes even better the day after when the flavors have had a chance to meld. If you’ve ever made a big pot of chili the night before and woken up to a home that smells like a cozy restaurant, you’ll recognize that feeling here—home and warmth, wrapped into one pan of chicken enchiladas.
Top Tips for Perfecting Your Chicken Enchiladas
Here are a few tricks I’ve learned over the years to keep this dish reliable, flavorful, and deeply comforting:
Zucchini Prep: If you’re adding grated zucchini for extra moisture, squeeze out as much liquid as you can after grating. It helps prevent a soggy bottom and keeps the texture bright. Zucchini’s mild flavor blends into the batter and filling without stealing the show from the chicken and cheese.
Mixing Advice: Don’t overmix the batter once you combine the dry and wet ingredients. A few gentle folds will give you a silkier texture and prevent dense bites. The goal is smooth, not rubbery.
Swirl Customization: The marbling isn’t just pretty—it distributes flavor and keeps the surface from drying out. Try a light swirl of additional batter on top if you want a more cohesive, creamy finish after baking.
Ingredient Swaps: Leftover turkey instead of chicken works beautifully, and you can swap cheddar for a milder cheese if you’re feeding kids who prefer a softer melt. If you’re watching salt, use a low-sodium enchilada sauce and taste as you go; you can always add salt later, but you can’t take it out once it’s in.
Baking Tips: If your oven runs hot, check at 28–30 minutes and cover with foil if the top is browning too quickly. Conversely, if your oven runs cool, a few extra minutes will help the sauce thicken and the cheese melt into a luscious finish.
Glaze Variations: For a different flavor profile, mix a portion of the glaze with a spoonful of sour cream and a splash of lime juice for a tangy, creamy drizzle. A little honey or agave can balance acidity if your sauce is particularly bright.
Lessons learned: the best homemade enchiladas aren’t just about sticking to a recipe. They’re about tasting as you go, adjusting heat, and letting the ingredients sing together. If you’ve made this with a different cheese or a spicier sauce, tell me how it turned out—I love hearing what works in your kitchen and what you discover along the way.
Storing and Reheating Tips
Chicken enchiladas store wonderfully, and a lot of the magic is that make-ahead mindset. Here’s how I keep them fresh and delicious for days after you first cook them:
Room Temperature: If you’re serving the next day, you can leave the dish covered at room temperature for up to 2 hours. After that, refrigerate to keep the ingredients safe and tasty.
Refrigerator Storage: Store leftovers in an airtight container or tightly covered baking dish for up to 3–4 days. Reheat in the oven at 350°F (175°C) for 15–20 minutes, or in the microwave in short 1–2 minute bursts, covered with a damp paper towel to keep moisture in.
Freezer Instructions: Freeze individual portions wrapped tightly in plastic wrap and placed in a freezer-safe bag for up to 2–3 months. Thaw in the fridge overnight, then reheat as above. Note that the texture of the tortillas may be softer after freezing, but the flavors stay bright and comforting.
Glaze Timing Advice: If you’re freezing, skip glazing before freezing and add the glaze after reheating to keep it fresh-tizz and glossy. If you’re refrigerating, you can glaze after reheating for a polished finish.
Freshly made enchiladas taste best, but these tips help you enjoy them on busy nights when time is scarce. The key is to keep the components well-proportioned and to reheat gently so nothing dries out. If you’re reheating from frozen, plan for a longer bake time to ensure the center heats through before the top browns too much.
Frequently Asked Questions
Final Thoughts
This chicken enchiladas recipe is more than a weeknight saver—it’s a dish that invites you into the kitchen with friends or family and makes the whole process feel like a warm, delicious ritual. It’s flexible, forgiving, and above all comforting in a way that’s hard to resist. The creamy batter, the hearty filling, and the glossy glaze all come together to create something that tastes like a hug in a pan. I’ve fed neighbors, hosted small gatherings, and watched my kids scrape their plates clean with delighted eyes. If you’re craving something that’s easy to pull off but feels special, this is your dish. And if you try a swap or two—maybe a different cheese, or a kick of jalapeño—tell me how it goes. I love hearing how your kitchen stories unfold with this recipe. Happy baking!
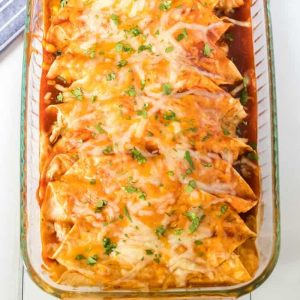
chicken enchiladas
Ingredients
Main Ingredients
- 8 count flour tortillas, large size
- 2 cups shredded chicken use rotisserie chicken for convenience
- 1 cups black beans
- 1 cups corn kernels
- 10 oz diced tomatoes with green chilies undrained
- 2 teaspoons ground cumin
- 0.5 teaspoons garlic powder
- 0.5 teaspoons onion powder
- 0.5 cups enchilada sauce
- 6 oz cheddar cheese, shredded divided
- 6 oz Monterey Jack cheese, shredded divided
- 0.25 cups cilantro, chopped
Instructions
Preparation Steps
- Preheat the oven to 350 degrees Fahrenheit.
- In a large bowl combine shredded chicken, black beans, corn, tomatoes with green chilies, cumin, garlic powder, onion powder, and 0.25 cup enchilada sauce. Stir to combine.
- Stir in half of the cheddar and Monterey Jack cheeses into the filling.
- Spread 0.5 cup enchilada sauce on the bottom of a 9x13 inch baking dish.
- Warm tortillas briefly to make rolling easier. Spoon filling onto each tortilla and roll up tightly. Place seam side down in the prepared baking dish.
- Pour remaining enchilada sauce over the rolls and sprinkle the remaining cheese on top. Bake for 20 to 25 minutes until cheese is melted and bubbly. Garnish with cilantro before serving.


