
Oh, chicken rollatini. Where do I even begin? This isn’t just a recipe; it’s a warm hug on a plate, a little bit of comfort that always manages to hit the spot. I remember the first time I made it, I was trying to impress some friends and honestly, I was a nervous wreck. But then, the aroma started wafting through the kitchen – this savory, herby, cheesy goodness – and I just knew it was going to be okay. It turned out to be a massive hit, and ever since, it’s become my go-to when I want something that feels a little special without spending hours in the kitchen. It’s like a fancy restaurant dish, but made with ingredients you probably already have. Honestly, if you’re looking for a way to elevate simple chicken breast into something truly spectacular, this chicken rollatini is your answer. Forget those dry, boring chicken dinners; this one is a keeper!
What is chicken rollatini?
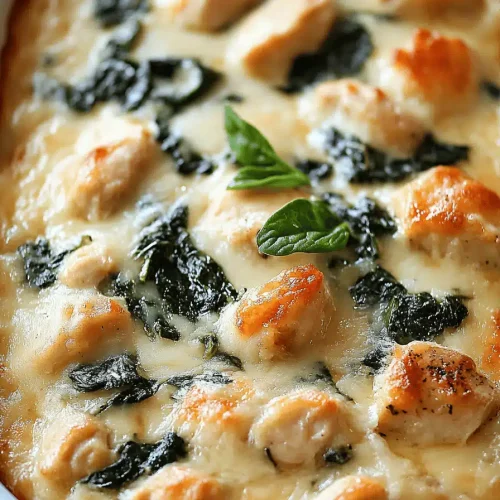
So, what exactly is this magical dish, chicken rollatini? Think of it as a more elegant, flavor-packed cousin to your everyday chicken cutlet. Essentially, we’re taking thin, tender pieces of chicken breast, laying them flat, and then filling them with a delicious mixture – usually cheese, herbs, and sometimes a bit of spinach. Then, we roll ’em up, secure them, and cook them until they’re golden brown and juicy. The magic really happens when you add a luscious sauce over the top. It’s not a deep-fried situation; it’s more of a pan-seared and then baked or simmered dish. The name “rollatini” itself just sounds sophisticated, doesn’t it? It hints at that Italian flair, that little bit of culinary charm that makes this dish feel so special, yet it’s surprisingly straightforward to whip up at home. It’s basically a delicious little package of joy!
Why you’ll love this recipe?
There are so many reasons why this chicken rollatini recipe has earned a permanent spot in my recipe binder, and I’m betting it will in yours too. First off, the flavor explosion is just incredible. You get the tender chicken, the creamy, savory filling (which we’ll get to in a minute!), all bathed in a rich, comforting sauce. It’s a symphony of tastes and textures. And speaking of textures, the chicken stays so wonderfully moist because it’s rolled up, keeping all those delicious juices locked inside. It’s far from the dry chicken dishes of my childhood!
Then there’s the simplicity of it all. While it looks and tastes like something from a fancy Italian restaurant, the actual steps are quite manageable. I’ve made this for weeknight dinners when I’m short on time, and it’s also my secret weapon when we have guests over. It always impresses, and nobody ever guesses how little effort was involved. You’d think something this delicious would require a culinary degree, but trust me, it’s totally doable for any home cook.
And let’s talk about budget-friendliness. chicken breast is a pretty affordable protein, and the filling ingredients are usually pantry staples or easy to find. It’s a way to make a meal feel luxurious without breaking the bank, which is always a win in my book. Plus, it’s incredibly versatile. You can switch up the filling, try different herbs, or even use a different type of cheese. It’s a dish that can adapt to your mood and what you have on hand. What I love most about this chicken rollatini, though, is the happy faces around the dinner table. It’s one of those dishes that just brings people together.
How do I make chicken rollatini?
Quick Overview
The whole process for this chicken rollatini is pretty straightforward. You’ll start by prepping your chicken breasts to be thin and flat, then you’ll mix up a simple yet flavorful filling. We’ll spread that filling onto the chicken, roll it up snugly, and then sear them to get a beautiful golden crust. Finally, they’ll simmer gently in a delightful sauce until they’re perfectly cooked. It sounds like a lot, but each step is quick and easy, and the result is a restaurant-quality meal that’s surprisingly fuss-free. It’s the kind of dish that feels like a treat but is totally weeknight-friendly.
Ingredients
For the Main Batter:
This isn’t exactly a batter like you’d use for fried chicken, but it’s the base! We need good quality chicken breasts, of course. I always look for ones that are around 6-8 ounces each so they’re not too thick. You’ll need about 4 of these. The key here is pounding them thin. My trick is to slice them horizontally first if they’re very thick, then place them between two pieces of plastic wrap or parchment paper and use a meat mallet or even the bottom of a heavy pan to pound them to about ¼-inch thickness. This ensures they cook quickly and evenly and are super tender.
For the Filling:
This is where the real flavor party starts! We’ll use about 1 cup of ricotta cheese – full-fat is best for creaminess, but I’ve had success with part-skim too. Then, about ½ cup of grated Parmesan cheese for that salty, nutty kick. I love to add about ½ cup of cooked, finely chopped spinach. Make sure you squeeze out ALL the excess water from the spinach after cooking it, otherwise, your filling will be watery. A clove or two of minced garlic, a pinch of nutmeg (this is my secret ingredient for cheesy fillings – it just elevates everything!), salt, and freshly ground black pepper to taste. Some people also like to add a little bit of mozzarella cheese in here for extra gooeyness, which is a great addition if you’re feeling fancy!
For the Glaze:
This is the luscious sauce that brings it all together. We’ll need about 1 tablespoon of olive oil for sautéing. One small shallot, finely minced, or half a small onion if you don’t have shallots. About 2 cloves of minced garlic. Then, 1 ½ cups of chicken broth, and ½ cup of heavy cream. Some white wine is also fantastic here if you have it – about ¼ cup, added before the broth – it adds such a lovely depth. A tablespoon or two of fresh chopped parsley for garnish and freshness. And, of course, salt and pepper to season. Some people like a tablespoon of lemon juice at the end for a little brightness, which is also a wonderful idea.
Step-by-Step Instructions
Step 1: Preheat & Prep Pan
First things first, get your oven preheated to 375°F (190°C). While that’s heating up, grab a large, oven-safe skillet or a Dutch oven. If you don’t have an oven-safe skillet, you can sear in a regular one and then transfer the chicken rollatini to a baking dish. A good, heavy-bottomed pan is your best friend here for even searing.
Step 2: Mix Dry Ingredients
In a medium bowl, combine the ricotta cheese, grated Parmesan cheese, cooked and squeezed-dry spinach, minced garlic, nutmeg, salt, and pepper. Stir everything together until it’s well combined and looks like a delicious, creamy paste. Taste it – you want it to be perfectly seasoned on its own, as it will infuse the chicken.
Step 3: Mix Wet Ingredients
This step is for the sauce that will go *under* the chicken. In a separate small bowl, whisk together your chicken broth and heavy cream. If you’re using white wine, you’ll add that later in the sautéing process. Keep this mixture handy near your stovetop.
Step 4: Combine
Lay out your pounded chicken breasts on a clean work surface. Spoon about 2-3 tablespoons of the ricotta filling onto the wider end of each chicken breast. Don’t overfill, or it will all ooze out when you roll them. Gently spread the filling towards the center, leaving a small border. Then, carefully roll up each chicken breast from the filling end towards the other end, tucking in the sides slightly if you can, to create a neat little roll. You can use toothpicks to secure them if you’re worried about them unrolling, but often they stay put just fine.
Step 5: Prepare Filling
This is a crucial step for flavor development! Heat the olive oil in your oven-safe skillet over medium-high heat. Once the oil is shimmering, carefully place the chicken rollatini seam-side down into the hot skillet. Sear them for about 2-3 minutes per side, until they’re beautifully golden brown. This step is key for developing that gorgeous crust and locking in moisture. Don’t crowd the pan; if necessary, sear them in batches. Once seared, remove the chicken rollatini from the skillet and set them aside on a plate.
Step 6: Layer & Swirl
In the same skillet (don’t wipe it out – all those brown bits are flavor!), add the minced shallot and cook for about 1-2 minutes until softened and fragrant. Add the minced garlic and cook for another 30 seconds until aromatic, being careful not to burn it. If you’re using white wine, pour it in now and let it bubble and reduce by about half. Then, pour in the chicken broth and heavy cream mixture. Bring it to a gentle simmer. Taste the sauce and season with salt and pepper as needed. Carefully nestle the seared chicken rollatini back into the skillet, seam-side down, nestled into the sauce. They should be partially submerged.
Step 7: Bake
Now, pop that skillet into your preheated oven. Bake for about 20-25 minutes, or until the chicken is cooked through and the sauce has thickened slightly. The chicken should reach an internal temperature of 165°F (74°C). You’ll see the sauce bubbling and coating the chicken beautifully. If the sauce looks a little thin, you can remove the chicken and let the sauce simmer on the stovetop for a few extra minutes to reduce. Or, if it’s too thick, add a splash more broth.
Step 8: Cool & Glaze
Once the chicken is cooked, carefully remove the skillet from the oven. Let the chicken rollatini rest in the sauce for about 5-10 minutes before serving. This allows the juices to redistribute, making the chicken even more tender. If you used toothpicks, now’s the time to gently remove them. Spoon some of that glorious sauce over the top of each rollatini. Sprinkle with fresh chopped parsley for a pop of color and freshness.
Step 9: Slice & Serve
You can serve these whole, or if you want to show off that beautiful filling, you can slice them on a slight diagonal. Serve them immediately, piping hot, with plenty of that delicious sauce spooned over the top. They are just divine!
What to Serve It With
This chicken rollatini is so wonderfully versatile, it’s a star all on its own, but it also pairs beautifully with a variety of sides depending on the occasion.
For Breakfast: Okay, hear me out! While not traditional, a slice of this chicken rollatini with a perfectly poached egg on top, a drizzle of extra sauce, and maybe some crispy breakfast potatoes would be an absolutely decadent brunch item. It’s definitely a showstopper for a special weekend breakfast.
For Brunch: This is where it truly shines! Serve it alongside a fresh green salad with a light vinaigrette to balance the richness. Roasted asparagus or green beans are also fantastic. For a more substantial brunch spread, consider some crusty bread for dipping into that sauce (oh, the sauce!) or perhaps some creamy polenta or a light lemon-herb couscous. A crisp white wine or a light sparkling rosé would be a perfect beverage pairing.
As Dessert: Now, this isn’t a dessert in the sweet sense, but it’s such a satisfying and comforting meal, it feels like dessert for your soul after a long day! You could follow it up with a light fruit salad or a small, delicate pastry if you have room. I often find this dish so filling that nothing else is needed!
For Cozy Snacks: If you happen to have leftovers (which is rare in my house!), a small portion reheated and served with some crusty bread for dipping is the ultimate comfort food snack. It’s like a warm, savory hug. My kids love it this way, almost like a gourmet chicken sandwich filling.
My family’s favorite way to enjoy this chicken rollatini is with a side of simple steamed broccoli and some creamy mashed potatoes. The potatoes soak up the sauce beautifully, and the broccoli adds a nice fresh counterpoint. It’s a classic combination that never fails to please everyone.
Top Tips for Perfecting Your Chicken Rollatini
Over the years, I’ve picked up a few tricks that make this chicken rollatini recipe even better, and I’m so excited to share them with you!
Zucchini Prep: Oops, I think I might have gotten ahead of myself! There’s no zucchini in this chicken rollatini recipe. My apologies! That’s what happens when you’re thinking about multiple delicious dishes at once. Let’s focus back on the chicken!
Chicken Prep: For the chicken, the most important thing is to get it nice and thin. If your chicken breasts are really thick, don’t be afraid to slice them horizontally to create two thinner pieces before pounding. This ensures they cook quickly and evenly, staying super tender. Pounding them between plastic wrap prevents mess and keeps the chicken from tearing. Aim for about ¼ inch thickness – you should almost be able to see through them slightly.
Mixing Advice: When you’re mixing the filling, make sure your spinach is REALLY well squeezed. I like to use paper towels or a clean kitchen towel to wring out as much moisture as possible. Watery spinach will lead to a watery filling, which can make your chicken rollatini soggy. Also, give that filling a taste before you put it on the chicken. It needs to be seasoned perfectly on its own!
Swirl Customization: When you’re rolling the chicken, don’t worry about making it perfectly tight like a jelly roll. A little bit of the filling peeking out is totally fine and actually looks quite appealing once cooked. If you struggle with rolling, try laying the filling slightly off-center and rolling from the longer edge. Toothpicks can be your best friend if you’re worried about them unrolling during searing or baking.
Ingredient Swaps: Feel free to get creative with the filling! Instead of spinach, you could use finely chopped sun-dried tomatoes, sautéed mushrooms, or even a little bit of pesto. For the cheese, while ricotta and Parmesan are classic, a blend of mozzarella and provolone can be delicious for extra melty goodness. If you don’t have shallots, a finely diced yellow onion or even some garlic chives can work in the sauce.
Baking Tips: Make sure you use an oven-safe skillet. The searing in the pan followed by baking in the same pan makes for fewer dishes and infuses the sauce with all those delicious browned bits from the chicken. If your sauce seems to be reducing too quickly in the oven, you can tent the skillet loosely with foil. Conversely, if it looks too thin towards the end, you can remove the chicken and let the sauce simmer uncovered on the stovetop for a few minutes to thicken up.
Glaze Variations: For a brighter sauce, consider adding a tablespoon of lemon juice right at the end, after you remove it from the oven. If you want a richer sauce, you can add a touch more heavy cream. Some people love adding a pinch of red pepper flakes to the sauce for a subtle kick.
Storing and Reheating Tips
One of the things I love most about this chicken rollatini is how well it stores and reheats. It’s a lifesaver for leftovers!
Room Temperature: Honestly, I don’t recommend leaving this dish out at room temperature for more than two hours, just for food safety reasons. It’s best enjoyed fresh, but if you have a small portion that you might finish within an hour or so, it’s okay.
Refrigerator Storage: Once cooled completely, store any leftover chicken rollatini in an airtight container in the refrigerator. You can keep it whole or sliced, submerged in its sauce. It should stay delicious for about 3-4 days. I usually just pop the whole skillet into the fridge, cover it tightly with foil, and then take out portions as needed.
Freezer Instructions: Yes, you can absolutely freeze this! Let the cooked chicken rollatini cool completely. You can freeze it in its sauce in freezer-safe containers or heavy-duty freezer bags. It will keep well in the freezer for up to 2-3 months. To thaw, transfer it to the refrigerator overnight.
Glaze Timing Advice: If you plan to freeze it, I actually prefer to reheat the chicken rollatini first and then add the glaze or sauce afterward. This helps maintain the texture of the chicken. If you’re just refrigerating, keeping it in the sauce is perfectly fine.
When reheating, the best way is in a skillet over low heat, adding a splash of chicken broth or water to loosen the sauce, or gently in the oven at around 300°F (150°C) until warmed through. Microwaving works too, but I find the stovetop or oven method yields the best texture for the chicken.
Frequently Asked Questions
Final Thoughts
There you have it, my friends! My absolute favorite chicken rollatini recipe. I hope you’re feeling inspired to give it a try. It’s one of those dishes that truly brings a little bit of joy to the table, whether it’s a busy weeknight or a special occasion. The combination of tender chicken, a creamy, savory filling, and that luscious sauce is just pure comfort food magic. It proves that you don’t need a lot of fancy ingredients or complicated techniques to create something truly spectacular.
If you enjoy this recipe, I think you’ll also love my Creamy Tuscan Chicken – it has a similar rich, comforting vibe. Or, for a different take on stuffed chicken, you might want to check out my Spinach and Feta Stuffed Chicken Breast.
Seriously, give this chicken rollatini a go. I can’t wait to hear how yours turns out! Don’t forget to leave a comment below and share your own tips or any variations you try. And if you make it, please tag me on social media – I love seeing your culinary creations! Happy cooking, and enjoy every delicious bite!
Chicken Rollatini with Spinach
Ingredients
Chicken and Filling
- 8 thin chicken cutlets chicken about 3 oz each
- 0.5 cup whole wheat Italian seasoned breadcrumbs
- 0.25 cup grated parmesan cheese divided
- 6 tbsp egg whites or egg beaters
- 5 oz frozen spinach squeezed dry of any liquid
- 6 tbsp part skim ricotta cheese
- 6 oz part skim mozzarella cheese
Sauce and Topping
- 1 cup pomodoro sauce or your favorite marinara sauce
- olive oil non-stick spray
- salt to taste
- pepper to taste
Instructions
Preparation Steps
- Preheat oven to 450°F. Lightly spray a baking dish with non-stick spray.
- Combine breadcrumbs and 2 tablespoons of grated parmesan cheese in one bowl and egg whites in another.
- Shred or finely chop 1.5 oz of mozzarella cheese. Combine with the remaining grated parmesan cheese, squeezed dry spinach, ricotta cheese, and 2 tablespoons of egg whites.
- Lay chicken cutlets flat on a work surface. Season with salt and pepper. Spread about 2 tablespoons of the spinach-cheese mixture onto each cutlet. Loosely roll each cutlet and place seam-side down in the prepared baking dish.
- Dip each rolled chicken cutlet in the egg white mixture, then coat evenly with the breadcrumb mixture. Place seam-side down in the baking dish.
- Lightly spray the chicken with olive oil. Bake for 25 minutes.
- Remove from the oven and top evenly with the pomodoro sauce, followed by the remaining mozzarella cheese.
- Bake for an additional 3 minutes, or until the cheese is melted and bubbling.
- Serve hot, with additional sauce on the side and extra grated parmesan cheese, if desired.


