Whenever I unwrap a Kit Kat, I’m whisked back to those sweet afternoons as a kid when my sister and I would sneak one from the stash, giggling as we split it finger-by-finger. But here’s the thing: turning those iconic chocolate-covered wafer bars into bite-sized nuggets? Absolute game changer. These Kit Kat Bites aren’t just a snack; they’re a treasure trove of nostalgia and ridiculously easy indulgence all wrapped up in one. Honestly, if you’re like me—someone who’s always sneaking a little sweet something after dinner but doesn’t want to commit to a whole slice of cake—these tiny bites are your new best friend. Plus, they’re surprisingly simple to whip up at home, and the kids (and adults alike!) ask for them all the time. It feels like having the best parts of a candy bar, intensified, but with that homemade touch that makes it all the more special.
What is a Kit Kat bite?
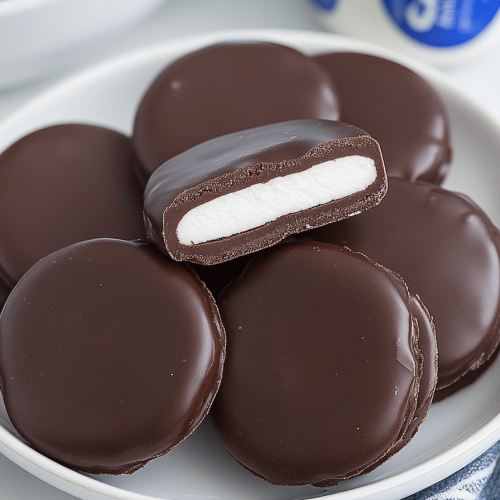
So, what exactly are Kit Kat Bites? Think of these as the mini superheroes of the dessert world—little handcrafted treats inspired by the famous Kit Kat bar. Essentially, they’re bite-sized morsels of chocolate and crispy wafer layered together, but made fresh in your kitchen, often with a delightful homemade twist. The name “Kit Kat” comes from the classic candy bar with layers of crispy wafers coated in smooth milk chocolate, famous worldwide for that unbeatable crunch and melt combo. These bites capture that charm but shrink it down into small, snackable, almost addictive pieces that you can pop in your mouth anytime. They’re the perfect union of texture and taste, and just like sharing a bar, but better—because you know exactly what went into them, and there’s a little extra love baked right in.
Why you’ll love this recipe?
Honestly, what I love most about making Kit Kat Bites is how the flavor totally mimics that beloved candy bar but with an unmistakable fresh-from-the-kitchen vibe. There’s something so satisfying in biting through the crisp wafer layers and having chocolate simply melt on your tongue, leaving you wanting that next bite immediately after the last. For me, the simplicity is a huge win—a handful of pantry staples like chocolate, wafer cookies, and some butter, and boom, you’re halfway there. It’s one of those no-fuss sweet treats that don’t require hours in the kitchen or piles of fancy ingredients, making it perfect for busy weeknights or last-minute dessert needs.
Plus, these bites are incredibly cost-efficient. Instead of buying pre-packaged candy bars that can sometimes feel a bit pricey when you want more than one, you get a batch that can last a few days—if the family doesn’t devour it in minutes, that is. I also adore their versatility. You can easily jazz them up with nutty layers, a hint of sea salt, or even sprinkle some crushed peppermint on top during holiday seasons. When I first made them, I tried swapping plain wafers with chocolate ones and adding a touch of espresso powder, and oh, it gave them this grown-up twist that totally wowed my guests. If you’re the type who loves a chocolate bar but fancies a little homemade magic to impress without breaking a sweat, this is the recipe you’ll find yourself coming back to again and again.
How do I make Kit Kat Bites?
Quick Overview
Making Kit Kat Bites is genuinely a breeze—don’t let that simple ingredient list fool you. The core idea is layering crispy wafers with luscious melted chocolate, then chilling everything to achieve that perfect snap. I usually melt chocolate gently, fold in crushed wafers, shape small rounds or squares, and pop them in the fridge. It’s quick, with minimal mess, and absolutely doable even if you’re new to candy making. Trust me, these bites come together faster than you can say ‘chocolate craving.’ Once you get the hang of layering and chilling, you’ll wonder why you ever bought the packaged version.
Ingredients
For the Main Batter:
- 200g milk chocolate (use good quality but not necessarily expensive—something melting-friendly)
- 100g crushed wafer cookies (I usually grab plain wafers for that authentic crunch)
- 1 tablespoon unsalted butter (helps with smoothness and shine)
For the Filling:
- Optional: 3 tablespoons peanut butter or hazelnut spread (adds a rich, nutty depth)
- Optional: a pinch of sea salt (balances sweetness beautifully)
For the Glaze:
- 100g dark chocolate (for coating or drizzling)
- 1 teaspoon coconut oil (helps thin out chocolate for smooth glazing)
- Optional: crushed nuts, sprinkles, or crushed candy for decorating
Step-by-Step Instructions
Step 1: Preheat & Prep Pan
Start by lining a small baking tray or shallow dish with parchment paper—this is your temporary home for the bites while chilling. Preheating isn’t necessary for these since we’re not baking, but having your workspace set up will keep things smooth and stress-free.
Step 2: Mix Dry Ingredients
Take your crushed wafers—breaking them evenly is key; I like a little chunky texture in there rather than dust. Toss them into a bowl, optionally add sea salt for that subtle contrast, then gently fold together so nothing’s hiding in lumps.
Step 3: Mix Wet Ingredients
Gently melt your milk chocolate and butter in a double boiler or microwave in 20-second bursts, stirring between each until silky and lump-free. If you’re adding peanut or hazelnut spread for a richer filling, mix it into the chocolate while it’s warm so everything blends smoothly.
Step 4: Combine
Pour the melted mixture into the crushed wafers and stir well to coat all the bits evenly. You want every crumb wrapped in chocolate without overmixing—overdoing it can threaten that crisp texture we all crave.
Step 5: Prepare Filling
If you’re going for multi-layers (and I highly recommend it!), spread a thin layer of your nutty filling onto the parchment, then top that with a bit more of the chocolate-wafers mix. Otherwise, no worries, you can keep it simple and just mix everything together as in Step 4.
Step 6: Layer & Swirl
For that classic swirled look, dollop the “filling” layer, then gently use a toothpick or butter knife to swirl it around. This not only looks fancy but helps the flavors mingle beautifully. You can get creative here—sometimes I add crushed peppermint and swirl that in for the holidays.
Step 7: Bake
No oven needed here! Instead, you pop the tray in the fridge and chill for at least 1 hour (overnight is even better if you can wait). This step is essential to set everything firmly so each bite holds shape and snap.
Step 8: Cool & Glaze
Once chilled, melt your dark chocolate with coconut oil until glossy and smooth. Spoon or drizzle over each bite—or fully dip for an extra chocolatey coat. Return to the fridge for another 30 minutes to let the glaze firm up.
Step 9: Slice & Serve
Use a sharp knife warmed under hot water to cut into neat little squares or rounds. Serve chilled—these bites are at their crunchy-yet-melty best right out of the fridge. I always get a kick out of how everyone’s eyes light up when I pass these around!
What to Serve It With
For Breakfast: Pair these slightly sweet Kit Kat Bites with a robust black coffee or a latte for a little mid-morning indulgence. Sometimes, my kids love nibbling them alongside yogurt or fresh fruit; it’s a fun way to start the day with a happy surprise.
For Brunch: Lay these bites out on a pretty platter with assorted nuts, fresh berries, and a pot of loose-leaf tea. They add a playful twist and a bit of crunch that guests marvel over almost like tiny, rich chocolates.
As Dessert: Serve chilled Kit Kat Bites with a scoop of vanilla ice cream or alongside a rich cheesecake for a textural contrast. A sprinkle of sea salt or a drizzle of caramel sauce ups the indulgence factor and has everyone asking for your “secret recipe.”
For Cozy Snacks: These are my go-to when I’m curled up on the couch watching a movie or working on my laptop late at night—little bursts of chocolate that satisfy without overdoing it. Paired with hot cocoa or a spiced tea, they feel like a warm hug on a chilly evening.
Top Tips for Perfecting Your Kit Kat Bites
Wafer Prep: Be gentle when crushing wafers. You want a mix of fine crumbs and small chunks to keep that signature crunch without ending up with a powdery mess. If the wafers are a bit stale, give them a quick toast in the oven to revive that crispness.
Mixing Advice: Stir just enough to coat all crumbs with chocolate—resist the urge to overmix otherwise the texture can get too dense or soggy. If you notice clumps or uncoated bits, a light hand with the wooden spoon usually does the trick.
Swirl Customization: When swirling the filling, don’t overdo it or the layers will blend fully, losing that marbled magic. A gentle lift and twist motion creates those pretty patterns that make these bites look gourmet but still feel homey.
Ingredient Swaps: I’ve swapped in dark chocolate for a richer flavor or white chocolate for a sweeter, creamier vibe. Nut butter fillings can vary too—almond butter works beautifully but can be a bit runnier, so just adjust the chilling time accordingly.
Chilling & Baking Tips: Chilling is non-negotiable; skip it and the bites won’t hold their shape. I recommend chilling on the middle rack of the fridge to ensure even setting. If your fridge runs warm, extend chilling times to avoid melty messes.
Glaze Variations: Adding coconut oil thins the chocolate and gives a glossy finish that hardens beautifully. You can also mix in a splash of vanilla or orange zest for subtle flavor twists. Don’t forget the fun part—sprinkle crushed nuts or colored sugar on top before the glaze sets for extra flair.
I learned a long time ago not to skip the glaze stage—plain chocolate-wafers are good, but that shiny, smooth coating really lifts these treats from simple to spectacular. Also, don’t be discouraged if your first batch looks a bit rough—it’s the taste that really wins hearts here.
Storing and Reheating Tips
Room Temperature: Kit Kat Bites keep well covered at room temp for 2-3 days, but only if your kitchen isn’t too warm. I usually store them in an airtight tin or sealed box to keep that crisp fresh.
Refrigerator Storage: Storing in the fridge is ideal for longevity—these can last up to a week. Use airtight containers or wrap them tightly to avoid absorbing other fridge odors. I always label them so they don’t get lost in the back!
Freezer Instructions: For longer storage, freeze bites individually wrapped in parchment then placed in a freezer-safe bag or container. They last for up to 3 months and thaw perfectly at room temp in about 30 minutes, maintaining their crunch and flavor.
Glaze Timing Advice: If you plan to freeze or refrigerate for several days, add the glaze after removing them from cold storage so the chocolate stays shiny and smooth. If you glaze before storing, sometimes condensation can form and dull the finish once chilled.
Frequently Asked Questions
Final Thoughts
Making Kit Kat Bites at home has quickly become one of those little joys in my kitchen I can’t do without. They bring back happy memories, satisfy sudden chocolate cravings, and impress guests way more than their humble ingredients suggest. The texture, the flavor, the simple delight in each buttery-crunchy morsel—that’s magic you won’t get from just any treat on the shelf. If you give these bites a try, I’d love to hear what spins you put on them or your favorite pairing—I’m already dreaming up my next batch with a dash of cinnamon and sea salt. Happy nibbling, and don’t forget to share the love (or sneak them all, I won’t judge!). Drop a comment if you try it out or have your own bite-sized chocolate stories to tell!
Kit Kat Bites
Ingredients
Main Ingredients
- 0.75 cup unsalted butter
- 0.75 cup heavy cream
- 1.5 cup granulated sugar
- 25 pieces regular sized marshmallows
- 12 ounce milk chocolate morsels
- 1 ounce unsweetened baking chocolate
- 4.5 cup rice krispies cereal
- 11 ounce butterscotch morsels
- 1 cup peanut butter morsels
Instructions
Preparation Steps
- In a large mixing bowl, add marshmallows, milk chocolate morsels, and baking chocolate. Set aside.
- In a large pot, bring to a boil the sugar, cream, and butter over medium-high heat. Once boiling, continue to boil for 4 minutes, stirring constantly. Remove from heat. Pour hot mixture over marshmallows and chocolate. Using an electric mixer, beat until chocolate has melted and mixture is smooth (about 2 minutes).
- Melt butterscotch and peanut butter morsels together in a microwave-safe bowl for one minute. Stir and heat at 30 second intervals until fully melted.
- In a large bowl, combine rice cereal, melted butterscotch, and about one-third of the chocolate mixture. Mix completely.
- In a parchment paper lined 13x9 baking dish, pour one-third of chocolate mixture onto bottom, spreading with a knife until bottom of dish is covered. Top with cereal mixture. Press firmly. Pour remaining one-third of chocolate mixture over cereal, spreading with a knife.
- Allow to set up in refrigerator for about 1-2 hours. Remove and cut into bite sized pieces. ENJOY!