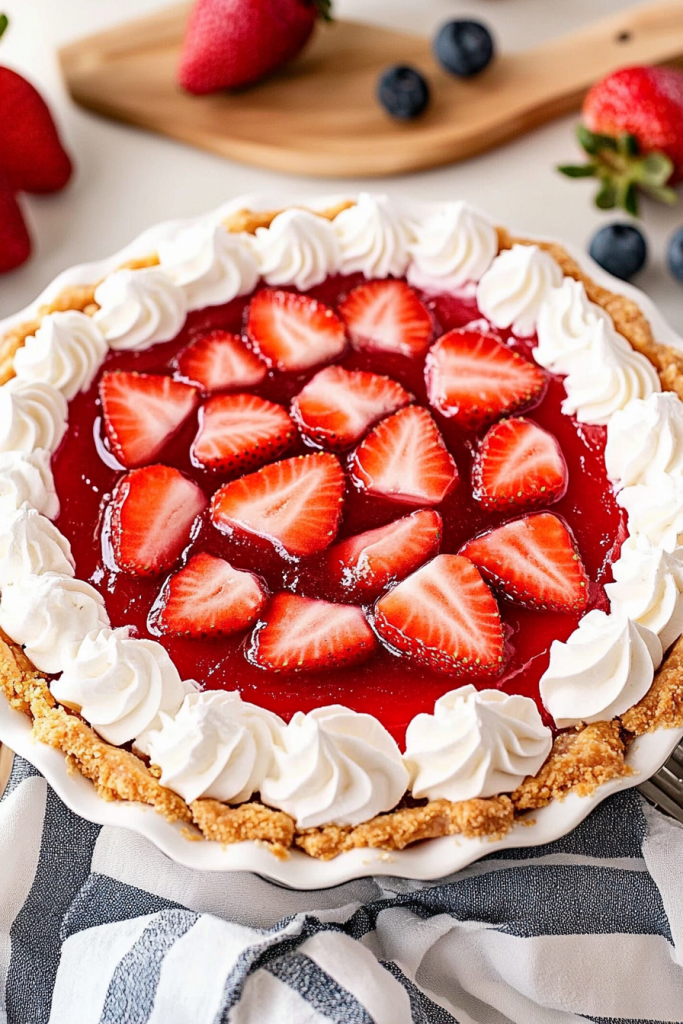
Oh, this strawberry jello pie! It’s one of those recipes that just *screams* summer to me, even when I’m whipping it up on a chilly fall day. My grandma used to make it all the time, and the smell of that bright, sweet strawberry filling wafting through the house is a core memory for sure. It’s not a real pie in the traditional sense, more like a wonderfully jiggly, impossibly light dessert that just melts in your mouth. Think of it as a no-bake cheesecake’s fruity cousin who decided to have way more fun. When I’m craving something sweet but don’t have hours to bake, this strawberry jello pie is my absolute go-to. It’s so simple, yet it always feels like a special occasion treat. Honestly, if you’re looking for a dessert that’s a guaranteed crowd-pleaser and won’t stress you out, you’ve found your winner.
What is strawberry jello pie?
So, what exactly *is* a strawberry jello pie? At its heart, it’s a dessert that uses strawberry-flavored gelatin (you know, the kind you probably loved as a kid!) as a base for its incredibly vibrant and wobbly filling. We usually set it in a pre-made graham cracker crust, giving it that perfect crunchy counterpoint to the smooth, cool filling. It’s not baked, which is a huge plus on hot days, and it requires minimal fuss. The name, strawberry jello pie, is pretty straightforward, but don’t let the simplicity fool you. It’s a delicate balance of sweet, tangy, and creamy that makes it utterly irresistible. It’s like a slice of pure joy, a portable little piece of sunshine that’s always a hit.
Why you’ll love this recipe?
What are some of the reasons why this strawberry jello pie recipe has earned a permanent spot in my recipe binder?flavor is just out of this world. That artificial strawberry flavor from the jello? It’s nostalgic, sure, but when you combine it with real fruit and creamy additions, it transforms into something truly magical. It’s intensely fruity without being too sweet, and that slight tang from the gelatin is just perfect. Then there’s the simplicity – and oh my goodness, is it simple! No baking involved means no oven temperatures to fuss over, no tricky dough to make, and hardly any cleanup. Seriously, you can whip this up in about 15 minutes of active time, and then it just needs to chill. For busy weeknights or when you’re entertaining unexpectedly, this is an absolute lifesaver. Plus, it’s incredibly cost-efficient. Gelatin packets are super affordable, and you probably already have most of the other ingredients in your pantry. It feels decadent without costing a fortune, which is always a win in my book. And it’s so versatile! While I adore the classic strawberry version, you can totally play around with different jello flavors or add-ins. It’s perfect as a light dessert after a big meal, a refreshing treat on a summer picnic, or even as a fun dessert for a kids’ party. What I love most about this strawberry jello pie is that it brings instant smiles. It’s just happy food, pure and simple, and seeing that jiggly, ruby-red dessert come out of the fridge always brings a little spark of excitement.
How do I make strawberry jello pie?
Quick Overview
This strawberry jello pie recipe is all about minimal effort and maximum reward. You’ll dissolve your strawberry gelatin, add some creamy goodness and fresh fruit, pour it into a crust, and let it set. It’s incredibly forgiving, and the hardest part is waiting for it to chill! It’s perfect for those days when you want a fantastic dessert without the baking drama.
Ingredients
For the Crust:
1 graham cracker crust (store-bought or homemade)
Pro-tip: If you’re making your own, a good ratio is about 1 ½ cups of graham cracker crumbs mixed with ½ cup of melted butter and 2 tablespoons of sugar. Press it firmly into a 9-inch pie plate.
For the Filling:
2 large boxes (6 oz each) strawberry gelatin
2 cups boiling water
1 ½ cups cold water
1 (14 oz) can sweetened condensed milk
1 ½ cups fresh strawberries, hulled and sliced or diced
Ingredient notes: Using two boxes of gelatin ensures a nice, firm set that’s easy to slice. For extra creaminess, some folks even use half-and-half or heavy cream instead of some of the cold water, but I find the sweetened condensed milk gives it the perfect richness without being too heavy. Fresh strawberries are key here for that burst of flavor and color!
For the Optional Glaze (Highly Recommended!):
1 packet strawberry gelatin
½ cup boiling water
½ cup cold water
Glaze consistency: This glaze is super simple and adds an extra layer of glossy fruitiness. It’s like a shiny, flavorful coat for your pie that keeps the fruit looking fresh and vibrant.
Step-by-Step Instructions
Step 1: Preheat & Prep Pan
Okay, so technically we’re not baking the pie itself, but we do need to get our crust ready. If you’re using a store-bought graham cracker crust, you’re good to go! If you’ve made your own, ensure it’s pressed firmly into the pie plate and chill it in the refrigerator for at least 10-15 minutes while you get the filling ready. This helps it set up so it doesn’t crumble when you pour in the filling.
Step 2: Mix Dry Ingredients
Grab a large mixing bowl. Pour both boxes of the strawberry gelatin into the bowl. This is where the magic starts! You want to make sure there are no clumps of gelatin powder, so give it a quick whisk or stir to loosen it up.
Step 3: Mix Wet Ingredients
Carefully pour the 2 cups of boiling water over the gelatin powder. Stir it gently but thoroughly until every last granule of gelatin has completely dissolved. This usually takes a couple of minutes. It’s super important that it’s all dissolved, otherwise, you’ll get a grainy texture. Once dissolved, stir in the 1 ½ cups of cold water. This starts cooling the mixture down.
Step 4: Combine
Now, for the creamy part! Pour the can of sweetened condensed milk into the gelatin mixture. Whisk it all together until it’s smooth and uniformly pink. It should look like a thick, luscious liquid. I always give it a good stir for at least a minute to make sure it’s fully incorporated and there are no milky streaks. This is the base for that wonderful, creamy, jiggly filling we all love.
Step 5: Prepare Filling
Gently fold in your sliced or diced fresh strawberries. You want to be careful not to mash them too much; we want little pockets of fresh fruit throughout the pie. I like to reserve a few pretty slices to arrange on top later, if I’m feeling fancy!
Step 6: Layer & Swirl
Pour the strawberry gelatin mixture evenly into your prepared graham cracker crust. If you saved some strawberry slices, arrange them attractively on top now. You can make pretty patterns or just scatter them about. The filling will be quite liquid at this point, but don’t worry, it will firm up beautifully in the fridge.
Step 7: Bake
Oops, I meant chill! This pie doesn’t get baked, it gets chilled. Carefully transfer the pie to the refrigerator. Let it chill for at least 4-6 hours, or until it’s completely set and firm to the touch. The longer it chills, the firmer it will be, making it easier to slice. I usually pop mine in the fridge overnight if I can resist!
Step 8: Cool & Glaze
Once the pie is fully set, it’s time for the optional but highly recommended glaze. In a small bowl, combine the remaining packet of strawberry gelatin with ½ cup boiling water. Stir until dissolved, then stir in ½ cup cold water. Let this glaze mixture cool slightly for about 10-15 minutes, just until it’s no longer hot but still liquid. Then, gently spoon or brush this glaze over the top of the set pie. This adds an extra layer of glossy fruitiness and helps keep the fresh strawberries on top looking vibrant. Return the pie to the refrigerator for another 30 minutes to let the glaze set.
Step 9: Slice & Serve
Once the glaze is set, your strawberry jello pie is ready to be admired and devoured! For the cleanest slices, I find it helps to run a sharp knife under hot water and wipe it dry between each cut. Serve it cold. It’s so refreshing and light, perfect on its own!
What to Serve It With
This delightful strawberry jello pie is wonderfully versatile, fitting in perfectly for any occasion! For Breakfast, while it might seem like a dessert, a small slice with a cup of strong coffee is surprisingly satisfying. It’s a fun way to start the day with a little sweetness, especially if you’ve made it with less sugar. For a more elegant affair like Brunch, I love to serve it alongside some fresh fruit salad, maybe some mini quiches or scones. Presentation is key here – I like to garnish each slice with a dollop of whipped cream and a fresh mint sprig. It looks so pretty on a brunch buffet! As Dessert, it truly shines. It’s the perfect light finish to a heavy meal like a barbecue or a rich pasta dinner. Pair it with a delicate sparkling wine or a light dessert wine. It’s also fantastic with a scoop of vanilla bean ice cream or a side of fresh berries. And for those moments when you just want a Cozy Snack, a simple slice on its own is pure comfort. My kids honestly love it with a glass of cold milk after school – it’s their favorite “special treat.” I’ve also found it pairs wonderfully with a side of shortbread cookies for dipping!
Top Tips for Perfecting Your Strawberry Jello Pie
Over the years, I’ve learned a few tricks that I think make this strawberry jello pie just that much better. First, when it comes to the Zucchini Prep – wait, wrong recipe! Ha! Kidding! For the strawberries, I always recommend using ripe, fresh ones. If they’re a bit mushy, they might break down too much. Hull them carefully and slice them evenly. For the Mixing Advice, the most crucial thing is ensuring the gelatin is *completely* dissolved in the boiling water. I can’t stress this enough! If you see any little granules at the bottom, keep stirring. Overmixing the sweetened condensed milk into the gelatin isn’t really a thing, but gentle stirring after adding the fruit is best to keep those beautiful strawberry pieces intact. For Swirl Customization, if you wanted to add another flavor, you could pour half the filling, add some different colored jello cubes or fresh berries, then pour the remaining filling. Or, try adding a tiny bit of red food coloring to the glaze for an even more intense color. For Ingredient Swaps, if you can’t find sweetened condensed milk, you could try a combination of evaporated milk and sugar, but it won’t be quite the same creamy texture. Some people have had success using sugar-free gelatin, but you might need to adjust the sweetness with a sugar substitute. For Baking Tips (I mean chilling!), make sure your fridge is cold enough. A temperature around 35-40°F is ideal. Placing it on a solid shelf, not the door, also helps ensure it sets evenly. Avoid opening the fridge door too often while it’s setting, as temperature fluctuations can affect the final texture. Finally, for Glaze Variations, experiment! You could use a raspberry gelatin for a two-tone fruit effect, or even a clear lime gelatin for a different flavor profile. Just make sure it’s cooled enough so it doesn’t melt the filling.
Storing and Reheating Tips
Keeping your strawberry jello pie fresh and delicious is pretty straightforward. For Room Temperature storage, honestly, I wouldn’t leave it out for more than an hour or two, especially if it’s warm where you are, as the gelatin can start to soften. If you need to keep it out for a short time before serving, just cover it loosely with plastic wrap or a cake dome. For Refrigerator Storage, this is where it lives! Store it in an airtight container or cover it tightly with plastic wrap. It will keep well in the fridge for about 3-4 days. The texture might change slightly over those days, becoming a bit firmer, but it’s still perfectly tasty. For Freezer Instructions, freezing isn’t ideal for this pie. The texture of gelatin can change significantly once thawed, often becoming watery. I highly recommend enjoying it fresh or within its refrigerator lifespan. The Glaze Timing Advice is simple: always let the main filling set *completely* before adding the glaze. And then let the glaze set for at least 30 minutes in the fridge before slicing and serving. If you store leftovers, the glaze might soften a bit, but it’s still delicious.
Frequently Asked Questions
Final Thoughts
So there you have it – my absolute favorite strawberry jello pie recipe! It’s honestly one of those desserts that brings a smile to everyone’s face, no matter their age. The combination of that tangy, fruity jello, the creamy richness from the sweetened condensed milk, and the crunch of the graham cracker crust is just perfection. It’s such a simple recipe, but it truly delivers on flavor and that delightful jiggly texture that just screams fun. I hope you give this strawberry jello pie a try, especially if you’re looking for a no-bake wonder that’s guaranteed to impress without stressing you out. If you enjoyed this, you might also love my no-bake chocolate pudding pie or my lemon icebox cake – they’re in a similar vein of easy, delicious, no-fuss desserts! Let me know in the comments below how yours turns out, or if you have any special family twists you’ve added! Happy baking (or rather, chilling)!
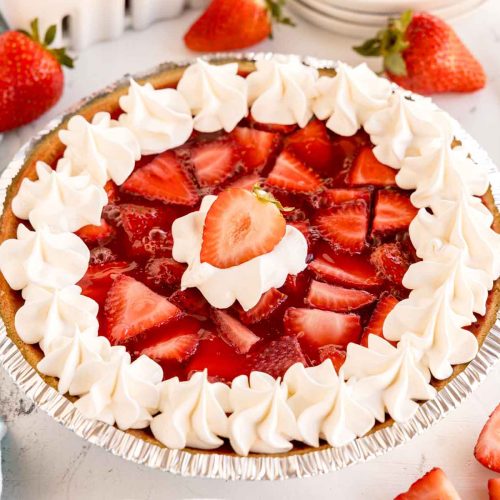
Strawberry Jello Pie
Ingredients
Main Ingredients
- 1 pint Sliced Strawberries
- 1 cup Water
- 1 cup Sugar
- 0.25 cup Dry Strawberry Jello Mix
- 3 TBS Cornstarch
- 1 Pre-made Graham Cracker Pie Crust
- cup Cool Whip (optional)
Instructions
Preparation Steps
- Place sugar, water, jello, and cornstarch into a pot and bring to a boil.
- Let boil for one minute then remove from heat and allow mixture to cool.
- Slice strawberries and add a thick layer into the bottom of the pie crust.
- Once completely cooled, pour strawberry filling over the strawberries. Chill for at least four hours, preferably overnight.
- Top with Cool Whip and garnish with strawberries right before eating (optional).


