There are certain foods that just wrap you up in a hug, aren’t there? For me, it’s always been anything potato-related. My grandma used to make these little baked potatoes, barely bigger than a golf ball, and they were just magical. She’d serve them with a dollop of sour cream and chives, and I swear, they tasted like pure comfort. Over the years, I’ve tweaked her recipe, adding my own little touches, and now I have a version that I think is truly something special. It’s not quite a french fry, not exactly a roasted potato, but somewhere beautifully in between. If you love those crispy-edged, fluffy-inside potato bites, you’re going to adore these little baked potatoes. They’re like the perfect appetizer, side dish, or even a fun snack when you’re craving something savory and incredibly satisfying. Forget complicated potato dishes; this one is a lifesaver on busy nights and always disappears in minutes at my house. My kids actually ask for these all the time, which is saying something!
What are little baked potatoes?
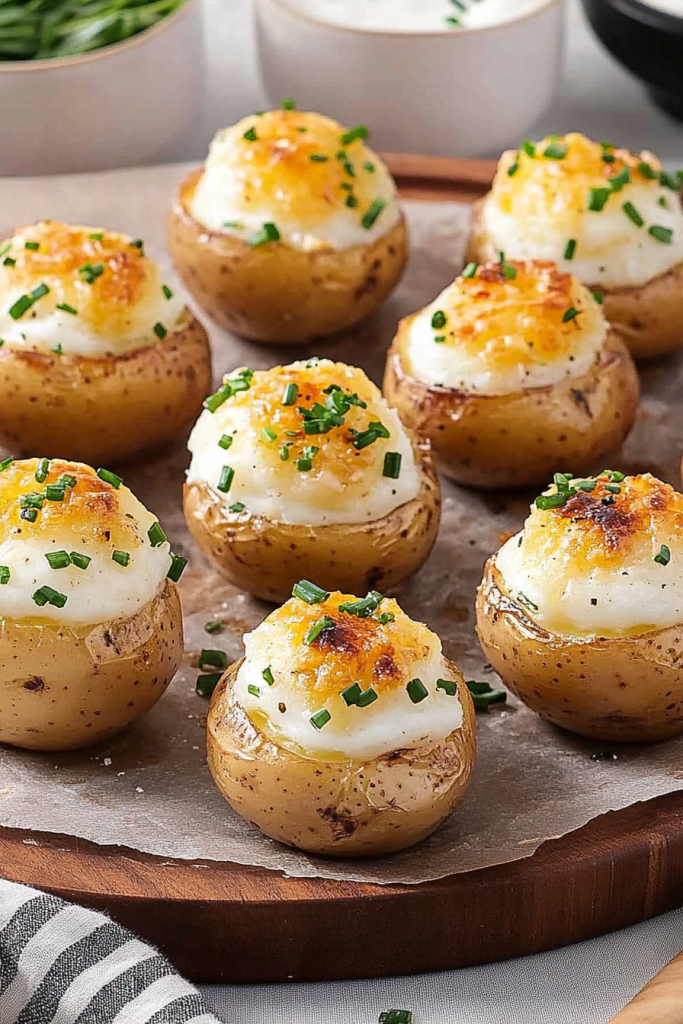
So, what exactly are these “little baked potatoes”? Think of them as the adorable, bite-sized cousins of your classic baked potato. They’re made with small, waxy potatoes, cut into chunks or wedges, then tossed with just the right amount of oil and seasonings before being baked until they’re impossibly tender on the inside and delightfully crisp on the outside. It’s essentially a simplified, super-accessible way to get that perfect baked potato texture without the fuss of peeling and wrestling with larger spuds. The beauty of them is in their simplicity; they let the natural, wonderful flavor of the potato shine through, enhanced by a touch of seasoning and the magic of heat. They’re not fried, so you get that satisfying crispiness without any greasiness, and they bake up so evenly. It’s my go-to when I want something that feels a little bit special but doesn’t require me to spend hours in the kitchen.
Why you’ll love this recipe?
I think you will fall in love with this recipe for a quick dinner.flavor is just out of this world. You get that satisfying, earthy potato taste, elevated by the crispy edges that have a beautiful golden-brown hue and a hint of saltiness. It’s simple, honest flavor that just hits the spot every single time. Then there’s the simplicity. Seriously, this is ridiculously easy to make. You don’t need any fancy equipment or complicated techniques. It’s mostly hands-off time in the oven, which is a huge win for me on busy weeknights. Plus, it’s incredibly cost-efficient. Potatoes are one of the most budget-friendly ingredients out there, and a bag of small potatoes can feed a crowd. Youversatility! Oh my goodness, these little baked potatoes can go with *anything*. Serve them with a barbecue feast, as part of a holiday spread, alongside a simple weeknight chicken breast, or even just with a big salad. I’ve also found they’re fantastic for meal prepping because they reheat so well. What I love most about this recipe, though, is the connection it brings. It reminds me of my grandma, and it’s a dish that brings my own family together around the table. It’s comfort food in its purest form.
How to Make Little Baked Potatoes
Quick Overview
Making these little baked potatoes is a breeze. You’ll start by prepping your small potatoes, getting them perfectly seasoned, and then letting the oven do all the hard work. The key is to get a nice, even coating of oil and seasonings, and then bake them at a good hot temperature so they get that irresistible crisp. It’s a straightforward process: wash, chop, toss, bake, and enjoy! This method guarantees fluffy insides and crispy exteriors, making them a guaranteed hit. It’s the perfect way to elevate simple potatoes into something truly craveable.
Ingredients
For the Potatoes:
You’ll want about 2 pounds of small, waxy potatoes. Yukon Golds or red potatoes work beautifully here because they hold their shape well and have a lovely creamy texture when cooked. Avoid starchy potatoes like Russets, as they tend to fall apart. Make sure they’re all roughly the same size so they cook evenly. I always give them a good scrub under cold water to get them nice and clean, no need to peel unless you absolutely prefer to!
For the Seasoning Blend:
This is where you can have a little fun! My basic go-to includes about 3 tablespoons of olive oil (or avocado oil, which has a higher smoke point), 1 teaspoon of kosher salt, half a teaspoon of black pepper, and a generous pinch of garlic powder. Sometimes, I’ll add a sprinkle of paprika for a little color and warmth, or a touch of dried rosemary for that classic potato pairing. You can really customize this based on what you love!
Optional Toppings:
This is where the magic really happens for serving. Sour cream or Greek yogurt is a must for me, along with freshly chopped chives or parsley. Shredded cheddar cheese, a drizzle of hot sauce, or even a dollop of my homemade aioli are also fantastic options. Just have fun with it!
Step-by-Step Instructions
Step 1: Preheat & Prep Pan
First things first, get your oven preheated to a good hot 400 degrees Fahrenheit (200 degrees Celsius). This high heat is crucial for getting those crispy edges. While the oven is heating up, grab a large baking sheet. You don’t need to grease it because the oil on the potatoes will prevent sticking, but if you’re extra cautious, a light spray of cooking oil or a drizzle of olive oil works too. I find parchment paper can sometimes prevent the bottoms from getting as crispy, so I usually skip it for this recipe, but it does make cleanup a dream if that’s your priority!
Step 2: Wash and Cut the Potatoes
Take your scrubbed potatoes and pat them completely dry with a clean kitchen towel or paper towels. Moisture is the enemy of crispiness, so this step is important! Now, for the cutting. If you have very small potatoes, you can cut them in half. If they’re a bit larger, cut them into quarters or even eighths, aiming for pieces that are roughly 1-inch in size. The goal is to have them all similar in size so they cook at the same rate. Don’t worry about perfection here; rustic is good! Just try to get them all to be roughly uniform for even cooking.
Step 3: Season the Potatoes
Place all your cut potatoes into a large mixing bowl. Drizzle them generously with your olive oil. Then, sprinkle over the kosher salt, black pepper, garlic powder, and any other dried herbs or spices you’re using. Now comes the fun part: get your hands in there! Toss everything together until each piece of potato is thoroughly coated in oil and seasoning. You want to make sure every nook and cranny has that delicious flavor clinging to it. This is where the magic starts to happen; the oil helps them crisp up beautifully and carry all those yummy seasonings.
Step 4: Arrange on Baking Sheet
Once the potatoes are beautifully coated, spread them out in a single layer on your prepared baking sheet. This is super important! Don’t overcrowd the pan. If your potatoes are piled on top of each other, they’ll steam instead of roast, and you won’t get that lovely crispiness. Give them some breathing room; they need space to get golden and delicious. If you have too many potatoes for one pan, it’s much better to use two pans than to cram them all onto one. Trust me on this one, it makes all the difference!
Step 5: Bake to Golden Perfection
Pop that baking sheet into your preheated oven. Now, bake them for about 25-35 minutes. The exact time will depend on the size of your potato pieces and your oven, so keep an eye on them. About halfway through the baking time, I like to give the pan a good shake or flip the potatoes with a spatula. This ensures they brown evenly on all sides and get that perfect crispy texture all around. You’re looking for them to be fork-tender in the center and beautifully golden brown and slightly crispy on the edges.
Step 6: Check for Doneness
You’ll know they’re ready when a fork slides easily into the center of a potato piece, and the edges are wonderfully crisp and browned. If they’re not quite there yet, pop them back in for another 5-10 minutes, checking frequently so they don’t burn. The goal is tender inside, crispy outside. Sometimes, if one side isn’t quite as golden as I’d like, I’ll even give the pan a quick turn in the oven. It’s all about getting that perfect texture!
Step 7: Serve Warm
Once they’re perfectly baked, carefully remove the baking sheet from the oven. Transfer the little baked potatoes to a serving bowl immediately. These are best served hot, right out of the oven, when they’re at their crispiest. Now it’s time for the fun part: topping them! Pile on your favorite toppings like sour cream, chives, cheese, or whatever else your heart desires. The warmth of the potatoes will melt the cheese beautifully. Enjoy every single delicious bite!
What to Serve It With
Oh, the possibilities are endless! These little baked potatoes are so incredibly versatile. For breakfast, I love serving them alongside scrambled eggs and crispy bacon. A sprinkle of chives makes them feel special, and they’re a hearty start to the day that isn’t too heavy. For brunch, they are a showstopper. Imagine them piled high in a rustic bowl with a dollop of creme fraîche and a scattering of smoked salmon – elegant and delicious! They’re a fantastic addition to any buffet, offering a more interesting potato option than just plain mashed or roasted potatoes. As dessert? Hear me out! While not a traditional dessert, if you’re having a casual get-together and someone has a craving for something savory after a sweet course, these fit the bill perfectly. Or, you could even try a sweet potato variation (though that’s a different recipe entirely!). For cozy snacks, especially on a chilly evening, these are pure comfort. I love just grabbing a handful while I’m watching a movie. They pair wonderfully with a hearty bowl of chili or even just a big green salad. My family loves them with grilled chicken or burgers, and they’re always a hit at barbecues. Honestly, they’re so good, they can stand alone, but they definitely elevate any meal they accompany.
Top Tips for Perfecting Your Little Baked Potatoes
After making these countless times, I’ve picked up a few tricks that really make a difference. For potato prep, always make sure they are thoroughly dry after washing. Even a little moisture can turn that desired crispiness into sogginess. I prefer not to peel them; the skin adds a nice texture and holds in so much flavor and nutrients. When it comes to mixing, don’t be shy with the oil and seasonings, but ensure everything is evenly distributed. I always use my hands for this step; it’s the most effective way to get every single potato piece coated. Overmixing isn’t really an issue with potatoes like it is with batters, but you want to avoid bruising them too much. For baking, the single layer is non-negotiable. I’ve learned the hard way that overcrowding leads to steamed, sad potatoes. Give them space! If you want an extra crispy bottom, consider rotating the pan halfway through and then possibly even putting them under the broiler for the last minute or two, but watch them like a hawk to prevent burning. For seasoning variations, I’ve experimented a lot. A dash of smoked paprika gives them a beautiful color and a subtle smoky flavor. A pinch of cayenne pepper adds a nice kick. For a Mediterranean twist, try adding some dried oregano and a squeeze of lemon juice right before serving. I’ve even tried tossing them with a bit of nutritional yeast for a cheesy, umami flavor, which is great for a dairy-free option. The key to ingredient swaps is usually sticking to waxy potatoes. If you can’t find small ones, just cut larger ones into similar-sized pieces. For oil, any neutral high-heat oil like avocado or grapeseed oil works well if you don’t have olive oil.
Storing and Reheating Tips
These little baked potatoes are honestly best enjoyed fresh, but they do store and reheat reasonably well, which makes them a great candidate for meal prep. Room temperature storage isn’t ideal for extended periods, especially in warmer climates, as they can lose their crispiness. They’re fine for a couple of hours after cooling, but I wouldn’t leave them out much longer. For refrigerator storage, let them cool completely before transferring them to an airtight container or a resealable bag. They’ll typically stay good for 3-4 days in the fridge. The crispiness will diminish, but they’ll still be tender and flavorful. Freezer instructions are a bit trickier if you want to maintain maximum crispiness. They can be frozen, but they tend to become a little softer upon thawing and reheating. If you do choose to freeze them, spread them in a single layer on a baking sheet and freeze until solid, then transfer to a freezer-safe bag or container for up to 2-3 months. Reheating is where you can bring back some of that crispiness. The best method is in a hot oven or a toaster oven set to around 400°F (200°C) for 10-15 minutes, or until heated through and crisped up. You can also reheat them in an air fryer for a similar effect. Avoid the microwave if you want any semblance of crispiness; it tends to make them soft and chewy. If you plan to store them and add toppings later, it’s best to keep the toppings separate until you’re ready to serve and reheat.
Frequently Asked Questions
Final Thoughts
I truly hope you give these little baked potatoes a try. They’re more than just a side dish for me; they’re a little taste of home, a reminder of simple pleasures, and a guaranteed crowd-pleaser. The way they get perfectly crisp on the outside while staying fluffy and tender within is just magical, and the fact that they’re so incredibly easy to make makes them a regular in my rotation. They’re the perfect example of how simple ingredients, treated with a little care, can create something truly spectacular. If you love these, you might also enjoy my recipe for crispy roasted sweet potato wedges or my garlic herb roasted potatoes. They offer similar comforting potato goodness! I can’t wait to hear what you think of this recipe. Please leave a comment below and let me know how yours turned out, and especially what toppings you chose! Happy baking (and eating)!

Mini Baked Potatoes
Ingredients
Main Ingredients
- 24 oz bite-size baby potatoes (I used the Honey Gold 2-Bite variety, washed and dried)
- 2 tablespoons extra virgin olive oil
- 1 tablespoons coarse sea salt
- 0.33 cup sour cream
- 2 tablespoons fresh chopped chives
Instructions
Preparation Steps
- Preheat the oven to 400°F. Line a baking sheet with parchment paper, or heavy duty aluminum foil, lightly sprayed with nonstick cooking spray.
- Using your hands, a pastry brush or a paper towel dipped in the extra virgin olive oil, grease the outside of each baby potato and place on the prepared baking sheet.
- Sprinkle both sides of the potatoes with sea salt, and bake for 25 minutes until fork tender.
- Remove the potatoes from the oven and let rest on the baking sheet for just a few minutes before carefully splitting down the center of the potatoes. (Keep in mind that you are only wanting to slice, not cut in half)
- Dollop about 1 teaspoon of the sour cream on top of the center of the potatoes and sprinkle with the chopped chives. Serve while hot.


