Oh, where do I even begin with this Margherita pizza? It’s one of those recipes that feels like a warm hug on a plate. I remember the first time I truly nailed it – it was a chaotic Tuesday evening, the kind where everyone’s a bit grumpy and dinner feels like a monumental task. My youngest was about five and kept asking “Are we there yet?” for everything, and my oldest was in the middle of a homework meltdown. I just wanted something simple, something delicious, something that would make everyone forget about the day’s stresses. And this easy Margherita pizza? It was an absolute lifesaver. The aroma that filled the kitchen was instantly calming, and seeing everyone’s faces light up as they took that first bite? Pure magic. It’s so much more than just a pizza; it’s a feeling, a memory in the making, and honestly, it’s probably the most requested thing in our house right now.
What is easy Margherita Pizza?
So, what exactly makes this *easy* Margherita pizza so special? Think of it as the classic Margherita pizza you know and love, but stripped down to its delicious, pure essence, with a few little tweaks that make it unbelievably simple to pull off, even on your busiest weeknights. It’s that iconic combination: a perfectly baked crust, tangy tomato sauce, creamy mozzarella, and fresh basil. But instead of spending ages on a fussy dough or layering multiple complicated components, we’re cutting corners where it counts – making it super approachable. It’s essentially a shortcut to pizza perfection, designed for real life. It’s that reliable recipe you can turn to when you’re craving something comforting and homemade without the fuss.
Why you’ll love this recipe?
Honestly, there are so many reasons why this easy Margherita pizza has become my go-to. First off, the flavor is just *incredible*. That simple combination of sweet tomatoes, creamy mozzarella that just melts into every bite, and the fresh, peppery bite of basil is a classic for a reason. It hits all the right notes. But what really seals the deal for me is the simplicity. I’m talking about a pizza that tastes like you slaved over it for hours, but in reality, you can have it on the table in less than an hour. This is a recipe that truly delivers on its promise of being *easy*. And let’s talk about cost-efficiency; most of the ingredients are pantry staples or readily available at any grocery store, making it a budget-friendly option for feeding the whole family. It’s also surprisingly versatile. While it’s a perfect Margherita, you can easily add a few extra toppings if you’re feeling adventurous, or serve it up as is, and everyone will be happy. What I love most about this easy Margherita pizza is that it proves you don’t need complicated techniques or fancy ingredients to create something truly spectacular. It’s the kind of recipe that makes you feel like a kitchen rockstar without breaking a sweat!
How do I make Margherita Pizza?
Quick Overview
This is the ultimate no-fuss pizza experience. We’ll be starting with a simple, quick dough that requires minimal kneading, a vibrant tomato sauce made from just a few pantry heroes, and the classic Margherita toppings. The magic lies in its speed and simplicity, proving that incredible homemade pizza is well within reach, even when you’re short on time. You get that satisfying crunch from the crust, the gooey cheese, and the burst of freshness from the basil – all with minimal effort. It’s the kind of recipe that makes you wonder why you ever ordered takeout!
Ingredients
What is the best pizza dough recipe?
2 ½ cups all-purpose flour, plus more for dusting
1 teaspoon instant yeast
1 teaspoon salt
1 cup warm water (about 105-115°F)
1 tablespoon Olive oil
For the Sauce:
1 (15 ounce) can crushed tomatoes (good quality makes a difference here!)
1 clove garlic, minced (or ½ teaspoon garlic powder if you’re in a pinch)
½ teaspoon dried oregano
Salt and freshly ground Black Pepper to taste
Pinch of sugar (optional, to balance acidity)
For the Toppings:
8 ounces fresh mozzarella, sliced or torn into pieces
Fresh basil leaves, for topping
Extra virgin olive oil, for drizzling
Step-by-Step Instructions
Step 1: Preheat & Prep Pan
First things first, let’s get that oven roaring! Preheat your oven to its highest setting, usually around 475-500°F (245-260°C). If you have a pizza stone or steel, place it in the oven while it preheats. If not, a sturdy baking sheet will do just fine – just make sure it’s preheated too, for that extra crispy crust. While the oven heats up, lightly flour a clean surface or a large cutting board where you’ll shape your pizza.
Step 2: Mix Dry Ingredients
In a large bowl, whisk together the flour, instant yeast, and salt. Giving them a good whisk ensures the yeast and salt are evenly distributed, which is key for a consistent dough. It might seem simple, but it really helps avoid any pockets of saltiness or under-risen spots later on.
Step 3: Mix Wet Ingredients
Pour the warm water into the dry ingredients. Add the tablespoon of olive oil. The warm water is crucial because it activates the yeast, making our dough nice and puffy. Too hot and you’ll kill the yeast, too cold and it won’t activate properly. Just aim for comfortably warm to the touch.
Step 4: Combine
Using a wooden spoon or a spatula, mix everything together until a shaggy dough forms. It will look messy and sticky, and that’s totally okay! Then, turn the dough out onto your lightly floured surface. Knead gently for about 3-5 minutes, just until it comes together into a relatively smooth ball. This dough doesn’t need a ton of kneading; we’re going for a tender crust, not a chewy one. If it’s super sticky, add a tiny bit more flour, but don’t go overboard. Once it’s a cohesive ball, place it back in the bowl, cover it with a damp kitchen towel or plastic wrap, and let it rest for about 15-20 minutes. This short rest allows the gluten to relax, making it easier to shape.
Step 5: Prepare Filling
While the dough is resting, let’s make our super simple sauce. In a small bowl, combine the crushed tomatoes, minced garlic (or garlic powder), dried oregano, salt, pepper, and that optional pinch of sugar. Give it a good stir. Taste it and adjust seasonings if needed. This is your shortcut sauce – it’s fresh, bright, and tastes so much better than anything from a jar. For the cheese, if you’re using a ball of fresh mozzarella, slice or tear it into bite-sized pieces. Patting it dry with a paper towel can help prevent your pizza from getting too watery.
Step 6: Layer & Swirl
Once the dough has rested, punch it down gently. Shape it into your desired pizza form – either a classic round or a rustic rectangle. You can do this by stretching it with your hands or using a rolling pin. Try to get the edges slightly thicker for a nice crust. Transfer the shaped dough to a piece of parchment paper for easy transfer to your hot stone or baking sheet. Spoon the tomato sauce evenly over the dough, leaving a small border for the crust. Then, artfully arrange your mozzarella pieces over the sauce. Don’t overcrowd it; you want that beautiful cheese melt.
Step 7: Bake
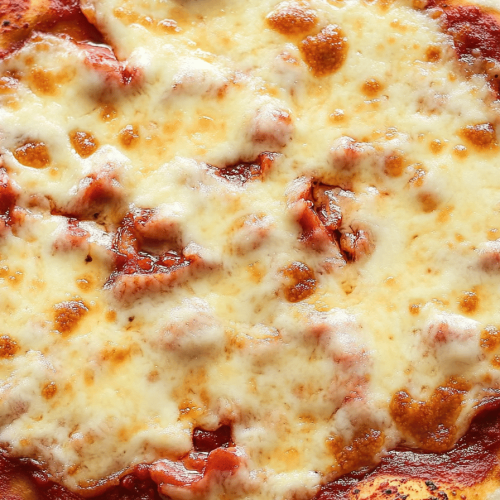
Carefully slide your pizza (on the parchment paper) onto the preheated pizza stone, steel, or baking sheet in the oven. Bake for 10-15 minutes, or until the crust is golden brown and the cheese is bubbly and slightly browned in spots. Keep an eye on it, as oven temperatures can vary wildly! You want that perfect balance of cooked-through crust and melted cheese.
Step 8: Cool & Glaze
Once it’s out of the oven, let the pizza cool for just a minute or two. This is important so the cheese doesn’t slide off when you cut it. Drizzle a little extra virgin olive oil over the top – it adds a lovely sheen and extra flavor. Scatter fresh basil leaves generously over the hot pizza right before serving. The heat of the pizza will wilt them slightly and release their amazing aroma. This is my absolute favorite part – that pop of green and the fresh fragrance!
Step 9: Slice & Serve
Use a sharp pizza cutter or a large knife to slice your masterpiece. Serve immediately while it’s hot and bubbly. The contrast between the warm, melty cheese and the fresh basil is divine. This easy Margherita pizza is best enjoyed right away, but trust me, it rarely lasts that long!
What to Serve It With
This easy Margherita pizza is so versatile, it’s practically a meal in itself, but it plays wonderfully with a few simple accompaniments. For a truly delightful breakfast treat (yes, I’m a fan!), a slice of this, maybe with a fried egg on top and a side of fruit, is surprisingly satisfying. For a more elegant brunch, I love to serve it alongside a light, crisp green salad with a lemon vinaigrette, or perhaps some roasted asparagus. It’s perfect for a casual weeknight dinner, of course, but it also holds its own for more special occasions. Think of it as a blank canvas! As a dessert, while a bit unconventional, a small slice with a drizzle of balsamic glaze can be surprisingly sophisticated. But for truly cozy snacks? It’s the star. I often pair a slice with a simple bowl of Tomato Soup or some garlic bread for an ultimate comfort food experience. My family tradition is to have it with a big, colorful Caesar salad – the crisp lettuce and creamy dressing are the perfect contrast to the warm, cheesy pizza. It’s about creating those simple, happy moments around the table, and this pizza always delivers.
Top Tips for Perfecting Your Easy Margherita Pizza
Over the years, I’ve picked up a few tricks that make this easy Margherita pizza even better. For the dough, don’t be afraid of a slightly sticky dough – it often leads to a more tender crust. Just keep your hands floured when kneading. If your dough feels too stiff, add water a teaspoon at a time; too wet, add flour. When it comes to the sauce, using good quality crushed tomatoes is really the game-changer. San Marzano tomatoes are fantastic if you can find them. Don’t skip tasting and adjusting the seasoning; that little pinch of sugar can really smooth out the tomato flavor. For the mozzarella, fresh is best here. If you use pre-shredded, it won’t melt as beautifully. Patting the fresh mozzarella dry is a small step, but it really helps prevent a soggy pizza. When you’re shaping the dough, work gently; you want to keep those air bubbles intact for a lighter crust. And remember that hot oven and preheated surface – that’s what gives you that coveted crispy bottom. I’ve learned the hard way that a too-cool oven results in a chewy, pale crust, and nobody wants that! If your oven has a “pizza” or convection setting, use it! For variations, I’ve experimented with adding a sprinkle of Parmesan cheese to the sauce for an extra salty kick, or a few red pepper flakes for a hint of heat. Baking times can vary, so keep an eye on your pizza – you’re looking for that gorgeous golden-brown crust and bubbly, slightly browned cheese. And finally, don’t skimp on the fresh basil; it’s the crown jewel that really elevates the whole thing. It’s amazing how much flavor it adds!
Storing and Reheating Tips
Now, about leftovers – if there are any! Honestly, this pizza is so good, we rarely have any. But if you do find yourself with a slice or two, proper storage is key. At room temperature, it’s best to enjoy it within two hours. After that, bacteria can start to grow. If you need to store it for a bit longer, the refrigerator is your best bet. Wrap individual slices tightly in plastic wrap or foil, or place them in an airtight container. It should stay good in the fridge for about 2-3 days. Quality might degrade a little, but it’s still perfectly edible. For longer storage, freezing is an option. Wrap slices very securely in plastic wrap, then in aluminum foil or place them in a freezer-safe bag. Properly wrapped, it can last in the freezer for up to 2-3 months. When you’re ready to reheat, there are a few ways to go. For best results, especially if you want that crispy crust back, reheat slices in a preheated oven or toaster oven at around 375°F (190°C) for about 5-10 minutes, or until heated through and the crust is crispy again. A skillet on the stovetop over medium-low heat also works wonders for reviving a slice – place the pizza in a dry skillet, cover, and heat until the cheese is melted and the bottom is crisp. Microwaving is the quickest method, but it can make the crust a bit chewy, so I usually reserve that for when I’m really in a rush. For frozen pizza, it’s best to thaw it in the refrigerator overnight before reheating using the oven or skillet method for optimal texture.
Frequently Asked Questions
Final Thoughts
So there you have it – my ridiculously easy Margherita pizza recipe! It’s the kind of dish that brings people together, sparks joy, and proves that delicious, homemade food doesn’t need to be complicated. It’s a testament to the beauty of simple, quality ingredients coming together perfectly. I truly hope this recipe becomes a staple in your kitchen too. If you give it a try, please let me know how it turns out in the comments below! I’d love to hear about your pizza triumphs, any creative twists you add, or even just how much your family devoured it. And if you enjoyed this, you might also love my No-Knead Focaccia Bread or my Quick Garlic Herb Pasta for more easy weeknight wins. Happy baking, and enjoy every cheesy, tomato-y, basil-infused bite!
easy margherita pizza
Ingredients
Pizza Dough
- 1 cup all purpose or white whole wheat flour plus more for dusting
- 1.5 teaspoons baking powder
- 0.5 teaspoon kosher salt
- 1 cup 0% Greek yogurt not regular, drained if there's any liquid
Sauce
- 0.33 cup canned san marzano tomatoes crushed by hand
- 1 clove garlic minced
- 0.25 teaspoon kosher salt
- 1 pinch dried oregano
- 1 pinch fresh black pepper to taste
Toppings
- 4 ounces fresh mozzarella cheese sliced thin and torn by hand
- 1 bunch fresh basil torn for topping
- extra virgin olive oil optional for drizzling
Instructions
Preparation Steps
- In a medium bowl combine the flour, baking powder and salt and whisk well.
- Add the yogurt and mix with a fork or spatula until well combined, it will look like small crumbles.
- Lightly dust flour on a work surface and remove dough from the bowl, knead the dough a few times until dough is tacky, but not sticky, about 20 turns (it should not leave dough on your hand when you pull away).
- Preheat oven to 450F. I like to use a pizza stone, and preheat the stone in the oven as well. If using a round pizza pan or sheet pan, spray with oil.
- Sprinkle a work surface and rolling pin with a little flour and roll the dough out into a large thin round or oval (or you can make 2 smaller pies).
- Lay the dough out onto the oiled nonstick pizza dish or sheet pan.
- Spread the sauce over the crust. Top with cheese and place the pan on the pizza stone, bake 10 to 12 minutes or until the cheese is bubbly and the crust is cooked through.
- Transfer to a cutting board, top with basil and drizzle with olive oil, if desired. Slice the pie into 8 slices.


