Oh, you know those days when you just *need* something comforting, something that smells like home and tastes like a warm hug? That’s exactly when I reach for this pumpkin cookie recipe. It’s not just any pumpkin cookie, mind you. These are the kind that disappear the moment they hit the cooling rack, the ones my family practically begs me to make, especially as the leaves start to turn. I remember the first time I tried to make a truly *great* pumpkin cookie – it was a disaster! Too dry, too flat, just… sad. But this recipe? It’s a lifesaver. It hits all the right notes: soft, chewy centers, just the right amount of spice, and that gorgeous swirl of creamy frosting. Honestly, if you’ve ever been intimidated by baking, or just looking for that perfect fall treat that doesn’t require a whole afternoon, you are in for such a treat. Think of them as a little slice of autumn magic, way easier than a full-blown pumpkin pie but with all that comforting flavor.
What are some of the best pumpkin cookies?
So, what exactly are these little beauties I’m raving about? Think of them as the ultimate bridge between a cakey cookie and a chewy cookie, with a delightful little tang from cream cheese frosting swirled right into the batter. It’s like getting a hug from a spiced cake and a soft cookie all at once. The name, “Pumpkin Swirl Cookies” (or whatever I feel like calling them that day!), really just captures the essence of what happens when that rich, spiced pumpkin batter meets a creamy, slightly tart cream cheese swirl before it bakes. It’s not a complicated concept, but the execution? Oh, it’s pure genius in its simplicity. They’re essentially soft, spiced pumpkin cookies that get a beautiful, marbled effect and an extra layer of deliciousness from the cream cheese. It’s the kind of cookie that makes you close your eyes and just savor it.
Why you’ll love this recipe?
There are so many reasons why I’ve made this recipe a staple in my kitchen, and I just know you’re going to fall in love with it too. First off, the FLAVOR is just out of this world. You get that unmistakable warmth of pumpkin and cinnamon, nutmeg, and a hint of cloves that just screams autumn. But what really sets these apart is that subtle cream cheese swirl; it cuts through the sweetness perfectly and adds this amazing creaminess. It’s not overpowering, just enough to make you think, “What *is* that delicious little something?”
Then there’s the SIMPLICITY. I know, I know, baking can sometimes feel like a chore, but trust me, these are surprisingly easy. You mix up a wet and dry batch, swirl them together, and boom – cookies ready for the oven. There’s no fancy equipment needed, and the steps are straightforward enough that even if you’re new to baking, you’ll nail it. I often whip these up on a busy weeknight when I just need a little something sweet. They’re also incredibly COST-EFFECTIVE. Most of the ingredients are pantry staples, and pumpkin puree is usually pretty affordable, especially when it’s in season. You get a whole lot of deliciousness for your dollar.
And the VERSATILITY! While they are absolutely divine on their own, I love how they pair with so many things. I’ll often serve them with a simple cup of coffee, but they’re also fantastic alongside a scoop of vanilla ice cream for an impromptu dessert. They’re perfect for bake sales, potlucks, or just having on hand for unexpected guests. Honestly, what I love most about this recipe is that it delivers on pure comfort and joy, without demanding hours in the kitchen. It’s the kind of treat that feels special but is so approachable. If you enjoyed my Chewy Ginger Molasses Cookies, you’ll adore the cozy spice notes here, but with that wonderful pumpkin twist!
How do you make pumpkin cookies?
Quick Overview
This recipe is all about creating two simple batters – a spiced pumpkin base and a tangy cream cheese swirl – and then artfully combining them. You’ll mix your dry and wet ingredients separately for each part, then gently fold them together to create those beautiful marbled patterns before baking. The result is a cookie that’s incredibly soft, bursting with fall flavor, and has a delightful creaminess from the swirl. It’s a straightforward process that yields impressive results, perfect for anyone looking for a foolproof, delicious pumpkin cookie.
Ingredients
For the Main Pumpkin Batter:
Here’s what you’ll need to get that gorgeous pumpkin flavor going. I always opt for 100% pure pumpkin puree, not pumpkin pie filling – it makes a world of difference in taste and texture. You can usually find it in a can near the other canned fruits and vegetables.
- 1 cup (2 sticks) unsalted butter, softened: Make sure it’s really soft, almost like softened cream cheese. This helps it cream beautifully with the sugar.
- 1 ½ cups granulated sugar: For sweetness and that classic cookie structure.
- 2 large eggs: Room temperature is best; they incorporate more smoothly.
- 1 teaspoon vanilla extract: A good quality vanilla really shines here.
- 1 cup 100% pure pumpkin puree: Again, unsweetened is key!
- 2 ½ cups all-purpose flour: Spooned and leveled, not scooped, for accurate measurement.
- 1 teaspoon baking soda: This gives them a nice lift.
- ½ teaspoon baking powder: For extra tenderness.
- 1 teaspoon ground cinnamon: The cornerstone of fall spices.
- ½ teaspoon ground nutmeg: Adds that warm, slightly sweet depth.
- ¼ teaspoon ground cloves: Just a pinch adds a wonderful aromatic kick.
- ½ teaspoon salt: Balances the sweetness and brings out all the flavors.
For the Cream Cheese Swirl:
This is where the magic happens! It’s a simple, luscious mixture that adds a wonderful tang and visual appeal.
- 4 ounces cream cheese, softened: Make sure it’s truly soft so it blends smoothly. Full-fat will give you the best results.
- ¼ cup powdered sugar: To sweeten the cream cheese just a touch.
- ½ teaspoon vanilla extract: Enhances the creaminess.
For the Glaze (Optional, but highly recommended!):
This glaze is super simple and adds a lovely finish, but honestly, they’re fantastic even without it!
- 1 ½ cups powdered sugar: Sifted to avoid lumps.
- 2-3 tablespoons milk (or half-and-half for extra richness): Start with 2 and add more until you get your desired consistency.
- ½ teaspoon vanilla extract: For a hint of flavor.
Step-by-Step Instructions
Step 1: Preheat & Prep Pan
First things first, let’s get that oven ready. Preheat it to 375°F (190°C). I like to line my baking sheets with parchment paper. It’s a lifesaver for cleanup and ensures the cookies don’t stick, giving them a nice, even bake. You can also use silicone baking mats if you have them.
Step 2: Mix Dry Ingredients
In a medium bowl, whisk together the flour, baking soda, baking powder, cinnamon, nutmeg, cloves, and salt. Whisking them together ensures all the spices and leavening agents are evenly distributed, which is super important for consistent cookies. I always give it a good whisk for about 30 seconds to make sure everything is well combined and there are no little clumps.
Step 3: Mix Wet Ingredients
In a large bowl, beat the softened butter and granulated sugar together with an electric mixer (or a whisk and some elbow grease!) until light and fluffy. This usually takes about 2-3 minutes. Then, beat in the eggs one at a time, making sure each is fully incorporated before adding the next. Stir in the vanilla extract and the pumpkin puree until everything is smoothly combined. It might look a little loose at this stage, and that’s perfectly fine!
Step 4: Combine
Gradually add the dry ingredients to the wet ingredients, mixing on low speed (or stirring with a spatula) until just combined. Be careful not to overmix here! Overmixing can develop the gluten in the flour too much, leading to tough cookies. You want to mix until you no longer see streaks of dry flour. A few little streaks are okay because you’ll be swirling in the cream cheese mixture next.
Step 5: Prepare Filling
In a small bowl, beat the softened cream cheese with the powdered sugar and vanilla extract until smooth and creamy. You can use a fork or a small whisk for this. You want it to be completely smooth so it swirls beautifully into the pumpkin batter.
Step 6: Layer & Swirl
Now for the fun part! Drop spoonfuls of the cream cheese mixture over the pumpkin cookie dough. Then, using a knife or a skewer, gently swirl the cream cheese into the dough. Don’t over-swirl! You want distinct ribbons and pockets of cream cheese, not a uniform color. Think of it like marbling paint – you want those beautiful patterns to show up in the baked cookies. I like to do about 4-5 gentle swirls for each bit of dough.
Step 7: Bake
Drop rounded tablespoons of the swirled dough onto your prepared baking sheets, leaving about 2 inches between them. I usually get about 12-15 cookies per batch. Bake for 10-12 minutes, or until the edges are set and the centers look slightly soft. They’ll continue to cook a little on the baking sheet after you take them out. A toothpick inserted into the center should come out with moist crumbs attached, not wet batter.
Step 8: Cool & Glaze
Let the cookies cool on the baking sheets for about 5 minutes before transferring them to a wire rack to cool completely. This is crucial! If you try to move them too soon, they might break. Once they are completely cool, you can whip up the glaze. In a small bowl, whisk together the sifted powdered sugar, vanilla extract, and 2 tablespoons of milk. Add more milk, a teaspoon at a time, until you reach a drizzle-able consistency. Drizzle generously over the cooled cookies. Let the glaze set for about 15-20 minutes before serving.
Step 9: Slice & Serve
These are best served slightly warm or at room temperature. If you’ve glazed them, the glaze will have set nicely. They look beautiful stacked on a plate, and the swirl pattern is always a showstopper. Grab a cup of coffee or a glass of milk, and enjoy these little bites of autumn bliss!
What to Serve It With
These pumpkin cookies are so versatile, they truly fit into any occasion! For a cozy Breakfast, they are an absolute dream with a steaming mug of coffee or a chai latte. The warm spices in the cookie just sing alongside those comforting morning beverages. I love placing a few on a small plate with a dollop of Greek yogurt and a drizzle of honey for a slightly more substantial start to the day.
When it comes to Brunch, they step up their game. Imagine these alongside a spread of pastries and fruit salad – they add that perfect touch of seasonal warmth. They look so pretty arranged on a tiered stand, especially if you’ve drizzled them with that lovely glaze. A mimosa or a sparkling cider pairs wonderfully with their sweetness.
As a Dessert, these cookies are simply divine. Serve them slightly warm with a scoop of vanilla bean ice cream for a deconstructed pie experience. They’re also wonderful after dinner with a rich espresso or a small glass of dessert wine. The cream cheese swirl adds just enough tang to make them feel sophisticated enough for dessert, but they’re still wonderfully homey.
And for those perfect Cozy Snacks, well, that’s where they truly shine in their simplest form. Just grab one (or two!) straight from the cookie jar with a glass of cold milk. They’re the ultimate comfort food for an afternoon treat or a late-night craving. My family tradition is to have these with hot chocolate on a chilly evening – it’s pure happiness. I’ve also found they pair surprisingly well with a sharp cheddar cheese for a sweet and savory bite, which is always a hit at parties!
Top Tips for Perfecting Your Pumpkin Cookies
Over the years, I’ve learned a few tricks that really make these pumpkin cookies shine. Let’s dive into some of my best advice to ensure yours turn out absolutely perfect every single time.
Zucchini Prep: Wait, did I say zucchini? Oops! I meant PUMPKIN PREP! My mind is clearly still in fall baking mode! For these pumpkin cookies, the most important prep is ensuring you’re using pure pumpkin puree, not pumpkin pie filling. The filling has added sugar and spices, which will throw off the balance of your cookies. Also, make sure your pumpkin puree isn’t too watery. If it seems exceptionally thin, you can give it a gentle drain in a fine-mesh sieve for a few minutes, though usually, the canned stuff is just right. I’ve also found that using room temperature ingredients for the main batter helps everything emulsify beautifully, leading to a smoother, more consistent dough.
Mixing Advice: The golden rule with cookies is usually “don’t overmix.” This is especially true for these. Once you add the dry ingredients to the wet, mix only until *just* combined. You don’t want to see any large streaks of dry flour, but a few tiny ones are fine. Overmixing develops the gluten in the flour, which can make your cookies tough and less tender. For the swirling, the goal is ribbons, not a uniform color. Gentle, broad strokes with a knife or skewer are key to achieving that gorgeous marbled effect. If you swirl too much, you’ll lose the beautiful contrast between the pumpkin and cream cheese flavors and textures.
Swirl Customization: This is where you can really let your artistic side out! For a classic swirl, I like to drop dollops of the cream cheese mixture over the pumpkin dough and then use the tip of a butter knife or a skewer to gently drag it through the dough in a figure-eight or spiral motion. Don’t be afraid to experiment with the number and size of the cream cheese dollops. You can also use different colored extracts (like a tiny bit of orange extract for a boost) or even a few drops of food coloring in the cream cheese for a fun twist, though I usually keep it simple and natural.
Ingredient Swaps: While this recipe is fantastic as is, I know some of you like to get creative! For a dairy-free option, you can try using a good quality vegan butter and a plant-based cream cheese for the swirl. The texture might be slightly different, but it should still be delicious. I’ve also experimented with using maple syrup instead of some of the granulated sugar in the pumpkin batter, but you’ll need to reduce the pumpkin puree slightly to compensate for the liquid in the syrup, and the cookie texture will be chewier and flatter. Always start with small substitutions and adjust accordingly!
Baking Tips: Oven temperatures can be wildly different! I always recommend an oven thermometer to ensure your oven is actually at 375°F. Baking time is also a guideline. You’re looking for set edges and a slightly soft center. The cookies will firm up as they cool. If you find your cookies are spreading too much, make sure your butter wasn’t too soft (it should be pliable, not melted) and that you didn’t overmix the batter. Placing the baking sheet in the center rack of your oven usually ensures the most even baking. I’ve also learned that letting them cool on the baking sheet for a good 5 minutes before transferring to a wire rack is critical for them to hold their shape.
Glaze Variations: While the simple vanilla glaze is my go-to, you can get creative here too! For a more festive flavor, add a pinch of pumpkin pie spice to the glaze, or a tiny bit of orange zest. If you like a thinner glaze, just add a little more milk. For a thicker, pipeable glaze, use less milk. You can also skip the glaze altogether and just dust the cooled cookies with a little powdered sugar or cinnamon sugar for a different look and taste. I’ve even seen people dip half of the cookie in melted chocolate – talk about decadent!
Storing and Reheating Tips
Keeping these pumpkin cookies fresh and delicious is actually quite simple, and I’ve found a few methods that work like a charm. My family tends to devour them pretty quickly, but when I do need to store them, here’s what I do.
Room Temperature: For cookies without glaze, I store them in an airtight container at room temperature for up to 3-4 days. They tend to stay nice and soft this way. If they have the glaze, it’s best to store them in a single layer in a container so the glaze doesn’t stick to other cookies. I usually don’t store glazed cookies at room temperature for more than 2 days, as the glaze can start to get a little sticky or soft.
Refrigerator Storage: If you live in a warm climate or just want them to last a bit longer, you can store them in the refrigerator. Place them in an airtight container. They’ll keep well for about a week. The texture might become a little firmer from the refrigeration, but they’ll still be delicious. I sometimes bring them back to room temperature for about 15-20 minutes before serving, or pop them in the microwave for just 5-10 seconds for a slight warmth and softness.
Freezer Instructions: These cookies freeze beautifully, which is a lifesaver for making ahead of time! I like to freeze them *before* glazing. Place cooled cookies in a single layer on a baking sheet and freeze until firm, then transfer them to a freezer-safe bag or airtight container. They can be frozen for up to 2-3 months. To thaw, simply remove them from the freezer and let them come to room temperature for a few hours. Once thawed, you can then add the glaze if you like. Alternatively, you can freeze glazed cookies, but be sure they are completely set and pack them carefully to prevent damage to the glaze.
Glaze Timing Advice: For the best results, I always recommend glazing cookies that are completely cooled, especially if you plan to store them at room temperature or in the refrigerator. If you’re freezing them, it’s best to freeze the plain cookies and glaze them after thawing and bringing them back to room temperature. This prevents the glaze from becoming frosty or damaged during the freezing and thawing process.
Frequently Asked Questions
Final Thoughts
There you have it, my friends! My absolute favorite pumpkin cookie recipe. I really hope you give these a try because they’re more than just a cookie to me – they’re a little bit of sunshine, a whole lot of comfort, and a reminder of all the good things that come with cozy seasons. The way the spiced pumpkin batter mingles with that tangy cream cheese swirl, creating a cookie that’s perfectly soft, wonderfully flavorful, and just a joy to eat… it’s honestly magic. They’re simple enough for a weeknight treat but special enough to impress any guest. If you love these, you might also enjoy my Spiced Apple Crumble Bars or my Classic Oatmeal Raisin Cookies for more cozy baking inspiration!
I can’t wait to hear how yours turn out! Please, if you make them, leave a comment below and let me know what you think, or share your own little twists and tips. Your feedback and pictures always make my day. Happy baking, and enjoy every single delicious bite!
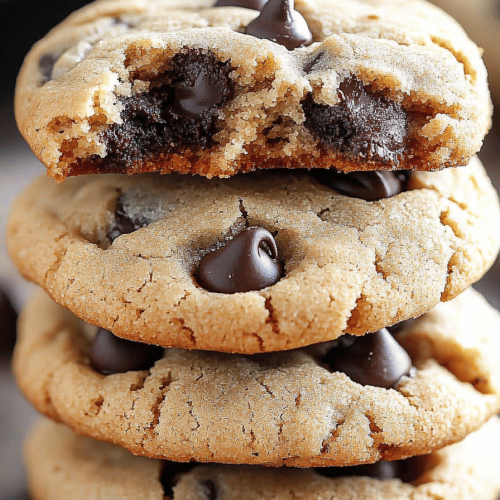
Soft and Chewy Pumpkin Oatmeal Chocolate Chip Cookies
Ingredients
Main Ingredients
- 0.5 cup unsalted butter melted
- 0.5 cup pumpkin puree use the remainder in other recipes
- 0.5 cup granulated sugar
- 0.25 cup light brown sugar packed
- 1 tablespoon molasses mild or medium flavored, not blackstrap
- 1.5 teaspoons vanilla extract or pumpkin pie spice extract
- 1.5 cups old-fashioned whole rolled oats not quick-cook or instant
- 1.25 cups all-purpose flour
- 2 teaspoons pumpkin pie spice a mixture of cinnamon, allspice, cloves, and nutmeg
- 0.5 teaspoon baking soda
- 0.25 teaspoon salt
- 1 cup semi-sweet chocolate chips
Instructions
Preparation Steps
- Melt the butter in a large microwave-safe bowl by heating on high for about 1 minute.
- Whisk in pumpkin puree, granulated sugar, brown sugar, molasses, and vanilla or pumpkin pie spice extract until smooth.
- Add oats, flour, pumpkin pie spice, baking soda, and salt. Stir until just combined.
- Stir in the chocolate chips until evenly distributed.
- Form approximately 13 equal-sized mounds of dough using a 1/4-cup measure or large scoop, then flatten slightly.
- Place dough mounds on a plate, cover with plastic wrap, and refrigerate for at least 3 hours or up to 5 days. Do not bake unchilled dough.
- Preheat oven to 350°F. Line a baking sheet with a Silpat or spray with cooking spray. Bake cookies spaced about 2 inches apart for 12 to 14 minutes until edges are set and centers remain slightly glossy.
- Let cookies cool on the baking sheet for about 10 minutes before serving.
- Store cookies airtight at room temperature up to 1 week or freeze up to 6 months. Alternatively, store unbaked dough refrigerated up to 5 days or frozen up to 4 months.