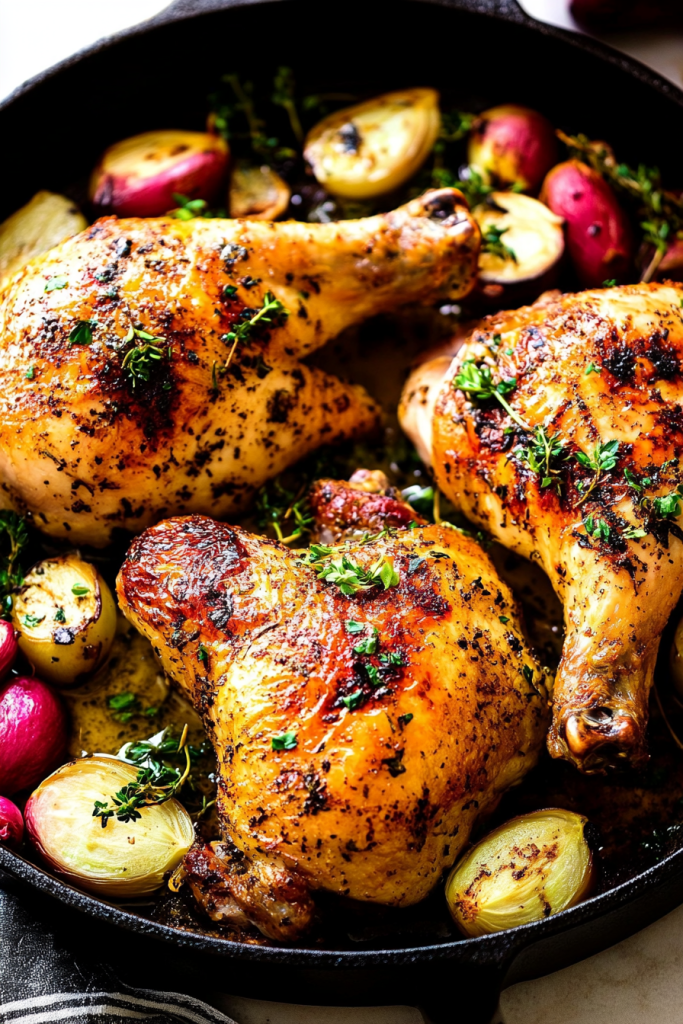
There’s something magical about a spatchcock chicken crackling in the oven, the scent filling the kitchen like a warm hug. I grew up watching my mom flatten birds and roast them until the skin was blistered and gold, and I learned to do the same in my own kitchen. This spatchcock chicken recipe is a cousin to the classic roast chicken you know, but it cooks faster, stays incredibly juicy, and makes the whole house smell like Sunday supper even on a Tuesday. I always tell friends: it’s basically a shortcut to a whole chicken’s best self—crispy skin, evenly cooked meat, and a presentation that looks fancy without a fuss. This one’s a lifesaver on busy nights and doubles beautifully for weekend gatherings. The first time I tried it with a squeeze of lemon and a handful of fresh thyme, the skin crackled like thin biscotti and the meat stayed perfectly tender. My kids actually ask for seconds, which is basically victory in our house.
What is a Spatchcock chicken?
Think of spatchcock chicken as a beautifully butterflied and flattened bird that roasts in half the time with far more even heat. The term spatchcock comes from old English, a playful way to say you’ve split the backbone and pressed the bird flat so it cooks quickly and crisps up all over. It’s essentially a kitchen shortcut to a roast chicken that’s juicy, deeply flavorful, and a little showy without the extra effort. I love this method because it makes weeknights feel celebratory without demanding a long simmer or a ton of hands-on time. You’ll get a crisp, bronzed skin and tender, evenly cooked meat from drum to breast—no more dry white meat or rubbery thighs. It’s the kind of technique that makes you feel like a pro even on a Monday, and that’s something I reach for again and again.
Why you’ll love this recipe?
What I love most about this spatchcock chicken is the texture game it plays. The skin becomes impossibly crisp, almost like a crackly sheet of seasoning that gives way to juicy meat beneath. The marinade is bright but simple—garlic, lemon, olive oil, and herbs—that lifts the natural chicken sweetness without overpowering it. It’s also incredibly forgiving: you can tweak salt, add a pinch of chili for heat, or swap in whatever herbs you’ve got on hand, and you’ll still wind up with something delicious. The cost is friendly, too: a single whole chicken goes a long way, with enough leftovers to tuck into salads, wraps, or quick fried rice. And because the chicken lies flat, heat penetrates more evenly, so you don’t have to babysit the oven for hours. This recipe is a sandbox for flavor experiments—try swapping thyme for oregano, or a touch of honey glaze for a glossy finish. My kids ask for seconds, which is basically a family endorsement you can’t ignore. It’s a crowd-pleaser that feels special enough for guests but simple enough for weeknights, and that balance is exactly why it sits at the top of my weekly rotation.
How do you make Spatchcock Chicken?
Quick Overview
In a nutshell: we flatten the bird, rub it with a zesty spice mix, roast on a hot sheet until the skin shimmers, then rest and glaze. The trick is drying the skin, using a hot oven, and giving the chicken a little time to settle after it comes out. The result is a beautifully browned, juicy chicken with crisp skin and even tenderness all around. It’s not complicated, but it feels special enough for weekend dinners or a big weeknight when you want “wow” without hours in the kitchen. Spatchcock chicken, in my kitchen, is the go-to method when I’ve got company and want to feed a crowd with minimal fuss.
Ingredients
For the Main Marinade:
- 1 whole chicken (3–4 pounds), spatchcocked (backbone removed and flattened) – ask your butcher to do it if you’re unsure, or use kitchen shears and a sturdy knife at home
- 1/4 cup olive oil
- 2 lemons (one zest, one juice)
- 4 garlic cloves, minced
- 1 tablespoon kosher salt
- 1 teaspoon black pepper
- 1 teaspoon smoked paprika (optional)
- 1 teaspoon dried oregano or thyme
- Pinch of red pepper flakes, for a gentle kick (optional)
For the Filling:
- 1 lemon, sliced into rounds, plus a few thyme sprigs
- 2 garlic cloves, thinly sliced
- Salt and pepper to taste
For the Glaze:
- 2 tablespoons honey or maple syrup
- 1 tablespoon soy sauce or tamari for depth
- 1 teaspoon lemon juice
- 1/2 teaspoon chili flakes (optional)
- Pinch of salt

Step-by-Step Instructions
Step 1: Preheat & Prep Pan
Heat your oven to 425°F (220°C). Line a rimmed sheet pan with foil or parchment for easy cleanup. Pat the chicken completely dry with paper towels—this is the little secret that makes the skin turn deeply bronzed. If you’ve got time, leave it uncovered in the fridge for 15–30 minutes to dry out the skin even more. This is where the magic starts. Place the bird on the sheet pan, breast-side up, so the skin has the most exposure to heat. If you pulled out the backbone yourself, you know you’ve already done the hard part—the rest is all about heat, salt, and patience.
Step 2: Mix Dry Ingredients
In a small bowl, combine the salt, pepper, smoked paprika, and oregano. This dry rub does most of the flavor work, especially right on the skin. The paprika helps toward that golden bronzy color without turning bitter. Sprinkle the rub all over the chicken, including the underside, so every inch gets a kiss of seasoning. A quick press with your hands helps it cling for a more even crust.
Step 3: Mix Wet Ingredients
In another bowl, whisk together olive oil, lemon juice, and lemon zest. The zest wakes up the citrus notes and boosts aroma in the pan as it roasts. Stir in the minced garlic. This wet mix is what carries the citrus brightness through the meat and keeps the surface from drying out too quickly. Trust me, this little lemony-garlic bath makes the skin sing.
Step 4: Combine
Drizzle the wet mixture over the seasoned chicken and rub it all over, getting under the skin wherever you can. Use your hands to press down and spread the flavors evenly. Don’t be shy—sliding your fingers between the skin and the meat lets the marinade penetrate and keeps the breast from drying out. If you can, tuck a few slices of lemon and a couple of thyme sprigs underneath the skin in several places for extra aroma.
Step 5: Prepare Filling
Line the cavity with a few lemon rounds and garlic slices, plus a couple of thyme sprigs. This extra layer of citrus and herb perfume helps perfume the interior as it roasts and keeps the drum and thigh areas juicy from the inside out. If you’re not into stuffing, you can skip this, but I recommend giving the cavity a little garlic-lemon love at least a couple of times per roast.
Step 6: Layer & Swirl
Place a few lemon slices and herb sprigs directly on top of the skin. If you want, tuck some under the skin as well to perfume the meat as it cooks. You can also drizzle a touch more glaze over the skin about 15 minutes before the end for an extra lacquered finish. The goal is to have a crisp, shiny, flavorful surface without making the skin soggy or overly sticky.
Step 7: Bake
Roast in the hot oven for about 45–55 minutes, depending on the bird’s size. You’ll know it’s ready when the skin is deeply bronzed and an instant-read thermometer reads 165°F (74°C) in the thickest part of the thigh, with the juices running clear. If you notice the skin browning too quickly, a quick tent with foil will save the finish without derailing the crispness. If your oven runs hot or cool, start checking at the 40-minute mark and use visual cues (color and fragrance) as much as a thermometer.
Step 8: Cool & Glaze
Let the chicken rest for 10–15 minutes after pulling it from the oven. Resting keeps the juices redistributing and ensures the meat remains juicy when you carve. While it rests, whisk together the glaze ingredients and heat slightly to dissolve the honey. Brush a thin layer over the skin for shine, then slice after the glaze sets for a glossy finish that clings to every surface. If you prefer a more restrained finish, skip the glaze and use the pan juices instead as a natural au jus.
Step 9: Slice & Serve
Carve along the breastbone and slice into thick, juicy portions. A sharp knife or carving knife helps you keep clean, even cuts. Arrange the pieces on a platter with a few wedges of lemon and a scatter of fresh herbs. I like to serve this with roasted potatoes and a bright green salad—something crisp and acidic to cut through the richness. The first bite should yield a crack of crispy skin, followed by succulent meat that carries the lemon-garlic-herb brightness straight to your senses. This spatchcock chicken is the kind of dish where you say, “This is exactly what I wanted,” and your family nods in agreement as forks start flying.
What to Serve It With
Side dishes that echo or complement the bright, citrusy, herb-forward profile of this spatchcock chicken are my go-to. Here are a few ideas that run the gamut from casual to a bit fancy, all family-friendly and easy to pull off.
For Breakfast: Slice leftover spatchcock chicken thin and tuck it into a fluffy omelet with a handful of greens, or top buttered toast with warm chicken, a fried egg, and a few capers for a salty, bright start to the day. A quick olive-oil toast with a squeeze of lemon and a sunny-side-up egg over the top makes breakfast feel like a celebration. The day always feels brighter after this kind of start.
For Brunch: Create a light chicken salad with chopped apples, celery, and a dollop of yogurt or mayo, then serve on crusty bread or crostini with a spritz of lemon. Finish with chives and a drizzle of olive oil. Brunch becomes a laid-back, crowd-pleasing affair when you add a few crisp elements like endive or watercress to balance the richness.
As Dessert: Okay, I know it sounds odd, but citrus and honey glaze on the chicken lends itself to a refreshing, bright finish when you pair it with a light citrus-y yogurt dessert or a simple lemon sorbet between bites. The acidity and sweetness echo the glaze in a way that feels surprisingly cohesive, especially after a crowd-pleasing main like this spatchcock chicken.
For Cozy Snacks: Shred the meat into warm tortilla wraps with avocado crema, pickled onions, and a sprinkle of cotija. Or toss it into a quick skillet of rice, black beans, and sautéed peppers for a cozy, no-fuss weeknight dinner that still feels special.
We often keep a bag of lemon wedges and a few extra herbs on the counter so guests can grab a bite and squeeze a final burst of brightness over their plates. It’s these little rituals that make this spatchcock chicken feel homey, not fussy.
Top Tips for Perfecting Your Spatchcock Chicken
Here are a few tricks that have saved dinners more than once. Think of these as the shortcuts I’ve learned after years of cooking this dish, and feel free to adapt them to your kitchen and your family’s taste.
Spatchcock Prep: If you’ve never spatchcocked a chicken before, this is the moment to try it. Use sharp kitchen shears and cut along both sides of the backbone, then press the bird flat. A little extra effort here pays off with faster, more even cooking and crisper skin. If you’re unsure, many butchers will do it for you or can guide you through the process.
Drying Out the Skin: Pat the chicken thoroughly dry and, if possible, air-dry uncovered in the fridge for 15–30 minutes. The drier the skin, the quicker you’ll achieve that crackly finish. I know it sounds extra, but it’s worth it for the texture you end up with.
Salt Early, Taste Later: Salt the skin well, but in the end taste and adjust with a light hand. A little extra salt at the end can wake up flavors without making the dish too salty. If you’re using a glaze, consider the glaze’s salt level too, so you don’t over-season.
Layering Aromatics: Don’t skip the lemon rounds and thyme tucked into the cavity and under the skin. The aroma travels with the steam and flavors the meat from the inside out. You’ll notice a brighter, more cohesive overall flavor if you give attention to this step.
Glaze Timing: If you want a glossy, lacquered look, brush on the glaze during the last 5–7 minutes of roasting. This helps set the glaze without burning it. If you prefer a more natural finish, skip the glaze and rely on pan drippings for a quick jus at the table.
Oven Play: Ovens vary. If yours tends to heat unevenly, rotate the pan halfway through roasting and watch the skin color. A quick tent with foil can save the finish if one side browns too fast.
Leftovers: This is one of those dishes that’s even better the second day. Shred the meat, toss with a squeeze of lemon and a touch of olive oil, and fold it into a warm salad or into a quick fried rice for a next-day dinner that tastes like it took all day to make.
Swirl of Flavor: For a different take, try swapping the lemon for orange or adding a teaspoon of fresh grated ginger to the marinade for a bright citrus-ginger note that feels like a new dish without straying far from your favorite chicken.
Storing and Reheating Tips
Proper storage is the key to keeping spatchcock chicken tasty for days. Here’s how I do it, with a few tips I’ve learned from experience.
Room Temperature: If you’ve got leftovers, aim to keep them in the fridge within two hours of cooking. Cool and refrigerate promptly to preserve juiciness and prevent any risk of spoilage. Leftover portions are perfect for quick lunches or a late-night, after-kids-bedtime snack that still feels homemade and comforting.
Refrigerator Storage: Store in an airtight container or wrapped well to maintain moisture. It’s best within 3–4 days. Reheating on the stovetop with a splash of stock or water helps prevent drying out the meat. A quick gentle simmer is all you need to bring back the tenderness.
Freezer Instructions: For longer storage, portion the meat and freeze it wrapped tightly. It’ll keep for up to 3 months. Thaw in the fridge overnight and reheat gently on the stove or in a low oven to maintain juiciness. The glaze can be re-warmed separately to refresh the surface before serving.
Glaze Timing Advice: If you’re freezing ahead, you can add the glaze after reheating to keep it fresh and shiny. Alternatively, rewarm the glaze separately and brush on after the meat is heated through for the best texture and gloss.
These tips keep the chicken tasting as bright and comforting as the day you first cooked it, even when you’re pulling it from the back of the fridge.
Frequently Asked Questions
Final Thoughts
Spatchcock chicken has become one of my go-to recipes because it feels special without being fussy. The technique keeps the meat incredibly juicy, the skin crackling, and the aroma irresistible as it fills the kitchen. It’s the kind of dish that makes you feel like you’ve staged a little home cooking show for your family, but you did it in your own jeans and an apron splattered with olive oil. I love how flexible it is—swap in different herbs, adjust the heat, or turn leftovers into a bright, quick lunch. If you’re craving something that tastes like a hug from the cook who’s been in your kitchen for years, this spatchcock chicken is it. Happy baking, and I’d love to hear how yours turns out—what tweaks did you try, what sides did you pair it with, and do your kids ask for seconds like mine do? Share your variations in the comments, rate the recipe, and tag me in your mouthwatering photos.


