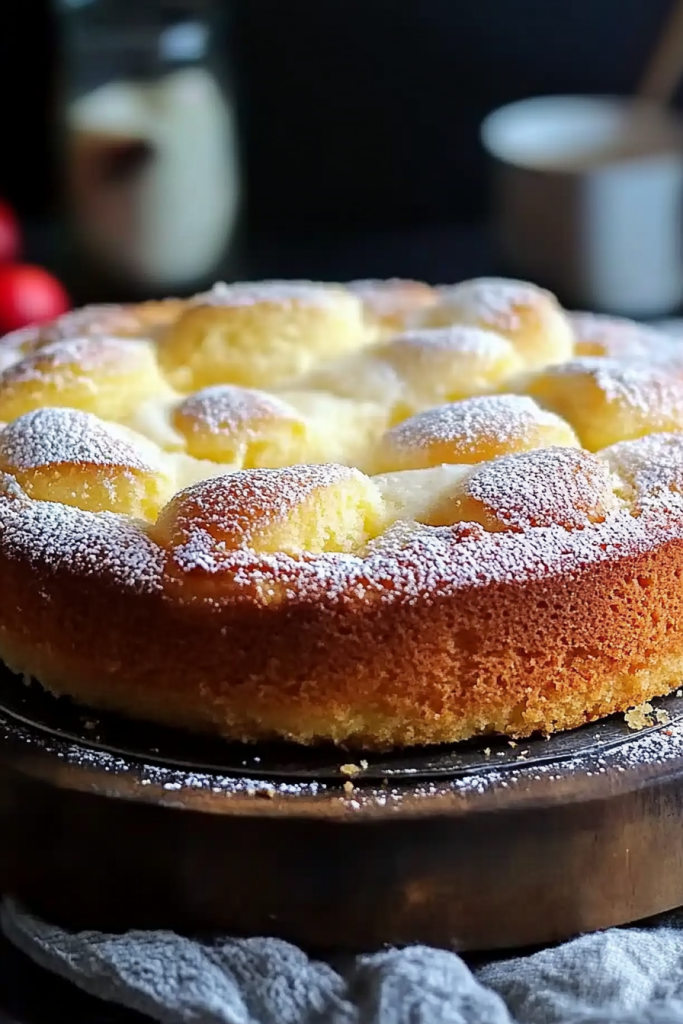
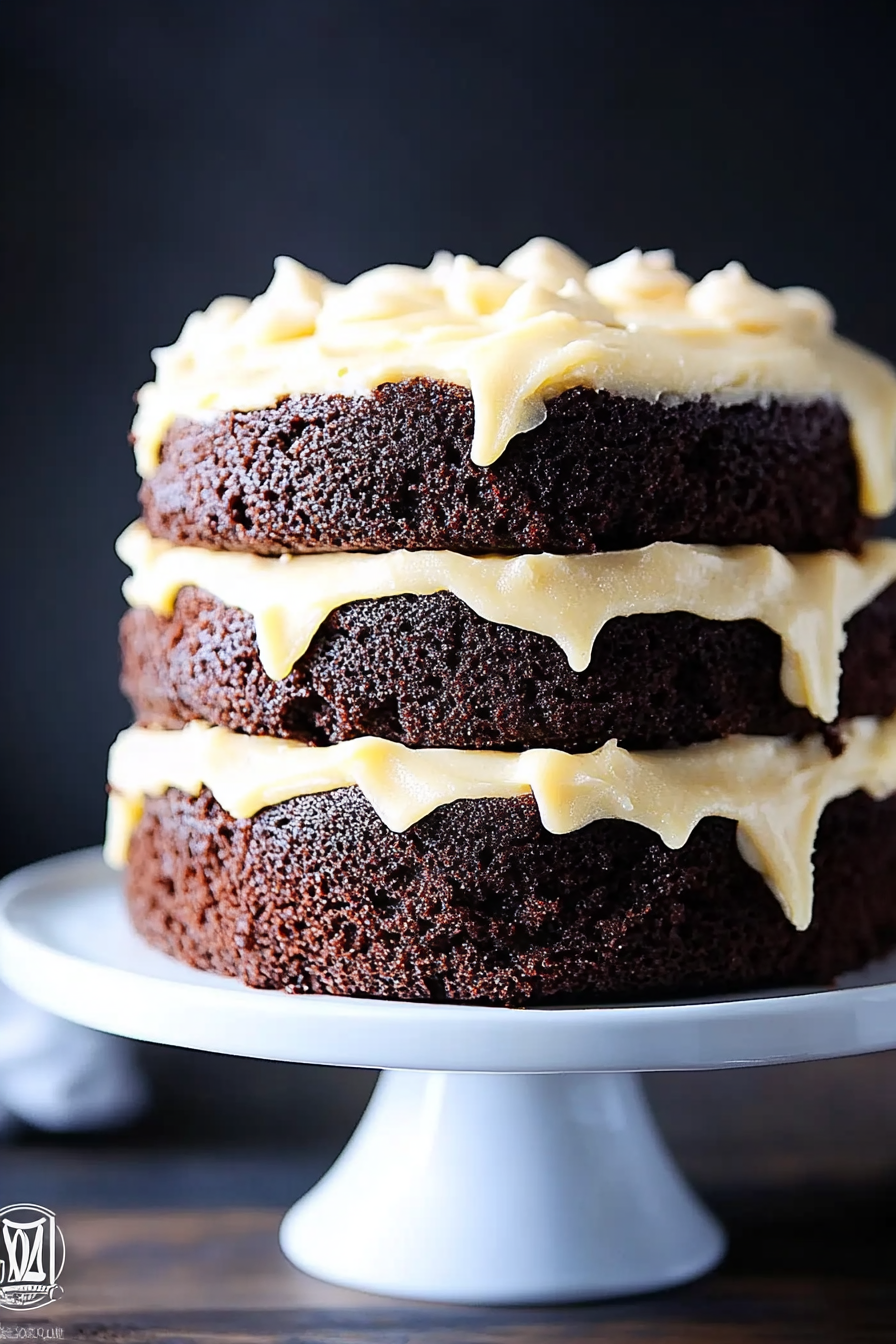
There are some recipes that just feel like a warm hug. This French butter cake is absolutely one of them for me. I remember my Grandma Edith making this for Sunday afternoons, and the entire house would fill with the most incredible aroma. It wasn’t a fancy cake, not by a long shot, but it had this humble magic that made you slow down and savor every single bite. It’s the kind of cake that doesn’t need a whole lot of fanfare, but it’s always the first thing to disappear from the dessert table. Forget those elaborate layer cakes that require a degree in pastry arts; this French butter cake is your secret weapon for those moments when you crave something utterly delicious without the fuss. It’s surprisingly simple, yet the flavor is so rich and satisfying. If you’ve ever had a Pound Cake and wished it had a little more… *something*… then you’re going to adore this.
What is French Butter Cake?
So, what exactly *is* a French Butter Cake? The name itself conjures up images of Parisian patisseries and buttery croissants, but this cake is actually a bit more down-to-earth. Think of it as a love letter to butter, but in cake form! It’s less about delicate crumb and more about rich, dense, comforting goodness. The “French” part, I think, comes from the sheer unapologetic use of butter, which gives it that incredible richness and a slightly fudgy, melt-in-your-mouth texture. It’s not your typical fluffy sponge cake. Instead, it’s dense, moist, and incredibly satisfying. It’s the kind of cake that feels substantial and luxurious, even though the ingredients are usually just pantry staples. It’s essentially a celebration of simple, high-quality ingredients coming together to create something truly special. It’s honest, it’s delicious, and it’s perfect for any time of day.
Why you’ll love this recipe?
Honestly, if I had to pick one cake to have on repeat, this French butter cake would be it. There are so many reasons why I keep coming back to this recipe, and I just know you’ll fall in love with it too. First off, the flavor is just out of this world. It’s deeply buttery, with a subtle sweetness that isn’t overwhelming. It has this lovely golden hue from the butter and eggs, and it just *looks* inviting. Then there’s the texture – it’s wonderfully moist and dense, almost like a rich brownie but lighter, and it just melts in your mouth. It’s not dry or crumbly at all, which is a huge win in my book.
But what I *really* adore about this recipe is how incredibly easy it is. Seriously, you don’t need any fancy equipment or complicated techniques. It’s mostly about creaming butter and sugar, then adding your other ingredients. It’s the kind of cake that’s a lifesaver on busy weeknights when you need a sweet treat but don’t have hours to spare. I’ve even made it on a whim when friends drop by unexpectedly, and it always impresses! Plus, it’s really budget-friendly. The ingredients are simple and readily available, meaning you can whip up this decadent dessert without breaking the bank. And talk about versatile! You can enjoy it plain, with a dusting of powdered sugar, or get a little creative with toppings. It’s perfect with a cup of coffee in the morning, as a delightful brunch treat, or as a satisfying end to any meal. It truly stands on its own, but it also pairs beautifully with so many things.
How do I make [Recipe Name]?
Quick Overview
Making this French butter cake is delightfully straightforward. You’ll start by creaming softened butter and sugar until light and fluffy, which is key for incorporating air. Then, you’ll gradually add eggs, followed by your dry ingredients (flour, baking powder, salt) alternating with your liquid (milk or buttermilk), being careful not to overmix. The batter will be thick, which is exactly what you want for this rich cake. Pour it into your prepared pan and bake until a toothpick comes out clean. Once cooled, a simple glaze or a dusting of powdered sugar finishes it off beautifully. It’s a process that’s forgiving and yields fantastic results every single time.
Ingredients
For the Main Batter:
1 cup (2 sticks) unsalted butter, softened to room temperature. This is non-negotiable! Using good quality butter makes a huge difference in the final flavor and texture. Make sure it’s truly softened, not melted, so it creams properly with the sugar.
1 ½ cups granulated sugar. You can adjust this slightly, but this amount gives a lovely balance of sweetness without being cloying.
3 large eggs, at room temperature. Room temperature eggs incorporate better into the batter, leading to a smoother, more emulsified mix.
1 teaspoon vanilla extract. Pure vanilla extract, if you can swing it, really adds a depth of flavor.
2 ½ cups all-purpose flour. Spooned and leveled, not scooped! Scooping can pack in too much flour.
1 ½ teaspoons baking powder. This gives the cake just a little lift.
½ teaspoon salt. Essential for balancing the sweetness and bringing out all the other flavors.
¾ cup milk or buttermilk, at room temperature. Buttermilk adds a delightful tang and tenderness. If you don’t have any, you can make a quick substitute by adding 1 tablespoon of lemon juice or white vinegar to ¾ cup of milk and letting it sit for 5-10 minutes.
For the Filling:
This is optional, but highly recommended for an extra layer of flavor and moisture! Think of it as a little surprise inside.
½ cup finely chopped chocolate (dark or semi-sweet is lovely) OR ½ cup fresh or frozen berries (like blueberries or raspberries). If using frozen, don’t thaw them completely, and consider tossing them in a tablespoon of flour to prevent them from sinking too much.
2 tablespoons granulated sugar.
1 teaspoon cinnamon (if using chocolate, or if you like a little warmth)
For the Glaze:
This is the crowning glory, but it’s totally optional! A simple glaze elevates it beautifully.
1 cup powdered sugar, sifted. Sifting is key for a smooth glaze.
2-3 tablespoons milk or lemon juice. Lemon juice adds a lovely brightness that cuts through the richness.
½ teaspoon vanilla extract (optional)
Step-by-Step Instructions
Step 1: Preheat & Prep Pan
First things first, let’s get your oven ready! Preheat it to 350°F (175°C). Now, grab a 9×5 inch loaf pan or an 8×8 inch square baking pan. Generously grease it with butter or non-stick cooking spray. Then, lightly dust it with flour, tapping out any excess. This ensures your beautiful French butter cake doesn’t stick and makes for a clean release every time. I’ve learned the hard way that skipping this step is a recipe for disaster!
Step 2: Mix Dry Ingredients
In a medium bowl, whisk together the all-purpose flour, baking powder, and salt. Whisking them together ensures the leavening agent and salt are evenly distributed throughout the flour, which means your cake will rise evenly and have consistent flavor. Set this bowl aside for now. This step seems small, but it really contributes to the cake’s perfect texture.
Step 3: Mix Wet Ingredients
In a large bowl, or the bowl of your stand mixer fitted with the paddle attachment, beat the softened butter and granulated sugar together. Start on low speed, then increase to medium-high and beat for about 3-5 minutes, until the mixture is pale yellow and fluffy. This is called creaming, and it’s crucial for creating a light texture. Scrape down the sides of the bowl as needed. Then, add the eggs one at a time, beating well after each addition. Make sure each egg is fully incorporated before adding the next. Finally, stir in the vanilla extract.
Step 4: Combine
Now, we’re going to combine the wet and dry ingredients. Add about one-third of the dry ingredients to the butter mixture and mix on low speed just until combined. Then, add half of the milk (or buttermilk) and mix again until just combined. Repeat this process, alternating dry and wet ingredients, ending with the dry ingredients. Be very careful not to overmix! Overmixing develops the gluten in the flour, which can lead to a tough cake. You want to mix just until no streaks of flour remain. The batter will be thick and luxurious.
Step 5: Prepare Filling
If you’re adding a filling (and I highly recommend it for that extra wow factor!), now’s the time to get it ready. In a small bowl, toss your chopped chocolate or berries with the 2 tablespoons of sugar and the optional cinnamon. If using berries, you can also toss them with about a tablespoon of flour to help prevent them from sinking too much during baking. This simple step adds a delightful surprise within each slice.
Step 6: Layer & Swirl
Spoon about half of the batter into your prepared pan and spread it evenly. If you’re using a filling, sprinkle it evenly over this first layer of batter. Then, spoon the remaining batter over the filling and spread it gently to cover. If you’re feeling fancy, you can use a toothpick or a skewer to gently swirl the filling into the batter for a beautiful marbled effect. Don’t overdo it; a few swirls are perfect!
Step 7: Bake
Place the pan in the preheated oven. Bake for 45-60 minutes for a loaf pan, or 35-45 minutes for an 8×8 inch pan. The baking time can vary depending on your oven, so keep an eye on it. You’ll know it’s done when a wooden skewer or toothpick inserted into the center comes out clean, or with just a few moist crumbs attached (no wet batter!). The top should be golden brown and slightly springy to the touch.
Step 8: Cool & Glaze
Once baked, remove the cake from the oven and let it cool in the pan on a wire rack for about 15-20 minutes. This is important – it allows the cake to set up a bit before you try to remove it. After this initial cooling, carefully invert the cake onto the wire rack to cool completely. While it’s cooling, whisk together the powdered sugar, 2 tablespoons of milk (or lemon juice), and optional vanilla for the glaze. If it’s too thick, add a little more liquid, a teaspoon at a time, until you reach your desired drizzling consistency. Once the cake is completely cool, drizzle the glaze over the top. It’s so satisfying to watch it drip down the sides!
Step 9: Slice & Serve
Once the glaze has set slightly, your beautiful French butter cake is ready to be sliced and enjoyed! Use a serrated knife for the cleanest cuts, especially if you have a dense cake. Serve it at room temperature for the best flavor and texture. I love cutting thick slices and just savoring them as they are, but it’s also divine with a dollop of fresh whipped cream or a scoop of vanilla bean Ice Cream.
What to Serve It With
This French butter cake is so wonderfully versatile, it truly fits into any part of your day. For breakfast, it’s an absolute dream. Imagine a thick slice alongside a steaming mug of coffee or a rich Hot Chocolate. It’s not too sweet for the morning, offering a delightful little indulgence to start your day. I sometimes lightly toast a slice and spread a thin layer of good quality jam on it – pure bliss!
If you’re planning a brunch, this cake can be a real showstopper. Present it on a pretty platter, perhaps with some fresh berries scattered around the base. It pairs wonderfully with a mimosa or a sparkling rosé. It adds a touch of elegance without being fussy, and it’s always a crowd-pleaser. My family loves it when I bake this for weekend brunches; it makes everything feel a little more special.
As a dessert, it’s simply divine. Serve a generous slice with a scoop of high-quality vanilla ice cream or a spoonful of crème fraîche. A drizzle of warm caramel sauce or a scattering of toasted almonds can also elevate it beautifully. It’s perfect for those moments when you want something sweet and satisfying after dinner, but you don’t want anything too heavy or complicated.
And for cozy snacks? This cake is your best friend. It’s perfect for that late-night craving when you need something comforting. Pair a slice with a glass of milk, or simply enjoy it on its own while curled up with a good book. It’s the ultimate comfort food. My kids always ask for this when they’ve had a long day at school; it’s their favorite after-school treat.
Top Tips for Perfecting Your [Recipe Name]
Over the years, I’ve learned a few tricks that I think really help elevate this French butter cake from good to absolutely spectacular. First, the butter temperature is *everything*. You want it softened, but not melted. If it’s too cold, it won’t cream properly with the sugar, and you won’t get that lovely aeration. If it’s too warm or melted, your cake can end up greasy and dense in the wrong way. I usually leave mine on the counter for about an hour before I plan to bake.
When you’re mixing the batter, remember my mantra: don’t overmix! It’s so tempting to keep going until everything looks *perfectly* uniform, but you really want to stop as soon as you don’t see any dry flour streaks. A few little lumps are fine. Overmixing develops the gluten in the flour, which leads to a tough, chewy cake, and we’re going for tender and moist here. This is a lesson I learned after a few less-than-ideal bakes early in my journey!
For the filling, if you’re using chocolate, don’t chop it too finely; you want little pockets of melted chocolate. If you’re using berries, make sure they’re not overly wet. Tossing them in a tablespoon of flour, as I mentioned, is a lifesaver for keeping them suspended within the batter. It’s a little trick that makes a big visual and textural difference.
Now, about ingredient swaps. If you find yourself out of buttermilk, the milk and lemon juice/vinegar trick is your best friend. It really does mimic the tang and tenderness buttermilk provides. I’ve also experimented with using a good quality almond milk or oat milk in place of regular milk, and it worked surprisingly well, yielding an even creamier texture in some cases. For a richer flavor, you could even use a combination of butter and a neutral oil, though it will change the classic butter cake profile slightly.
When it comes to baking, every oven is a little different. I always recommend doing the toothpick test. If your cake is browning too quickly on top before the inside is cooked, you can loosely tent a piece of aluminum foil over it. For a loaf cake, make sure your oven rack is in the center position. This allows for even heat circulation all around the cake. Also, don’t be afraid to let it bake a few minutes longer if needed – a slightly longer bake is better than an underbaked cake!
Finally, the glaze! The consistency is key. You want it thick enough to coat the cake but thin enough to drizzle. If it’s too thick, add milk or lemon juice by the teaspoonful. If it’s too thin, whisk in a little more powdered sugar. For a different flavor, you could add a tiny bit of almond extract or even some finely grated lemon or orange zest to the glaze. It’s all about making it your own!
Storing and Reheating Tips
Storing this French butter cake is quite simple, and it keeps remarkably well, which is one of the reasons I love it so much. At room temperature, I find it stays wonderfully moist for about 2-3 days, especially if it’s wrapped tightly in plastic wrap or stored in an airtight container. This is perfect for when you want to have it on hand for a few days of deliciousness. I usually keep it on the counter, away from direct sunlight or heat.
If you need it to last a bit longer, the refrigerator is your best bet. Stored in an airtight container in the fridge, this cake can stay fresh for up to a week. Be aware that refrigeration can sometimes slightly firm up the cake due to the butter content. To bring it back to its best texture, I highly recommend letting it sit at room temperature for about 30 minutes to an hour before serving. This allows the butter to soften again, bringing back that lovely melt-in-your-mouth quality.
And yes, you can freeze this glorious cake! For the best quality, I recommend freezing it *without* the glaze. Wrap the completely cooled cake (or slices) tightly in a couple of layers of plastic wrap, followed by a layer of aluminum foil or a freezer-safe bag. It should keep well in the freezer for about 2-3 months. To thaw, transfer the frozen cake or slices to the refrigerator overnight. Once thawed, you can add a fresh glaze or a dusting of powdered sugar.
Regarding the glaze, it’s best to apply it just before serving or when the cake has cooled completely. If you’re storing it at room temperature or in the fridge for a day or two, the glaze should hold up well. If you’re freezing it, definitely wait to glaze until after thawing. Applying glaze to a frozen cake will likely result in a gummy or uneven finish. Trust me, a freshly glazed cake is always worth the wait!
Frequently Asked Questions
Final Thoughts
This French butter cake is more than just a recipe to me; it’s a source of comfort and joy. It’s proof that you don’t need a million fancy ingredients or hours in the kitchen to create something truly delicious and memorable. The rich, buttery flavor and wonderfully moist texture are simply divine, and the ease of preparation means it’s always an accessible treat. Whether you’re looking for a simple yet elegant dessert, a comforting breakfast option, or a delightful addition to your brunch spread, this cake delivers every single time. It’s the kind of recipe that becomes a staple in your kitchen, the one you reach for again and again.
If you love this classic, you might also enjoy exploring other simple yet decadent bakes like my Lemon Pound Cake or my Easy Chocolate Chip Scones. They share that same spirit of deliciousness made accessible. I truly hope you give this French butter cake a try. I can’t wait to hear what you think, and I’d absolutely love to see your creations! If you make it, please leave a comment below or share a photo – I’d be so thrilled!
Happy baking!

French butter cake
Ingredients
Main Ingredients
- 1 cup Unsalted butter softened
- 1.5 cup Granulated sugar
- 3 large Eggs
- 1 teaspoon Vanilla extract
- 2 cup All-purpose flour
- 1 teaspoon Baking powder
- 0.25 teaspoon Salt
Instructions
Preparation Steps
- Preheat oven to 350°F (175°C). Grease and flour a 9-inch cake pan.
- Cream together the butter and sugar until light and fluffy.
- Beat in the eggs one at a time, then stir in the vanilla extract.
- In a separate bowl, whisk together the flour, baking powder, and salt.
- Gradually add the dry ingredients to the wet ingredients, mixing until just combined.
- Pour the batter into the prepared pan and bake for 30-35 minutes, or until a wooden skewer inserted into the center comes out clean.
- Let the cake cool in the pan for 10 minutes before inverting it onto a wire rack to cool completely.


