I still remember the first time I tried a truly amazing Frozen Limonada de Coco. It was on a sweltering summer afternoon during a trip to the coast, and the ice-cold, creamy, tart, and sweet concoction was like a little piece of heaven. It instantly transported me. Now, whenever the heat gets a little too intense, or I just need a serious pick-me-up that tastes like sunshine, this is my go-to. It’s so much better than those overly sweet, artificial-tasting slushies you might find elsewhere. My family devours this, and honestly, it’s my secret weapon for turning a rough day around. It’s that perfect balance of tangy lemon and rich coconut that just sings. Forget store-bought mixes; this homemade frozen limonada de coco is the real deal, and you’re going to absolutely love it.
What is a frozen limonade?
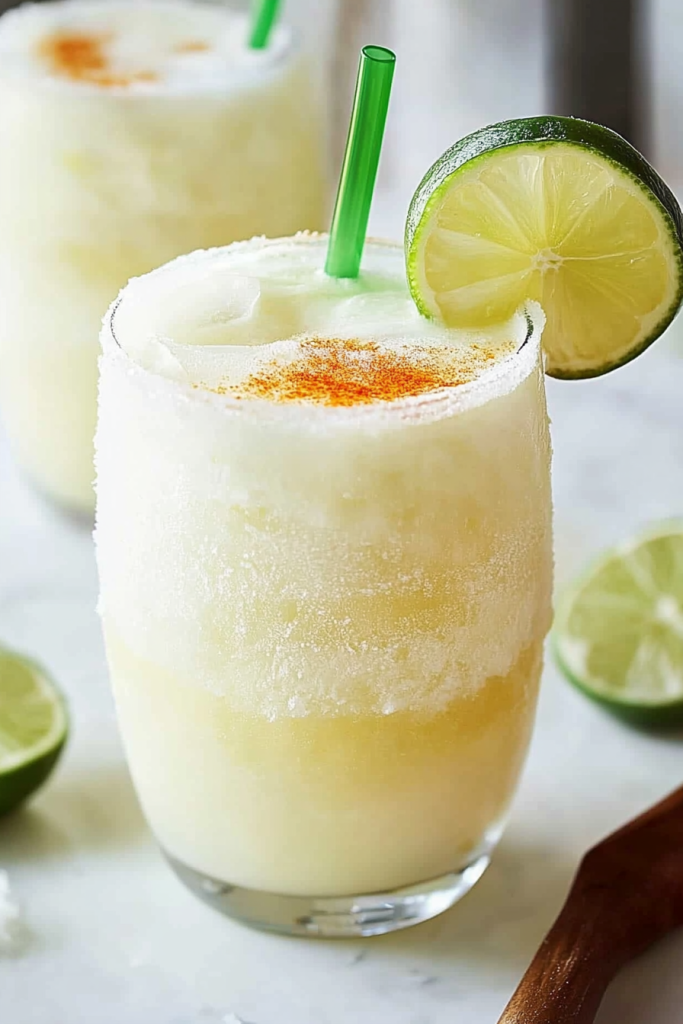
So, what exactly is this magical drink? At its heart, Frozen Limonada de Coco is a delightful, blended beverage that marries the zesty brightness of lemonade with the tropical creaminess of coconut. Think of it as a super-chilled, slushy version of a classic limonada, but with a rich, velvety twist. It’s essentially a frozen lemonade, but instead of just water and lemon, we’re adding coconut milk (or cream!) and often a touch of sweetened condensed milk to get that incredible texture and depth of flavor. It’s incredibly refreshing, satisfying, and feels like a special treat, even though it’s surprisingly simple to whip up. It’s the kind of drink that makes you want to close your eyes, take a sip, and pretend you’re on a beach somewhere, even if you’re just in your kitchen.
Why you’ll love this recipe?
Honestly, there are so many reasons why this frozen limonada de coco has become a staple in my house. First off, the **flavor** is just out of this world. You get that initial bright, tangy punch from the fresh lemon juice, followed by the smooth, decadent sweetness of the coconut. It’s not too sour, not too sweet – it hits that perfect sweet spot every single time. Then there’s the **simplicity**. I’m all about recipes that don’t demand hours in the kitchen, especially on busy weeknights or when it’s just too hot to turn on the stove. This comes together in a blender in mere minutes. Seriously, you just toss everything in, blitz it, and you’re done! And let’s talk about **cost-efficiency**. Using basic pantry staples like lemon juice, coconut milk, and a little sweetener, you can create a drink that rivals any fancy café for a fraction of the price. It’s a budget-friendly way to indulge. Plus, its **versatility** is a huge plus. While I adore it as a refreshing beverage, it’s also fantastic as a light dessert. You can adjust the sweetness, add a splash of rum for an adult twist, or even make it with lime juice for a slightly different, but equally delicious, profile. What I love most about this is that it feels special and indulgent without being complicated or expensive. It’s the perfect drink when you’re craving something sweet and tropical but don’t want to bake a whole cake.
How do I make limonade de coco?
Quick Overview
Making this frozen lemonade is ridiculously easy. It’s all about blending the right ingredients until perfectly smooth and slushy. We’ll combine fresh lemon juice, creamy coconut milk, a touch of sweetener, and plenty of ice. The key is getting the right balance of tartness and sweetness, with that luscious coconut undertone. Trust me, once you try this, you’ll ditch any store-bought mixes forever because the flavor is just incomparable. It’s a lifesaver on hot afternoons and always a crowd-pleaser.
Ingredients
For the main drink:
4 cups fresh lemon juice (from about 12-16 lemons – I always juice more than I think I’ll need!)
1 (13.5 ounce) can full-fat coconut milk (use the creamy stuff, not the light version for the best texture)
1/2 cup sweetened condensed milk (adjust to your sweetness preference, you can always add more!)
1/4 cup granulated sugar (optional, if you prefer it sweeter, or can substitute with more condensed milk)
4-5 cups ice cubes (start with 4, add more for a thicker consistency)
Optional Enhancements:
1 teaspoon vanilla extract (adds a subtle warmth)
A pinch of salt (really brings out the flavors!)
Fresh mint leaves, for garnish
Step-by-Step Instructions
Step 1: Prepare Your Lemon Juice
This is the most crucial part for fresh flavor! Roll your lemons firmly on the counter to help release more juice. Then, slice them in half and juice them. I highly recommend using a citrus juicer, whether it’s a manual one or an electric one. Strain the juice through a fine-mesh sieve to remove any seeds and excess pulp. You want about 4 cups of pure, unadulterated lemon goodness. I always make a little extra juice just in case, because you never know.
Step 2: Gather Your Creamy Base
Open your can of full-fat coconut milk. Give it a good stir because the cream often separates. You want to scoop out the thick, creamy part from the top, as well as some of the liquid. The full-fat version is non-negotiable here if you want that dreamy, luscious texture. It’s what gives this frozen limonada de coco its signature richness.
Step 3: Sweeten It Up (Carefully!)
Now, let’s talk sweetness. Sweetened condensed milk is my secret weapon for achieving that perfect creamy texture and balanced sweetness. Pour in about half a cup. If you prefer it less sweet, you can start with a little less and add more to taste later. I also add a quarter cup of granulated sugar if I’m feeling like I need an extra kick of sweetness, or if my lemons are particularly tart. A tiny pinch of salt can also really make the flavors pop – don’t skip this!
Step 4: Combine and Blend
Into your blender, add the fresh lemon juice, the prepared coconut milk, the sweetened condensed milk, and the optional granulated sugar and salt. Now, add your ice cubes. Start with about 4 cups. You can always add more to make it thicker.
Step 5: Blend Until Smooth
Secure the lid on your blender and start blending on a low speed, gradually increasing to high. Blend until the mixture is completely smooth and has a thick, slushy consistency. You shouldn’t see any large ice chunks. If it’s too thick, add a tablespoon or two of water or a little more lemon juice. If it’s too thin, add a few more ice cubes and blend again. Taste and adjust the sweetness if needed. This is where you can really personalize it!
Step 6: Pour and Serve Immediately
Once it’s perfectly blended, pour your frozen limonada de coco into chilled glasses. For an extra special touch, garnish with fresh mint leaves or a thin slice of lemon. This drink is best served immediately while it’s perfectly frosty and delicious.
Serving Suggestions
This frozen limonada de coco is so versatile, it works for pretty much any occasion! For a refreshing **breakfast** treat, I love pairing it with some light pastries or a Fruit Salad. It’s a wonderful way to wake up your taste buds without being too heavy. For **brunch**, it feels incredibly elegant. Serve it in pretty glasses with a sprig of mint; it pairs beautifully with quiches, crepes, or even a stack of fluffy pancakes. If you’re looking for a delightful **dessert**, this is a winner. It’s lighter than many traditional desserts but just as satisfying, especially after a hearty meal. It’s also fantastic for those lazy weekend afternoons or **cozy snacks** when you just want something cool and delicious. I’ve even added a splash of white rum or vodka to this for a grown-up tropical cocktail that’s always a hit at parties. My family also loves it when we have backyard barbecues – it’s the perfect antidote to grilling heat!
Top Tips for Perfecting Your Frozen Limonada de Coco
Over the years, I’ve picked up a few tricks to make sure this frozen limonada de coco turns out absolutely perfect every single time. First, **lemon quality is key**. Use fresh, ripe lemons! The zest contains a lot of essential oils that add depth, so don’t be afraid to really get all the juice out. If your lemons feel hard, just roll them firmly on your counter before cutting and juicing – it makes a world of difference. For the **coconut milk**, always opt for full-fat. The light versions just won’t give you that luscious, creamy texture that makes this drink so special. Shake the can well before opening, or even better, scoop out the thick cream from the top for an extra decadent result. When it comes to **sweetness**, this is where you can really personalize it. My recipe uses sweetened condensed milk, which not only sweetens but also contributes to the creamy texture. Taste as you go! If your lemons are super tart, you might need a little more. If you’re trying to avoid condensed milk, you can use a simple syrup or agave nectar, but you might need to adjust the amount to get the right consistency and flavor balance. Don’t be afraid to **experiment with ice**. The amount of ice directly affects the thickness. Start with the recommended amount and add more if you want a super thick, almost sorbet-like consistency. Too little ice and it’ll be too liquidy; too much and your blender might struggle. Also, ensure your blender is up to the task – a powerful blender will make quick work of the ice, giving you a super smooth texture.
Storing and Reheating Tips
While this frozen limonada de coco is truly best enjoyed immediately after blending, sometimes you’ll have leftovers, or you might want to make a batch ahead of time. If you have any leftover, store it in an airtight container in the freezer. It should keep well for about 2-3 weeks. When you’re ready to serve it again, you’ll likely need to let it sit out at room temperature for about 10-15 minutes to soften slightly, or give it a quick re-blend in your blender with a splash of water or lemon juice to get it back to a drinkable consistency. Honestly, I find re-blending is the best way to revive it. For **refrigerator storage**, it’s not ideal as the ice will melt, and it will become watery. If you do refrigerate it, know that it will lose its frozen texture. The best approach for leftovers is definitely the freezer. If you’re planning a party and want to have it ready, you can blend everything *except* the ice and store the liquid mixture in the fridge. Then, when you’re ready to serve, just pour the liquid into your blender, add the ice, and blend until smooth. This way, you get that perfectly fresh, frosty texture every time. The key is that frosty texture; it’s what makes it so delightful!
Frequently Asked Questions
Final Thoughts
I truly hope you give this Frozen Limonada de Coco a try. It’s more than just a drink; it’s a little escape in a glass, a burst of tropical sunshine that’s incredibly easy to make. It’s proof that you don’t need fancy ingredients or complicated steps to create something truly special and delicious. It’s the perfect way to cool down on a hot day, impress guests, or just treat yourself to something wonderfully refreshing. If you love this, you might also enjoy my recipes for a refreshing Mango Lassi or my homemade Sparkling Raspberry Lemonade. They both capture that same spirit of bright, fruity deliciousness! I can’t wait to hear what you think! Let me know in the comments below how yours turned out, or if you’ve tried any fun variations. Happy blending!
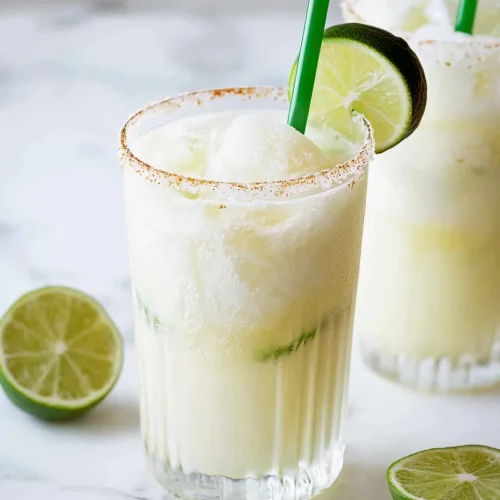
Frozen Limonada de Coco
Ingredients
Main Ingredients
- 14 oz Cream of Coconut
- 1 cup Lime Juice, freshly squeezed
- 3 cups Ice cubes
- 0.5 cup Water
Instructions
Preparation Steps
- Combine all ingredients in a blender.
- Blend until smooth and creamy.
- Pour into glasses and serve immediately. Garnish with lime wedges if desired.


