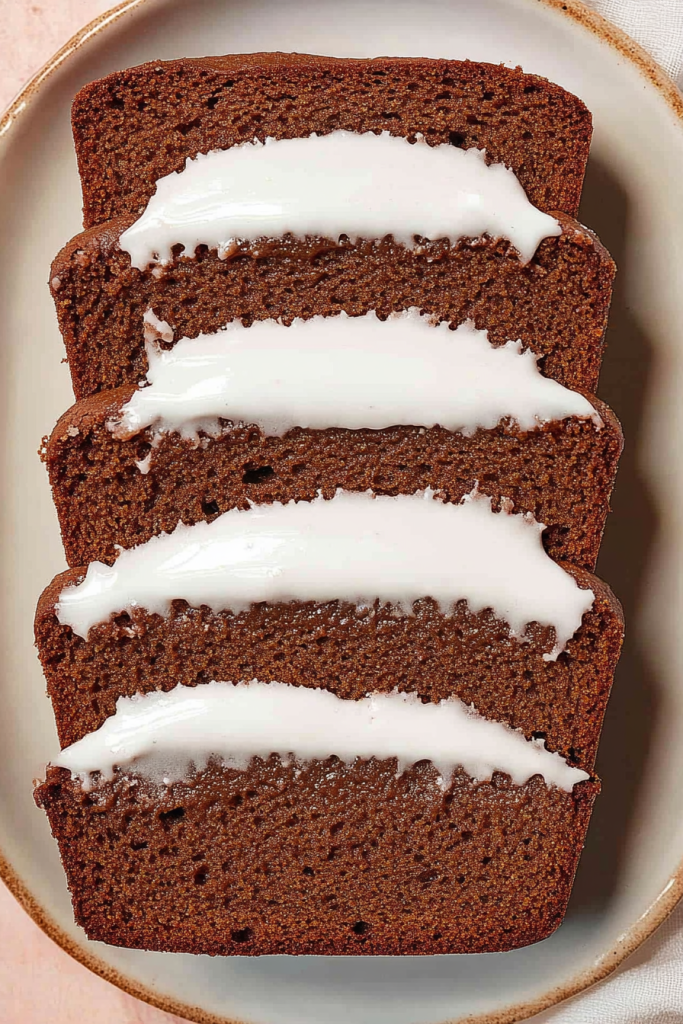
Oh, where do I even begin with this gluten-free Gingerbread Loaf? It’s one of those recipes that just feels like a warm hug on a chilly day. I remember the first time I pulled it out of the oven, the entire house was filled with that intoxicating scent of ginger, cinnamon, and molasses – it instantly took me back to my grandmother’s kitchen during the holidays. And the best part? It’s surprisingly simple to whip up, even on a busy Tuesday. Seriously, if you’ve ever found yourself craving something deeply comforting and utterly delicious, but you’re trying to avoid gluten, this gluten-free gingerbread loaf is your new best friend. It’s far better than those store-bought, often cardboard-like, gluten-free baked goods. This is the real deal, folks!
What is gluten free gingerbread bread?
So, what exactly *is* this magical gluten-free gingerbread loaf? Think of it as your classic, cozy gingerbread cake, but without the gluten. It’s a dense, moist, and wonderfully spiced loaf that’s perfect for slicing and enjoying with a cup of tea or coffee. The “gingerbread” part comes from a beautiful blend of warming spices like ginger, cinnamon, cloves, and nutmeg, all married together with the rich, deep flavor of molasses. The “loaf” means it bakes up in a single pan, making it super easy to slice and share (or, let’s be honest, hoard for yourself!). And the “gluten-free” bit is where the magic happens for so many of us. We’ve figured out how to get that tender crumb and rich flavor using a carefully selected blend of gluten-free flours, so absolutely no one has to miss out on this holiday classic. It’s essentially comfort baking, made accessible for everyone.
Why you’ll love this recipe?
There are so many reasons why this gluten-free gingerbread loaf has earned a permanent spot in my recipe binder, and I just know you’re going to fall in love with it too. First off, the flavor is just out of this world. It’s not just sweet; it’s complex and warming. The ginger gives it a gentle kick, the cinnamon and cloves add that classic holiday spice, and the molasses brings a deep, slightly smoky sweetness that’s utterly irresistible. It’s the kind of flavor that makes you want to curl up by the fire with a good book.
Then there’s the simplicity. I know, I know, sometimes “gluten-free” can sound intimidating, but trust me, this recipe is designed to be straightforward. You mix your dry ingredients, mix your wet ingredients, and then combine them. No fancy techniques, no weird equipment. Even if you’re not a seasoned baker, you can totally nail this. What I love most about this is its texture – it’s incredibly moist and tender, which can be a real challenge with gluten-free baking. I’ve tinkered with this recipe so many times to get it just right, and it never disappoints.
And let’s talk about cost-effectiveness. Most of the ingredients are pantry staples, and even the gluten-free flour blend is pretty standard these days. It’s a budget-friendly way to create something truly special. Plus, it’s so versatile! You can enjoy it plain, drizzle it with a simple glaze, or even dress it up with a dollop of whipped cream or a scoop of vanilla Ice Cream. It’s perfect for a quick breakfast, a delightful afternoon snack, or even a satisfying dessert. My kids, who can be notoriously picky, gobble this up. It’s become our go-to treat when we need a little pick-me-up, especially when the weather turns colder. Honestly, if you’re looking for a reliable, crowd-pleasing, and incredibly tasty gluten-free bake, this is it. It’s a lifesaver!
How do I make gluten-free gingerbread loaf?
Quick Overview
Making this gluten-free gingerbread loaf is a breeze! You’ll start by whisking together your dry ingredients, then combine your wet ingredients, and finally, bring them all together into a beautiful, fragrant batter. We’ll then pour this into a prepared loaf pan and bake it until it’s perfectly golden and a tester comes out clean. The whole process, from start to finish, takes less than an hour of active time, making it totally achievable even on a weeknight. The key to its success is using good quality ingredients and not overmixing. Simple steps, truly spectacular results!
Ingredients
For the Main Batter:
1 ½ cups (210g) All-Purpose Gluten-Free Flour Blend: Make sure it’s a blend that contains xanthan gum. If yours doesn’t, you’ll need to add about ½ teaspoon. I find that blends with a mix of rice flour, tapioca starch, and potato starch work wonderfully here, giving you that tender crumb. Avoid blends that are too heavy on almond or coconut flour, as they can change the texture significantly.
1 teaspoon Baking Soda: This is crucial for giving our loaf a good lift. Make sure it’s fresh – old baking soda loses its oomph!
½ teaspoon Baking Powder: A little extra boost to ensure a light and airy texture.
1 teaspoon Ground Ginger: The star spice! Use good quality ground ginger for the best flavor. I always get a fresh jar around the holidays.
1 teaspoon Ground Cinnamon: Another classic that pairs beautifully with ginger.
½ teaspoon Ground Cloves: Cloves have a strong, pungent flavor, so a little goes a long way to add that warm complexity.
¼ teaspoon Ground Nutmeg: Freshly grated is amazing if you have it, but pre-ground is perfectly fine too. It adds a lovely subtle warmth.
½ teaspoon Salt: Balances out the sweetness and enhances all the other flavors.
½ cup (113g) Unsalted Butter, softened: Using softened butter, not melted, is important for creaming properly with the sugar. This creates air pockets for a lighter loaf.
¾ cup (150g) Packed Light Brown Sugar: The molasses in brown sugar is key to that classic gingerbread flavor and helps keep the loaf incredibly moist. Make sure to pack it into your measuring cup!
½ cup (120ml) Molasses: This is non-negotiable for true gingerbread flavor. Use unsulphured molasses if possible, as it has a milder, less bitter taste. Grandma always swore by Grandma’s Molasses, and I do too!
2 large Eggs, at room temperature: Room temperature eggs incorporate more easily into the batter, leading to a smoother, more homogenous mixture.
1 teaspoon Vanilla Extract: Pure vanilla extract adds a lovely depth of flavor.
½ cup (120ml) Milk: You can use regular dairy milk or a non-dairy alternative like almond or soy milk. I’ve tested this with almond milk and it actually made it even creamier! Make sure it’s at room temperature.
For the Filling (Optional but highly recommended!):
2 tablespoons Brown Sugar
1 tablespoon Ground Cinnamon
1 tablespoon Melted Butter
For the Glaze:
1 cup (120g) Powdered Sugar: Sifted to avoid lumps.
2-3 tablespoons Milk or Water: Start with 2 and add more as needed to reach your desired consistency.
½ teaspoon Vanilla Extract (optional)**
Step-by-Step Instructions
Step 1: Preheat & Prep Pan
First things first, preheat your oven to 350°F (175°C). This ensures the oven is nice and hot when your batter is ready. Next, grab a standard 9×5 inch loaf pan. Grease it really well with butter or cooking spray, and then lightly flour it with a little of your gluten-free flour blend. This extra step helps prevent any sticking, which is always a win. You can also line the bottom with parchment paper for extra insurance – I often do this when I want to be absolutely certain it’ll come out perfectly.
Step 2: Mix Dry Ingredients
In a large bowl, whisk together your gluten-free flour blend, baking soda, baking powder, ground ginger, cinnamon, cloves, nutmeg, and salt. Give it a good whisk for about 30 seconds. This aerates the flour and evenly distributes all the spices and leavening agents, which is super important for a good rise and even flavor. You don’t want pockets of spice or sections that didn’t get enough baking soda!
Step 3: Mix Wet Ingredients
In a separate medium bowl, cream together the softened butter and packed Brown Sugar until light and fluffy. This usually takes about 2-3 minutes with an electric mixer, or a bit longer by hand. Then, beat in the molasses, room temperature eggs (one at a time, beating well after each), and vanilla extract until everything is well combined and smooth. Don’t worry if it looks a little curdled at this stage; it’s perfectly normal.
Step 4: Combine
Now, we’re going to add the dry ingredients to the wet ingredients in three additions, alternating with the milk. Start by adding about a third of the dry ingredients to the wet, mixing on low speed (or gently by hand) until just combined. Then, add half of the milk and mix until just combined. Repeat this process: another third of the dry, the rest of the milk, and finally, the last of the dry ingredients. Mix only until no dry streaks remain. Be careful not to overmix! Overmixing can make gluten-free baked goods tough, so just mix until you see everything come together. The batter should be thick but pourable.
Step 5: Prepare Filling
If you’re adding the optional filling (and I highly recommend it!), quickly mix together the 2 tablespoons of brown sugar and 1 tablespoon of cinnamon in a small bowl. Set this aside.
Step 6: Layer & Swirl
Pour about half of the gingerbread batter into your prepared loaf pan and spread it evenly. Sprinkle half of the cinnamon-sugar mixture over the batter. Then, dollop the remaining batter on top and spread it gently to cover. Sprinkle the rest of the cinnamon-sugar mixture over the top. Now, for the swirl: gently drag a knife or skewer through the batter in a zigzag pattern to create those beautiful swirls. Don’t overdo it; you want distinct layers of spice.
Step 7: Bake
Pop the loaf pan into your preheated oven. Bake for 50-60 minutes, or until a wooden skewer or toothpick inserted into the center comes out clean. Ovens can be finicky, especially with gluten-free baking, so start checking around the 50-minute mark. If the top is browning too quickly, you can loosely tent it with aluminum foil.
Step 8: Cool & Glaze
Once baked, let the gingerbread loaf cool in the pan on a wire rack for about 10-15 minutes. This allows it to set up slightly. Then, carefully invert the loaf onto the wire rack to cool completely. While it’s cooling, whisk together the powdered sugar, 2 tablespoons of milk (or water), and vanilla extract (if using) for the glaze. Add more liquid, a teaspoon at a time, until you reach a pourable but not too thin consistency. Once the loaf is completely cool (this is important, otherwise the glaze will melt off!), drizzle the glaze over the top, letting it drip down the sides. Let the glaze set for about 15-20 minutes before slicing.
Step 9: Slice & Serve
Once the glaze has set, you’re ready to slice and enjoy! Use a sharp knife to get clean slices. This loaf is delicious at room temperature, but I often find it even better slightly warm. Enjoy it on its own, or with a dollop of whipped cream or a scoop of your favorite Ice Cream. It makes a beautiful presentation on a platter, especially with the glossy glaze!
What to Serve It With
This gluten-free gingerbread loaf is so versatile, it’s practically a chameleon in the kitchen! It shines on its own, but here are some of my favorite ways to serve it, depending on the occasion.
For Breakfast: This is absolutely wonderful for a hearty breakfast. I love slicing it and toasting it lightly – it brings out even more of that spiced aroma. It pairs perfectly with a strong cup of black coffee or a creamy latte. For a slightly more elegant touch, serve it with a dollop of Greek yogurt and a sprinkle of fresh berries. It’s so much more satisfying than a typical pastry.
For Brunch: When we have friends over for brunch, this loaf is always a hit. I’ll arrange slices on a nice platter, perhaps with a few edible flowers or a dusting of powdered sugar for extra flair. It’s a wonderful accompaniment to savory brunch dishes like scrambled eggs or bacon. For beverages, a mimosa or a sparkling cider complements the warm spices beautifully.
As Dessert: Don’t underestimate this loaf as a dessert! Serve a generous slice warm with a scoop of high-quality vanilla bean ice cream. The contrast of the warm, spiced cake and the cold, creamy ice cream is pure bliss. A drizzle of caramel sauce or a sprinkle of toasted pecans takes it to the next level. It’s much more comforting and less fussy than a traditional cake.
For Cozy Snacks: This is where this loaf truly excels in my house. On a rainy afternoon, or when the kids need a little treat after school, I’ll cut a slice and serve it with a big glass of milk. It’s the ultimate comfort snack. If I’m feeling particularly indulgent, I might add a smear of cream cheese frosting or a dollop of whipped cream. It’s a wonderful, comforting bite that feels special without being overly complicated.
My family has a tradition of making this loaf on the first snowy day of winter. It’s our signal to slow down, get cozy, and enjoy the simple pleasures. It never fails to bring smiles around the table.
Top Tips for Perfecting Your Gluten-Free Gingerbread Loaf
I’ve made this gluten-free gingerbread loaf more times than I can count, and through all those batches, I’ve picked up a few tricks that I think really make a difference. I want you to have the absolute best experience making this, so here are my top tips.
Gluten-Free Flour Blend Choice: This is probably the most important factor for texture. Not all gluten-free flour blends are created equal. For this loaf, I highly recommend a blend that’s designed for baking, usually containing rice flour, tapioca starch, and potato starch. A good blend will have xanthan gum already included. If yours doesn’t, make sure to add about ½ teaspoon to the dry ingredients. Avoid blends that are predominantly made of almond or coconut flour, as they can result in a denser, heavier loaf. I’ve tested a lot of them, and a balanced blend is truly key to achieving that tender, moist crumb we’re after.
Don’t Overmix the Batter: This is a golden rule for all baking, but especially crucial for gluten-free. Once you combine the wet and dry ingredients, mix *just* until the streaks of flour disappear. Overmixing develops any residual starches too much, leading to a tough, gummy texture. It’s better to have a tiny bit of flour still visible than to overwork it. The gentle folding and light mixing are your friends here.
Room Temperature Ingredients: Seriously, don’t skip this. Softened, but not melted, butter and room temperature eggs and milk will emulsify much better into the batter. This creates a smoother, more cohesive mixture and helps the leavening agents work more effectively, leading to a better rise and a more tender crumb. I’ve learned that taking just a few extra minutes to bring your ingredients to room temperature can save you from a dense, disappointing loaf.
The Molasses Matters: For that authentic, deep gingerbread flavor, using good quality molasses is essential. I prefer unsulphured molasses because it has a richer, more robust flavor without being overly bitter. If you can find a dark or blackstrap molasses that you enjoy, even better, but regular unsulphured will work beautifully. Don’t substitute with corn syrup or other sweeteners; molasses is what gives gingerbread its signature taste.
The Importance of Cooling: Patience is a virtue, especially when it comes to cooling your baked goods. Letting the loaf cool in the pan for 10-15 minutes before turning it out onto a wire rack is vital. This allows the internal structure to set properly. Trying to slice it too soon can lead to it falling apart. Also, make sure it’s completely cool before glazing. If you glaze a warm loaf, the glaze will melt and become a sticky mess rather than a pretty coating.
Baking Time Nuances: Ovens vary wildly. The 50-60 minute baking time is a guideline. Always start checking for doneness around the 50-minute mark. A wooden skewer or toothpick inserted into the center should come out clean. If the top is browning too fast, loosely tent the loaf with aluminum foil. This prevents the outside from burning before the inside is cooked through. It’s all about observing your oven and your loaf.
Glaze Consistency: For the glaze, start with the smaller amount of liquid and add more gradually. You’re looking for a consistency that’s thick enough to coat the back of a spoon but thin enough to drizzle. If it’s too thick, add a tiny bit more liquid. If it’s too thin, add a bit more powdered sugar. A perfect glaze adds a touch of sweetness and visual appeal without being overwhelming.
Storing and Reheating Tips
One of the best things about this gluten-free gingerbread loaf is how well it keeps! It’s actually often even more moist and flavorful the next day. Here’s how I store it to keep it tasting its best:
Room Temperature Storage: Once the loaf is completely cooled and the glaze has set, you can store it at room temperature. Wrap it tightly in plastic wrap or place it in an airtight container. It will stay fresh and delicious for up to 3 days. I find that keeping it wrapped is the best way to maintain its moisture. If you live in a very warm or humid climate, you might want to consider refrigerating it after the first day, as it can get a bit sticky otherwise.
Refrigerator Storage: If you plan to keep it longer than 3 days, or if your kitchen is on the warmer side, transferring it to the refrigerator is a good idea. Again, wrap it tightly in plastic wrap or put it in an airtight container. It should stay good in the fridge for up to a week. The texture might become a little firmer when cold, but it’s easily remedied.
Freezer Instructions: This loaf freezes exceptionally well, which is fantastic if you want to bake ahead or have leftovers you don’t think you’ll get through quickly. Once completely cool and glazed, wrap the entire loaf tightly in a double layer of plastic wrap, then a layer of aluminum foil. Alternatively, you can slice it and wrap individual slices. It will keep its quality in the freezer for up to 2-3 months. Thaw it overnight at room temperature, or briefly in the microwave on a low setting.
Glaze Timing Advice: For room temperature and refrigerator storage, it’s best to glaze the loaf *after* it has completely cooled and just before serving or storing. If you freeze the loaf, I actually recommend glazing it *after* it has been thawed. This way, the glaze stays fresh and doesn’t get any condensation issues during freezing. Just allow it to thaw, then apply the glaze. If you *must* freeze a glazed loaf, make sure the glaze is fully set, and wrap it extra carefully.
When reheating a slice that has been refrigerated or frozen, a few seconds in the microwave (on about 50% power) can revive its warmth and moisture beautifully. Just be careful not to overheat it. You can also warm it gently in a low oven for a few minutes.
Frequently Asked Questions
Final Thoughts
So there you have it, my absolute favorite gluten-free gingerbread loaf. I truly hope you give this recipe a try. It’s more than just a recipe to me; it’s a feeling, a memory, and a way to bring a little extra warmth and comfort into your home. It’s proof that gluten-free baking doesn’t mean sacrificing flavor or texture. The way the spices mingle with the rich molasses, creating that irresistible aroma and deep, satisfying taste, is just pure magic. And the fact that it’s so straightforward to make makes it even better.
If you enjoyed this recipe, you might also love my gluten-free spiced apple cake or my easy gluten-free chocolate chip cookies. They’re all part of my mission to make delicious, home-baked treats accessible to everyone. Don’t be shy – I’d be absolutely delighted if you’d leave a comment below to let me know how yours turned out, or if you have any special variations you’d like to share. Your feedback makes my day! Happy baking, and I can’t wait to hear all about your delicious gluten-free gingerbread loaf!
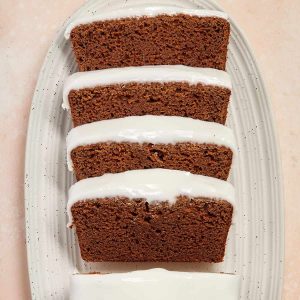
gluten-free gingerbread loaf
Ingredients
Main Ingredients
- 1.75 cups gluten-free all-purpose flour
- 1 teaspoon baking soda
- 0.5 teaspoon salt
- 1 tablespoon ground ginger
- 1 teaspoon ground cinnamon
- 0.5 teaspoon ground cloves
- 0.75 cup unsalted butter, softened
- 0.75 cup granulated sugar
- 0.75 cup packed brown sugar
- 2 large eggs
- 1 cup molasses
- 1 cup hot water
Instructions
Preparation Steps
- Preheat oven to 350°F (175°C). Grease and flour a loaf pan.
- In a large bowl, whisk together the flour, baking soda, salt, ginger, cinnamon, and cloves.
- In a separate bowl, cream together the butter and sugars until light and fluffy. Beat in the eggs one at a time, then stir in the molasses.
- Gradually add the dry ingredients to the wet ingredients, alternating with the hot water, beginning and ending with the dry ingredients. Mix until just combined.
- Pour the batter into the prepared loaf pan and bake for 50-60 minutes, or until a toothpick inserted into the center comes out clean.
- Let cool in the pan for 10 minutes before transferring to a wire rack to cool completely.


