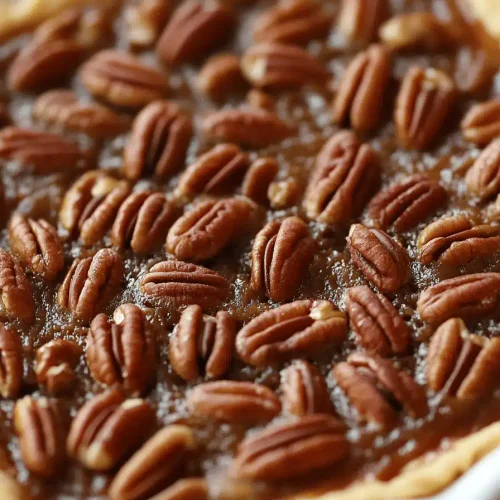
Every time autumn rolls around, I find myself craving that warm, cozy feeling that only a good pie can bring. This maple pecan pie? It’s like a big, comforting hug in dessert form. I first stumbled upon this recipe years ago during a chilly weekend with my family, and honestly, it’s been a star ever since. The rich aroma of toasted pecans mingling with the sweet, caramel-like hint of pure maple syrup fills the house in a way no pumpkin pie ever quite does — it’s like a little secret celebration in the kitchen. This pie’s sticky-sweet filling with just the right crunch is the reason my kids ask for seconds before dinner’s even done. If you love the classic pecan pie but want a twist with subtle depth and a natural sweetness, this maple pecan pie might just become your new go-to.
What is Maple Pecan Pie?
So, what makes this pie different from the usual pecan pie you see at holiday tables? Think of maple pecan pie as the same delightful pecan pie base, but with pure maple syrup as the sweetener instead of (or alongside) corn syrup or brown sugar. It’s essentially a nutty, gooey, buttery dessert that celebrates the natural flavors of pecans, enhanced by the warm, slightly smoky nuance of maple syrup. The name comes right from this key ingredient swap, which gives it a more complex sweetness and a hint of those delicious maple forest vibes. It’s a comforting classic with a little twist that’s approachable even if you’re a beginner in pie-making — no fancy techniques needed, just good ingredients and a little love.
Why you’ll love this recipe?
What I love most about this maple pecan pie is how it balances that sticky, rich syrupy filling with the satisfying crunch of toasted pecans on top. The flavors are deep and wonderfully layered — you get the earthiness of the nuts, the buttery buttery pie crust, and that unmistakable maple sweetness that’s not at all overpowering. If you’ve made the usual pecan pie before, this is like its cooler, more complex cousin.
Plus, it’s surprisingly simple to make. I mean, pecan pie feels fancy, but this recipe strips away any fussiness. You mix, pour, and bake. Seriously, it fits perfectly into busy weekend baking or those “oops, I forgot dessert” moments. And the ingredients are super budget-friendly. Maple syrup isn’t cheap, but you don’t need a whole bottle, and you don’t use corn syrup or expensive extracts to replicate flavor — it’s the real deal.
If you have a soft spot for pecan pie or want to try a mildly sweet alternative to your usual pumpkin or apple pies, this maple pecan pie is your way to impress. It’s great on its own or spiced up with a scoop of vanilla ice cream or even a drizzle of bourbon caramel for something a little extra. It’s the pie we come back to again and again at Thanksgiving, but honestly, it’s perfect for anytime the oven’s warm and the family’s gathered.
How do you make a maple pecan pie?
Quick Overview
Basically, this pie starts with a simple, flaky pre-made or homemade pie crust. Then you mix your filling — eggs, maple syrup, a little brown sugar, butter, vanilla, and salt — until it’s smooth and pleasantly sweet. Next, stir in toasted pecans and pour everything into the pie shell. Baking is straightforward: just until the filling is set but still a little jiggly in the middle. The result? A perfectly gooey center with a crisp top crust that’s impossible to resist. Trust me, you’ll want to keep this method bookmarked for years to come.
Ingredients
For the Pie Crust: What is the recipe?
- 1 9-inch pie crust (store-bought or homemade) – I always keep a frozen crust on hand for emergencies.
For the Filling:
- 3 large eggs – room temperature so they blend better.
- 1 cup pure maple syrup – the star of the show, not imitation stuff.
- 1/2 cup packed light brown sugar – adds deeper caramel notes.
- 4 tbsp unsalted butter, melted – for richness.
- 2 tsp vanilla extract – don’t skip this, it brightens everything up.
- 1/2 tsp salt – balances the sweetness perfectly.
- 1 ½ cups chopped pecans, toasted – toasting is key for that toasty crunch and flavor boost.
For the Glaze (Optional):
- 2 tbsp pure maple syrup – for brushing on right after baking for shine.
- 1 tsp melted butter – adds a pretty gloss and extra flavor.
- Pinch of cinnamon (optional) – for warmth if you’re feeling festive.
Step-by-Step Instructions
Step 1: Preheat & Prep Pan
Go ahead and warm your oven to 350°F (175°C) early. Having your oven fully heated makes all the difference in even baking. Pop your pie crust into a 9-inch pie dish, gently pressing it in without stretching. I always prick the bottom with a fork a few times so it doesn’t bubble up too much — learned that the hard way!
Step 2: Mix Dry Ingredients
In a medium bowl, whisk together the brown sugar and salt. Combining these first helps avoid any little lumps creeping into your filling. You want it nice and smooth, so the sugar dissolves evenly into your wet ingredients.
Step 3: Mix Wet Ingredients
In a separate large bowl, beat the eggs well until they’re frothy. Slowly add the pure maple syrup, melted butter, and vanilla extract while whisking. You’ll notice the mixture lightens a bit and smells heavenly — that vanilla and maple combo is pure magic here.
Step 4: Combine
Now, gently fold your dry mixture into the wet until it’s all just blended. Be careful not to over-mix; you’re aiming for a smooth batter with no streaks of sugar but some air bubbles are absolutely fine. The filling should be glossy and pourable — thick but not gluey.
Step 5: Prepare Filling
Toast your pecans on a dry skillet over medium heat for about 3-5 minutes until they’re fragrant and golden — you’ll know because your kitchen fills with that irresistible nutty smell. Chop roughly (or leave halves for a more dramatic crunch). Stir the pecans into the filling last, folding gently so every bite is studded with nuts.
Step 6: Layer & Swirl
Pour the filling evenly into the prepared pie crust. If you want a little visual flair, you can swirl some extra maple syrup on top with a toothpick — this creates a lovely marbled effect. I like to reserve a few pecan halves for placing on top as a pretty garnish.
Step 7: Bake
Pop the pie in the middle of your oven for 50-60 minutes. Don’t freak out if the center jiggles slightly when you gently shake the pie dish — that’s exactly how it should be. It will firm up as it cools. If you see the crust browning too fast, a foil shield around the edges can save it from burning.
Step 8: Cool & Glaze
Once you pull it out, let it cool completely on a wire rack — patience is a must here, but trust me, the wait is worth it. When cool, gently brush the top with your maple butter glaze to add a shiny finish that makes the nuts pop visually and adds just a hint of extra sweetness.
Step 9: Slice & Serve
Use a sharp serrated knife for clean cuts, dipping it in hot water between slices if you want fancier edges. Serve at room temperature or slightly warmed — it pairs brilliantly with a scoop of vanilla bean or a dollop of whipped cream. This is the kind of pie that disappears at family gatherings, so make sure to slice generously!
What to Serve It With
For Breakfast: Nothing beats a warm wedge paired with freshly brewed coffee, especially a nutty dark roast. The sweetness of the pie contrasts beautifully with the slightly bitter coffee, and let’s be honest, it feels indulgent enough to replace your usual pastry.
For Brunch: Set it alongside a fresh fruit salad and a mimosa or fresh-squeezed orange juice. The elegance of the pie makes your brunch spread feel extra special, and the nutty flavor complements crisp fruits like apples or pears nicely.
As Dessert: This maple pecan pie shines with vanilla ice cream or a drizzle of caramel sauce. Add some chopped toasted pecans sprinkled over the top for crunch and texture. For holiday dinners, it’s always the first dessert to vanish off the table in my house.
For Cozy Snacks: Afternoon tea or hot chocolate calls for a small slice. It’s the perfect sweet bite to curb those sugar cravings without feeling heavy. Pair with a cozy blanket and a book, and you’re set.
Top Tips for Perfecting Your Maple Pecan Pie
Pie Crust Prep: If using homemade, chill your dough well before rolling. This keeps it flaky and prevents shrinking. If store-bought, let it warm slightly before pressing it in so it doesn’t tear.
Mixing Advice: Be gentle when combining wet and dry ingredients — over-mixing can toughen the filling’s texture. The batter should be smooth but slightly airy. Use a whisk or a fork, not an electric mixer, for more control.
Swirl Customization: For extra swirl pizzazz, drizzle a bit of thick maple syrup on top of the filling and use a knife to create marbled patterns. Don’t go crazy — subtlety is key for that elegant look.
Ingredient Swaps: I’ve tested this pie with half the maple syrup replaced by honey—great if you like it a bit less intense. You can swap pecans for walnuts or hazelnuts for a different crunch but stick with toasted nuts; raw ones can leave the texture flat.
Baking Tips: Keep a close eye after 45 minutes; ovens vary and the filling’s doneness is best checked by a slight jiggle, not a full set like a cake. Also, use an oven thermometer if you can; it makes a huge difference whether your temperature is spot on.
Glaze Variations: Sometimes I add a pinch of cinnamon or stirred in a drop of bourbon to the glaze — it adds a festive aroma without overpowering the maple flavor. Brush it on right after baking while the pie is still warm for the best glossy finish.
One mistake I learned from is rushing the cooling — cutting too soon turns the pie into a gooey mess. Let it rest well, and you’ll get clean slices. Also, don’t skip toasting the nuts; it brings out their oils and adds that irresistible caramelized crunch.
Storing and Reheating Tips
Room Temperature: This pie keeps well at room temp for about 1-2 days if loosely covered with foil or a cake dome to avoid drying out. I usually serve it at room temp anyway because the texture is perfect there.
Refrigerator Storage: Store leftover pie in an airtight container or wrapped tightly in plastic wrap. It will stay fresh and moist for up to 5 days. Just bring it back to room temp or warm slightly before serving since the fridge can dull those rich flavors.
Freezer Instructions: Maple pecan pie freezes beautifully. Wrap wrapped pie tightly in plastic wrap and then aluminum foil to avoid freezer burn. Freeze up to 2 months. When ready to enjoy, thaw overnight in the fridge and warm gently in a 300°F oven for 10-15 minutes for that fresh-baked feeling.
Glaze Timing Advice: Add the glaze only after baking and while the pie is cooling at room temperature. If glazing before refrigeration or freezing, it can turn sticky or dull. This little step really elevates presentation and taste, so don’t skip!
Frequently Asked Questions
Final Thoughts
Honestly, this maple pecan pie feels like a little treasure I keep baking because every bite brings back warm family memories and buttery, nutty happiness. The rich, gooey filling combined with that crunchy pecan top is just unbeatable — it’s got that nostalgic comfort with a special twist from the maple syrup. If you’re someone who loves easy recipes that pack a serious flavor punch and feel ultra comforting, don’t hesitate to give this one a try. I promise it’ll be the highlight of your dessert table and might just become the pie you’re always asked to bring along. And hey, if you experiment with it or have your own twist, please drop a note below—I’d love to hear how yours turns out! Happy baking and sweet slice moments ahead!
maple pecan pie
Ingredients
Main Ingredients
- 1.25 cups all-purpose flour
- 0.5 tsp salt
- 0.5 cup unsalted butter, cold and cubed cut into 1/2-inch cubes
- 0.25 cup ice water approximately 2 to 4 tbsp
- 3 large eggs
- 1 cup maple syrup
- 0.75 cup dark brown sugar packed
- 1 tbsp all-purpose flour
- 2 tsp vanilla extract
- 0.25 cup unsalted butter melted
- 0.5 tsp salt
- 2 cups pecan halves raw or toasted
Instructions
Preparation Steps
- In a food processor, pulse 3/4 cup of flour and salt 2 to 3 times to combine.
- Add cubed butter and pulse until mixture resembles coarse crumbs, about 15 seconds.
- Add the remaining 1/2 cup flour and pulse until evenly distributed and sandy in texture.
- Transfer mixture to a bowl and gradually add ice water folding gently until dough forms when pinched.
- Shape dough into a disc, wrap in plastic wrap, and refrigerate for at least 1 hour.
- Roll out chilled dough between parchment papers and fit into a 9-inch pie plate. Dock the crust with a fork.
- Refrigerate the dough-lined pie plate for 2-3 hours or freeze for 1 hour to firm up the crust.
- Preheat oven to 350°F. Line crust with parchment and fill with pie weights. Bake for 20-25 minutes until lightly browned.
- In a large bowl, whisk eggs, maple syrup, brown sugar, vanilla, melted butter, flour and salt until smooth.
- Arrange pecans evenly in the pre-baked crust and pour filling over pecans.
- Bake pie for 40-45 minutes, placing a pie crust shield after 15-20 minutes to prevent overbrowning.
- Remove pie when edges are set and center is slightly jiggly. Cool on a wire rack for 1 hour then refrigerate for 3-4 hours.
- Pie can be made 1-2 days ahead. Keep refrigerated and serve within 4-5 days.