Oh, these ham and cheese sliders! If there’s one recipe that has truly earned its permanent spot in my kitchen rotation, it’s this one. I swear, the moment I start assembling them, the whole house starts to buzz with anticipation. It’s that perfect combination of savory ham, gooey cheese, and that slightly sweet, buttery roll that just screams comfort. I remember the first time I made these for a casual get-together – they were gone in a flash, and everyone was asking for the recipe. Honestly, it’s like a miniature, super-elevated Grilled Cheese but so much more satisfying and just plain fun to eat. They’re incredibly forgiving, which is a huge win in my book, and they come together so much faster than you might think, making them a lifesaver on those evenings when dinner plans feel overwhelming.
What are Ham and Cheese Sliders?
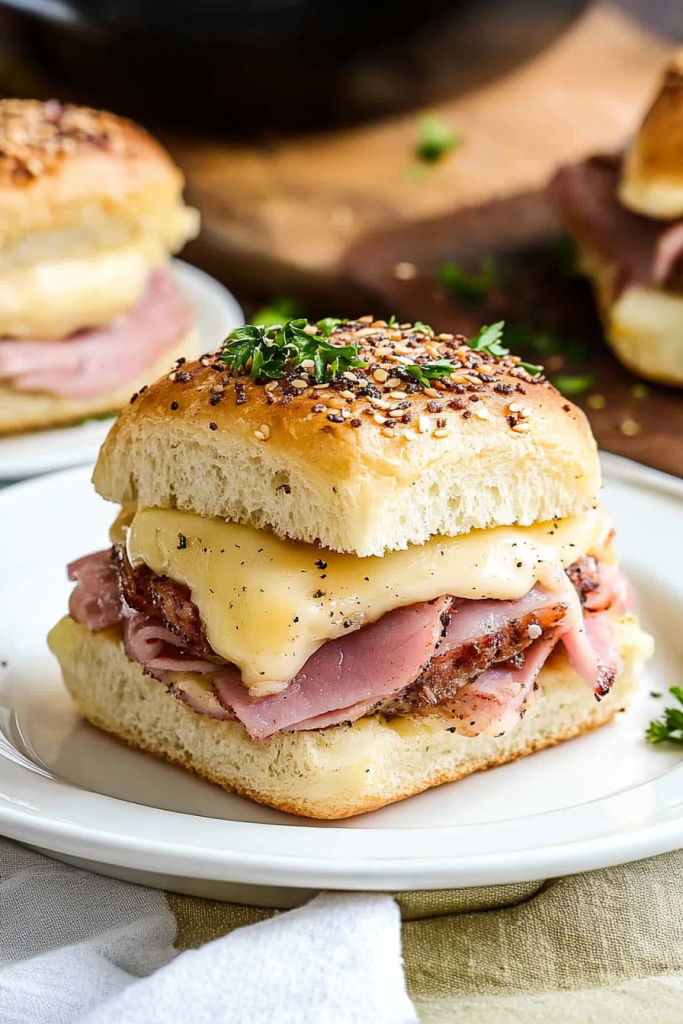
So, what exactly are these magical little bites? Think of them as the most delicious, most convenient, and arguably the most addictive version of a ham and Cheese Sandwich you’ve ever encountered. We’re talking about taking those soft, sweet dinner rolls – the kind that practically melt in your mouth – and slicing them horizontally, creating a whole sheet of sandwich goodness. Then, we layer on generous amounts of savory ham and your favorite melty cheese. The magic really happens when a simple, luscious butter and herb mixture is brushed over the top and they get baked until golden and bubbly. It’s essentially a whole pan of individual ham and cheese sandwiches, but baked together, making them incredibly easy to serve and eat, especially when you’re hosting a crowd or just need a crowd-pleasing meal for the family. They’re not fancy, but they are incredibly satisfying.
Why you’ll love this recipe?
Where do I even begin with why you’ll absolutely adore these ham and Cheese Sliders? First off, the flavor is just out of this world. You get that salty, savory ham paired with the creamy, stretchy cheese, all nestled in a slightly sweet, buttery roll. It’s a flavor combination that just *works*, and it’s universally loved. My kids, who can be a bit picky sometimes, devour these like there’s no tomorrow – and trust me, that’s high praise! And the simplicity? Oh my goodness, it’s a game-changer. You can whip these up on a busy weeknight with minimal fuss, and they bake up beautifully without much hands-on time. I’ve even prepped them ahead of time and just popped them in the oven when guests arrive, which is always a win for stress-free entertaining. They’re also incredibly budget-friendly. You can use pretty much any ham and cheese you have on hand, and the rolls are usually quite inexpensive. This means you get a fantastic, satisfying meal or appetizer without breaking the bank. And let’s talk versatility – these aren’t just for dinner! They’re perfect for game days, potlucks, quick lunches, or even as a hearty breakfast. They truly are a do-it-all kind of recipe, and that’s why I keep coming back to them time and time again. What I love most about this recipe is that it feels special without requiring a ton of effort, which is my ultimate cooking sweet spot.
How do you make ham and cheese sliders?
Quick Overview
Making these ham and cheese sliders is surprisingly straightforward. You’ll essentially be slicing a pack of dinner rolls horizontally, layering on your ham and cheese, and then topping it all off with a magical butter mixture before baking. The key is to get everything layered evenly so each slider is packed with flavor. It’s the kind of recipe where the sum is truly greater than its parts, and the end result is a tray of irresistible, gooey, savory goodness that disappears fast.
Ingredients
For the Sliders:
1 package (12 count) dinner rolls (Hawaiian sweet rolls are my absolute favorite here, but any soft, slightly sweet roll will work beautifully)
1/2 pound thinly sliced deli ham (I prefer a good quality smoked ham, but honey ham is also delicious)
1/2 pound thinly sliced cheese (provolone, Swiss, or cheddar are all fantastic options. I often use a mix!)
1/4 cup unsalted butter, melted
1 tablespoon Dijon mustard (optional, but adds a lovely tang)
1 teaspoon Worcestershire sauce
1 teaspoon dried minced onion
1/2 teaspoon garlic powder
1/4 teaspoon poppy seeds (optional, for a little crunch and visual appeal)
For the Filling:
[This is all incorporated into the slider ingredients above for simplicity!]
For the Glaze:
[This is also incorporated into the slider ingredients as the melted butter mixture.]
Step-by-Step Instructions
Step 1: Preheat & Prep Pan
First things first, preheat your oven to a nice 350 degrees Fahrenheit (175 degrees Celsius). Grab a 9×13 inch baking dish. No need to grease it; the butter mixture will help keep things from sticking. If your rolls are still connected in the package, that’s perfect for this step! Just lay them all in the baking dish, all snuggled up.
Step 2: Mix Dry Ingredients
In a small bowl, we’re going to whisk together our flavor enhancers. Combine the melted butter, Dijon mustard (if you’re using it – I highly recommend it for that little zing!), Worcestershire sauce, dried minced onion, garlic powder, and poppy seeds. Give it all a good stir until it’s nicely blended. This mixture is going to be our flavor powerhouse, infusing those rolls with so much goodness.
Step 3: Mix Wet Ingredients
[This step is combined with the dry ingredients in Step 2 for our slider recipe!]
Step 4: Combine
[The “combining” happens as we assemble the sliders directly in the pan.]
Step 5: Prepare Filling
Now, this is where the delicious layers come in. Carefully take a serrated knife and slice the entire block of rolls horizontally, just like you would a giant loaf of bread. Be gentle so you don’t end up with a million tiny pieces! Once sliced, lift the top half of the rolls off and set it aside. Now, you’ll layer your ham evenly over the bottom half of the rolls. Don’t be shy with the ham! Then, layer your cheese slices evenly over the ham. If you’re using different kinds of cheese, now’s the time to spread them out. Make sure you get cheese all the way to the edges so every bite is gooey!
Step 6: Layer & Swirl
Once your ham and cheese are perfectly in place on the bottom half of the rolls, it’s time to bring the top back. Carefully place the top half of the rolls back on top of the cheese and ham. Now, take that glorious butter mixture you made in Step 2 and generously brush it all over the tops of the rolls. Make sure every nook and cranny gets coated! This is what creates that beautiful golden crust and infuses the whole slider with flavor. If you want to get fancy, you can gently press down on the sliders with a spatula to help them meld together a bit, but it’s not strictly necessary.
Step 7: Bake
Pop that beautiful pan of sliders into your preheated oven. Bake for about 15-20 minutes, or until the tops are golden brown and the cheese is wonderfully melted and starting to ooze out the sides. You’ll know they’re ready when the whole kitchen smells absolutely divine. Keep an eye on them, as oven temperatures can vary; you’re looking for that perfect golden-brown crispiness on top.
Step 8: Cool & Glaze
Once they’re out of the oven, let the sliders rest in the baking dish for about 5-10 minutes. This is important! It allows the cheese to set up just a bit, making them easier to slice and serve without falling apart completely. While they’re resting, you can re-brush any spots that might look a little dry with any leftover butter mixture if you made extra, or just let them be. The initial brushing is usually enough!
Step 9: Slice & Serve
Now for the best part! Using a sharp knife (a serrated one works well here again), carefully cut between the individual rolls to create your sliders. You can either serve them whole as little squares, or carefully separate each one. They are absolutely divine served warm, right out of the oven. The melty cheese and savory ham are at their peak then. They’re perfect just as they are!
What to Serve It With
These ham and cheese sliders are so versatile, they truly fit into almost any meal! For a perfect breakfast, I love serving them alongside a fresh fruit salad. The sweetness of the fruit is a lovely contrast to the savory sliders. A strong cup of coffee is non-negotiable, of course! If you’re thinking brunch, these are a fantastic addition to a more elaborate spread. I like to plate them neatly and maybe add a sprig of parsley for a pop of color. For beverages, a sparkling mimosa or a fresh-squeezed orange juice is lovely. If you’re craving something sweet after dinner, these sliders actually make for a surprisingly satisfying dessert, especially if you’ve used a slightly sweeter cheese or ham. They’re like a savory, more grown-up version of a cookie! And for those cozy snack times, especially on a chilly evening, they’re pure comfort. I’ll often pair them with a warm bowl of Tomato Soup – it’s an unbeatable classic combo. My family also loves them with a side of pickles or a simple coleslaw for a bit of crunch and tang. We’ve even had them as a fun, easy dinner on movie nights, where everyone can just grab their own slider. It’s these simple, comforting pairings that really make them shine.
Top Tips for Perfecting Your Ham and Cheese Sliders
Over the years, I’ve picked up a few tricks that I think really elevate these ham and cheese sliders from good to absolutely spectacular. When it comes to the rolls, don’t be afraid to really get that butter mixture all over the top. I’ve learned that under-buttering is a common mistake that leads to a less-than-crispy top. Make sure it seeps down a bit between the rolls too! For the ham and cheese, layering is key. Try to spread them out as evenly as possible, making sure the cheese goes all the way to the edges. This way, you won’t have any dry spots and every bite will be deliciously gooey. I once tried using too much ham, and it made the sliders a bit greasy and difficult to eat, so a balanced ratio is definitely best. If you’re using different cheeses, like I often do, a mix of something sharp like cheddar and something mild and melty like provolone gives the best flavor and texture. I’ve found that pre-shredded cheese can sometimes not melt as smoothly, so I prefer to use sliced cheese or shred my own blocks. When it comes to baking, every oven is a little different. I always start checking around the 15-minute mark. If the tops are browning too quickly, you can always loosely tent them with foil for the last few minutes of baking. And a crucial tip: let them rest! I know it’s tempting to dive right in, but letting them sit for those 5-10 minutes makes a huge difference in their structure and makes them so much easier to serve neatly.
Storing and Reheating Tips
These ham and cheese sliders are usually gobbled up quickly in my house, but on the off chance there are leftovers, here’s how I handle them. If you need to store them at room temperature, I usually keep them in a loosely covered container for no more than a few hours, especially if it’s warm out. The bread can get a bit dense if it’s sealed too tightly when warm. For refrigerator storage, I place any leftovers in an airtight container or wrap the baking dish tightly with plastic wrap. They’ll keep well for about 2-3 days. The texture might change slightly – they’ll be less crispy on top – but they’re still incredibly tasty! When it comes to reheating, my absolute favorite way is to pop them back into a 350°F (175°C) oven for about 5-10 minutes, just until they’re warmed through and the cheese is melty again. You can also reheat them in a toaster oven or even carefully in a skillet over low heat, though the oven is usually best for getting that lovely crispness back. If you’re reheating individual sliders, you can place them on a baking sheet. For freezing, I recommend assembling the sliders but baking them only partially, or not at all. Once cooled completely, wrap them tightly in plastic wrap and then in foil, and they should last for about 1-2 months. Thaw them in the refrigerator overnight and then bake as usual. If you’ve already baked them and have leftovers, you can freeze them too, just be aware the bread might be a bit softer upon reheating.
Frequently Asked Questions
Final Thoughts
There you have it – the recipe for my beloved ham and cheese sliders! I really hope you give these a try. They’re such a fantastic example of how simple ingredients can come together to create something truly comforting and delicious. They’re perfect for any occasion, whether you’re feeding a hungry family, hosting a game day party, or just looking for a satisfying lunch. The combination of savory ham, gooey cheese, and those perfectly toasted, buttery rolls is just a winner every single time. If you love these, you might also enjoy my recipe for Quick Cheesy Garlic Breadsticks, which has a similar comforting vibe, or perhaps my Sheet pan sausage and Peppers for another easy, crowd-pleasing meal. I can’t wait to hear what you think of these sliders, and I’d be absolutely delighted if you’d share your own favorite variations or how your family enjoys them in the comments below! Happy baking, and enjoy every single cheesy, ham-tastic bite!

Ham and Cheese Sliders
Ingredients
Main Ingredients
- 12 count slider buns
- 0.5 pound ham, sliced
- 0.75 pound Swiss cheese, sliced
- 0.25 cup butter, melted
- 1 tablespoon Dijon mustard
- 1 teaspoon poppy seeds
Instructions
Preparation Steps
- Preheat oven to 350°F (175°C).
- Slice slider buns in half horizontally.
- Layer the bottom half of the buns with ham and Swiss cheese.
- In a small bowl, whisk together melted butter, Dijon mustard, and poppy seeds.
- Place the top half of the buns on the sliders and brush with the butter mixture.
- Bake for 15-20 minutes, or until cheese is melted and the tops are golden brown.
- Slice and serve immediately.


