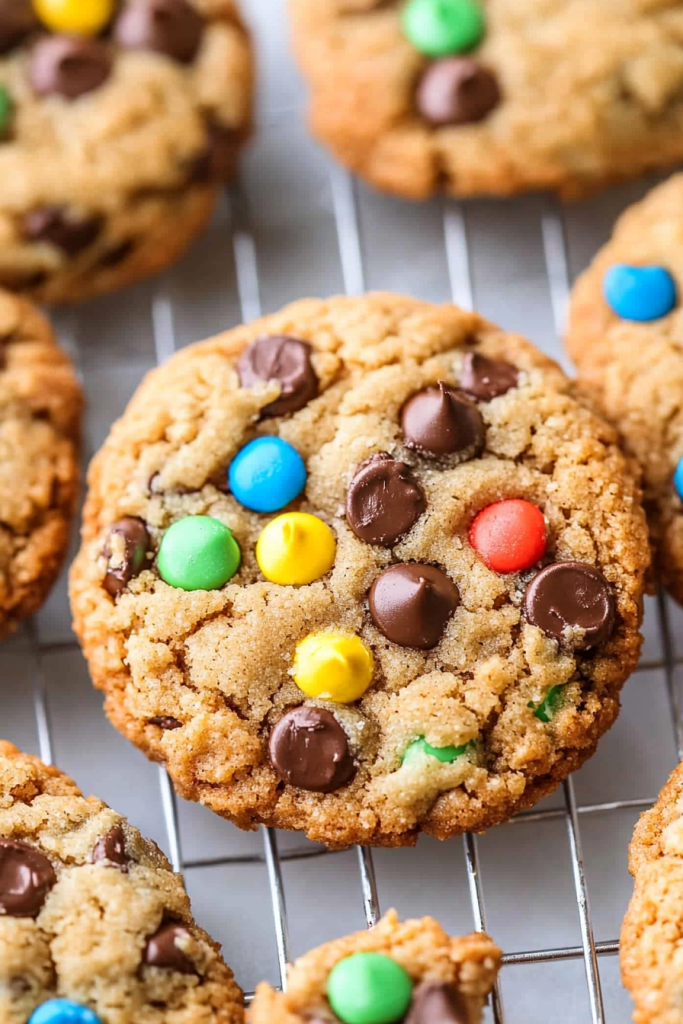
On a rainy afternoon, when the house smells like cocoa and cinnamon and the kids are begging for something sweet, I reach for my old standbys. This is one of those simple, comforting recipes that feels like a hug in a tray—easy monster cookies that bake up chewy, studded with chocolate and rainbow candy, and ready in under an hour. The aroma alone brings everyone to the kitchen, and I swear the cookies disappear in minutes when the whole gang’s gathered around the table. I’ve made these countless times, and they never fail to deliver that warm, homey feeling. They’re not fussy, they don’t require rare ingredients, and they’re perfect for busy weeknights or spontaneous cookie swaps with friends. If you’re craving something sweet but don’t want to fuss, this easy monster Cookies Recipe will become your go-to. I always do this when I need a quick, cozy treat—whip up a batch, share half, and watch the smiles bloom. Here’s my favorite family version, with a little extra love in every bite.

What is easy monster cookie?
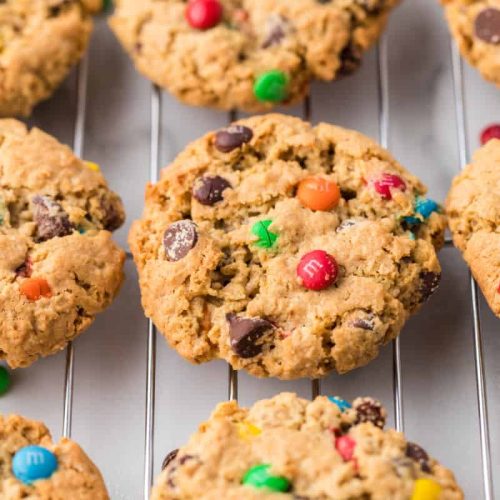
Think of easy monster cookies as the loveable, sturdy cousin of the classic peanut butter cookie. It’s essentially a chewy, oat-studded bar or big-batch cookie that gets its personality from peanut butter, oats, and a parade of chocolate chips and candy to keep things fun. The name “monster cookies” comes from their chunky, hearty presence—each bite feels satisfying, almost like you’re biting into a little celebration. It’s a no-fuss concept: mix a few pantry staples, stir in some texture and sweetness, bake, and you’ve got something that tastes like you spent an hour fussing in the kitchen. My version leans into the chewy, rustic side, with optional swirls and a glaze that’s entirely up to you. It’s essentially a flexible, crowd-pleasing cookie bar that you can tailor to your family’s favorites, and that’s what makes it such a lifesaver on busy nights.
Why you’ll love this recipe?
What I love most about this easy monster cookies is the way they come together without drama. You get that warm, nutty flavor from Peanut Butter, a sturdy chew from oats, and pockets of melty chocolate that feel like a mini celebration in your mouth. The recipe is forgiving: you can swap in quick oats or use a little extra butter if you want a crisper edge. It’s also incredibly versatile—you can swap in M&M’s for a candy-speckled look, dried cranberries for a hint of tart sweetness, or even mini pretzels for a salty crunch. The cost is gentle on the wallet, and you can batch them up for school snacks, potlucks, or a Friday movie night. Plus, the cookies travel well; I’ve tucked these into lunch boxes and watched tiny hands reach for seconds—the proof is in the happy faces around the table. The texture is consistently chewy with a slight edge that stays nice for days, which makes them a staple in my freezer-and-serve repertoire. If you’ve got kids or coworkers who love a little candy in their cookie, this recipe is the perfect bridge between comfort and fun.
- Flavor: Rich peanut butter, toasted oats, and chocolate create a layered, comforting bite with a hint of vanilla that
- SimplicityWhat is the best recipe for cookie dough?
- Cost-efficiency: Pantry-friendly ingredients mean you can feed a crowd without breaking the bank.
- Versatility: Switch up the add-ins to suit your mood or the season—M&M’s for color, dried fruit for tang, or a hint of espresso powder for depth.
How to Make easy monster cookies
Quick Overview
This is a one-pan-ish approach that bakes as sheet bars, then gets sliced into generous squares. You’ll whisk dry things together, beat the sugars with Peanut Butter and eggs until silky, fold the two together, press into a lined sheet pan, bake until just set, and finish with a glossy chocolate glaze if you like. The beauty is in the straightforward steps: no chilling, no rolling, just mix, spread, bake, and slice. It’s a crowd-pleaser that you can finish in under an hour, and it scales up with ease for bake sales or big family gatherings.
Ingredients
For the Main Batter:
- Creamy Peanut Butter — 1 cup (250 g). Look for natural, smooth peanut butter with oil that’s easy to stir. If your peanut butter is too thick, warm it 10–15 seconds to loosen it up. This is the flavor anchor, so quality matters here.
- Brown sugar — 1 cup (200 g). It gives a mellow caramel note and chewy texture. If you want a lighter bite, you can use half brown sugar, half granulated sugar.
- White sugar — 1/2 cup (100 g). Helps with spread and a touch of crisp edge around the cookies.
- Eggs — 2 large. They hold everything together and keep the bars moist in the middle.
- Vanilla extract — 2 teaspoons. A little vanilla goes a long way in deepening the flavors.
- Old-fashioned rolled oats — 2 cups (180 g). The heart of the texture; avoid instant oats for a chewier bite.
- All-purpose flour — 1 cup (120 g). Optional, but I like it for structure. You can leave it out if you want a chewier, more rustic bar.
- Baking soda — 1 teaspoon. A little leavening lifts the bars and keeps them from looking dense.
- Salt — 1/2 teaspoon. Enhances every other flavor and keeps the sweetness in check.
- Chocolate chips — 1 cup (175 g). I use semisweet; milk chocolate works too if you want a sweeter bite.
- Mini M&M’s — 1 cup (180 g). The candy bits add color and a gentle crunch that kids adore.
For the Filling:
- Optional peanut butter swirl — 1 tablespoon per non-filled batch, whisked briefly to loosen. You can dollop in small rounds and swirl with a toothpick for pockets of extra peanut-y goodness.
- Optional cream cheese swirl — 2 tablespoons per 12 bars, lightly softened and swirled in to create a creamy surprise. This is optional but delicious if you’re in the mood for something a little luxe.
For the Glaze:
- Chocolate glaze — 1/2 cup powdered sugar, 2 tablespoons cocoa powder, 2–3 tablespoons milk, pinch of salt. Whisk until smooth and glossy for a pretty finish that sets as it cools.
- Optional mix-ins — a pinch of espresso powder or a splash of vanilla in the glaze can push the chocolate notes just a touch deeper.
Step-by-Step Instructions
Step 1: Preheat & Prep Pan
Preheat your oven to 350°F (175°C). Line a 9×13-inch sheet pan with parchment paper or a light coating of nonstick spray. I love parchment because you can lift the entire slab out in one piece for easy slicing. If you’re using a darker sheet pan, keep an eye on the bake time—it may color a touch faster.
Step 2: Mix Dry Ingredients
In a large bowl, whisk together the oats, flour (if using), baking soda, and salt. Give them a quick sift if you have one—this helps keep the texture uniform and avoids dense pockets of flour.
Step 3: Mix Wet Ingredients
In a separate bowl, beat the peanut butter, brown sugar, and white sugar until the mixture looks smooth and a bit fluffy. Add eggs and vanilla, beating until fully incorporated and glossy. The mixture should feel cohesive and silky—the way you want it right before you fold in the dry ingredients.
Step 4: Combine
Fold the dry ingredients into the wet just until you don’t see any dry streaks. Don’t overmix; you want a sturdy batter, not a cement-like dough. The oats will thicken as you fold, and that’s exactly what you’re after.
Step 5: Prepare Filling
If you’re going for the peanut butter swirl or cream cheese swirl, dollop or pipe small amounts across the top of the batter in the pan. Use a toothpick or small knife to swirl lightly—don’t overdo it or you’ll lose the cookie texture in the bake.
Step 6: Layer & Swirl
Spread the batter evenly in the prepared pan to about 1/2-inch thickness. If you’re not using a filling, simply smooth it down with a spatula. If you are, the swirl tips will show up as pretty marbling once baked. Sprinkle the chocolate chips and M&M’s evenly over the top for that signature festive look.
Step 7: Bake
Bake 20–22 minutes, until the edges are golden and the center looks just set but still a touch soft. Ovens vary, so start checking at 18 minutes and don’t overbake—you want that chewy interior with a little bite on the edges. If you’re using the glaze, prepare it while the sheet cools a few minutes after baking so you can drizzle while the bars are warm and receptive.
Step 8: Cool & Glaze
Let the slab cool in the pan for at least 15 minutes. If you’re glazing, whisk the glaze ingredients until smooth and drizzle over the still-warm surface. The heat will help set the glaze into a pretty sheen. If you prefer a simple, no-glaze approach, a light dusting of powdered sugar or a pinch of flaky sea salt works beautifully too.
Step 9: Slice & Serve
Once completely cooled, lift the slab out with the parchment and place it on a cutting board. Slice into generous squares or bars, whichever you prefer. The bars stay tidy and uniform, making them perfect for sharing. I like finishing with a small scatter of extra candy bits on top just before serving for a candy-burst look. Serve with cold milk and a smile, and watch the room light up.
What to Serve It With
These easy monster cookies are versatile enough to pair with virtually anything. Here are a few ideas that feel like a little celebration, no matter the occasion:
For Breakfast: A brisk cup of coffee or a glass of cold milk, and a bold plate of cookie squares to kickstart the morning. The oats in the cookies make them feel a touch more breakfast-y than a regular cookie, which I absolutely love on lazy weekend mornings.
For Brunch: A small platter of cookie squares arranged with berries and whipped cream. The colors from M&M’s pop on the plate, and they pair nicely with a yogurt parfait or a citrusy sparkling beverage.
As Dessert: Warm cookies with a scoop of vanilla ice cream and a drizzle of extra glaze. They’re a playful, crowd-pleasing finish to a family-style meal.
For Cozy Snacks: A plate with a few cookies, a mug of hot cocoa, and a few roasted nuts on the side. Pure comfort, and the kids honestly think you’re a hero for pulling these out on movie night.
Top Tips for Perfecting Your easy monster cookies
Here are the little tweaks that have saved me more times than I can count. Each tip comes from those imperfect-first-batch moments that taught me what to adjust.
Oats & Texture: Use old-fashioned oats for chew and structure. Quick oats? They disappear into a softer texture. If you crave more chew, you can soak the oats in a splash of milk for a few minutes before mixing. It helps everything hydrate evenly.
Mixing Mastery: Don’t overmix after adding dry ingredients. A few streaks of flour are fine. Overmixing develops gluten and can yield a tougher bar. Stop as soon as you see no visible flour and you’ll keep that tender bite.
Swirl Customization: If you love a dramatic swirl, reserve a small portion of the batter and swirl a separate filling in after spreading the base. Use a toothpick to create designs that look gorgeous once baked.
Ingredient Swaps: Gluten-free option: substitute all-purpose flour with a 1:1 gluten-free blend. You may notice a slight texture change; to compensate, add 1 tablespoon more peanut butter to keep moisture. For dairy-free, use a dairy-free chocolate chip and a plant-based glaze if you like.
Baking Tips: If your oven runs hot, reduce to 325°F (165°C) and bake a bit longer. If your oven is cooler, you may need to extend the bake by a few minutes. Don’t rely solely on the timer—look for edges that look set and centers that still look a touch glossy.
Glaze Variations: Want a glossy finish without glaze? Dust with powdered sugar and a pinch of cocoa for a simple spark. Or swap the milk for a splash of cream for a silkier glaze that sets nicely as it cools.
Lessons Learned: I learned to press the batter thin and even in the pan so every square bakes evenly. It’s a tiny step, but it makes a huge difference in those chewy edges and creamy centers that everyone loves. And I’ve learned to stash a few extra candy bits to sprinkle on top right after slicing for that photo-worthy finish. This is the kind of recipe that rewards patience and a little personal flair—the kind of thing you’ll find yourself adjusting to match your family’s taste buds with every batch.
Storing and Reheating Tips
Okay, so you’ve got a tray of cookies that’s basically begging to be shared. Here’s how I keep them fresh and tasty for days, and how I reheat them when the craving hits late at night.
Room Temperature: Store in an airtight container at room temperature for up to 4–5 days. If you’ve baked with glaze, keep the glaze surface up and away from any condensation to preserve the shine.
Refrigerator Storage: They’ll stay fresh for about a week in an airtight container. If you’re worried about the oats drying out a touch, you can place a slice of bread in the container to maintain moisture. It’s a tiny trick that helps during long storage.
Freezer Instructions: Freeze baked bars (already sliced) in a single layer on a baking sheet, then transfer to a freezer bag. They’ll hold for up to 3 months. Thaw overnight in the fridge or at room temperature and enjoy with a quick microwave puff to restore softness.
Glaze Timing Advice: If you’re freezing, wait to glaze until you’re ready to serve. The glaze will stay glossy if applied to cookies that are fully cooled or slightly warm; if you glaze cold cookies, the glaze may seize a bit.
Quality indicators: cookies should feel moist but hold their shape, with a glossy top if glazed. If they’re dry and crumbly, you probably baked them too long or the dough didn’t have enough moisture. A quick check the next time—reduce bake time by 1–2 minutes or add a teaspoon more peanut butter per batch.
Frequently Asked Questions
Final Thoughts
These easy monster cookies aren’t just a recipe; they’re a little invitation to gather, share, and savor. They remind me of Sunday afternoons at grandma’s house, with the old mixer humming in the background and everyone leaning on the counter to swap stories while the dough comes together. The bars are forgiving, the flavors are comforting, and the finish—whether with glaze or without—feels a little special without being fancy. If you’re looking for a tried-and-true crowd-pleaser that travels well and holds up in the lunch box, this is it. Try a batch this week, tweak it to your family’s favorite add-ins, and tell me how you customized it. I’d love to hear about your twists and which mix-ins you now reach for first. Happy baking!
easy monster cookies
Ingredients
Main Ingredients
- 0.5 cup unsalted butter, softened
- 1 cup granulated sugar
- 1 cup light brown sugar
- 0.75 cup creamy peanut butter
- 3 large eggs
- 1 tablespoon vanilla extract
- 1 cup all-purpose flour
- 3.5 cups quick cook oats
- 2 teaspoon baking soda
- 11 ounce semi-sweet chocolate chips
- 10 ounce M&M's mini chocolate baking bits
- 0.75 cup raisins (optional)
Instructions
Preparation Steps
- Preheat oven to 350 degrees Fahrenheit. Line baking sheets with parchment paper and set aside.
- In a large bowl, beat butter with sugars until creamy. Add peanut butter and beat well.
- Add eggs and vanilla; beat until combined. Stir in flour, oats, and baking soda until just blended.
- Fold in chocolate chips and candy bits.
- Drop dough by 2 tablespoon portions onto prepared sheets. Bake 12 to 15 minutes until lightly browned. Cool on the pan briefly, then transfer to a wire rack.
- Store in an airtight container for up to one week.


