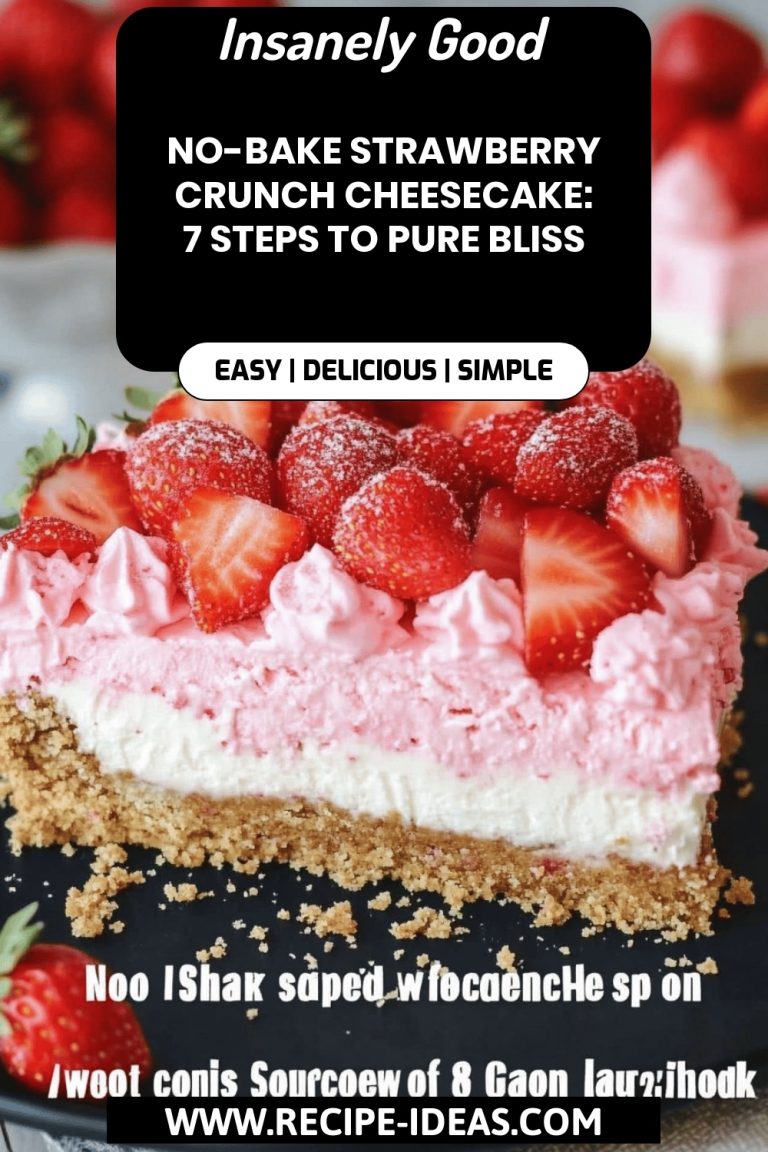
Oh, where do I even begin with this no bake cheesecake? It feels like ages ago that I first stumbled upon a version of this, and honestly, it changed my life, especially during those sweltering summer months when the thought of turning on the oven felt like a crime against humanity. I remember one particularly chaotic week – deadlines looming, kids bouncing off the walls, and a sudden craving for something sweet. I thought I’d have to settle for a store-bought cookie, but then, like a culinary angel, this recipe popped into my head. It’s ridiculously simple, ridiculously delicious, and uses ingredients I almost always have on hand. Forget those complicated baked cheesecakes that take hours and run the risk of cracking (which, let’s be honest, still taste fine, but aren’t the prettiest). This no bake cheesecake is my secret weapon, my crowd-pleaser, my go-to for when I need a little bit of creamy, dreamy goodness without breaking a sweat. It’s the kind of dessert that makes people say, “Wow, you made this?!” and you get to smile smugly because, well, you totally did, and it was *easy*.
What is no bake cheesecake?
So, what exactly is this magical thing we call no bake cheesecake? Think of it as all the glorious, tangy, creamy deliciousness of a traditional cheesecake, but without any of the baking fuss. It’s essentially a chilled dessert that relies on the magic of Cream Cheese, a touch of sweetener, and sometimes a bit of whipped cream or condensed milk to achieve that iconic rich and smooth texture. The crust is usually a simple graham cracker or cookie crumb mixture pressed into the pan, no oven required. It’s the perfect answer for anyone who loves that cheesecake flavor but might be intimidated by baking, short on time, or just wants to avoid heating up the kitchen. It’s the ultimate “set it and forget it” kind of dessert, though “forgetting” about it is pretty tough once it’s chilling!
Why you’ll love this recipe?
Honestly, the list of reasons to adore this no bake cheesecake is pretty darn long, but let me hit you with the highlights. First off, the flavor. It’s that perfect balance of tangy Cream Cheese, sweet vanilla, and a hint of lemon that just sings. It’s rich without being heavy, and it has this incredible, melt-in-your-mouth creaminess that’s utterly addictive. My kids go absolutely bonkers for it, and they’re tough critics, let me tell you! The simplicity is a huge win too. We’re talking minimal steps, minimal dishes, and absolutely zero oven time. This is a lifesaver on busy weeknights or when you have unexpected guests pop over. You can whip this up in about 20 minutes and then just let it work its magic in the fridge. Plus, it’s surprisingly budget-friendly. You probably have most of the ingredients in your pantry right now! And the versatility? Oh my goodness. While this basic version is divine, it’s a fantastic canvas for all sorts of toppings. Think fresh berries, chocolate sauce, caramel, fruit compotes – you name it. What I love most about this recipe, beyond all the practical stuff, is the pure joy it brings. It’s a dessert that always feels a little bit special, a little bit celebratory, even when it’s just a Tuesday night treat. It’s my go-to when I need something impressive without the stress, and it never, ever disappoints.
How do I make no bake cheesecake?
Quick Overview
This no bake Cheesecake Recipe is all about simplicity and stunning results. You’ll start by creating a buttery, crumbly crust that you simply press into your pan. Then, you’ll whip up a luscious, creamy filling that’s unbelievably smooth and flavorful. It all comes together quickly, and the hardest part is waiting for it to chill and set to perfection. It’s a method that guarantees a beautiful, delicious dessert with minimal effort, making it perfect for any occasion or just because you deserve a treat!
Ingredients
For the Crust:
2 cups graham cracker crumbs (about 14-16 full graham crackers, finely crushed) – I find that grinding them in a food processor gives the most consistent texture, but a zip-top bag and a rolling pin works too!
6 tablespoons unsalted butter, melted
2 tablespoons granulated sugar – Just a touch to sweeten things up a bit.
1/4 teaspoon salt – This really enhances the flavor of the crumbs.
For the Filling:
2 (8-ounce) packages Cream Cheese, softened – This is KEY! Make sure it’s at room temperature so you don’t end up with lumps. I usually pull mine out about an hour before I plan to start.
1 cup powdered sugar, sifted – Sifting prevents any little lumps from messing with that smooth texture.
1 teaspoon vanilla extract – Pure vanilla extract makes a big difference here.
1 tablespoon fresh lemon juice – This adds that classic cheesecake tang and brightness. Don’t skip it!
1 cup heavy whipping cream, cold – Make sure it’s really cold for the best whipping results.
For the Glaze (Optional, but highly recommended!):
1 cup fresh berries (strawberries, blueberries, raspberries) or fruit topping of your choice
1 tablespoon sugar (if using fresh fruit and you want it slightly sweeter)
1 teaspoon lemon juice (optional, to brighten the fruit flavor)
Step-by-Step Instructions
Step 1: Preheat & Prep Pan
Grab a 9-inch springform pan. If you don’t have one, a regular 9-inch pie plate or even a square baking dish will work, though the springform makes for the cleanest release. Lightly grease the bottom and sides of the pan with a little non-stick spray or butter. This just ensures your beautiful crust doesn’t stick. No need to preheat your oven for this recipe!
Step 2: Mix Dry Ingredients
In a medium bowl, combine the graham cracker crumbs, granulated sugar, and salt. Give them a good stir to make sure everything is evenly distributed. This is a small step, but it ensures every bite of your crust is just right.
Step 3: Mix Wet Ingredients
Pour the melted butter over the dry ingredients. Stir with a fork or spatula until all the crumbs are moistened. You want it to look like wet sand – clumping together when you squeeze it.
Step 4: Combine
Pour the crumb mixture into your prepared springform pan. Use the bottom of a glass or a flat measuring cup to firmly press the crumbs evenly across the bottom and slightly up the sides of the pan. Get it nice and compact – this is what holds your cheesecake together! Pop the crust into the freezer while you make the filling. This helps it set up nicely.
Step 5: Prepare Filling
In a large bowl, beat the softened Cream Cheese with an electric mixer (handheld or stand mixer) until it’s completely smooth and creamy, with no lumps. This is probably the most crucial step for a silky-smooth filling. Add the sifted powdered sugar, vanilla extract, and lemon juice. Beat again until well combined and smooth. Scrape down the sides of the bowl as needed.
Step 6: Layer & Swirl
In a separate, clean bowl, whip the cold heavy cream until stiff peaks form. Be careful not to over-whip it into butter! Gently fold about half of the whipped cream into the cream cheese mixture. Then, gently fold in the remaining whipped cream until just combined and no streaks remain. You want to keep as much air in there as possible. Spoon this glorious filling over your chilled crust. Smooth the top with a spatula. If you want to add a swirl, you can gently drizzle a bit of melted chocolate or fruit puree on top and swirl with a toothpick, but for this basic version, a smooth top is perfect.
Step 7: Bake
Actually, we don’t bake this! Just pop the entire pan into the refrigerator. Let it chill for at least 6 hours, or preferably overnight. This chilling time is essential for the cheesecake to set properly and develop its signature firm yet creamy texture. Trust me, the waiting is the hardest part!
Step 8: Cool & Glaze
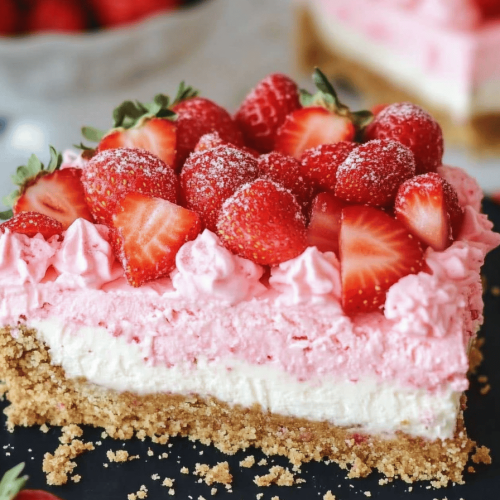
Once your cheesecake is fully chilled and set, it’s time for the glaze (if you’re using one!). For a simple berry topping, you can gently toss your fresh berries with the sugar and lemon juice in a small bowl and let them macerate for about 15-20 minutes. This draws out their natural juices and makes them wonderfully saucy. Once ready to serve, carefully release the sides of the springform pan. Spoon your glaze or topping over the top of the cheesecake. If you’re not glazing immediately, keep the cheesecake covered in the fridge.
Step 9: Slice & Serve
To get nice, clean slices, use a sharp knife dipped in hot water and wiped dry between each cut. Serve chilled, and prepare for applause! It’s truly delightful on its own or with your favorite fruit topping.
What to Serve It With
This no bake cheesecake is so wonderfully versatile, it can be dressed up or down for any occasion. For a casual breakfast or brunch, I love pairing it with a simple cup of strong coffee. The richness of the cheesecake is a lovely contrast to the bitterness of the coffee. You can also serve it with a light fruit salad on the side to add some freshness. If you’re thinking elegant brunch, go for a mimosa or a sparkling rosé – the bubbles cut through the richness beautifully. As a dessert, it’s a showstopper! Serve it with a drizzle of rich chocolate ganache, a dollop of whipped cream, or a vibrant fruit coulis. My personal favorite is a warm berry compote that slightly melts the cheesecake surface. For cozy snacks, a slice with a glass of milk or a warm mug of tea is pure comfort. My family also loves it with a sprinkle of chopped nuts, like toasted pecans or almonds, for a little crunch. Honestly, the possibilities are endless, and it always feels a little bit like a special occasion when this cheesecake makes an appearance!
Top Tips for Perfecting Your No Bake Cheesecake
I’ve made this no bake cheesecake more times than I can count, and over the years, I’ve picked up a few tricks that really make a difference. For the crust, really pack it down firmly. If it’s too loose, it’ll crumble when you slice it. Using the bottom of a measuring cup or a flat-bottomed glass is your best friend here. When it comes to the filling, the absolute MOST important thing is that your cream cheese is fully softened. I can’t stress this enough! If it’s cold, you’ll end up with lumps, no matter how long you beat it. Softened means room temperature, easy to squish with your finger. When whipping the heavy cream, make sure your bowl and whisk are clean and dry, and that the cream is very cold. This helps it whip up to stiff peaks quickly, which is exactly what you want for that light, airy texture in the filling. If you’re tempted to add more powdered sugar, I’d say taste the mixture before you do. The cream cheese itself has a slight tang, and you don’t want to overpower it. A touch of lemon juice is crucial for that authentic cheesecake flavor, so don’t omit it! And for the chilling time, seriously, give it the full amount. I know it’s hard to wait, but that time is what allows the cheesecake to set up properly. If you rush it, you’ll have a softer, less structured dessert. I once tried to speed things up by putting it in the freezer, and while it set quickly, the texture wasn’t quite the same – a little icier. So, the fridge is definitely the way to go for that perfect, creamy consistency. Lastly, for the optional glaze, don’t overload it. A gentle topping that complements the cheesecake, rather than overwhelming it, is key. Fresh berries are always a winner for me because their tartness balances the richness so beautifully.
Storing and Reheating Tips
This no bake cheesecake is wonderfully forgiving when it comes to storage. If you happen to have any leftovers (which is rare in my house!), you can keep it at room temperature for about 1-2 hours if it’s not too warm out, but I generally recommend refrigeration for best quality and safety. For refrigerator storage, cover the cheesecake tightly with plastic wrap or aluminum foil, or transfer it to an airtight container. It should stay delicious for about 3-4 days. The texture might change slightly as it sits, becoming a little firmer, but it’s still incredibly tasty. If you know you won’t be able to finish it within a few days, freezing is a great option! You can freeze the entire cheesecake, or individual slices. Wrap it very well in plastic wrap, then in a layer of aluminum foil, and finally place it in a freezer-safe bag or container. It can be stored in the freezer for up to 1-2 months. To thaw, transfer the cheesecake from the freezer to the refrigerator and let it thaw overnight. If you’re freezing slices, wrap them individually and thaw them in the fridge. I usually add any glazes or fresh fruit toppings *after* thawing, as they tend to be best when fresh and can get soggy if frozen with the cheesecake. If you’ve added a glaze before freezing, it might be a little less vibrant upon thawing, but still perfectly edible.
Frequently Asked Questions
Final Thoughts
So there you have it, my friends – my absolute favorite no bake cheesecake recipe. It’s more than just a dessert; it’s a testament to the fact that you don’t need a fancy degree or hours in the kitchen to create something truly wonderful. This cheesecake is proof that simplicity often leads to the most delightful results. It’s the kind of recipe that brings smiles, sparks conversations, and always leaves everyone asking for seconds. If you’re looking for a dessert that’s foolproof, incredibly delicious, and requires zero oven time, you simply have to give this one a try. It’s perfect for those impromptu gatherings, special occasions, or just when you need a little bit of creamy, dreamy comfort in your life. I truly hope you enjoy making and eating it as much as I do. If you give this a whirl, please let me know how it turns out in the comments below! I’d love to hear about your favorite toppings or any fun variations you come up with. Happy “baking”!
No Bake Cheesecake
Ingredients
Crust
- 1.5 cups Graham cracker crumbs
- 0.5 cup Granulated sugar
- 6 tablespoons Unsalted butter, melted
Filling
- 32 ounces Cream cheese, softened
- 1 cup Powdered sugar
- 1 teaspoon Vanilla extract
- 1 cup Heavy cream
Instructions
Make the Crust
- In a medium bowl, combine graham cracker crumbs, sugar, and melted butter. Stir until well combined.
- Press the mixture into the bottom of a 9-inch springform pan.
- Refrigerate for at least 15 minutes while you make the filling.
Make the Filling
- In a large bowl, beat the softened cream cheese until smooth.
- Add powdered sugar and vanilla extract and beat until combined.
- In a separate bowl, whip the heavy cream until stiff peaks form.
- Gently fold the whipped cream into the cream cheese mixture until combined.
- Pour the filling over the prepared crust.
- Refrigerate for at least 4 hours, or preferably overnight, until set.
Serve
- Before serving, release the sides of the springform pan.
- Slice and serve. Enjoy!