Oh, hey there! Come on in and grab a mug. I’ve been so excited to share this with you. You know those days when you’re running on fumes, the kids are begging for a snack, and the thought of turning on the oven feels like climbing Mount Everest? Yeah, me too. That’s exactly when I reach for this recipe. It’s my secret weapon, my quick-fix wonder, my absolute go-to for a little boost of deliciousness without any fuss. Seriously, these no-bake energy bites are little powerhouses of goodness, and they taste like a treat. They remind me a little of those classic oatmeal cookies my grandma used to make, but in a way that feels healthier and is ready in minutes. If you’re looking for a way to fuel your day, curb those afternoon slumps, or just have something utterly delightful on hand, you’ve found your new best friend. Let’s get these no-bake energy bites rolling!
What are no-bake energy bites?
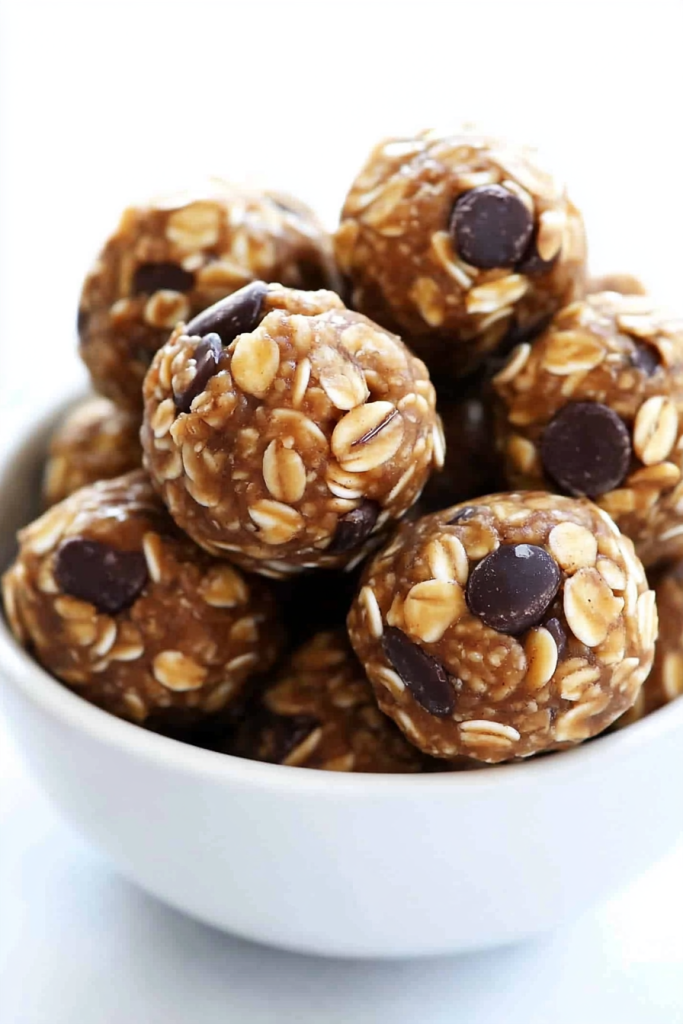
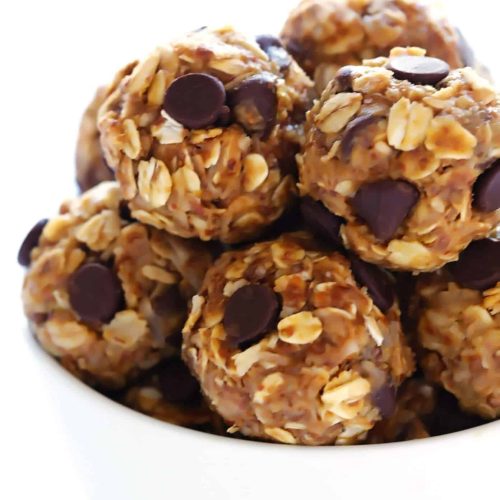
So, what exactly are these magical little morsels? Think of them as tiny, portable snacks packed with wholesome ingredients that give you a sustained burst of energy. They’re not baked, hence the name, which is a total game-changer for busy days or when you just can’t be bothered with the oven. Essentially, it’s a simple mixture of oats, a binder (usually nut butter and a liquid sweetener), and then you toss in whatever other goodies your heart desires – chocolate chips, seeds, dried fruit, coconut, you name it! They’re naturally sweet, satisfying, and oh-so-easy to whip up. The beauty of no-bake energy bites is their adaptability. They’re like a blank canvas for your taste buds, and you can customize them endlessly. It’s the perfect solution when you want something that feels like a dessert but offers real nutritional benefits. Forget those expensive store-bought bars; these are so much better, tastier, and you know exactly what goes into them!
Why you’ll love this recipe?
I’m telling you, this recipe is a lifesaver, and I’ve got a whole list of reasons why you’re going to fall head over heels for it. First off, the flavor is just incredible. It’s got that comforting, slightly sweet, satisfying taste from the oats and your chosen mix-ins. My kids are obsessed! They call them “power balls,” and they’re always asking for them. And the simplicity? Unbeatable. You literally just dump everything into a bowl, mix it up, and roll. No fancy equipment, no waiting for dough to chill, no oven preheating. It’s genuinely one of the easiest things I make. Plus, it’s so budget-friendly. Oats, Peanut Butter, a touch of honey – these are pantry staples that don’t break the bank. And the versatility is off the charts! You can swap out ingredients, add new ones, and create a completely different flavor profile each time. I love that I can make a batch and have healthy snacks for the entire week. Honestly, what I adore most is that feeling of accomplishment after a few minutes of mixing, knowing I’ve got delicious, nutritious snacks ready to go. It’s the perfect answer when you’re craving something sweet at 10 pm but don’t want to bake a whole cake!
How do I make no-bake energy Bites?
Quick Overview
Making these no-bake energy bites is as straightforward as it gets. You’ll simply combine your core ingredients – oats, nut butter, and a sweetener – in a bowl, stir until it’s all nicely incorporated, and then mix in your favorite add-ins. The key is getting the consistency right so they hold their shape. Once mixed, you’ll just roll them into little balls. It’s truly that simple! This method bypasses any baking time, meaning you go from ingredients to snack-ready in under 15 minutes. It’s perfect for those moments when hunger strikes unexpectedly or when you need a quick, healthy grab-and-go option. Trust me, you’ll be making these on repeat.
Ingredients
For the Main Batter:
Rolled Oats: 2 cups. I always prefer old-fashioned rolled oats here. Quick oats can make them a bit too mushy, and steel-cut oats are too hard. Rolled oats give you that perfect chewy texture that holds everything together beautifully. Make sure they’re gluten-free if you need them to be! I usually buy mine in bulk because we go through them so fast.
Nut Butter: 1 cup. Peanut Butter is a classic and always works. Creamy or chunky, it doesn’t matter to me, though creamy makes for easier mixing. If you have a peanut allergy or just want to switch things up, almond butter, cashew butter, or even sunflower seed butter are fantastic alternatives. I tested this with almond butter and it made them even creamier!
Liquid Sweetener: 1/2 cup. Honey or maple syrup are my top choices. Maple syrup gives a slightly richer flavor, while honey is a bit more traditional. Agave nectar works too. The amount can be adjusted slightly depending on how sweet you like things and the natural sweetness of your nut butter.
Vanilla Extract: 1 teaspoon. This just adds that little something extra, that cozy warmth that makes baked goods taste so comforting. Don’t skip it!
Ground Flaxseed or Chia Seeds: 2 tablespoons (optional, but recommended!). These are nutritional powerhouses! They add fiber, omega-3s, and also help bind the bites together. I love the little flecks they add to the texture, and you can’t even taste them.
For the Mix-Ins (get creative!):
Mini Chocolate Chips: 1/2 cup. Because chocolate makes everything better, right? Dark Chocolate chips are my go-to for a richer flavor.
Shredded Unsweetened Coconut: 1/4 cup. Adds a lovely texture and subtle tropical sweetness. Make sure it’s unsweetened, otherwise, your bites might become too sweet.
Chopped Nuts or Seeds: 1/4 cup. Almonds, walnuts, pecans, pumpkin seeds, sunflower seeds – whatever you have on hand! Adds a nice crunch.
Dried Fruit: 1/4 cup. Raisins, cranberries, chopped apricots – these add little bursts of sweetness and chewiness.
Step-by-Step Instructions
Step 1: Gather and Measure Your Ingredients
This is more of a prep step, but it’s crucial for smooth sailing. Get all your ingredients measured out and ready to go. It makes the whole process so much faster and less stressful. Have your oats, nut butter, sweetener, vanilla, and any seeds or flax measured. Get your mix-ins ready too. This ensures you’re not fumbling around mid-recipe.
Step 2: Combine the Base Ingredients
In a large mixing bowl, add the rolled oats, nut butter, liquid sweetener, and vanilla extract. If you’re using ground flaxseed or chia seeds, toss those in now too. These are your foundation for the no-bake energy bites.
Step 3: Mix Thoroughly
This is where the magic starts to happen! Use a sturdy spoon or a spatula to really mix everything together. You want to ensure the nut butter and sweetener are evenly distributed throughout the oats. Keep mixing until you have a cohesive, slightly sticky dough-like mixture. It should hold together when you pinch it.
Step 4: Fold in Your Mix-Ins
Now for the fun part! Add your chosen mix-ins – the mini chocolate chips, shredded coconut, chopped nuts, or dried fruit. Gently fold these into the mixture. You don’t want to overmix here, just enough so that the additions are well distributed. If the mixture seems too dry and isn’t holding together, add another tablespoon of nut butter or sweetener. If it seems too wet, add a tablespoon or two more oats. I’ve learned that the consistency of nut butters can vary, so a little adjustment is often needed.
Step 5: Chill the Mixture (Optional but Recommended!)
For easier rolling, especially if your mixture is a bit soft, I like to pop the bowl in the refrigerator for about 15-30 minutes. This helps the fats in the nut butter firm up a bit, making the dough less sticky and easier to handle. It’s not strictly necessary, but it makes the rolling process a breeze.
Step 6: Roll into Bites
Once the mixture is chilled (or if you’re skipping that step), it’s time to roll! Take about a tablespoon of the mixture at a time and roll it between your palms to form a compact ball. They don’t need to be perfectly uniform; rustic is charming! I usually get about 20-24 bites from this recipe, depending on how large I make them.
Step 7: Arrange and Chill to Set
Place the rolled energy bites on a baking sheet lined with parchment paper or wax paper. This prevents them from sticking. Once they’re all rolled, place the entire baking sheet into the refrigerator for at least 30 minutes. This allows them to firm up completely and hold their shape beautifully. You can also freeze them for about 15 minutes if you’re in a super hurry.
Step 8: Enjoy!
And that’s it! Your delicious, homemade no-bake energy bites are ready to be enjoyed. You can store them in an airtight container in the refrigerator. They’re perfect for grabbing on the go, packing in lunchboxes, or enjoying as a healthy afternoon snack. I always make sure to have a batch ready for when those snack cravings hit!
What to Serve It With
These no-bake energy bites are incredibly versatile, and honestly, they’re fantastic all on their own. But if you’re looking to elevate your snack game or pair them with something special, I’ve got a few ideas that always go over well in my house. For breakfast, they’re a dream alongside a steaming mug of coffee or a vibrant green smoothie. Just pop one or two in your mouth as you sip your morning brew – it’s a quick, satisfying start to the day. For a slightly more elaborate brunch spread, I love arranging them on a platter with fresh fruit like berries or sliced melon. They add a lovely textural contrast and a pop of sweetness. If you’re serving them as a light dessert, consider placing a couple on a small plate with a dollop of Greek Yogurt or a drizzle of dark chocolate sauce. It feels indulgent without being heavy. And for those cozy, rainy afternoons when all you want is comfort food, they’re perfect with a glass of milk or a warm cup of herbal tea. My kids especially love them as an after-school snack with a glass of chocolate milk – it feels like a treat to them!
Top Tips for Perfecting Your No-Bake Energy Bites
I’ve made these no-bake energy bites more times than I can count, and along the way, I’ve picked up a few tricks that make them consistently perfect. First off, the consistency of your nut butter is key. If it’s very oily, you might need to drain off some of the excess oil or add a touch more oats. If it’s super stiff, you might need an extra drizzle of your liquid sweetener. Don’t be afraid to taste the mixture before rolling and adjust sweetness or flavor. My biggest tip? Don’t overmix after adding your mix-ins, especially chocolate chips, or they can start to break down and make the dough messy. When it comes to rolling, if the mixture is too sticky for your liking, chilling it, as I mentioned, is your best friend. Alternatively, you can lightly dampen your hands with water – just a tiny bit – to prevent sticking. And for ingredient swaps, be brave! I’ve tried dried cherries, cacao nibs, and even a pinch of cinnamon in the base mix, and they were all delicious. If you’re using different kinds of dried fruit, make sure they’re chopped small so they don’t make the bites too chunky. For a nut-free version, sunflower seed butter or tahini work well, though tahini has a stronger flavor, so you might want to pair it with a stronger sweetener like maple syrup. I once accidentally added too much sweetener, and they became almost gooey; a few extra oats solved that problem, but it’s always best to measure carefully the first time!
Storing and Reheating Tips
One of the best things about these no-bake energy bites is how well they store. Since they aren’t baked, they’re not meant to be reheated in the traditional sense, but proper storage keeps them fresh and delicious. I usually keep them in an airtight container in the refrigerator. They’ll stay good for about 1-2 weeks this way. The chilling helps them maintain their shape and texture. If you find they’re getting a little too hard in the fridge, just let them sit at room temperature for about 10-15 minutes before enjoying. For longer storage, you can absolutely freeze these! Lay them in a single layer on a baking sheet and freeze until solid, then transfer them to a freezer-safe bag or container. They’ll keep for up to 2-3 months. To thaw, just move them from the freezer to the refrigerator overnight, or let them sit at room temperature for an hour or so. I find they are almost as good straight from the freezer on a really hot day, like a little frozen treat!
Frequently Asked Questions
Final Thoughts
There you have it – my absolute favorite recipe for no-bake energy bites! I truly hope you give these a try. They’re more than just a snack; they’re a little moment of self-care, a way to fuel your body with delicious, wholesome ingredients, and a foolproof solution for busy days. The joy of seeing my family grab these for a healthy boost, or even enjoying one myself when that afternoon slump hits, is immense. They’re so adaptable, so easy, and just incredibly satisfying. If you love this recipe, you might also enjoy my No-Bake Granola Bars or my Healthy Chocolate Avocado Mousse for more quick and delicious treats! I can’t wait to hear what you think and what delicious combinations you come up with. Let me know in the comments below how your no-bake energy bites turn out! Happy snacking!
No-Bake Energy Bites
Ingredients
Main Ingredients
- 1.5 cup rolled oats
- 0.5 cup peanut butter creamy or crunchy
- 0.5 cup chocolate chips
- 0.25 cup honey
- 1 tsp vanilla extract
- 0.25 cup flaxseed meal optional
Instructions
Preparation Steps
- In a medium bowl, combine all ingredients.
- Mix until well combined.
- Roll into 1-inch balls.
- Place on a baking sheet and refrigerate for at least 30 minutes before serving.


