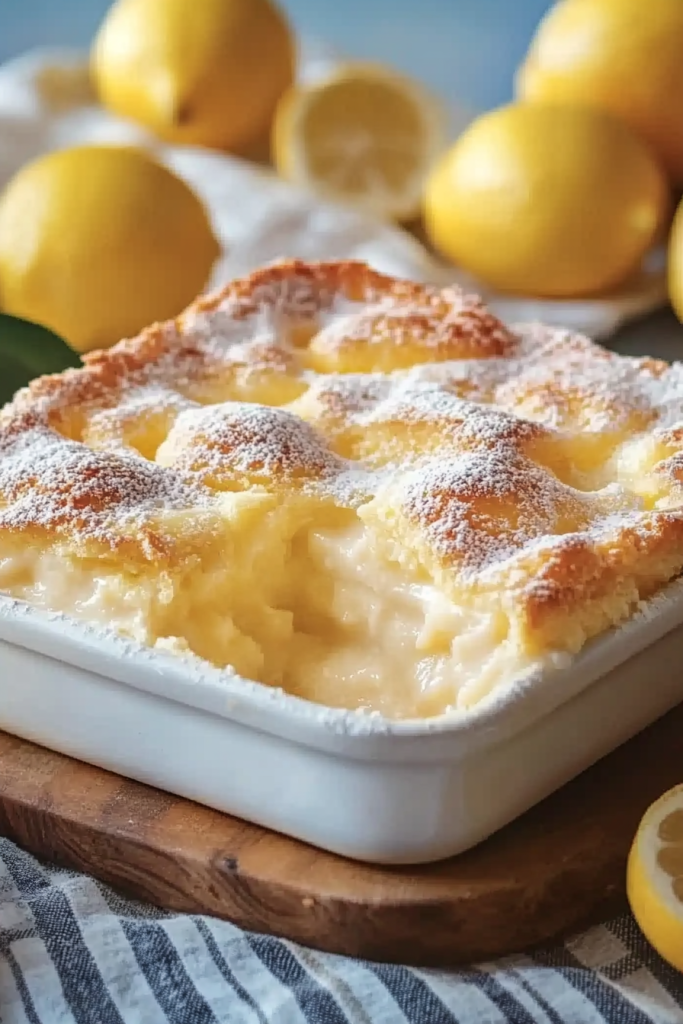
There are some recipes that just… feel like sunshine. This one bowl lemon dessert is absolutely one of those for me. It’s that bright, zesty flavor that instantly lifts your spirits, you know? I remember the first time I made this, it was during a particularly dreary February week, and I just craved something that tasted like summer. I’d seen similar recipes, often involving multiple bowls and a lot of fuss, but I was determined to find a simpler way. And boy, did I! This recipe isn’t just a winner because it tastes incredible; it’s a lifesaver on busy nights. Honestly, the smell alone as it bakes fills the whole house with this amazing citrusy aroma that makes everyone flock to the kitchen. It’s become my go-to when I need a little pick-me-up, or when unexpected guests drop by. It’s so ridiculously easy, I often whip it up when I’m really craving something sweet at 10 pm but don’t want to commit to baking a whole cake. It’s my little secret weapon, and now I’m so excited to share it with you!
What is a one bowl lemon
So, what exactly *is* this magical creation? Think of it as a super moist, incredibly tender lemon cake or loaf, but without all the fuss of creaming butter and sugar or separate dry and wet ingredient bowls. It’s essentially a wonderfully simple batter that gets a burst of bright lemon flavor from both the zest and the juice, and it’s often infused with a subtle sweetness that’s just perfect. The “one bowl” part isn’t just a catchy name; it’s the absolute truth! We mix everything right in one go, which means less mess, less washing up, and more time for you to actually enjoy a slice (or two!). It’s the kind of dessert that feels both comforting and refreshing, like a perfect balance of cake and a delightful lemon confection. It’s not quite a dense Pound Cake, and it’s not a super airy sponge; it lands in this delightful middle ground that’s just pure joy to eat.
Why you’ll love this recipe?
Honestly, where do I even begin with why this one bowl lemon dessert is so special? Let’s start with the FLAVOR, because it’s truly phenomenal. The lemon is bright and zesty, not overly sweet, and it just sings. It’s like a little ray of sunshine in every bite. Then there’s the SIMPLICITY. I mean, one bowl. That’s it! No electric mixers required, no complicated steps. You can literally have this in the oven in about 10-15 minutes flat. And speaking of speed, it’s incredibly COST-EFFECTIVE too. The ingredients are all pantry staples, which is always a win in my book. Plus, it’s so VERSATILE! I’ve served this at everything from a casual weekend breakfast to a more elegant dessert after a dinner party. It’s delicious on its own, but a dollop of whipped cream or some fresh berries take it to the next level. What I love most about this recipe is that it’s forgiving. Even if you’re a beginner baker, you’re going to nail this. It’s the kind of recipe that makes you feel like a kitchen pro without breaking a sweat. It’s definitely a step up from a basic lemon quick bread, offering a more tender crumb and a more intense lemon punch.
How to Make This One Bowl Lemon Dessert
Quick Overview
The beauty of this recipe is its straightforward nature. We’ll whisk together our dry ingredients, then stir in our wet ingredients, fold in any flavorful additions, and pour it all into a prepared pan. The key is to get a good mix without overworking the batter, ensuring a tender crumb. It bakes up beautifully, and a simple glaze finishes it off perfectly. It’s seriously that easy – a true testament to the magic of one-bowl baking.
Ingredients
For the Main Batter:
This is where all the magic starts. We want good quality ingredients here, as they really shine in simpler recipes.
- 2 cups all-purpose flour: I always use unbleached flour for a slightly better texture. If you’re going gluten-free, a good 1:1 gluten-free blend works wonderfully – I tested this with one and it actually made it even creamier!
- 1 ½ cups granulated sugar: You can reduce this slightly if you prefer a tarter dessert, but this amount gives a lovely sweetness that balances the lemon.
- 2 teaspoons baking powder: This is our leavening agent, so make sure it’s fresh!
- ½ teaspoon salt: Balances the sweetness and enhances the flavors.
- Zest of 2 large lemons: Don’t skip this! It’s where so much of that incredible lemon aroma and flavor comes from. Zest them before you juice them – it’s so much easier.
- 1 cup milk: Whole milk gives the richest results, but I’ve had success with 2% and even a good quality oat milk or almond milk.
- ½ cup unsalted butter, melted: Make sure it’s cooled slightly so it doesn’t cook the eggs.
- 2 large eggs: At room temperature is best for proper emulsification.
- ¼ cup fresh lemon juice: From those zested lemons, of course!
For the Filling:
This is optional, but it adds a little extra something special. You can totally skip it if you’re in a rush, but it’s so worth it!
- 2 tablespoons lemon juice
- 2 tablespoons granulated sugar
- 1 tablespoon finely chopped candied ginger (optional, but adds a lovely warmth!)
For the Glaze:
This is the crowning glory! It adds that extra punch of lemon and a pretty finish.
- 1 cup powdered sugar: Sifted if you want it super smooth, but I often don’t bother and it’s fine.
- 2-3 tablespoons fresh lemon juice: Start with 2 and add more until you reach your desired consistency.
Step-by-Step Instructions
Step 1: Preheat & Prep Pan
First things first, get that oven preheated to 350°F (175°C). This is crucial for even baking. Then, grab an 8×8 inch baking pan or a 9-inch round cake pan. I like to grease it generously with butter and then lightly flour it, tapping out any excess. Alternatively, you can line it with parchment paper, leaving an overhang on two sides – this makes lifting it out a breeze!
Step 2: Mix Dry Ingredients
In your largest mixing bowl (the one and only!), whisk together the flour, granulated sugar, baking powder, salt, and lemon zest. Make sure you really get that zest distributed evenly throughout the dry ingredients. This step ensures all those wonderful flavors are well distributed in the final bake.
Step 3: Mix Wet Ingredients
In a separate, smaller bowl or a liquid measuring cup, whisk together the milk, melted butter, eggs, and fresh lemon juice. Just a quick whisk until everything is combined and looks like a smooth, pale yellow mixture.
Step 4: Combine
Now, pour the wet ingredients into the bowl with the dry ingredients. Using a spatula or a wooden spoon, gently fold and stir until *just* combined. It’s really important not to overmix here. A few streaks of flour are perfectly fine; they’ll disappear as it bakes. Overmixing can lead to a tougher dessert, and we want ours to be wonderfully tender.
Step 5: Prepare Filling (Optional)
If you’re making the filling, in a small bowl, simply whisk together the 2 tablespoons of lemon juice and 2 tablespoons of sugar. If you’re feeling fancy, stir in the finely chopped candied ginger. It adds such a lovely little surprise!
Step 6: Layer & Swirl
Pour about half of the batter into your prepared pan and spread it evenly. If you’re using the filling, drizzle about half of it over the batter. Then, pour the remaining batter over the top and drizzle the rest of the filling. Now, grab a knife or a skewer and gently swirl the filling into the batter. You don’t need to go crazy; just a few passes will create lovely ribbons of extra lemon goodness. This step is purely for visual appeal and an extra burst of flavor!
Step 7: Bake
Pop the pan into your preheated oven. Bake for 30-40 minutes for an 8×8 pan, or about 40-50 minutes for a 9-inch round. You’ll know it’s done when a wooden skewer or toothpick inserted into the center comes out clean, or with just a few moist crumbs attached. The top should be golden brown and slightly puffed.
Step 8: Cool & Glaze
Let the dessert cool in the pan on a wire rack for about 15-20 minutes. While it’s cooling, whisk together the powdered sugar and 2 tablespoons of lemon juice in a small bowl for the glaze. Add more lemon juice, a teaspoon at a time, until it’s a smooth, pourable consistency. Once the dessert has cooled slightly, drizzle the glaze all over the top. It will set up as it cools further.
Step 9: Slice & Serve
Allow the dessert to cool completely before slicing and serving. This is key to getting clean slices, especially with the glaze. I love cutting it into squares or wedges. It’s delicious served at room temperature.
What to Serve It With
This one bowl lemon dessert is so wonderfully adaptable! For a delightful BREAKFAST treat, it pairs beautifully with a strong cup of coffee or a soothing cup of herbal tea. I love serving it warm, straight from the oven (once it’s cooled enough, of course!), with just a light dusting of powdered sugar if I’m feeling extra fancy. For BRUNCH, it steps up its game. Think elegant plating with a side of fresh berries – raspberries and blueberries are my favorites – and perhaps a dollop of lightly sweetened whipped cream or Greek yogurt. A glass of chilled Prosecco or a mimosa is also a perfect companion. As a DESSERT, it’s pure bliss. Serve it with a scoop of vanilla bean Ice Cream or a raspberry sorbet for a fantastic contrast of flavors and temperatures. For those COZY SNACKS, it’s just perfect on its own, maybe with a glass of milk or a warm mug of spiced cider. My family has a tradition of having a slice with hot chocolate on rainy afternoons; it’s incredibly comforting. The tartness of the lemon cuts through the richness of the chocolate perfectly!
Top Tips for Perfecting Your One Bowl Lemon Dessert
I’ve made this more times than I can count, and through those countless bakes, I’ve picked up a few tricks that really make a difference. Here are my top tips to ensure yours turns out absolutely perfect every time!
Zucchini Prep: Wait, zucchini? Oh, I think you might be mistaking this for a different recipe! This is a lemon dessert, no zucchini involved! But if you *were* making something with zucchini, the key is always squeezing out as much moisture as possible. Grating it finely is also best. Freshness is paramount – always use young, firm zucchini.
Mixing Advice: The biggest mistake people make is overmixing. When you combine the wet and dry ingredients, just stir until you no longer see big streaks of dry flour. A few small lumps are totally fine. Trust me on this one; it’s the secret to a tender crumb. The batter should be thick but pourable.
Swirl Customization: If you’re adding a filling, don’t go overboard with swirling. A few gentle passes with a knife or skewer are all you need to create pretty patterns. Too much swirling can make the dessert look muddy. Aim for distinct ribbons of flavor and color.
Ingredient Swaps: While this recipe is fantastic as is, I’ve experimented a bit. For a dairy-free version, I’ve found that full-fat coconut milk or a good quality almond milk works well in place of regular milk. For the butter, a neutral-flavored oil like canola or vegetable oil can be used in a 1:1 ratio, though you might lose a little bit of richness. If you’re out of baking powder, you can sometimes use baking soda with an acidic ingredient, but it requires careful ratios and can affect the texture, so I’d stick to baking powder if possible.
Baking Tips: Always preheat your oven fully. My oven tends to run a little hot, so sometimes I bake it for a few minutes less than the recipe states, or at a slightly lower temperature if I’m worried about the top browning too quickly. I usually place my pans on the middle rack for the most even heat distribution. The toothpick test is your best friend here; don’t be afraid to check it a few times towards the end of the baking time.
Glaze Variations: The basic lemon glaze is amazing, but you can totally customize it. For a more intense lemon flavor, add a tiny bit of lemon extract. If you want a hint of lavender, add a pinch of culinary lavender. You can also make it thicker or thinner by adjusting the lemon juice. For a beautiful pink hue, a drop of pink food coloring or a tablespoon of raspberry puree can be added. If you don’t have powdered sugar, you can make a simple syrup with sugar and water, then reduce it slightly for a glaze, though it won’t be quite as opaque.
Storing and Reheating Tips
This one bowl lemon dessert is wonderful for making ahead, which is always a bonus in my busy life! For storing it at ROOM TEMPERATURE, I usually keep it in an airtight container or covered tightly with plastic wrap for up to 2-3 days. It stays nicely moist for that long, especially if it’s not too warm where you live. If your kitchen is quite warm, or if you’ve added berries or cream, REFRIGERATOR STORAGE is better. It will keep well in the fridge, tightly covered, for up to 4-5 days. The texture might firm up slightly in the fridge, but it’s still delicious. To reheat, you can simply let it come to room temperature for about 30 minutes, or gently warm individual slices in a low oven (around 300°F or 150°C) for about 5-8 minutes until just warmed through. For FREEZER INSTRUCTIONS, this dessert freezes beautifully! Once completely cooled, wrap it tightly in plastic wrap, then in a layer of aluminum foil, or place it in a freezer-safe airtight container. It can be frozen for up to 2-3 months. To thaw, transfer it to the refrigerator overnight. The glaze might soften slightly upon thawing, but it’s still perfectly fine. If you plan to freeze it *without* the glaze, that’s an option too! You can add the glaze after it’s thawed and warmed, or just dust it with powdered sugar. I usually add the glaze *after* it’s thawed and brought back to room temperature if it’s been frozen.
Frequently Asked Questions
Final Thoughts
So there you have it – my ultimate one bowl lemon dessert! It’s a recipe that embodies everything I love about baking: simplicity, incredible flavor, and the joy of sharing something delicious with the people you care about. It’s the perfect example of how a few humble ingredients can come together to create something truly special. Whether you’re looking for a quick weeknight treat, a showstopper for a brunch, or just a little burst of sunshine on a cloudy day, this recipe has got you covered. It’s a staple in my kitchen for a reason, and I really hope it becomes one in yours too. If you give this a try, please let me know how it turns out in the comments below! I’d love to hear about your creations and any little twists you might have added. And if you’re a fan of bright, citrusy flavors, you might also enjoy my Simple Lemon Blueberry Scones recipe – they’re another favorite! Happy baking, and enjoy every zesty bite!


