You know those days? The ones where you’re just craving something truly decadent, something that feels like a warm hug from the inside out, but the thought of baking a whole cake from scratch makes you want to hide under the covers? Yeah, I have those days too. And on those days, my absolute go-to, my secret weapon, my “I-need-this-now” treat is this Peanut Butter Cup Brownie Trifle. Honestly, it’s less of a recipe and more of a love letter to chocolate and peanut butter. It’s the kind of dessert that looks like you spent hours on it, but between you and me, it’s surprisingly simple to pull together, especially when you have a good brownie base. Think of it as a deconstructed brownie, but way, way better. It’s the perfect balance of fudgy brownie, creamy peanut butter goodness, and a luscious chocolate frosting that just ties it all together. Forget complicated layered cakes; this trifle is all about pure, unadulterated indulgence, and it’s one of the reasons why I’m so thrilled to share it with you today. This Peanut Butter Cup Brownie Trifle is seriously a lifesaver.
What is a peanut butter cup brownie trifle?
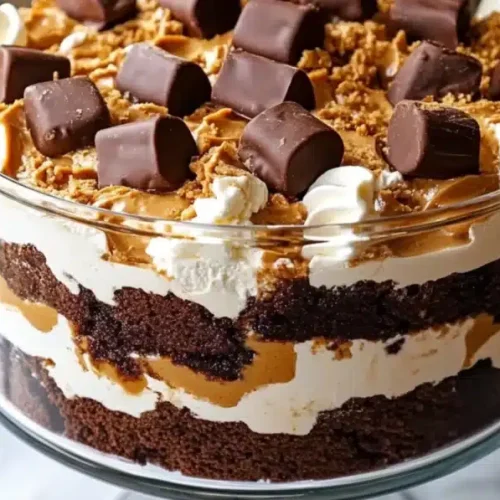
So, what exactly *is* this magical concoction? Well, it’s pretty much everything you dream of in a dessert, layered into a beautiful trifle dish. Imagine rich, fudgy brownies crumbled into bite-sized pieces. Then, layer that with a dreamy, creamy Peanut Butter pudding or mousse, and top it all off with a decadent chocolate ganache or frosting. It’s like taking your favorite brownie and your favorite peanut butter cup and swirling them together with a cloud of chocolate. The name itself, Peanut Butter Cup Brownie Trifle, really says it all, doesn’t it? It’s essentially an easy-to-assemble dessert that captures all the beloved flavors and textures of a classic peanut butter cup and a rich brownie, but in a format that’s incredibly forgiving and visually stunning. It’s not fussy, it’s not complicated, and that’s precisely why it’s become a staple in my kitchen for everything from casual get-togethers to those moments when I just need a serious sweet fix.
Why you’ll love this recipe?
There are so many reasons why this Peanut Butter Cup Brownie Trifle has earned a permanent spot in my recipe rotation, and I’m betting it will in yours too! First and foremost, the flavor. Oh my goodness, the flavor! It’s that perfect marriage of deep, chocolatey brownie and creamy, slightly salty peanut butter. Every spoonful is a delightful explosion of textures and tastes. You get the chewy bits of brownie, the smooth, cool pudding, and the rich, glossy frosting. It’s pure bliss. And honestly, it’s surprisingly easy to make. I’ve found that even on my busiest weeknights, I can whip this up without feeling overwhelmed. The ingredients are all pretty common, and the assembly is straightforward – no fancy techniques required. Plus, it’s incredibly cost-effective compared to buying a similar fancy dessert from a bakery. You get so much bang for your buck! What I love most about this recipe, though, is its versatility. You can totally customize it to your liking. Prefer a lighter peanut butter filling? Go for it! Want to add some chopped nuts for crunch? Absolutely! I’ve even made it with a dairy-free brownie base and almond milk for the filling, and it was still absolutely divine. It’s perfect for potlucks because it travels well and always gets rave reviews. It’s also a crowd-pleaser for parties, and my kids *always* ask for seconds – sometimes even thirds! If you’re a fan of my No-Bake Chocolate Eclair Cake or my Classic Mississippi Mud Pie, you’re going to fall head over heels for this one. It offers that same comforting, indulgent vibe but with a unique peanut butter twist that’s just irresistible.
How do I make a Peanut Butter Cup Brownie Trifle?
Quick Overview
This trifle is all about layering delicious components for maximum impact with minimal fuss. We’ll start with some quick and easy homemade brownies, whip up a dreamy Peanut Butter filling, and then bring it all together with a luscious chocolate topping. The beauty of a trifle is that it’s forgiving; if your brownie crumbles aren’t perfect or your layers aren’t perfectly neat, it still looks amazing. It’s all about that rustic charm and incredible flavor. This method ensures you get a wonderful mix of textures in every bite, making it feel super decadent without a ton of effort.
Ingredients
For the Main Batter (Brownies):
1 ½ cups all-purpose flour
1 cup granulated sugar
½ cup unsweetened cocoa powder (Dutch-processed is my favorite for a richer flavor)
½ teaspoon baking powder
¼ teaspoon salt
½ cup unsalted butter, melted
2 large eggs, at room temperature
1 teaspoon vanilla extract
½ cup milk (whole milk gives the best texture, but 2% works too)
*Tip: For the best fudgy brownies, don’t overmix the batter once you add the wet ingredients to the dry. Just mix until *just* combined. Also, using room temperature eggs helps them incorporate more smoothly, leading to a more uniform batter.*
For the Filling:
1 (8 ounce) package cream cheese, softened
½ cup creamy Peanut Butter (use your favorite brand, Jif or Skippy are classics)
1 cup powdered sugar, sifted
1 teaspoon vanilla extract
1 ½ cups heavy whipping cream, cold
*Preparation Note: Make sure your cream cheese is truly softened so it whips up smoothly without lumps. And don’t skimp on chilling your heavy cream – cold cream whips up much better and faster! If you like a stronger peanut butter flavor, you can add an extra tablespoon or two of peanut butter here, but be mindful it can make the filling a bit denser.*
For the Glaze:
1 cup semi-sweet chocolate chips (or milk chocolate if you prefer it sweeter)
½ cup heavy whipping cream
1 tablespoon unsalted butter, softened
*Consistency Tips: For a pourable glaze, heat the cream until just simmering, then pour it over the chocolate chips. Let it sit for 5 minutes before whisking in the butter until smooth and glossy. If it’s too thick, add a tiny splash more cream. If it’s too thin, let it sit at room temperature for a bit to thicken up.*
Step-by-Step Instructions
Step 1: Preheat & Prep Pan
First things first, preheat your oven to 350°F (175°C). Get a 9×13 inch baking pan ready by greasing it well and then lightly flouring it, or even better, line it with parchment paper, leaving an overhang on the sides. This makes lifting the brownies out so much easier later on. Give it a good spray with non-stick cooking spray too, just to be sure nothing sticks. This prep work is key to getting those beautiful, intact brownie pieces for layering.
Step 2: Mix Dry Ingredients
In a large mixing bowl, whisk together the flour, granulated sugar, cocoa powder, baking powder, and salt. Whisking them together well ensures that all the leavening agents and flavorings are evenly distributed throughout the batter. You want to make sure there are no big clumps of cocoa powder, so give it a good whisk until everything is nicely combined and looks like a fine, dark sand. This step is super important for even baking and flavor.
Step 3: Mix Wet Ingredients
In a separate, medium-sized bowl, whisk together the melted butter, eggs, vanilla extract, and milk. Whisk until everything is well combined and smooth. Make sure your eggs aren’t straight from the fridge; letting them sit out for about 15-20 minutes will help them emulsify better with the other wet ingredients, leading to a smoother, more tender brownie. This is where the richness and moisture start to come together.
Step 4: Combine
Now, pour the wet ingredients into the bowl with the dry ingredients. Using a spatula or a wooden spoon, gently mix everything together until *just* combined. Seriously, don’t overmix! A few streaks of flour are perfectly fine at this stage. Overmixing develops the gluten in the flour too much, which can lead to tough brownies. We’re going for fudgy and tender here, so mix with a light hand until there are no dry pockets left.
Step 5: Prepare Filling
In a large bowl (you can use an electric mixer for this part!), beat the softened cream cheese and peanut butter together until they are smooth and creamy. Gradually beat in the sifted powdered sugar until well combined. Then, add the vanilla extract and beat again. In a separate bowl, whip the cold heavy whipping cream until stiff peaks form. Gently fold about a third of the whipped cream into the cream cheese mixture to lighten it, then fold in the remaining whipped cream until it’s just combined and you have a beautiful, airy peanut butter mousse. Be careful not to overmix, or you’ll deflate all that lovely airiness!
Step 6: Layer & Swirl
Once your brownies have cooled completely, cut them into bite-sized cubes. Now for the fun part! Grab your trifle dish or a large clear bowl. Start with a layer of brownie cubes at the bottom. Spoon about a third of the peanut butter filling over the brownies, spreading it evenly. Add another layer of brownie cubes, followed by another third of the peanut butter filling. Repeat for a third layer. Finally, pour the chocolate glaze over the top, letting it drip down the sides a bit. You can use a skewer or a knife to gently swirl the glaze into the top layer of the filling for a marbled effect. It looks so fancy!
Step 7: Bake
Bake the brownie batter in the preheated oven for 25-30 minutes, or until a toothpick inserted into the center comes out with moist crumbs attached, not wet batter. You want them to be fudgy, not cakey. Keep an eye on them towards the end; ovens can vary! I always check mine around the 25-minute mark. Overbaking is the enemy of fudgy brownies, so err on the side of slightly underbaked if you’re unsure.
Step 8: Cool & Glaze
Let the brownies cool completely in the pan on a wire rack. This is crucial! Trying to layer warm brownies will just result in a mushy mess. Once they are completely cool, you can prepare the glaze. While the brownies are cooling, make your chocolate glaze. Gently warm the heavy cream in a small saucepan until it’s just starting to simmer around the edges. Pour the hot cream over the chocolate chips in a heatproof bowl. Let it sit for about 5 minutes to allow the chocolate to melt. Then, whisk in the softened butter until the glaze is smooth, glossy, and beautifully melted. Let it cool slightly so it’s not piping hot when you pour it over the trifle.
Step 9: Slice & Serve
This trifle is best served chilled, so after assembly, pop it in the refrigerator for at least 2-3 hours (or even overnight) to allow the flavors to meld and the layers to set up properly. This step is so important for the best texture and taste. When you’re ready to serve, use a large spoon to scoop out generous portions. The layers should be distinct and beautiful, and the combination of textures and flavors will be absolutely divine. It’s a showstopper, and everyone will think you’re a baking genius!
What to Serve It With
This Peanut Butter Cup Brownie Trifle is so wonderfully versatile, it really shines on its own, but here are some ideas for how to pair it up, depending on the occasion. For a leisurely breakfast or brunch, I love serving a small scoop alongside a perfectly brewed cup of strong coffee. The bitterness of the coffee beautifully cuts through the richness of the trifle, creating a balanced start to the day. You could even sprinkle a few fresh berries on top for a touch of freshness. If you’re serving this as a formal dessert after a lovely dinner, present it in individual clear glasses or ramekins for an elegant touch. A dollop of freshly whipped cream or a sprinkle of chocolate shavings can elevate it further. For those cozy snack moments, when you just need a little something sweet to lift your spirits, this trifle is pure comfort. It’s perfect with a tall glass of cold milk – a classic pairing that never gets old. My family loves it as an after-dinner treat, especially after a hearty Sunday roast. We usually just dig in with spoons straight from the trifle dish, no fuss required. It’s also fantastic when paired with a scoop of vanilla bean ice cream if you’re feeling extra indulgent. Honestly, it’s so good, you could serve it with a side of just about anything, or nothing at all, and it would be a hit!
Top Tips for Perfecting Your Peanut Butter Cup Brownie Trifle
I’ve made this Peanut Butter Cup Brownie Trifle more times than I can count, and over the years, I’ve picked up a few tricks that I think make it even better. For the brownies, the key to that perfect fudgy texture is really not overbaking them. I usually pull mine out when there are still a few moist crumbs attached to a toothpick, knowing they’ll continue to cook a bit as they cool. For the peanut butter filling, make sure your cream cheese is truly softened. I’ve learned the hard way that cold cream cheese leads to a lumpy filling, no matter how long you beat it! Sifting the powdered sugar also makes a world of difference in achieving that super smooth, creamy consistency. When it comes to the swirling technique for the glaze, don’t go overboard. A few gentle swirls are all you need to create a beautiful marbled effect without muddying the colors. If your glaze seems a bit too stiff, I’ve found that a tiny splash of warmed milk or cream can loosen it up perfectly. For ingredient swaps, if you’re not a huge fan of semi-sweet chocolate, feel free to use milk chocolate chips for a sweeter glaze, or even dark chocolate for a more intense flavor. I’ve also experimented with using different types of peanut butter – chunky adds a nice texture if you like that! And one of my favorite “lessons learned” is about the chilling time. While you *can* serve it sooner, letting it chill for at least 4 hours really allows all those flavors to meld together beautifully and the layers to firm up perfectly. This is what takes it from good to absolutely extraordinary. Trust me on this one!
Storing and Reheating Tips
Storing this delightful Peanut Butter Cup Brownie Trifle is pretty straightforward, and thankfully, it holds up beautifully. At room temperature, I’d say it’s best enjoyed within 2-3 hours, especially if your kitchen is warm, as the cream cheese filling can start to soften. If you need to store it for longer, the refrigerator is your best friend. I usually cover the trifle dish tightly with plastic wrap, making sure it’s sealed well to prevent any odors from creeping in. In the refrigerator, it will stay fresh and delicious for up to 3-4 days. The flavors actually tend to deepen and meld even more overnight, so don’t be surprised if it tastes even better on the second day! If you want to freeze portions, which is a great idea if you think you won’t get through it all, I recommend portioning it into individual airtight containers. Wrap them well in plastic wrap first, then cover with foil or place them in a freezer-safe bag. It should keep well in the freezer for about 1-2 months. When you’re ready to enjoy frozen portions, the best way to thaw them is to transfer them to the refrigerator overnight. The glaze timing is important too – I always add the glaze just before serving or a few hours beforehand. If it sits on the brownie layers for too long in the fridge, especially if it’s a thinner glaze, it can sometimes make the brownies a bit too soggy. My preference is to add the glaze just before the final chill time to let it set nicely on top.
Frequently Asked Questions
Final Thoughts
Honestly, this Peanut Butter Cup Brownie Trifle is more than just a dessert for me; it’s a little slice of happiness, a reminder of cozy evenings and happy gatherings. It’s the kind of recipe that proves you don’t need to be a professional baker to create something truly spectacular and deeply satisfying. The combination of rich, fudgy brownies and creamy peanut butter goodness is simply divine, and the ease with which it comes together is a major bonus. If you’re a fan of chocolate and peanut butter (and who isn’t?), then you absolutely have to give this a try. It’s perfect for satisfying that sweet craving, impressing guests without the stress, or simply treating yourself because you deserve it. I really hope you enjoy making and eating this as much as I do. If you end up making it, I would absolutely love to hear about it! Drop a comment below and let me know how yours turned out, or share any fun twists you added. Happy baking, and happy indulging!
Peanut Butter Cup Brownie Trifle
Ingredients
Main Ingredients
- 1 box Brownie mix
- 0.5 cup Milk
- 1 cup Heavy cream
- 1 cup Peanut butter
- 0.25 cup Powdered sugar
- 12 count Peanut butter cups Chopped
- 2 cup Whipped cream
Instructions
Preparation Steps
- Prepare brownie mix according to package directions and bake. Let cool completely.
- In a bowl, beat together heavy cream, peanut butter, and powdered sugar until smooth.
- Cut the cooled brownies into cubes.
- In a trifle dish, layer brownie cubes, peanut butter mousse, chopped peanut butter cups, and whipped cream. Repeat layers.
- Garnish with extra peanut butter cups and whipped cream. Chill for at least 1 hour before serving.


