Oh, where do I even begin with this purple velvet cake? It’s more than just a dessert; it’s a hug in cake form. I remember the first time I tried to make something like this, I was maybe ten years old and obsessed with anything that looked remotely magical. My grandmother, bless her heart, used to make this incredible Red Velvet Cake, and I always wondered if there was a way to make it… well, more exciting. Faster forward a few decades, and after countless kitchen experiments (some more successful than others, let’s be honest!), I’ve landed on this absolute gem. This purple velvet cake isn’t just visually stunning, it’s got this unbelievably moist crumb and a flavor that’s just sophisticated enough to feel special, but comforting enough for a Tuesday afternoon. It’s the kind of cake that makes your kitchen smell divine and instantly lifts everyone’s spirits. If you’ve ever loved red velvet, you’re going to be absolutely smitten with this vibrant twist.
What is purple velvet cake?
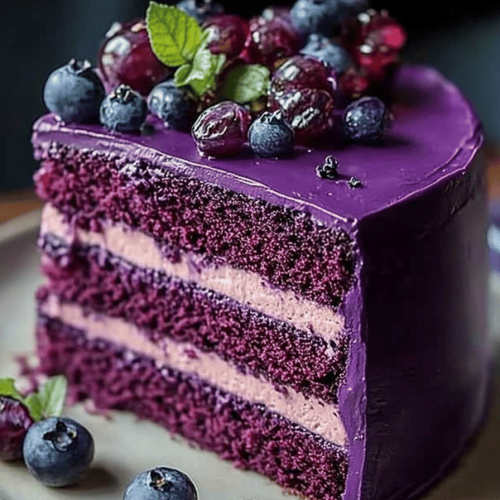
So, what exactly is this showstopper? Think of it as the magical cousin of the classic Red Velvet Cake. It gets its gorgeous, deep purple hue not from artificial dyes (though you *can* add a touch if you’re feeling bold!), but from a generous amount of pureed beets and a little bit of cocoa powder. Don’t let the beets fool you; you won’t taste them one bit! They just lend this incredible moisture and a subtle earthiness that balances the sweetness perfectly. The “velvet” part comes from the silky-smooth texture, achieved through a specific mixing method and the rich fat content from buttermilk and butter. It’s essentially a rich, tender cake with a hint of cocoa and a captivating color that makes it feel like you’re cutting into a jewel. It’s a beautiful surprise that’s always a conversation starter.
Why you’ll love this recipe?
Why do I love purple velvet cake?flavor is just out of this world. It’s subtly sweet, with a delicate cocoa note and that signature tang from the buttermilk that makes it so incredibly balanced. It’s not overly rich, but it feels luxurious. Then there’s the simplicity. Now, I know “cake from scratch” can sound intimidating, but I promise you, this recipe is surprisingly straightforward. The beets get processed quickly, and the rest is just a matter of whisking and folding. It’s far easier than you might think, and the results are miles beyond any box mix. Plus, it’s incredibly cost-efficient. Beets are ridiculously inexpensive,versatility! This cake is a dream as is, but it’s also a fantastic canvas for different frostings – Cream Cheese is classic, but a simple vanilla buttercream or even a tangy lemon frosting works wonders. I’ve also found it’s a fantastic base for cupcakes if you’re short on time or want individual portions. It’s that perfect sweet treat when you’re craving something a little decadent but still want it to feel homemade and special. What I love most about this is how it makes people smile; that first bite and the surprised look when they realize what gives it its amazing color and moisture – it’s priceless!
How to Make Purple Velvet Cake
Quick Overview
This purple velvet cake is all about layering flavors and textures. We’ll start by roasting or steaming and pureeing some vibrant beets, then combine them with our wet ingredients before adding them to a perfectly balanced dry mix. The key is gentle mixing to keep that velvet texture, followed by a delicate swirl and a bake until it’s just tender. Finally, a luscious glaze ties it all together. It’s a process that’s more about mindful steps than complicated techniques, and trust me, the aroma filling your kitchen is worth every minute.
Ingredients
For the Main Batter:
3 cups all-purpose flour (spooned and leveled, not scooped – this is a lifesaver for cake texture!)
1 teaspoon baking soda
1/2 teaspoon salt
1 tablespoon unsweetened cocoa powder (good quality makes a difference here!)
1 cup (2 sticks) unsalted butter, softened (make sure it’s truly softened, not melted, for the best creaming)
2 cups granulated sugar
2 large eggs, at room temperature
1 teaspoon vanilla extract
1 cup buttermilk, at room temperature (if you don’t have buttermilk, you can make a quick substitute by adding 1 tablespoon of white vinegar or lemon juice to 1 cup of milk and letting it sit for 5-10 minutes)
1 cup pureed cooked beets (about 2 medium beets, roasted or steamed until tender, then blended until smooth)
For the Filling:
1/2 cup Cream Cheese, softened
1/4 cup powdered sugar (for a touch of sweetness)
For the Glaze:
1 ½ cups powdered sugar, sifted (sifting is key for a smooth glaze!)
2-3 tablespoons milk or heavy cream (start with 2 and add more only if needed)
1/2 teaspoon vanilla extract
Optional: A tiny drop of purple food coloring for an even more intense hue, or a splash of lemon juice for a tangier flavor.
Step-by-Step Instructions
Step 1: Preheat & Prep Pan
Get your oven preheated to 350°F (175°C). Grease and flour a 9×13 inch baking pan. You can also line it with parchment paper for extra insurance, especially if you’re worried about sticking. I like to grease, flour, and then add a parchment sling because I always worry about pulling a cake out perfectly!
Step 2: Mix Dry Ingredients
In a medium bowl, whisk together the flour, baking soda, salt, and cocoa powder. Whisking them together thoroughly ensures everything is evenly distributed, which means no pockets of baking soda or salt in your cake. This is a simple step, but it’s crucial for an even bake and rise.
Step 3: Mix Wet Ingredients
In a large bowl, cream together the softened butter and granulated sugar using an electric mixer until light and fluffy. This can take about 3-5 minutes. Beat in the eggs one at a time, then stir in the vanilla extract. In a separate small bowl or jug, whisk together the buttermilk and the pureed beets. Make sure your beets are truly smooth; any chunks can affect the texture.
Step 4: Combine
Gradually add the dry ingredients to the wet ingredients, alternating with the buttermilk-beet mixture. Start and end with the dry ingredients. Mix on low speed until just combined. Be careful not to overmix! Overmixing develops the gluten in the flour, which can lead to a tough cake. We want tender, velvety goodness here.
Step 5: Prepare Filling
In a small bowl, beat the softened Cream Cheese with the powdered sugar until smooth and creamy. This little bit of cream cheese folded into the batter adds an extra layer of richness and a hint of tang that just elevates the whole cake. It’s optional, but I highly recommend it for that extra special touch!
Step 6: Layer & Swirl
Pour about half of the cake batter into your prepared pan. Dollop spoonfuls of the cream cheese filling over the batter. Then, gently pour the remaining cake batter over the filling. You can use a knife or a skewer to gently swirl the filling into the batter, creating beautiful purple ribbons. Don’t over-swirl, or the filling will just disappear into the batter.
Step 7: Bake
Bake for 30-35 minutes, or until a wooden skewer or toothpick inserted into the center of the cake comes out clean. Keep an eye on it towards the end; ovens can vary! If the top starts to brown too quickly, you can loosely tent it with foil. The smell of this baking is just heavenly.
Step 8: Cool & Glaze
Let the cake cool in the pan for about 15-20 minutes before inverting it onto a wire rack to cool completely. Once completely cool, whisk together the sifted powdered sugar, vanilla extract, and 2 tablespoons of milk or cream. Add more milk a teaspoon at a time until you reach your desired drizzling consistency. Drizzle generously over the cooled cake. The glaze will set slightly, giving you that beautiful finish.
Step 9: Slice & Serve
Once the glaze has set a bit, slice your gorgeous purple velvet cake and serve. It’s best enjoyed at room temperature, but it’s so good, I’ve definitely eaten it straight from the fridge too!
What to Serve It With
This purple velvet cake is pretty spectacular on its own, but here are a few ideas on how to elevate the experience, depending on the occasion:
For Breakfast: Honestly, if you’re feeling adventurous, a small slice with your morning coffee is a decadent treat. The subtle sweetness and hint of cocoa are a wonderful wake-up call. I sometimes cut small, thin squares and serve them with a dollop of Greek yogurt for a slightly healthier twist.
For Brunch: This is where the cake truly shines. Serve it on a pretty platter with fresh berries – raspberries or blueberries are fantastic companions. A light dusting of powdered sugar or a few edible flowers can make it feel incredibly elegant. Pair it with a mimosa or a freshly brewed pot of coffee. It’s a showstopper that will have your guests asking for the recipe immediately!
As Dessert: Of course, this is its natural habitat! For a more formal dessert, serve a slice with a scoop of vanilla bean ice cream or a swirl of freshly whipped cream. A drizzle of raspberry coulis or a scattering of chocolate shavings adds an extra touch of luxury. It’s perfect after a hearty meal.
For Cozy Snacks: Sometimes you just need cake, right? This is perfect for an afternoon pick-me-up with a cup of tea or a glass of cold milk. My kids absolutely love it like this after school. It feels comforting and indulgent without being overwhelming.
My family tradition is to have this for birthdays, but I’ve also made it just because the mood strikes. The key is that it always feels special, no matter the reason.
Top Tips for Perfecting Your Purple Velvet Cake
I’ve been making cakes for a long time, and I’ve picked up a few tricks along the way that I think really make a difference. Here are my top tips for getting this purple velvet cake just right, every single time:
Zucchini Prep: Okay, wait, I mean BEET prep! My apologies, my brain jumped ahead. For the beets, make sure they are cooked until fork-tender but not mushy. Roasting them brings out their natural sweetness, which I prefer, but steaming works too. The crucial part is blending them into a super smooth puree. Any stringy bits or chunks will mess with the texture of your cake. And definitely make sure they’re cooled before adding them to your batter!
Mixing Advice: This is probably the MOST important tip for that “velvet” texture. When you’re combining the wet and dry ingredients, mix until *just* combined. You should still see a few streaks of flour. Then, give it a few more gentle folds. Seriously, don’t go crazy with the mixer. Overmixing leads to a tough, dense cake, and we want airy, tender crumb. It’s better to have a tiny bit of flour not fully incorporated than to overwork the batter.
Swirl Customization: The cream cheese swirl is mostly for aesthetics, but it adds a lovely tang. Don’t go overboard with the swirling! You want distinct ribbons of cream cheese, not a uniform pinkish-purple mess. A few gentle passes with a knife or skewer is all you need. Think artistic swirls, not a muddy blend. If you want to amp up the color, you can add a tiny drop of purple food coloring to your beet puree *before* adding it to the batter, but I find the natural color from the beets is usually enough!
Ingredient Swaps: If you’re out of buttermilk, that 1 tablespoon of vinegar or lemon juice to 1 cup of milk trick I mentioned earlier is a lifesaver! It creates that same acidity that reacts with the baking soda for lift and tenderness. As for the butter, you *can* use a good quality margarine, but the flavor and texture won’t be quite as rich. I haven’t personally tested oil, so I can’t vouch for that substitution. For the cocoa, Dutch-processed cocoa powder gives a darker color and smoother flavor, but natural unsweetened will work fine in a pinch.
Baking Tips: Always use the middle rack of your oven. This ensures even heat distribution all around the cake. If your oven tends to run hot, I recommend using an oven thermometer to be sure. The toothpick test is your best friend: insert it into the center, and if it comes out clean or with a few moist crumbs attached (not wet batter), it’s done. A slightly underbaked cake is often better than an overbaked, dry one!
Glaze Variations: If you’re not a fan of powdered sugar, you could do a simple chocolate ganache or even just a light dusting of powdered sugar. For the glaze, the key is consistency. If it’s too thin, it’ll run right off. Too thick, and it’ll be hard to drizzle. Start with less liquid and add more *very* gradually until it’s perfect. A little splash of lemon juice in the glaze adds a wonderful tang that cuts through the sweetness beautifully, especially if you skipped the cream cheese filling.
Storing and Reheating Tips
Proper storage is key to keeping this beautiful purple velvet cake tasting its best. I’ve learned this through experience – nobody wants a stale slice!
Room Temperature: Once the cake is fully cooled and the glaze has set, you can store it at room temperature for about 2-3 days. Keep it in an airtight container or covered tightly with plastic wrap. The humidity in your kitchen can affect how long it stays fresh, so in very humid environments, the fridge might be a better option sooner.
Refrigerator Storage: For longer storage, or if you live in a warm climate, the refrigerator is your best bet. Keep it in an airtight container, and it should last for about 5-7 days. The texture might become a little firmer when chilled, so I always recommend letting it come back to room temperature for about 20-30 minutes before serving for the best flavor and texture.
Freezer Instructions: This cake freezes surprisingly well! Once it’s completely cooled and glazed, wrap it very tightly in a double layer of plastic wrap, then in a layer of aluminum foil. It can be stored in the freezer for up to 2-3 months. Thaw it overnight in the refrigerator, then let it sit at room temperature for a bit before serving. Honestly, I’ve pulled out a slice from the freezer and just let it come to room temp, and it’s been great!
Glaze Timing Advice: If you plan to freeze the cake *before* glazing, wrap it well and freeze. Then, thaw it in the fridge and let it come to room temp. At that point, you can make a fresh glaze and apply it. If you’re storing it for a few days at room temp or in the fridge *with* the glaze, just make sure it’s completely cool before you apply it. Adding glaze to a warm cake will make it melt and run off.
Frequently Asked Questions
Final Thoughts
So there you have it – my beloved purple velvet cake recipe! I truly hope you give this a try. It’s more than just a dessert; it’s an experience. It’s that beautiful balance of vibrant color, moist crumb, and a flavor that’s just right – not too sweet, not too plain, but perfectly decadent. It’s a recipe that brings joy, whether you’re baking it for a special occasion or just because. If you loved this, you might also enjoy my Chocolate Zucchini Bread recipe for another way to sneak veggies into delicious baked goods, or my Lemon Raspberry Scones for a delightful morning treat. Give this purple velvet cake a bake, and let me know how it turns out for you in the comments below! I can’t wait to hear about your purple creations. Happy baking, my friends!
Purple Velvet Cake
Ingredients
Cake Ingredients
- 2.5 cups all-purpose flour
- 2 cups granulated sugar
- 0.75 cup unsweetened cocoa powder
- 1.5 teaspoons baking powder
- 1.5 teaspoons baking soda
- 1 teaspoon salt
- 1 cup buttermilk
- 0.5 cup vegetable oil
- 2 large eggs
- 2 teaspoons vanilla extract
- 2 tablespoons purple gel food coloring
Cream Cheese Frosting Ingredients
- 8 ounces cream cheese, softened
- 0.5 cup unsalted butter, softened
- 3 cups powdered sugar
- 1 teaspoon vanilla extract
- 0.25 teaspoon salt
Instructions
Cake Preparation
- Preheat oven to 350°F (175°C). Grease and flour two 9-inch round cake pans.
- In a large bowl, whisk together flour, sugar, cocoa powder, baking powder, baking soda, and salt.
- In a separate bowl, whisk together buttermilk, oil, eggs, vanilla extract, and food coloring.
- Gradually add the wet ingredients to the dry ingredients, mixing until just combined. Do not overmix.
- Pour batter evenly into prepared cake pans.
- Bake for 30-35 minutes, or until a toothpick inserted into the center comes out clean. Let cool in pans for 10 minutes before inverting onto a wire rack to cool completely.
Frosting Preparation
- In a large bowl, beat cream cheese and butter until smooth.
- Gradually add powdered sugar, beating until smooth. Stir in vanilla extract and salt.
Assembly
- Level the cake layers if needed. Place one layer on a serving plate and spread with frosting.
- Top with the second cake layer and frost the top and sides of the cake.
- Decorate as desired. Serve and enjoy!