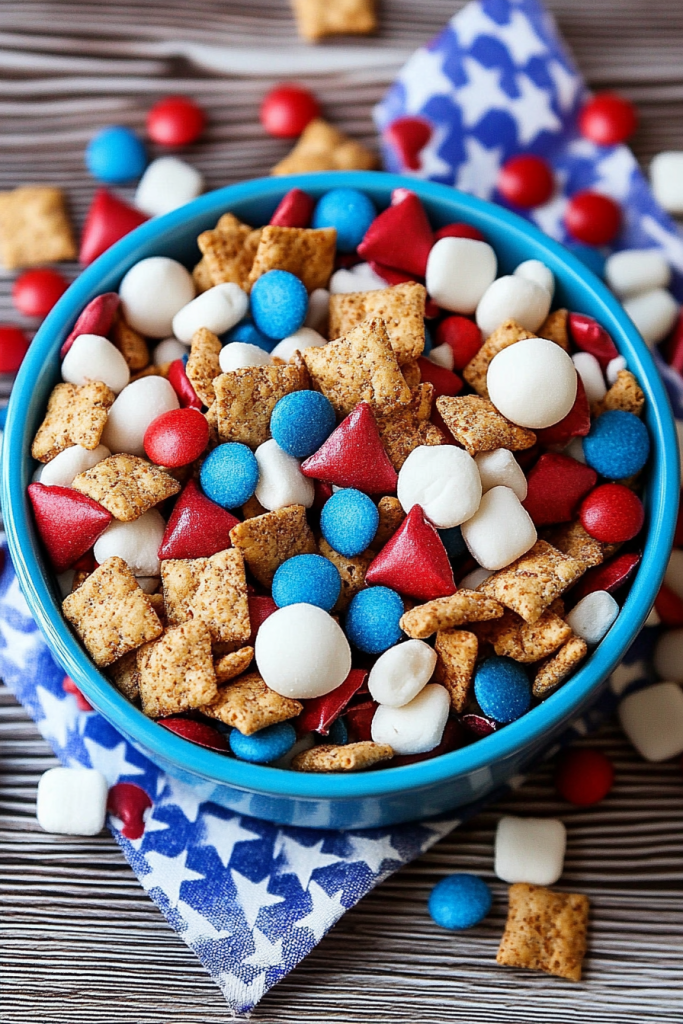
You know those days when you just need something a little… festive? Something that screams ‘happy!’ without a whole lot of fuss? That’s exactly how I felt last week, staring into the pantry, needing a quick win for an impromptu gathering. I remembered this ridiculously easy red white blue Snack Mix, and let me tell you, it’s become my go-to for everything from 4th of July picnics to just a Tuesday afternoon pick-me-up. It’s got that perfect sweet and salty crunch, and honestly, the colors just make everyone smile. It’s not as complicated as making a layered cake, and it’s way more satisfying than just grabbing a bag of chips. This mix is proof that you can create something special and visually stunning with just a few pantry staples. It’s the kind of recipe you keep on a sticky note, tucked away in your favorite cookbook, because you’ll be reaching for it again and again.
What is a Red White Blue Snack Mix?
So, what exactly is this Red White Blue Snack Mix all about? Think of it as your ultimate party in a bowl! It’s a delightful jumble of crunchy, sweet, and savory elements that come together to create a truly addictive treat. The “Red White Blue” part comes from the ingredients we use – typically pretzels, white chocolate or candy melts, and some kind of red or blue element like dried cranberries, M&M’s, or even a sprinkle of red and blue food coloring. It’s essentially a gourmet popcorn or Chex Mix, but with a patriotic twist that makes it perfect for holidays or just when you’re feeling spirited. I love that it’s so adaptable; you can swap out ingredients based on what you have or what your family loves. It’s the perfect blend of familiar flavors and fun textures, all coming together in a beautiful, edible mosaic. It’s the kind of thing that looks like you spent hours on it, but shhh, that’s our little secret!
Why you’ll love this recipe?
Honestly, where do I even begin with why this Red White Blue Snack Mix is an absolute winner? First off, the flavor. It hits all the right notes: that satisfying salty crunch from the pretzels, the sweet embrace of melted chocolate, and then you get these little bursts of chewy goodness or tartness depending on your additions. It’s the kind of snack that keeps you coming back for “just one more handful.” And the simplicity? Oh my goodness. If you can melt chocolate and stir, you can make this. It’s a lifesaver on busy nights when you need a quick treat or a last-minute party contribution. Plus, it’s surprisingly budget-friendly! Most of the ingredients are pantry staples, making it an economical way to impress. What I love most about this is its versatility. You can easily customize it for any occasion. Feeling extra festive? Add some edible star sprinkles. Need a vegan option? Use dairy-free chocolate. It truly adapts to your needs. It’s so much more satisfying than just buying a pre-made mix because you control the quality and can tailor it to your exact preferences. It’s a small batch of happiness that brings big smiles, and that, my friends, is truly priceless.
How do I make a red and blue snack mix?
Quick Overview
This snack mix is a breeze to whip up, taking just a few simple steps. You’ll start by prepping your base ingredients, then gently coating them in melted White Chocolate or candy melts, and finally, tossing in your colorful accents. The hardest part is waiting for it to set! It’s a no-bake wonder that comes together in under 20 minutes of active time, making it perfect for even the busiest of days. Trust me, the minimal effort yields maximum deliciousness and visual appeal.
Ingredients
For the Base:
I prefer the twists for better chocolate-holding nooks and crannies. I like
2 cups Crispy Rice cereal (like Rice Krispies)
1 cup puffed cereal (like Chex or Corn Pops – a mix is nice!)
*Tip: Using a variety of shapes adds wonderful texture and visual interest.*
For the Coating:
12 ounces White Chocolate chips or candy melts (I find candy melts hold their shape a bit better, but good quality white chocolate works beautifully too)
2 tablespoons coconut oil or vegetable oil (this helps the chocolate melt smoothly and not seize up)
For the Patriotic Flair:
1 cup red candy-coated chocolate pieces (like M&M’s)
1 cup blue candy-coated chocolate pieces (like M&M’s)
½ cup dried cranberries (for a lovely red tartness)
*Optional: Red and blue edible glitter or star sprinkles for extra sparkle!
Step-by-Step Instructions
Step 1: Prep Your Workspace
First things first, you want to get everything ready before you start melting your chocolate. Line a large baking sheet or a couple of cookie sheets with parchment paper or wax paper. This is crucial for easy cleanup and to prevent the mix from sticking. Make sure you have enough space to spread out your ingredients. I usually clear a good chunk of my counter!
Step 2: Combine the Dry Base
In a very large bowl, gently combine your pretzel twists, crispy rice cereal, and puffed cereal. Give it a good, light toss with your hands or a large spatula. You don’t want to crush the pretzels, just ensure everything is evenly distributed. This is your foundation for all that deliciousness.
Step 3: Melt the White Chocolate
Now for the magic binder! In a microwave-safe bowl, combine your white chocolate chips or candy melts with the coconut oil. Microwave in 30-second intervals, stirring well after each interval, until the chocolate is completely melted and smooth. Be patient here; you don’t want to scorch the chocolate. Alternatively, you can use a double boiler method for extra gentle melting.
Step 4: Coat the Base
Pour the melted white chocolate over the dry ingredients in your large bowl. Use a spatula to gently fold and stir everything together until all the dry components are coated evenly. This might take a minute or two, and it’s okay if there are a few dry spots initially. The goal is a nice, even coating without drowning everything.
Step 5: Add the Patriotic Colors
Now for the fun part! Sprinkle in your red and blue candy-coated chocolates and the dried cranberries. If you’re using edible glitter or sprinkles, add those now too. Gently fold everything together again. You want to distribute the colors and textures throughout the mix. Try not to overmix, or you’ll break your pretzels!
Step 6: Spread and Set
Carefully spread the coated snack mix in a single layer onto your prepared baking sheet(s). Try to get it as even as possible so it sets uniformly. If you like clusters, you can gently press some areas together. Let it sit at room temperature for about 30-60 minutes, or until the chocolate is completely hardened. For a quicker set, you can pop it in the refrigerator for about 15-20 minutes, but be mindful of condensation if you do that.
Step 7: Break and Enjoy!
Once the chocolate is fully set, break the hardened snack mix into bite-sized pieces. It will naturally break into irregular chunks, which is part of its charm! And there you have it – your delicious, festive Red White Blue Snack Mix is ready to be devoured!
What to Serve It With
This Red White Blue Snack Mix is incredibly versatile, but here are a few of my favorite ways to serve it up:
For Breakfast: While not a traditional breakfast item, a small handful alongside a cup of coffee on a holiday morning feels like a special treat! It’s a sweet little indulgence to start a festive day. I love breaking off a few pieces and just nibbling while I read the news.
For Brunch: Present it in a beautiful bowl as part of your brunch spread. It adds a pop of color and a delightful crunch that complements lighter fare like fruit salads or quiches. It’s especially fun for a holiday brunch like Memorial Day or the 4th of July. I always get compliments when I bring this!
As Dessert: This is fantastic served in small bowls after dinner, especially if you’ve had a richer meal. It’s a satisfying sweet bite without being too heavy. You can also crumble some over a vanilla ice cream sundae for an unexpected texture and flavor boost!
For Cozy Snacks: Honestly, this is my go-to for movie nights or just when I’m craving something sweet and salty. It’s perfect for sharing (or not!) while curled up on the couch. It’s so easy to just grab a handful when that craving strikes, and it feels a little more special than everyday snacks. My kids always ask for this when we’re watching a family movie.
I’ve also found that my family loves it when I present it in little paper cups for an easy grab-and-go option during backyard BBQs. It keeps fingers from getting too messy, and everyone can have their own personal stash!
Top Tips for Perfecting Your Red White Blue Snack Mix
Over the years, I’ve picked up a few tricks that help make this Red White Blue Snack Mix absolutely perfect every time. It’s not complicated, but these little things can make a big difference!
Melting Chocolate Wisely: The key to smooth, lump-free coating is patience. Always melt chocolate in short intervals, stirring thoroughly between each one. Overheating chocolate can make it seize up and become unusable. If using candy melts, they are generally more forgiving, but white chocolate can be a bit trickier. Adding that tablespoon of oil is crucial for a pourable, smooth consistency that coats everything beautifully without being too thick.
Gentle Mixing is Key: When you’re combining the dry ingredients with the melted chocolate, fold gently. You don’t want to smash your pretzels into dust or crush the cereal into tiny bits. The goal is to coat, not pulverize. A large bowl and a rubber spatula are your best friends here. Think of it as a gentle hug for your ingredients.
Don’t Overdo the Add-ins: While it’s tempting to cram in all sorts of goodies, don’t overload the mix. Too many additions can make it difficult to coat evenly, and you risk having pockets of dry ingredients or uneven sets. Stick to the quantities suggested, or slightly adjust, but avoid going overboard. Quality over quantity!
Ingredient Swaps: This is where the fun really starts! No pretzels? Use broken bagel chips or even oyster crackers for a salty crunch. Don’t have crispy rice cereal? Puffed corn cereal or even Cheerios can work in a pinch. For the red and blue, if you can’t find candy-coated chocolates, dried cherries or blueberries can add a chewy, tart element. Even a handful of colorful sprinkles can make it festive. Just remember, the goal is texture and color contrast.
Setting It Up for Success: Spreading the mix in a single, even layer on parchment paper is so important. It allows the chocolate to set evenly and makes it easy to break apart later. If you leave it in a big pile, the bottom layers might stay soft while the top hardens. For a truly professional look, you can even gently press down sections to create clusters before it sets. Patience here really pays off in the final presentation.
The Glaze (or Lack Thereof): This recipe doesn’t strictly *need* a glaze, as the white chocolate is the coating. However, if you want an extra layer of sweetness or color, you could drizzle some thinned-out red or blue candy melts over the top *after* the initial white chocolate has set. Just melt a small amount of candy melts with a tiny bit of oil and drizzle artfully with a spoon or a piping bag.
Storing and Reheating Tips
One of the best things about this Red White Blue Snack Mix is how well it stores. It’s perfect for making ahead!
Room Temperature Storage: Once completely set, you can store this snack mix in an airtight container at room temperature for up to a week. I like to use large cookie tins or sturdy plastic containers. Just make sure the lid seals tightly to keep out moisture and prevent it from going stale. It holds up remarkably well!
Refrigerator Storage: While not strictly necessary, if your kitchen is particularly warm or humid, you can store it in the refrigerator. However, be aware that condensation can form when you take it out, which might make it a little sticky. If you do refrigerate, use an airtight container and allow it to come to room temperature for a bit before serving to minimize condensation.
Freezer Instructions: This snack mix freezes surprisingly well! For best results, break it into pieces and place them in a freezer-safe airtight container or a heavy-duty zip-top bag. You can freeze it for up to 2-3 months. Thaw it overnight in the refrigerator, and then let it sit at room temperature for about 30 minutes before enjoying to let any condensation dissipate. I’ve done this before big holidays when I need to get ahead.
Glaze Timing Advice: If you decide to add a drizzle of colored candy melts for extra decoration, make sure the initial white chocolate coating is completely set before you add the drizzle. And if you’re planning to freeze or refrigerate, it’s usually best to add any decorative drizzles *after* thawing and bringing it back to room temperature, just to ensure they hold up best.
Frequently Asked Questions
Final Thoughts
There you have it – the super simple, incredibly satisfying Red White Blue Snack Mix! I truly hope you give this one a try. It’s more than just a snack; it’s a little burst of joy, perfect for those moments when you want something special without a lot of fuss. It’s a reminder that delicious and festive can go hand-in-hand with easy. If you love this kind of crunchy, sweet-and-salty magic, you might also enjoy my [link to another savory snack recipe] or my [link to another sweet treat recipe]. I can’t wait to hear how your Red White Blue Snack Mix turns out! Please leave a comment below and let me know your favorite additions or any fun variations you come up with. And if you snap a pic, tag me on social media – I’d love to see your creations!


