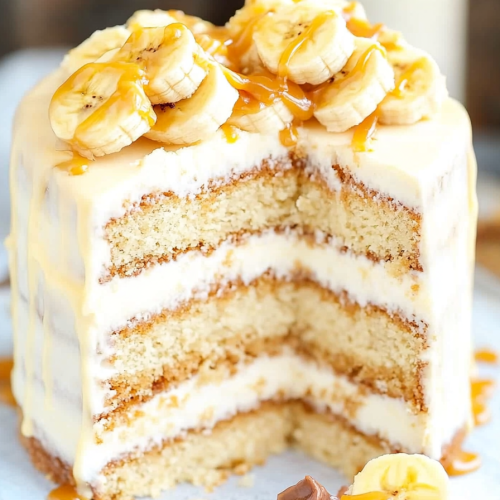
Oh, my friends, do I have a treat for you today! You know those moments when you just need something decadent, something that whispers sweet nothings to your soul? This Salted Caramel cake is that moment. It’s not just a cake; it’s a hug in dessert form. I remember the first time I made this for a neighborhood potluck – I swear, the entire cake vanished before the evening was even halfway over! People kept asking, “What IS this amazing cake?” And my little secret? It’s the perfect balance of sweet, salty, and utterly comforting. If you’ve ever dreamed of a dessert that’s both show-stopping and surprisingly simple, you’re in the right place. Think of it as a more sophisticated, caramel-kissed cousin to your basic chocolate cake, but with a flavor profile that’s completely its own. This isn’t just a recipe; it’s a memory waiting to happen.
What is salted caramel cake?
So, what exactly makes this salted caramel cake so special? At its heart, it’s a wonderfully moist and tender cake, often with a hint of warmth from spices or vanilla, but the real magic happens with the star of the show: the salted caramel. We’re talking about rich, buttery caramel infused with just the right amount of flaky sea salt. It’s not just an afterthought; it’s woven into the very fabric of the cake, usually as a luscious filling or a decadent swirl. Imagine biting into a slice and getting that initial sweet caramel hit, followed by a subtle salty counterpoint that just makes your taste buds sing. It’s like a perfectly curated playlist for your mouth. This isn’t your average grocery store Sheet Cake; it’s a handcrafted delight that feels both familiar and excitingly new.
Why you’ll love this recipe?
Honestly, if you haven’t made this salted Caramel Cake yet, you’re missing out on pure joy. Let me break down why it’s become a staple in my kitchen and why I know you’ll adore it too. First and foremost, the flavor is just out of this world. It’s this incredible dance between sweet, rich caramel and that essential pop of salt. It’s complex without being complicated, and it satisfies that deep craving for something sweet and satisfying like nothing else. But it’s not just about the taste. What I truly appreciate is how surprisingly simple it is to make. I’ve had nights where I’ve thrown this together with ingredients I already had on hand, and it always turns out beautifully. Plus, it’s incredibly cost-effective! The ingredients are pretty standard pantry staples, meaning you don’t need to break the bank for a show-stopping dessert. And talk about versatile! This cake is perfect for birthdays, holidays, or just a random Tuesday when you need a little pick-me-up. It’s a bit like my classic chocolate lava cake in terms of indulgence, but it offers a totally different, yet equally delightful, flavor experience. It’s that go-to recipe that makes you look like a baking superhero, even on your busiest days. I swear, the smell alone when it’s baking makes everyone in the house flock to the kitchen!
How do you make salted caramel cake?
Quick Overview
This salted caramel cake is all about building layers of flavor and texture. We start by creaming together our wet and dry ingredients for a super tender crumb, then we create a rich, homemade salted caramel that we’ll either swirl directly into the batter or use as a luscious filling. The whole process is pretty straightforward, and trust me, even if baking isn’t your strongest suit, you can absolutely nail this. The key is to take your time with the caramel and not to overmix the batter. The result is a cake that’s moist, flavorful, and has that irresistible salty-sweet goodness in every bite.
Ingredients
For the Main Batter:
You’ll need all-purpose flour, granulated sugar, Brown Sugar for that extra moisture and depth, baking soda and baking powder for lift, and a pinch of salt to enhance all those lovely flavors. I always like to add a touch of cinnamon or nutmeg, but that’s totally optional if you want to keep it purely caramel-focused. And for the wet ingredients, we’ve got eggs, your favorite neutral oil (like vegetable or canola), buttermilk for extra tenderness (if you don’t have buttermilk, just do the milk-plus-vinegar trick!), and pure vanilla extract. Using buttermilk is a game-changer for moisture, so if you can get your hands on it, do it!
For the Filling:
This is where the magic really happens! We’ll make a simple caramel sauce with granulated sugar, water, butter, and heavy cream. The secret to a good caramel is patience – don’t rush it! Once it’s a beautiful amber color, stir in the butter and cream off the heat. And the crucial element: flaky sea salt! I love Maldon salt for its delicate crunch and pure salty flavor. You can adjust the salt to your preference, but I find this ratio perfect. You can also add a tiny splash of bourbon or rum here if you’re feeling adventurous.
For the Glaze:
For a beautiful finish, we’ll whip up a simple glaze. It’s usually powdered sugar, a little more heavy cream or milk, and a touch of vanilla. Sometimes, I’ll even swirl in a tablespoon or two of leftover caramel sauce into the glaze for an extra punch of flavor and a gorgeous marbling effect. Consistency is key here; you want it pourable but not too thin.
Step-by-Step Instructions
Step 1: Preheat & Prep Pan
First things first, get your oven preheated to 350°F (175°C). I usually like to use a 9×13 inch baking pan for this cake, but you could also do two 8-inch rounds for a Layer Cake. Grease and flour your pan really well, or even better, line it with parchment paper. This ensures your beautiful salted caramel cake slides out without a hitch. I always do this step first, so everything is ready to go when the batter is!
Step 2: Mix Dry Ingredients
In a large bowl, whisk together your flour, granulated sugar, brown sugar, baking soda, baking powder, and salt. Give it a good whisk to make sure everything is evenly distributed. This step is super important for ensuring your cake rises evenly and doesn’t have any pockets of leavening agents. You want that light, airy texture.
Step 3: Mix Wet Ingredients
In a separate bowl, whisk together your eggs, oil, buttermilk, and vanilla extract until well combined. Make sure your buttermilk and eggs are at room temperature; it helps everything emulsify better. If your eggs are too cold, you can just pop them in a bowl of warm water for a few minutes.
Step 4: Combine
Now, pour the wet ingredients into the dry ingredients. Mix them together *just* until they are combined. Seriously, don’t overmix! A few little lumps are totally fine. Overmixing develops the gluten too much, and you’ll end up with a tough cake, and nobody wants that. A gentle hand is your best friend here.
Step 5: Prepare Filling
While the cake batter is resting for a moment, let’s make that glorious salted caramel. In a saucepan over medium heat, combine granulated sugar and water. Stir just until the sugar dissolves, then stop stirring. Let it bubble away, swirling the pan occasionally, until it turns a beautiful deep amber color. This can take about 8-12 minutes. Once it’s amber, carefully whisk in the butter until melted, then slowly, *very slowly*, whisk in the warm heavy cream. It will bubble up like crazy, so be careful! Once smooth, stir in your flaky sea salt. Let it cool for a few minutes until it’s slightly thickened but still pourable.
Step 6: Layer & Swirl
Pour about half of the cake batter into your prepared pan. Dollop spoonfuls of the salted caramel over the batter. Then, pour the remaining batter on top, covering the caramel as best you can. If you want a more marbled effect, you can gently swirl the caramel into the batter with a knife or skewer. Don’t overdo it, or you’ll just end up with caramel throughout the batter, which is still delicious, but less visually striking. The goal is those gorgeous caramel ribbons!
Step 7: Bake
Bake for 30-40 minutes, or until a wooden skewer inserted into the center of the cake comes out clean. Keep an eye on it towards the end; ovens can be finicky! If the top starts to brown too quickly, you can always loosely tent it with foil. I usually do the skewer test because it’s the most reliable way to tell if it’s done.
Step 8: Cool & Glaze
Let the cake cool in the pan for about 15-20 minutes before inverting it onto a wire rack to cool completely. This is super important! If you try to glaze it while it’s hot, you’ll have a melty mess. Once it’s totally cool, whisk together your powdered sugar, a little bit of milk or cream, and vanilla until you get a smooth, pourable glaze. Drizzle it generously over the top of the cake. If you want that extra caramel boost, mix a couple of tablespoons of the leftover caramel into the glaze before drizzling.
Step 9: Slice & Serve
Once the glaze has set a bit, slice your beautiful salted caramel cake into squares. I love serving it slightly warm, or at room temperature. It’s pure bliss!
What to Serve It With
This salted caramel cake is honestly a star all on its own, but I love playing around with pairings to elevate the experience. For a cozy breakfast or weekend brunch, I often serve a slice with a strong cup of coffee or a creamy latte. The richness of the coffee cuts through the sweetness beautifully. Sometimes, I’ll add a dollop of lightly sweetened whipped cream or even a small scoop of vanilla bean ice cream on the side. It’s incredibly decadent but surprisingly light enough for a morning treat. For a more formal dessert setting, think elegant plating. I might drizzle a little extra caramel sauce around the plate, add a few fresh berries (raspberries are fantastic with caramel!), or even a sprinkle of toasted nuts like pecans or walnuts for added crunch. It’s stunning alongside a dessert wine or a rich espresso. And for those moments when you just need a comforting snack, honestly, a simple slice on its own is perfection. My kids will fight over the last piece, often with a glass of cold milk. It’s the ultimate comfort food that always brings smiles.
Top Tips for Perfecting Your Salted Caramel Cake
I’ve made this salted caramel cake more times than I can count, and through those countless bakes, I’ve picked up a few tricks that I think you’ll find super helpful. For the batter, the biggest thing is honestly not overmixing. Mix the wet and dry ingredients until they *just* come together. A few streaks of flour are okay; they’ll disappear in the oven. Overmixing is the enemy of a tender crumb, and we want this cake to be melt-in-your-mouth moist. When you’re making the caramel, patience is your best friend. Don’t be tempted to crank up the heat to speed things along; that’s how you end up with burnt caramel. Watch for that beautiful amber hue, and when it’s there, take it off the heat immediately. Adding the butter and cream off the heat also prevents splattering and helps create a smoother sauce. For the swirling technique, don’t go crazy. You want distinct ribbons of caramel, not a muddy mess. A gentle swirl with a knife or skewer is all you need. For ingredient swaps, I’ve actually tested this with almond milk instead of buttermilk, and it still turned out wonderfully creamy! Just make sure you’re using ingredients that are at room temperature for the best emulsification. And for baking, remember that every oven is a little different. Start checking for doneness around the 30-minute mark with a toothpick. If the cake is browning too fast, you can loosely tent it with foil. I’ve even baked this in two 8-inch round pans for a layer cake, and it’s just as divine, though you might need to adjust baking time slightly. Finally, when it comes to the glaze, start with a smaller amount of liquid and add more a teaspoon at a time until you reach your desired consistency. You can always thin it out, but it’s hard to thicken it up once it’s too runny!
Storing and Reheating Tips
Now, if you happen to have any leftover salted caramel cake (which, let’s be honest, is a rare occurrence in my house!), storing it properly is key to keeping it delicious. At room temperature, the cake will stay fresh for about 2-3 days, especially if it’s fully cooled and covered tightly with plastic wrap or stored in an airtight container. I find that keeping it in its original baking pan with a good quality lid works wonders. If you’ve already cut into it, pressing a piece of plastic wrap directly onto the cut surface before covering the whole cake helps prevent it from drying out. If you need it to last a bit longer, the refrigerator is your best bet. Wrap it well in plastic wrap and then in foil, or store it in a good airtight container. It should keep well in the fridge for up to a week. When you’re ready to enjoy it, you can serve it cold, or let it sit out at room temperature for about 30 minutes to an hour to take the chill off and soften slightly. For reheating, I usually avoid the microwave because it can sometimes make the cake a little rubbery. Instead, a quick zap in a low oven (around 300°F or 150°C) for about 5-10 minutes can warm it through beautifully without drying it out. Just be sure to keep an eye on it! And for the glaze, if you’ve already applied it, it generally holds up well with these storage methods. If you’re planning to store the unfrosted cake and glaze it later, that’s totally doable too! Just keep them separate until you’re ready to serve.
Frequently Asked Questions
Final Thoughts
So there you have it, my friends – the recipe for what I truly believe is one of the most satisfying cakes you’ll ever bake. This salted caramel cake is more than just a dessert; it’s an experience. It’s the perfect blend of comforting familiarity and delightful decadence, a true testament to how simple ingredients can come together to create something truly spectacular. I hope you give it a try and that it brings as much joy to your kitchen as it does to mine. If you love this recipe, you might also want to explore my fudgy brownies or my easy lemon drizzle cake – they’re all about that homemade goodness with a touch of something special. Happy baking, and I can’t wait to hear how yours turns out!
Salted Caramel Cake
Ingredients
Cake Ingredients
- 2.75 cups all-purpose flour
- 2 teaspoons baking powder
- 0.5 teaspoon baking soda
- 0.75 teaspoon salt
- 1.75 cups granulated sugar
- 0.75 cup unsalted butter, softened
- 2 large eggs
- 1 teaspoon vanilla extract
- 1 cup buttermilk
Salted Caramel Frosting Ingredients
- 1 cup granulated sugar
- 0.5 cup unsalted butter
- 0.5 cup heavy cream
- 0.5 teaspoon sea salt
- 4 cups powdered sugar
- 0.25 cup unsalted butter, softened
Instructions
Cake Instructions
- Preheat oven to 350°F (175°C). Grease and flour two 9-inch round cake pans.
- In a large bowl, whisk together flour, baking powder, baking soda, and salt.
- In a separate bowl, cream together sugar and butter until light and fluffy.
- Beat in eggs one at a time, then stir in vanilla.
- Gradually add the dry ingredients to the wet ingredients, alternating with the buttermilk, beginning and ending with the dry ingredients. Mix until just combined.
- Pour batter evenly into the prepared pans.
- Bake for 30-35 minutes, or until a toothpick inserted into the center comes out clean.
- Let cool in pans for 10 minutes before inverting onto a wire rack to cool completely.
Salted Caramel Frosting Instructions
- In a saucepan, melt sugar over medium heat, stirring constantly until it becomes a golden caramel.
- Remove from heat and whisk in butter and heavy cream until smooth.
- Stir in sea salt and let cool slightly.
- In a bowl, beat together powdered sugar and softened butter until creamy.
- Gradually add the cooled caramel to the powdered sugar mixture and beat until smooth and fluffy.
Assembly
- Level the cake layers if needed.
- Place one layer on a serving plate and spread with a generous amount of frosting.
- Top with the second layer and frost the top and sides of the cake.
- Drizzle with extra caramel, if desired, and serve.