
I still remember the first time I truly understood what incredible sweet and sour chicken could be. It wasn’t some overly-sweetened, neon-orange concoction from a takeout menu. No, this was a revelation. It was the kind of dish that made my husband stop mid-chew, my kids abandon their usual picky eating protests, and me, well, I just wanted to dive headfirst into the sticky, tangy goodness. This isn’t just any recipe; it’s my go-to for when I need a serious flavor punch without spending hours in the kitchen. It’s the sweet and sour chicken that has converted even the staunchest critics, and trust me, I’ve got a few of those in my family. Forget those sad, soggy versions; this one is crispy, vibrant, and packed with just the right balance of sweet and tart. It’s the kind of meal that feels both comforting and exciting, a perfect weeknight savior that tastes like a weekend treat.
What is sweet and sour chicken?
So, what exactly is this magical dish we call sweet and sour chicken? At its heart, it’s a classic Chinese-American stir-fry where tender pieces of chicken are coated in a vibrant, tangy sauce. Think of it as a flavor explosion: the sweetness comes from ingredients like sugar and pineapple juice, while the sourness is usually from vinegar. It’s the perfect harmony between these two powerful tastes that makes it so addictive. The chicken itself is often coated and fried or baked to get a delightful crispiness, which then gets coated in that glorious glaze. It’s essentially a flavor playground where salty, sweet, sour, and often a hint of savory notes dance together. It’s less about strict rules and more about achieving that perfect, craveable balance that makes your taste buds sing. It’s the kind of dish that feels universally loved because it hits all those satisfying flavor notes.
Why you’ll love this recipe?
Honestly, if you’re looking for a reason to make this sweet and sour chicken, I could give you about a dozen! First off, the flavor. Oh, the flavor! It’s this incredible dance between sweet and tangy, with a depth that you just don’t get from a bottle. The chicken stays wonderfully juicy, and when it’s coated in that glossy sauce, it’s pure bliss. What I love most about this recipe is how surprisingly simple it is. I know, I know, “sweet and sour chicken” might sound intimidating, but this version is designed for real life. You won’t be slaving away for hours. Plus, it’s incredibly budget-friendly. You probably have most of the ingredients in your pantry already, which makes it a lifesaver when you need a delicious meal without breaking the bank. And the versatility! You can serve it over rice, with noodles, or even just eat it straight from the bowl (guilty as charged!). It’s way better than my old go-to Kung Pao Chicken Recipe when I’m craving something a bit more classic and comforting.
How do I make sweet and sour chicken?
Quick Overview
This recipe is all about building layers of flavor and texture. We start by prepping the chicken for that signature crispiness, then whip up a quick, bright sauce, and finally bring it all together for a glorious finish. It’s a straightforward process that guarantees fantastic results every time. You’ll be amazed at how quickly this comes together, especially on a busy weeknight. The key is having everything prepped and ready to go before you start cooking, a little trick I learned after way too many frantic stir-fry attempts!
Ingredients
For the Main Batter:
These ingredients are crucial for getting that perfect, crisp coating on the chicken. You want a batter that’s light enough to not be heavy but sturdy enough to hold up to the sauce. I always use all-purpose flour here, but for a gluten-free version, a good quality gluten-free blend works wonders – just make sure it doesn’t have too much xanthan gum, or it can get a bit gummy. The cornstarch is your secret weapon for crispiness; don’t skip it! Baking powder gives it a little lift, making the coating less dense. A pinch of salt and pepper is just for basic seasoning, really, because the sauce is doing most of the heavy lifting in the flavor department.
- 1.5 pounds boneless, skinless chicken thighs or breasts, cut into 1-inch pieces
- 1 cup all-purpose flour
- 1/2 cup cornstarch
- 1 teaspoon baking powder
- 1/2 teaspoon salt
- 1/4 teaspoon black pepper
- 2 large eggs, lightly beaten
- 1/4 cup water
- Vegetable oil, for frying (about 2-3 cups)
For the Filling:
This is where you add some vibrant color and texture. I’m a huge fan of bell peppers in this dish because they add a lovely sweetness and a satisfying crunch. Red and green are my favorites for visual appeal, but feel free to use yellow or orange too! The onion provides a savory base, and the pineapple chunks? Absolute non-negotiable for me. They add bursts of sweet, juicy flavor that are just divine. Make sure to reserve the pineapple juice – it’s gold for the sauce!
- 1 red bell pepper, seeded and cut into 1-inch pieces
- 1 green bell pepper, seeded and cut into 1-inch pieces
- 1 medium yellow onion, cut into 1-inch chunks
- 1 cup pineapple chunks (canned or fresh), reserve juice
For the Glaze:
This is the star of the show! The balance of sweet and sour is key here. Ketchup provides a base and a touch of sweetness, while rice vinegar brings that essential tang. Brown Sugar adds a deeper, caramel-like sweetness that’s far superior to white sugar. Soy sauce brings umami and saltiness, and a touch of cornstarch at the end thickens it all up beautifully, giving it that glossy, clingy texture. I always make a little extra glaze because I love to drizzle it over everything before serving!
- 1 cup reserved pineapple juice
- 1/2 cup ketchup
- 1/4 cup rice vinegar
- 1/4 cup packed brown sugar
- 2 tablespoons soy sauce
- 1 tablespoon cornstarch
- 1 tablespoon water
Step-by-Step Instructions
Step 1: Preheat & Prep Pan
First things first, get your frying oil ready. Pour about 2-3 cups of vegetable oil into a large, heavy-bottomed pot or Dutch oven. Heat it over medium-high heat until it reaches about 350°F (175°C). If you don’t have a thermometer, you can test it by dropping a tiny bit of batter into the oil; it should sizzle immediately and float to the top. While the oil heats up, get your chicken prepped. Pat the chicken pieces very dry with paper towels. This is super important for getting a crispy coating; wet chicken means soggy batter!
Step 2: Mix Dry Ingredients
In a medium bowl, whisk together the all-purpose flour, cornstarch, baking powder, salt, and pepper. Make sure everything is well combined. You want an even distribution of these dry elements so your batter adheres properly to the chicken. Give it a good whisk for about 30 seconds. This dry mix is what your chicken will be tossed in right before it hits the wet ingredients, creating the base for that lovely crisp coating.
Step 3: Mix Wet Ingredients
In a separate, larger bowl, whisk the eggs with the 1/4 cup of water until they’re nicely blended. This is where you’ll dip your floured chicken pieces. Make sure you have enough space in this bowl to comfortably coat the chicken without making a mess. Having your wet ingredients ready means you can move quickly from coating the chicken to frying it.
Step 4: Combine
Now, let’s bring it all together for the batter. Dredge the dried chicken pieces in the dry flour mixture, shaking off any excess. Then, dip each floured piece into the beaten egg mixture, letting any excess drip off. Finally, give them another light toss in the dry flour mixture. This double-dredging method helps create an extra-crispy coating. Work in batches so you don’t overcrowd the pan when frying. I usually do about 6-8 pieces at a time.
Step 5: Prepare Filling
While the chicken is frying (or just before you start), get your veggies and pineapple ready. Make sure your bell peppers and onion are cut into roughly the same size pieces as your chicken so they cook evenly. If you’re using canned pineapple, drain it but definitely save that juice! Having all these prepped and ready means you can move straight to the stir-frying stage without any last-minute chopping.
Step 6: Layer & Swirl
This step is more about assembling and cooking the sauce. In a small bowl, whisk together the cornstarch and 1 tablespoon of water to create a slurry. In a large skillet or wok, heat about 1 tablespoon of vegetable oil over medium-high heat. Add the bell peppers and onion and stir-fry for 2-3 minutes until they’re slightly tender but still crisp. Pour in the reserved pineapple juice, ketchup, rice vinegar, Brown Sugar, and soy sauce. Bring to a simmer, stirring constantly. Once simmering, stir in the cornstarch slurry. Cook, stirring, for about 1-2 minutes, until the sauce has thickened and is glossy. This is where you get that beautiful, sticky glaze!
Step 7: Bake
Okay, here’s my secret for perfectly Crispy Chicken without deep-frying a huge batch: I bake it after a quick pan-fry! Once your chicken pieces are golden brown and crispy from frying (this takes about 3-4 minutes per batch), transfer them to a baking sheet lined with parchment paper. Make sure they’re in a single layer. Bake in a preheated oven at 400°F (200°C) for about 8-10 minutes, or until they are cooked through and extra crispy. This baking step ensures every piece is perfectly cooked and holds its crispiness even when coated in sauce.
Step 8: Cool & Glaze
Let the Baked Chicken cool for just a couple of minutes. This is the moment of truth! Add the crispy chicken pieces to the skillet with the thickened sweet and sour sauce. Gently toss the chicken in the sauce until each piece is beautifully coated. You want to do this right before serving so the chicken stays as crispy as possible. If the sauce seems too thick, you can add a tiny splash more pineapple juice or water. If it’s too thin, a little more cornstarch slurry (made with 1 teaspoon cornstarch and 1 tablespoon water) can help.
Step 9: Slice & Serve
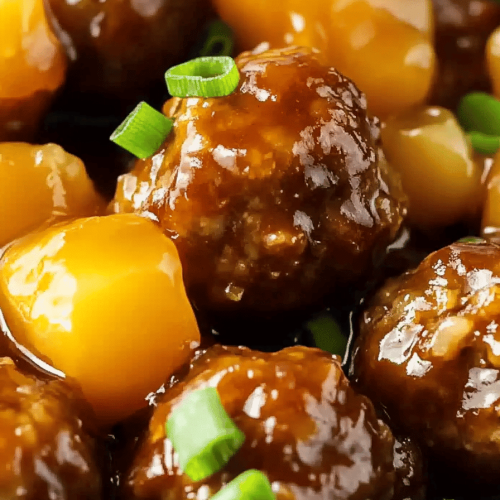
Serve your glorious sweet and sour chicken immediately! I love to spoon it over fluffy white rice, or even better, some brown rice for added texture and nutrition. Garnish with some toasted sesame seeds and thinly sliced green onions for a pop of freshness and color. The contrast between the tender, crispy chicken, the vibrant veggies, and that perfectly balanced sweet and sour glaze is just divine. It’s a complete meal that looks as good as it tastes. Enjoy every single bite!
What to Serve It With
This sweet and sour chicken is so incredibly versatile, it’s almost like having a blank canvas for a delicious meal. For a classic, no-fuss dinner, it’s absolutely divine served over a bed of steaming white rice. My kids, in particular, love it this way; they can scoop up all that extra sauce with their rice, and it’s gone in minutes. If you’re feeling a bit more adventurous, try serving it with some fluffy quinoa for a healthier twist, or even a side of fried rice for a double dose of Asian-inspired goodness. I’ve also found that a simple side of steamed broccoli or snow peas is a fantastic way to add some green and balance out the richness of the dish. It’s my go-to when I want something hearty but also feel like I’m getting some veggies in. For a lighter meal, a crisp, fresh salad with a light vinaigrette can be a refreshing accompaniment. And for those really cozy nights in, sometimes just a small bowl of this with a fork is all you need – pure comfort food!
Top Tips for Perfecting Your Sweet and Sour Chicken
Over the years, I’ve learned a few tricks that make this sweet and sour chicken recipe absolutely foolproof. For the chicken, make sure it’s completely dry before dredging. This is non-negotiable if you want that perfect crispiness! I usually pat it down twice with paper towels. When you’re frying the chicken, don’t overcrowd the pan. This lowers the oil temperature and leads to greasy, soggy chicken instead of beautifully crisp pieces. Work in batches! For the sauce, always taste and adjust. The “sweet” and “sour” balance is really personal preference. If you like it tangier, add a splash more vinegar. If you prefer it sweeter, a bit more brown sugar or even a tablespoon of honey can do the trick. When you add the cornstarch slurry, stir constantly and let it bubble for a minute or two. This ensures it thickens properly and cooks out that starchy taste. I’ve experimented with different vinegars – apple cider vinegar works in a pinch, but rice vinegar is truly the best for that authentic flavor. For the vegetables, I like them to have a little bite, so I stir-fry them briefly. If you prefer them softer, you can sauté them a bit longer or even blanch them beforehand. And my biggest tip? Make the sauce just before you’re ready to toss the chicken in it. That way, the chicken is still hot and crispy, and the sauce is perfectly thickened, ensuring maximum deliciousness. If you ever find your sauce too thin, a quick fix is to mix another teaspoon of cornstarch with a tablespoon of cold water and stir it into the simmering sauce until thickened. It’s a lifesaver!
Storing and Reheating Tips
One of the best things about this sweet and sour chicken is that it actually reheats pretty well! If you have leftovers (which, let’s be honest, is rare in my house), store them in an airtight container in the refrigerator. They’ll stay good for about 2-3 days. To reheat, I usually opt for the oven or a skillet. Pop the chicken and sauce mixture onto a baking sheet at about 350°F (175°C) for about 10-15 minutes, or until heated through and slightly crisped up again. If you’re in a hurry, you can reheat it in a skillet over medium heat, stirring frequently. This helps to revive some of that crispiness that can be lost in the microwave. I personally don’t recommend the microwave if you want to keep some texture, but if it’s your only option, just reheat it gently until warm. For the best results, try to store the chicken and rice separately if possible, as rice can sometimes get a bit mushy when stored together. If you want to freeze it, I’d recommend freezing the plain fried chicken and the sauce separately. Thaw them in the refrigerator overnight, then reheat the chicken and toss with the sauce. This method helps preserve the texture of the chicken. The sauce itself freezes and thaws beautifully.
Frequently Asked Questions
Final Thoughts
So there you have it – my absolute favorite sweet and sour chicken recipe! It’s the kind of dish that proves you don’t need complicated techniques or exotic ingredients to create something truly spectacular in your own kitchen. It’s the perfect balance of crispy, tender, sweet, and tangy, and I just know you’re going to love it as much as my family and I do. It’s proof that sometimes, the simplest recipes are the most rewarding. If you’re a fan of this, you might also want to check out my General Tso’s Chicken recipe – another incredible weeknight warrior! I can’t wait to hear what you think of this sweet and sour chicken. Please leave a comment below and let me know how yours turned out, or if you have any fun variations you tried!
Sweet and Sour Chicken
Ingredients
Main Ingredients
- 1.5 lb Chicken breast cut into 1-inch pieces
- 0.25 cup Cornstarch
- 1 tsp Salt
- 0.5 tsp Black pepper
- 2 tbsp Vegetable oil
- 1 cup Bell peppers sliced (mix of colors)
- 1 cup Pineapple chunks canned or fresh
- 0.5 cup Sweet and sour sauce store-bought or homemade
Instructions
Preparation Steps
- In a bowl, combine chicken pieces with cornstarch, salt, and pepper. Toss to coat.
- Heat oil in a large skillet or wok over medium-high heat.
- Add chicken to the skillet and cook until golden brown and cooked through, about 5-7 minutes.
- Add bell peppers and pineapple to the skillet and cook for 2-3 minutes, until slightly softened.
- Pour in the sweet and sour sauce and cook for another 2-3 minutes, until the sauce has thickened and everything is well coated.
- Serve immediately over rice.


