You know those days when the summer heat just hangs heavy in the air, and all you can think about is something ridiculously refreshing but also a little bit fun? Yeah, me too. This is my absolute go-to for exactly those moments. It’s so simple, but it feels like such a treat, and the best part? It’s healthy! I know, I know, “healthy” and “treat” don’t always go hand-in-hand, but this one’s a game-changer. My kids, who can be the pickiest eaters on earth sometimes, go absolutely bonkers for these. They’re like fancy little dessert fries, but made from pure, unadulterated watermelon. Seriously, if you’re looking for a way to jazz up your fruit intake or need a cool-down that won’t weigh you down, you *have* to try these watermelon fries. They’re a million times better than just slicing up a melon, and they’re so easy, you can whip them up in a flash.
What are watermelon fries?
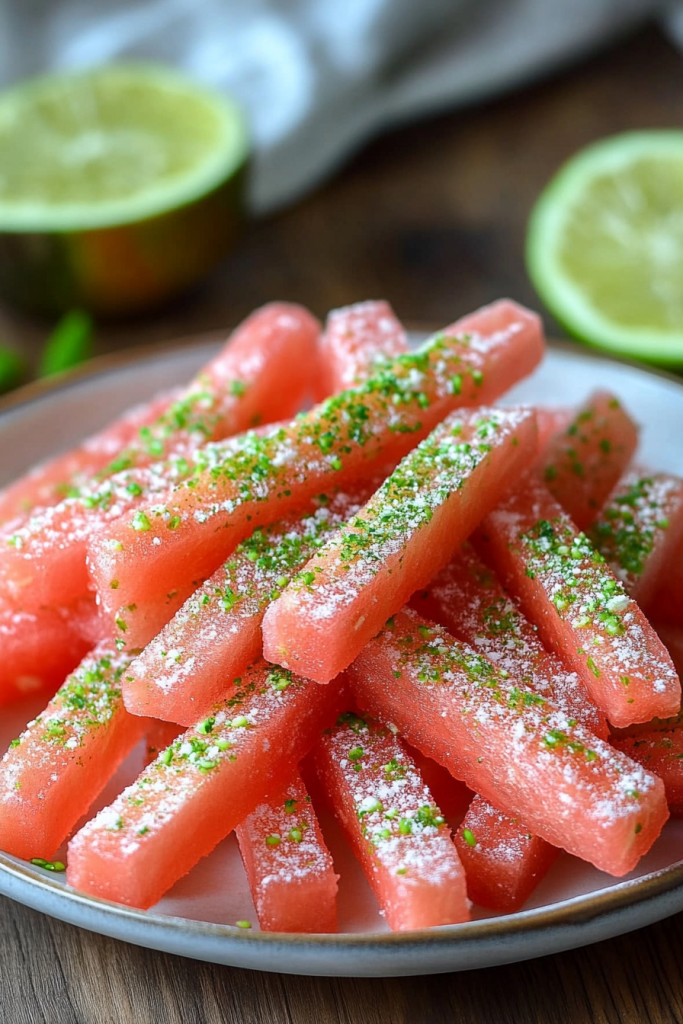
Okay, so the name itself is pretty self-explanatory, right? Watermelon Fries! But let me paint you a picture. Imagine perfectly chilled, crisp watermelon cut into neat little sticks, just like French fries. But instead of savory and salty, these are bursting with sweet, juicy watermelon goodness. We then give them a little hug with a creamy, tangy yogurt dip and a sprinkle of something a little extra – maybe some toasted coconut or a drizzle of honey. It’s essentially taking the most iconic summer fruit and giving it a playful, snackable makeover. Think of it as a deconstructed watermelon salad, but way more fun to eat. It’s the kind of treat that makes you feel like you’re indulging, even though you’re just enjoying nature’s candy. It’s perfect for a hot afternoon, a poolside snack, or even a healthy alternative when you’re craving something sweet after dinner but don’t want to bake a whole cake.
Why you’ll love this recipe?
What are the reasons this recipe has become a staple in my kitchen, especially when the sun starts beating down?flavor is just incredible. It’s pure, unadulterated watermelon – that bright, sweet, slightly floral taste that just screams summer. When it’s perfectly chilled, it’s like a little burst of sunshine in your mouth. And the magic really happens when you pair it with that creamy, slightly tangy yogurt dip. It’s the perfect complement, cutting through the sweetness just enough to make it absolutely irresistible. I’ve tried a lot of fruit dips, but this one, oh boy, this one is a lifesaver. It’s deceptively simple, which leads me to the next big win: simplicity. You need like, five minutes and a sharp knife to get the watermelon prepped, and the dip comes together in another minute. It’s seriously that easy. This is my secret weapon on busy weeknights when everyone’s suddenly starving and I haven’t planned anything. And let’s talk about Cost-efficiency: What is the best way to measure cost-efficiency?. Watermelon is usually one of the most budget-friendly fruits you can find in the summer, making this an incredibly economical way to serve a crowd or just have a fun snack on hand. Plus, it’s so versatile! I’ll get into more ideas later, but you can serve these as a dessert, a snack, or even a fun appetizer. What I love most about this is how it makes healthy eating feel like a special occasion. It’s a far cry from just a plain old Fruit Salad, and it’s way more exciting than just handing out juice boxes. It’s proof that delicious and healthy can absolutely go hand-in-hand, and it’s a winner every single time.
How to Make Watermelon Fries
Quick Overview
This recipe is all about embracing the natural sweetness of watermelon and giving it a fun, dippable twist. We’ll simply slice chilled watermelon into fry-like shapes, prepare a quick and easy yogurt dip, and then serve them up together for a refreshing and delightful treat. It’s the ultimate easy snack that requires minimal effort but delivers maximum smiles. Trust me, this is one of those recipes you’ll find yourself making over and over again because it’s just that satisfying and ridiculously simple.
Ingredients
For the Watermelon Fries:
You’ll need one large, seedless watermelon. Look for one that feels heavy for its size, which usually means it’s nice and juicy. A ripe watermelon will have a creamy yellow spot on the underside where it rested on the ground. Make sure it’s chilled thoroughly in the refrigerator for at least a few hours, or even overnight. Cold watermelon is key for that refreshing crunch!
For the Creamy Yogurt Dip:
You’ll need plain Greek Yogurt (full-fat or 2% works best for creaminess, but non-fat is fine too if that’s your preference). About 1 cup should be plenty. For a touch of sweetness, 1-2 tablespoons of honey or maple syrup. You can adjust this to your liking – start with less and add more if needed. A squeeze of fresh lime or lemon juice (about 1 teaspoon) adds a lovely bright note. If you’re feeling adventurous, a tiny pinch of salt can actually enhance the sweetness. For a little extra flavor kick, a 1/4 teaspoon of vanilla extract is divine.
Optional Toppings:
This is where you can get creative! Toasted shredded coconut, chopped fresh mint, a drizzle of honey or agave, or even a sprinkle of cinnamon can all add a wonderful dimension. I’ve also tried a sprinkle of finely chopped pistachios for a bit of crunch, and it was a huge hit!
Step-by-Step Instructions
Step 1: Preheat & Prep Pan
This step is less about preheating and more about setting up your watermelon. Since we’re working with watermelon, there’s no oven involved! What we need to do is ensure our watermelon is perfectly chilled and ready to go. Take your watermelon out of the fridge about 10-15 minutes before you plan to slice it. This just takes the edge off the extreme cold so it’s not painfully icy, but still super refreshing.
Step 2: Mix Dry Ingredients
There are no dry ingredients to mix in this particular recipe! We’re keeping it super simple and focusing on the fresh fruit and a quick dip.
Step 3: Mix Wet Ingredients
In a small bowl, combine the Greek yogurt, honey or maple syrup, lime or lemon juice, vanilla extract (if using), and a pinch of salt (if using). Whisk everything together until it’s smooth and creamy. Taste it and adjust the sweetness or tartness as needed. If you want it sweeter, add a little more honey. If you want it tangier, add another tiny squeeze of lime juice. This is your chance to make the dip perfect for your palate!
Step 4: Combine
We’re not combining wet and dry here, but rather preparing our main star. Place your chilled watermelon on a stable cutting board. Carefully cut the watermelon in half, then into quarters. Trim away the rind, trying to get as close to the flesh as possible without losing too much. Then, slice the watermelon quarters into thick planks, about 1/2 to 3/4 inch thick. Finally, cut these planks into fry-like strips. Aim for pieces that are roughly the same size so they cook (or rather, chill!) evenly.
Step 5: Prepare Filling
Our “filling” is the delicious yogurt dip we prepared in Step 3. Make sure it’s smooth and well-combined. If you’re using any optional toppings like shredded coconut or chopped mint, have them ready in small bowls so you can easily sprinkle them on.
Step 6: Layer & Swirl
This step is all about presentation! Arrange the watermelon fries on a platter. You can serve the dip in a separate bowl alongside, or for a fun touch, you can even do a little drizzle of the dip over a few of the fries right before serving. If you’re using toppings, sprinkle them sparingly over the fries for a visual pop and added texture.
Step 7: Bake
There’s no baking involved with watermelon fries! They rely on being perfectly chilled to be crisp and refreshing. So, instead of baking, we’re ensuring they are well-chilled. If you haven’t already, pop the sliced watermelon fries back into the fridge for at least 15-30 minutes before serving to make sure they are ice-cold.
Step 8: Cool & Glaze
Again, no cooling or glazing in the traditional sense. We want the watermelon to be *cold*. The “glaze” in this case would be the yogurt dip and any optional toppings. You add these just before serving to maintain the crispness of the watermelon.
Step 9: Slice & Serve
Arrange your perfectly chilled watermelon fries on a platter. Serve the creamy yogurt dip in a small bowl right next to them, along with any of your chosen toppings. Encourage everyone to dip generously! This is best served immediately while the watermelon is still perfectly cold and crisp.
What to Serve It With
These watermelon fries are so incredibly versatile, it’s almost silly! They’re not just for a hot afternoon snack, though they absolutely excel there. For breakfast, imagine serving these alongside a fluffy stack of pancakes or alongside a yogurt parfait. The cool, sweet watermelon is such a refreshing contrast to warm breakfast foods. My kids absolutely love them as a fun addition to their morning plate, making breakfast feel a little more special without any extra fuss. For a weekend brunch spread, these are a must-have. They add a pop of color and a light, healthy option that balances out richer dishes like bacon or quiche. You could even arrange them artfully on a platter with some other fruits and cheeses. They pair beautifully with a mimosa or a refreshing iced tea. As a light dessert, especially on a warm evening, these are just perfect. They’re sweet enough to satisfy a craving but so light that you don’t feel weighed down. Serve them with a tiny drizzle of honey and maybe a sprig of mint for an elegant finish. Or for the ultimate cozy snack, just cut them up, whip up the dip, and let everyone graze straight from the platter. They’re brilliant for picnics, BBQs, or just an after-school pick-me-up. I’ve even served them as a fun appetizer at a summer get-together, with the dip in the center and the fries fanned out around it. It’s always a conversation starter and a guaranteed hit!
Top Tips for Perfecting Your Watermelon Fries
I’ve made these watermelon fries more times than I can count, and over the years, I’ve picked up a few tricks that really make a difference. First, watermelon prep is crucial. Always, always start with a well-chilled watermelon. If it’s warm, it’s just not going to have that amazing refreshing crispness. When you’re cutting off the rind, try to get it all off cleanly. I know it seems like a small detail, but a stringy rind is no fun to bite into. For slicing, make sure your knife is sharp. A dull knife can crush the watermelon and make it mushy, which is the opposite of what we want. Aim for consistent thickness in your fries so they all have a similar texture. For the mixing advice on the dip, my biggest tip is to taste as you go. Everyone’s preference for sweetness and tanginess is different, and the yogurt itself can vary. Don’t be afraid to add a little more honey or a splash more lime juice until it tastes just right to you. Overmixing isn’t really an issue with the dip, but ensure it’s smooth so it coats the watermelon nicely. When it comes to swirl customization, I usually just stick to a simple drizzle or serve the dip on the side, but if you’re feeling artistic, you could try swirling a tiny bit of berry puree into the yogurt for a colored effect, though I haven’t personally tested that one yet – sounds intriguing though! For ingredient swaps, if you don’t have Greek yogurt, a thick, plain dairy-free yogurt like coconut or soy yogurt works well, though it might change the tanginess a bit. For sweeteners, agave nectar is a good substitute for honey. If you don’t have fresh lime or lemon, a tiny splash of apple cider vinegar can add a bit of tang, but use it sparingly. When it comes to baking tips – well, there’s no baking here! But the equivalent is ensuring your watermelon is super cold. Pop those fries back into the fridge for at least 15-30 minutes before serving. This is non-negotiable for the best texture. My biggest lesson learned here was that serving them lukewarm is just… sad. It loses all that delightful crunch and refreshing quality. For glaze variations, beyond the dip, I love a simple sprinkle of toasted coconut. It adds a tropical flair and a lovely textural contrast. Fresh mint is also amazing for a burst of coolness. Honestly, the simplicity is part of the charm, so don’t overcomplicate it!
Storing and Reheating Tips
Now, this is where we need to be a little realistic. Watermelon fries are definitely best enjoyed fresh. The magic happens when that watermelon is crisp and cold, and once it starts to warm up or sit for too long, it loses that delightful texture. However, there are ways to store them if you have leftovers, and knowing how to do it right makes all the difference. For room temperature storage, I honestly wouldn’t recommend it for more than an hour or two, especially if it’s warm out. They’ll start to get a bit soft and watery. If you absolutely must leave them out, keep them on a platter covered loosely with plastic wrap, but try to serve them within 1-2 hours. For refrigerator storage, this is your best bet. If you have leftover watermelon fries, pack them into an airtight container. You can put a piece of parchment paper between layers if you’re worried about them sticking, but usually, it’s not a big issue. They’ll keep reasonably well in the fridge for about 1-2 days. The texture will change slightly – they won’t be as crisp as when they were freshly cut, but they’ll still be perfectly edible and refreshing. The yogurt dip should be stored separately in its own airtight container in the refrigerator, where it will last for up to 5 days. For freezer instructions, I generally don’t recommend freezing watermelon fries. The high water content means they’ll become very mushy upon thawing. They’re really meant to be enjoyed fresh or chilled. If you are going to freeze them for some reason (perhaps to use in a smoothie later?), slice them, lay them in a single layer on a baking sheet lined with parchment paper, freeze until solid, then transfer to a freezer-safe bag or container. They’ll be best used within a month. Glaze timing advice is simple: always add the dip and any toppings right before serving. If you dip the fries in the yogurt dip and then try to store them, the watermelon will get soggy from the moisture in the dip. So, keep the dip separate until serving time!
Frequently Asked Questions
Final Thoughts
So there you have it – watermelon fries! It’s such a simple idea, but it’s one of those recipes that brings a huge amount of joy for minimal effort. It’s the perfect example of how you can take a humble ingredient like watermelon and turn it into something truly special and fun. Whether you’re looking for a healthy dessert, a cool-down snack on a scorching day, or just a way to make your kids (or yourself!) smile, these watermelon fries are an absolute winner. They’re refreshing, they’re delicious, and they’re so incredibly easy to whip up. If you loved this recipe, you might also want to check out my recipes for Frozen Yogurt Bark or my super easy Fruit Salad Kebabs for more healthy and fun summer treats! I truly hope you give these watermelon fries a try. They’ve become a summer staple in our home, and I have a feeling they might just become one in yours too. Let me know in the comments below how yours turned out, and if you discovered any amazing topping combinations!
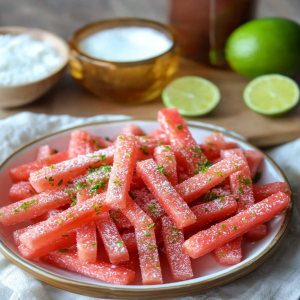
Watermelon Fries
Ingredients
Main Ingredients
- 1 small Watermelon Seedless, chilled
- 0.25 cup Lime juice
- 0.25 cup Tajin seasoning
Instructions
Preparation Steps
- Cut the watermelon into fry-like shapes.
- Drizzle with lime juice.
- Sprinkle generously with Tajin seasoning.
- Serve immediately and enjoy!


