Oh, where do I even begin with these Watermelon Fries? It feels like just yesterday I was trying to find a way to make fruit more exciting for my little ones, you know, those picky eaters who suddenly decide they’re not fans of *anything* you put in front of them. I remember one sweltering summer afternoon, staring at a perfectly ripe watermelon on the counter, and it hit me – why not make it fun? Like, *really* fun? Forget sad, soggy melon cubes. I wanted something playful, something bite-sized, something that would make them say, “Wow, what IS this?” And thus, my watermelon fries were born. It’s not really a “fry” in the potato sense, of course, but the shape and the way you eat them? Totally fries. It’s like a playful nod to comfort food, but entirely made of sunshine and pure, unadulterated sweetness. Honestly, it’s become my go-to for a quick, healthy treat that feels totally indulgent, and trust me, it beats cutting up a giant melon into fiddly pieces any day of the week. This recipe is a game-changer, a summer staple, and frankly, just pure joy on a plate.
What are watermelon fries?
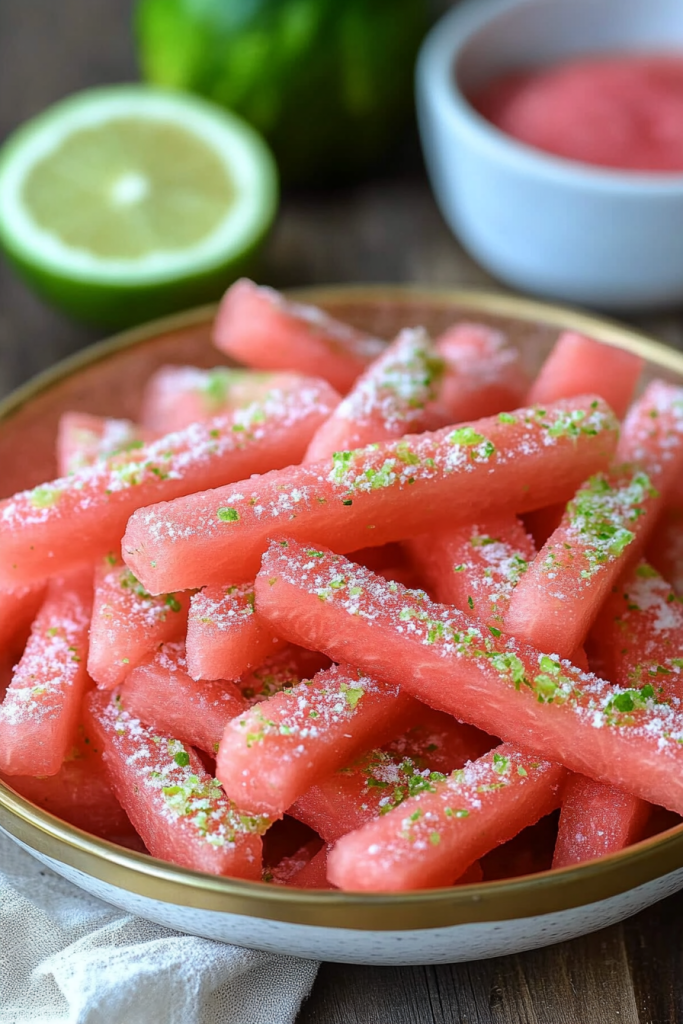
So, what exactly are these magical “watermelon fries”? Imagine this: slices of juicy, sweet watermelon, expertly cut into little fry-like shapes. That’s pretty much it! But the genius is in the simplicity and the presentation. We’re not deep-frying anything here, thank goodness. Instead, we’re taking the natural sweetness and vibrant color of a ripe watermelon and transforming it into something that feels a little bit special. Think of it as a playful edible art project for your kitchen. It’s essentially a watermelon, but presented in a way that sparks curiosity and excitement, especially for kids (and let’s be honest, adults too!). The name just stuck because it perfectly describes the shape and the casual, dippable nature of these delightful treats. It’s less about cooking and more about creative slicing and a touch of fun topping.
Why you’ll love this recipe?
There are so many reasons why this watermelon fry recipe has earned a permanent spot in my recipe rotation. First off, the **flavor** is just out of this world, especially when the watermelon is at its peak. It’s pure, refreshing sweetness with that delightful juicy crunch. Then there’s the **simplicity**. I mean, you’re essentially just cutting a piece of fruit. It takes minutes! This one’s a lifesaver on busy nights when you need a healthy snack option that doesn’t require a ton of effort. And talk about **cost-efficiency**! A single watermelon can yield so many servings, making it incredibly budget-friendly. Plus, it’s naturally vegan, gluten-free, and packed with hydration – what’s not to love? What I love most about this is its incredible **versatility**. You can serve them plain, or with a simple dip, or even get fancy with a sprinkle of this or that. It’s perfect when you’re craving something sweet at 10pm but don’t want to bake a whole cake. I’ve made these for everything from casual backyard BBQs to slightly more elegant summer brunches, and they’re always a hit. They just bring a smile to everyone’s face!
How do you make watermelon fries?
Quick Overview
Making watermelon fries is ridiculously easy, which is a huge part of their charm. You’ll simply slice your watermelon, cut those slices into fry-like strips, and then arrange them for serving. The magic really happens with the optional toppings or dips, which elevate them from simple fruit to a truly delightful treat. It’s the perfect way to enjoy watermelon without all the fuss of seeds or messy juice drips. The entire process, from start to finish, takes mere minutes, making it ideal for spontaneous cravings or last-minute dessert ideas.
Ingredients
For the Main Treat:
1 large, ripe watermelon: Look for one that feels heavy for its size, with a dull rind and a creamy yellow spot where it rested on the ground. That’s the sign of a sweet, sun-kissed melon!
For an Optional Sweet Dip (My Go-To):
1 cup Greek Yogurt (full-fat for extra creaminess!) or coconut yogurt for a vegan option.
1 tablespoon honey or maple syrup (adjust to your sweetness preference).
1/2 teaspoon vanilla extract.
A tiny pinch of salt to enhance the sweetness.
For an Optional Spicy Kick:
1/4 cup lime juice.
1 tablespoon chopped fresh mint.
1/2 teaspoon chili powder (or a pinch of cayenne for more heat).
Step-by-Step Instructions
Step 1: Prepare the Watermelon
First things first, give your watermelon a good wash. Then, carefully cut it in half, and then in half again, so you have quarters. This makes it much easier to handle. Place a quarter on a cutting board, rind-side down. Now, here’s the trick: slice off the rind. You want to cut just deep enough to remove the green and white parts, leaving you with that beautiful pink flesh. Try to keep the slices as even as possible, about 1/2 to 3/4 inch thick.
Step 2: Slice into “Fries”
Take those rindless watermelon slices and lay them flat. Now, cut them into strips that resemble french fries – about 1/2 inch wide. Don’t worry about perfection; a little variation adds to the charm! If you find any seeds, just pluck them out as you go. It’s much easier to do this now than when they’re on the plate.
Step 3: Arrange for Serving
You can serve these immediately, or if you’re feeling fancy, arrange them upright in a glass or a small basket lined with parchment paper, just like you would with real fries. This presentation is always a big hit, especially with little ones. If you’re not using a dedicated holder, simply arrange them nicely on a platter.
Step 4: Prepare Optional Dips (If Using)
While the watermelon is naturally delicious on its own, a little dip can take it to the next level. For the sweet dip, just whisk together the Greek yogurt, honey/maple syrup, vanilla extract, and salt in a small bowl until smooth and creamy. For the spicy kick, combine the lime juice, chopped mint, and chili powder in another small bowl. Taste and adjust seasonings as needed. You can make these dips while you’re slicing the watermelon to save time.
Step 5: Serve and Enjoy!
Present your watermelon fries with the optional dips on the side. Let everyone dig in! The combination of the cool, juicy watermelon with a creamy, sweet dip or a zesty, spicy one is pure summer bliss. It’s refreshing, delicious, and guilt-free!
What to Serve It With
These watermelon fries are so incredibly versatile, they truly fit into any occasion. For **breakfast**, I love serving them alongside a light yogurt parfait or a bowl of overnight oats. They add a burst of freshness that’s just divine with morning coffee. For **brunch**, they’re a showstopper! Imagine a beautiful spread with mini quiches, some avocado toast, and a vibrant platter of these watermelon fries. I like to arrange them in a tall glass with a sprig of mint for an elegant touch. As **dessert**, they are surprisingly satisfying. They’re perfect after a heavier meal, offering a sweet, palate-cleansing finish. I sometimes dust them with a tiny bit of powdered sugar or a sprinkle of finely chopped pistachios for a little crunch. And for **cozy snacks**, well, that’s probably their most frequent role in my house! They’re perfect for an afternoon pick-me-up, especially on a warm day. My kids will happily grab a handful of these, and it’s so much better than reaching for sugary cookies. My family tradition is to have them after playing outside on a hot day; it’s the ultimate refreshment!
Top Tips for Perfecting Your Watermelon Fries
I’ve made these watermelon fries more times than I can count, and I’ve definitely picked up a few tricks along the way. For the **watermelon prep**, the biggest tip is to make sure it’s really ripe. A watery, bland watermelon just won’t do. Use a sharp knife when you’re cutting off the rind; it makes the job so much easier and cleaner. You want those slices to be about 1/2 to 3/4 inch thick – too thin and they might fall apart, too thick and they’re a bit unwieldy. For the **mixing advice**, well, there isn’t much mixing for the watermelon itself, but for the dips, the key is to taste and adjust! If you’re making the sweet dip, add the honey or maple syrup gradually until it’s just right for your palate. For the spicy dip, start with a smaller amount of chili powder; you can always add more. Overmixing the yogurt dip can sometimes make it a bit too thin, so just a gentle whisk is all you need. When it comes to **swirl customization** (if you were to add something like a yogurt swirl *onto* the watermelon itself, which I sometimes do!), I find a toothpick or a skewer works best for creating patterns. For **ingredient swaps**, if you don’t have Greek yogurt, regular plain yogurt works, but it might be a bit runnier. Coconut yogurt is a fantastic dairy-free alternative that adds a lovely subtle flavor. If you’re out of honey or maple syrup, agave nectar is another good option. For the spicy dip, if you don’t have fresh mint, a tiny bit of dried mint can work in a pinch, but fresh is always better. For **baking tips**, there aren’t any, which is the beauty of this recipe! It’s all about chilled goodness. The only thing to consider is ensuring your watermelon is cold before slicing; it makes the texture firmer and more enjoyable. For **glaze variations**, instead of a dip, you could drizzle a bit of melted Dark Chocolate over the “fries” for a decadent treat, or a simple balsamic glaze for a more sophisticated flavor profile. My personal “lesson learned” was once trying to make them *too* uniform; the charm is in their slightly imperfect, hand-cut look!
Storing and Reheating Tips
The beauty of watermelon fries is that they are best served fresh and chilled. However, if you happen to have leftovers (which is rare in my house!), here’s how to store them. For **room temperature storage**, I honestly don’t recommend it for more than an hour or two, especially on a warm day, as watermelon can get a bit mushy and less appealing. If you do need to leave them out briefly, keep them covered in a cool spot. **Refrigerator storage** is your best bet. Store any leftover watermelon fries in an airtight container. They’ll keep their best texture for about 1-2 days. They might release a little extra juice, which is normal. Just drain any excess liquid before serving again. For **freezer instructions**, I generally don’t freeze watermelon fries. The texture changes quite a bit upon thawing, becoming more watery and less crisp. If you were to try it, I’d recommend freezing them in a single layer on a baking sheet lined with parchment paper before transferring them to a freezer-safe bag. Thaw them in the refrigerator. They’re often best blended into smoothies after freezing. Regarding **glaze timing advice**, if you plan on storing any, it’s best to store the plain watermelon fries separately from any dips or glazes. Add the dips or glazes right before you serve them again to maintain the best texture and flavor.
Frequently Asked Questions
Final Thoughts
So there you have it – watermelon fries! It’s such a simple concept, but it brings so much joy. It’s the perfect example of how a little creativity can turn an ordinary fruit into something truly special and fun. I hope you give these a try, especially if you have little ones (or just a big kid at heart!) who you want to encourage to eat more fruit. It’s refreshing, it’s healthy, and honestly, it just feels like summer in a bite. If you love this idea, you might also enjoy my recipe for Grilled Pineapple spears or my tropical fruit salad skewers – they have that same fun, fresh vibe! I can’t wait to hear how yours turn out. Please leave a comment below and let me know what you think, or share your own favorite watermelon creations! Happy slicing and happy eating!
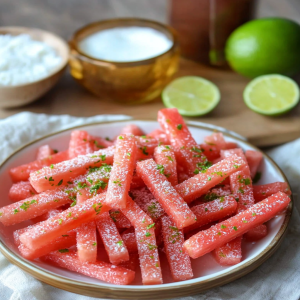
Watermelon Fries
Ingredients
Main Ingredients
- 1 medium Watermelon
- 0.25 cup Lime juice
- 0.125 cup Tajin seasoning
- Mint leaves, for garnish (optional)
Instructions
Preparation Steps
- Cut the watermelon into fry-shaped pieces.
- Place the watermelon fries in a bowl.
- Drizzle with lime juice and sprinkle with Tajin seasoning.
- Garnish with mint leaves, if desired, and serve immediately.


