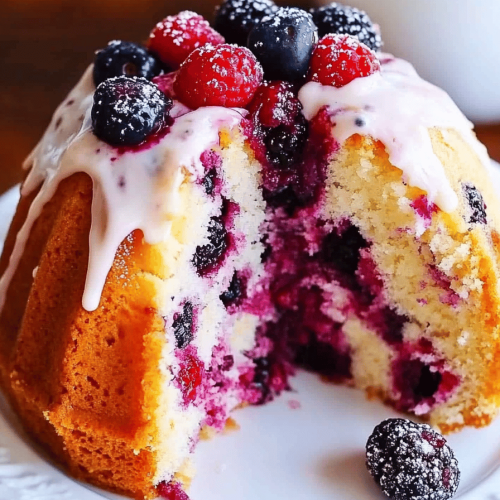
I still remember the glow of the kitchen light on a rainy evening, the way my grandma’s apron rustled as she pulled a golden pan from the oven, and the sweet scent that seemed to wrap around the house like a warm hug. That scent wasn’t just sugar; it was caramelized bundt cake magic, a buttery, vanilla-kissed chorus that made disbelief melt away—the way you’re sure you’ve tasted something wonderful, then realize you’ve just reconnected with a memory you didn’t know you’d misplaced. This version is my modern love letter to that moment: deeply caramel-forward, a tender crumb, and a glaze that clings in little ribbons like decorative frosting on a cherished family treat. It’s got the soul of a Sunday dessert with the ease of a weekday bake, and yes, it’s the kind of cake that disappears in minutes in my house—my kids actually ask for seconds, which is basically the highest compliment I can receive. So here’s my favorite caramelized bundt cake, shared with you over coffee and a sprinkle of nostalgia.
What is a caramelized bundt cake?
Think of this as a refined take on a beloved Bundt Cake, where a syrupy caramel glaze soaks into a moist, vanilla-forward crumb and creates those gorgeous, slightly sticky edges that caramel lovers crave. The name hints at the method: a caramelized glaze that’s worked through the batter and around the pan, giving a kiss of sweetness in every bite. It’s essentially a classic bundt cake uplifted by a slow, buttery caramel bath and a gentle swirl of filling that provides pockets of silky decadence. It’s a cake you can whip up for a family celebration or a weeknight treat, because it’s forgiving, deeply comforting, and the kitchen smells like sunshine and caramel for hours after it comes out of the oven.
Why you’ll love this recipe?
What I love most about this caramelized Bundt Cake is how it feels fancy without being fussy. The glaze isn’t a hard, glossy shell—it’s a soft, caramel-y drizzle that clings to every curve of the cake and invites you in for a second slice. The batter is light enough to stay tender, yet sturdy enough to hold onto the swirl without turning into a crumbly mess. It’s also surprisingly versatile: you can swap a portion of the flour for almond flour for a nuttier bite, or switch up the filling with a dollop of salted butter caramel for an extra swoon-worthy center. This one’s a lifesaver on busy nights because you can bake it and still have room for seconds the same day. For me, the real joy comes from watching friends and family cut into the cake and exhale with that “oh wow” moment—proof that a simple cake can carry an entire afternoon of memories. If you like a similar vibe, you might also enjoy my lemon loaf or chocolate-studded banana cake, but this caramelized bundt cake has a way of lingering in the kitchen like a familiar melody. Trust me on this one: the aroma alone is enough to slow time a little and invite conversation around the table.
How do I make a caramelized bundt cake?
Quick Overview
This method is simple: whisk a smooth batter, swirl in a caramelized filling, bake until the edges pull slightly away from the pan, and finish with a glaze that’s glossy but soft enough to kiss the top. The secret is balancing the caramel in the batter with a glaze that’s pourable but not runny, so every corner of the cake gleams with a whisper of sweetness. You’ll love how quickly it comes together and how the pan coats itself with that glossy, caramel sheen—the kind that makes a cake feel celebratory even on a Tuesday.
Ingredients
For the Main Batter:
- 1 3/4 cups (220 g) all-purpose flour, sifted
- 1 cup (200 g) granulated sugar
- 1/2 cup (115 g) unsalted butter, softened
- 2 large eggs, room temperature
- 1/2 cup (120 ml) whole milk or dairy-free milk alternative
- 1 1/2 teaspoons vanilla extract
- 1/2 teaspoon baking powder
- 1/4 teaspoon baking soda
- 1/4 teaspoon salt
For the Filling:
- 1/3 cup (80 ml) caramel sauce or runny Dulce De Leche
- 2 tablespoons heavy cream or coconut cream
- Pinch of sea salt (optional, for salted caramel lovers)
For the Glaze:
- 1/2 cup (120 ml) caramel sauce (preferably thick, not too runny)
- 1-2 tablespoons water or milk to loosen, if needed
- 1/4 teaspoon vanilla or a pinch of espresso powder for depth
Step-by-Step Instructions
Step 1: Preheat & Prep Pan
Heat the oven to 350°F (175°C). Generously butter and flour a 10-cup bundt pan, tapping out the excess. If you’ve got a spray with flour, that works beautifully too. A well-prepped pan is the difference between a smooth release and a crumbly disaster, so take a moment to pamper it. I like to dust with a little cocoa powder in addition to flour for a subtle, chocolatey edge that echoes the caramel.
Step 2: Mix Dry Ingredients
Whisk together flour, baking powder, baking soda, and salt in a medium bowl. This is the dry foundation that keeps the cake light and springy. I always sift them if I’m feeling extra particular—the tiny air bubbles help the crumb stay tender, and it’s a small habit that pays off in the bake.
Step 3: Mix Wet Ingredients
In a separate large bowl, cream the butter and sugar until pale and fluffy. Add eggs one at a time, beating well after each. Mix in vanilla and milk. The mixture should look glossy and feel like velvet when you lift the spoon. If you’ve never creamed butter and sugar until it’s nearly pale yellow and airy, you’re in for a treat: that air is what makes the cake so tender.
Step 4: Combine
Fold the dry ingredients into the wet in three additions, just until combined. A few streaks are totally fine—overmixing is the enemy here. The batter should be smooth, with a gentle sheen. If it feels a touch thick, add a tablespoon or two of milk to loosen, but you don’t want it to be batter-thin.
Step 5: Prepare Filling
In a small bowl, whisk together the caramel sauce and cream until smooth. Add a pinch of sea salt if you’re using Salted Caramel. This filling is the heartbeat of the cake, so taste it and adjust for sweetness and creaminess. If your caramel sauce is thick, warm it briefly to loosen before swirling.
Step 6: Layer & Swirl
Pour about two-thirds of the batter into the prepared pan. Dollop spoonfuls of the caramel filling across the batter, then swirl gently with a knife to create ribbons. Add the remaining batter and swirl again, aiming for a loose marbling that hints at pattern but doesn’t look engineered. The goal is pockets of caramel and a soft, cinnamon-kissed vanilla base.
Pro tip: if your glaze is ready, don’t pour it yet—wait until after the cake has cooled a bit. The glaze should be glossy and slightly thick, not gluey.
Step 7: Bake
Bake for 50-60 minutes, or until a skewer inserted into the center comes out clean with a few moist crumbs clinging. If your oven tends to run hot, start checking at 45 minutes. The cake should spring back when touched lightly in the center. If the top darkens too quickly, tent it with a sheet of foil for the last 10 minutes to finish baking without scorching the surface.
Step 8: Cool & Glaze
Cool in the pan for 15 minutes, then invert onto a rack to cool completely. A warm cake loves a slow chill. Drizzle the glaze over the cooled surface, letting it pool into the crevices and lace along the edges. If you want a more dramatic caramel kiss, glaze while the cake is still just barely warm so the glaze can seep into the crumb a touch.
Step 9: Slice & Serve
Once the glaze is set, slice with a sharp serrated knife. Clean between cuts for neat portions, wiping the blade between slices. Serve with a dollop of softly whipped cream or a scoop of vanilla bean ice cream if you’re feeling extra celebratory. The first bite should carry that initial caramel warmth, followed by a tender crumb and a lingering, gentle sweetness. My family always leaves a few crumbs on the plate—proof that everyone has devoured a little piece of comfort.
What to Serve It With
This caramelized bundt cake shines on its own, but it earns a little extra personality when paired with the right accompaniments. Here are a few ideas that fit different moments:
For Breakfast: A bold coffee or a chai latte; serve with thinly sliced apples beneath the cake for a fruity, spiced morning. The caramel aromas pair beautifully with a robust cup of espresso, turning a simple morning bite into a celebration. My family loves a light dusting of powdered sugar and a few crushed almonds for texture.
For Brunch: A platter with citrus segments and a bit of tangy yogurt. The brightness cuts through the sweetness, and the textural contrast makes every bite interesting. A sparkling rosé can elevate the mood without overpowering the cake’s caramel chorus.
As Dessert: A scoop of vanilla ice cream or a spoonful of salted caramel whipped cream complements the glossy glaze perfectly. A few toasted pecans scattered over the top add a gentle crunch that makes the cake feel restaurant-worthy without the fuss.
For Cozy Snacks: A warm mug of cocoa with a sliver of caramelized bundt cake on the side is basically Sunday afternoon in edible form. If you’re sharing with kids, a light drizzle of glaze over individual slices makes it feel special but approachable.
Top Tips for Perfecting Your Caramelized Bundt Cake
These are the little habits that have made this cake consistently reliable in my kitchen:
Zucchini Prep: Not applicable here, but moisture management matters in related recipes. For bundt cake, I keep ingredients room temp and ensure that butter is properly creamed to trap air. If you’re swapping in a vegetable puree elsewhere, make sure to drain or squeeze excess moisture well so the batter doesn’t get gummy.
Mixing Advice: Overmixing is the enemy. Fold until just combined, then rest the batter for about 5 minutes before pouring. You’ll notice the batter becomes silkier as it rests, giving you a lighter crumb once baked.
Swirl Customization: For more dramatic marbling, reserve a portion of the batter and swirl only the top third. A quick swirl with a skewer will create a “river” of caramel that looks gorgeous when sliced. If you want a more uniform look, pour the batter in as a thick layer, add the filling, and do a gentle swirl less aggressively.
Ingredient Swaps: Whole milk can be swapped for almond or oat milk; the cake will stay tender, though the flavor will shift slightly. If you’re dairy-free, use coconut cream for the filling and a plant-based glaze. It’s a surprisingly forgiving recipe, so feel free to experiment with nut butters in the filling for a deeper caramel effect.
Baking Tips: If you notice the crust browning too quickly, cover loosely with foil for the last 10-15 minutes. Place the pan on a lower rack to help the interior bake evenly. Let the cake rest for at least 15 minutes in the pan before turning; this helps set the crumb and prevents cracking.
Glaze Variations: Add a pinch of sea salt to the glaze for a salted caramel vibe, or whisk in a tablespoon of espresso powder for a mocha twist. If the glaze becomes too thick, heat it slightly and whisk in extra liquid a teaspoon at a time until you reach a pourable consistency.
I’ve learned to keep a little extra caramel sauce on hand for drizzling—sometimes you just want that shiny finishing touch on the very first slice. My kids love watching the glaze puddle along the ridges of the bundt, catching every little carved edge for a glossy finish that photographs beautifully and tastes even better than it looks.
Storing and Reheating Tips
Caramelized bundt cake keeps nicely if you handle it with care:
Room Temperature: Store in an airtight container or cover tightly with plastic wrap for up to 2 days. The glaze might become a touch sticky in higher humidity, but it still tastes glorious. If you’re planning to serve it within a day or two, keep the cake covered to preserve moisture and prevent crusting.
Refrigerator Storage: Wrap well and refrigerate for up to 5 days. The texture will firm a bit when cold, but a quick warm-up in the microwave for 10-15 seconds or a brief stint in a low oven softens it nicely and revives the caramel aroma.
Freezer Instructions: Freeze baked, cooled cake wrapped tightly in plastic wrap and then in foil for up to 2 months. Thaw overnight in the fridge and bring to room temperature before serving. A light re-glaze before serving makes it feel fresh and extra indulgent.
Glaze Timing Advice: If you’re freezing, drizzle the glaze just before serving to keep the surface pristine. If you’re refrigerating, reheat the cake slightly to restore the glaze’s gloss and the crumb’s tenderness. The glaze tends to set harder when chilled, so a gentle warm-up is key for that glossy, pourable finish again.
Frequently Asked Questions
Final Thoughts
This caramelized bundt cake is the dessert I reach for when I want a hug in a pan, a memory to share, and a bit of kitchen theater all at once. It’s forgiving enough for a weeknight bake, but elegant enough to offer at a dinner party with a candlelit table and soft music in the background. The batter stays tender, the swirl stays visible, and that glaze—oh, that glaze—gives you a glossy finish that catches the light the moment the cake is sliced. If you’re new to bundt baking, start with this one; it will teach you the rhythm of caramel and crumb and leave you with a confident leap into more ambitious bakes. I’d love to hear how yours turns out—leave a comment with your tweaks, your favorite filling, and the moment a friend took that first bite and asked for seconds. Happy baking!
caramelized bundt cake
Ingredients
Main Ingredients
- 1.5 cup all-purpose flour
- 1 teaspoon baking powder
- 0.5 teaspoon baking soda
- 0.25 teaspoon salt
- 1 cup unsalted butter, softened
- 1.5 cup packed light brown sugar
- 3 count large eggs
- 2 teaspoon vanilla extract
- 0.75 cup caramel sauce
- 0.5 cup whole milk
Instructions
Preparation Steps
- Preheat the oven to 350 degrees F. Butter and flour a 10-inch Bundt pan.
- In a large bowl, cream the butter and brown sugar until light and fluffy.
- Add the eggs one at a time, beating well after each addition, then beat in the vanilla.
- In a separate bowl, whisk together the flour, baking powder, baking soda, and salt.
- With the mixer on low, add the dry ingredients to the wet in three additions, alternating with the caramel sauce, and end with the dry ingredients.
- Pour the batter into the prepared Bundt pan and bake for 50-60 minutes, until a toothpick inserted in the center comes out clean.
- Let the cake cool in the pan for 15 minutes, then invert onto a wire rack to cool completely.
- If desired, drizzle extra caramel sauce over the cooled cake for topping.