Oh, hello there! Come on in, grab a mug. I was just thinking about this amazing roasted cauliflower recipe and knew I had to share it with you. You know how sometimes you have a vegetable that just… sits there? Looking a bit sad in the crisper drawer? That used to be cauliflower for me. It felt like something you *should* eat, but not something you truly *looked forward* to. Then, I stumbled upon this method, and honestly, it’s a game-changer. It’s so ridiculously simple, yet the flavor is out of this world. Forget those bland, boiled florets of your childhood; this is cauliflower transformed. It’s the kind of dish that makes you rethink everything you thought you knew about a humble vegetable. If you’ve ever found yourself scrolling through recipes looking for something healthy but still incredibly satisfying, this roasted cauliflower recipe is about to become your new best friend. It’s become a staple in my kitchen, especially when I need a quick, impressive side that doesn’t require a culinary degree.
What is roasted cauliflower?
So, what exactly *is* this magical roasted cauliflower? It’s pretty much exactly what it sounds like, but with a little bit of love and a few key techniques, we elevate it from “just cauliflower” to “OMG, what is this sorcery?!” Think of it as taking those pale, unassuming florets and giving them a spa treatment in the oven. We toss them with Olive oil, salt, pepper, and a few other little flavor boosters, then roast them at a high temperature until they’re tender on the inside and beautifully caramelized and slightly crispy on the outside. The roasting process is where all the magic happens. It brings out this incredible nutty, sweet flavor that you just don’t get with other cooking methods. It’s essentially the simplest way to unlock cauliflower’s full potential, turning it into something genuinely crave-worthy.
Why you’ll love this recipe?
There are so many reasons why this roasted cauliflower recipe has earned a permanent spot on my Weekly Meal Plan. First and foremost, the flavor is just spectacular. You get these wonderfully sweet, nutty notes from the caramelization, with a hint of savory goodness from the seasonings. It’s honestly addictive! I often find myself sneaking florets straight off the baking sheet while it’s still hot – don’t tell anyone! Then there’s the simplicity. Seriously, this is a lifesaver on those nights when you get home late and still want something wholesome and delicious. You can prep it in about five minutes, and the oven does all the hard work. It’s incredibly cost-efficient too. Cauliflower is usually quite budget-friendly, and the other ingredients are pantry staples. This recipe is also ridiculously versatile. I’ll get to more serving ideas later, but honestly, it pairs well with almost everything. What I love most about this particular roasted cauliflower recipe is how forgiving it is. Even if you don’t get the caramelization *perfect*, it still tastes amazing. It’s the kind of dish that makes you feel like a kitchen wizard without any of the stress. It’s also a fantastic way to get picky eaters to actually enjoy cauliflower, which, let’s be honest, is a major win in my book!
How do I make roasted cauliflower?
Quick Overview
The process for making this fantastic roasted cauliflower is wonderfully straightforward. You’ll chop your cauliflower into florets, toss them with a simple blend of olive oil and seasonings, and then roast them until they’re tender and gorgeously browned. The high heat is key here, as it creates those irresistible crispy edges and deepens the flavor. It’s really that easy – minimal effort, maximum flavor payoff. This method is fantastic because it concentrates the natural sugars in the cauliflower, making it incredibly palatable and frankly, delicious.
Ingredients
What is the recipe for Roasted Cauliflower?
1 large head of cauliflower, trimmed and cut into bite-sized florets
3-4 tablespoons extra virgin olive oil (use a good quality one if you have it, it makes a difference!)
1 teaspoon sea salt (or to taste)
½ teaspoon freshly ground Black Pepper (or to taste)
Optional: ½ teaspoon garlic powder (adds a lovely depth)
For the Optional Finishing Touch (Highly Recommended!):
1 tablespoon fresh lemon juice (brightens everything up)
A sprinkle of red pepper flakes (for a little kick)
A handful of chopped fresh parsley (for freshness and color)
Step-by-Step Instructions
Step 1: Preheat & Prep Pan
First things first, let’s get that oven nice and hot! Preheat your oven to 400°F (200°C). While it’s heating up, grab a large baking sheet. You can line it with parchment paper if you want super easy cleanup, or just use it as is. A nice, big baking sheet ensures the cauliflower has plenty of space to roast and doesn’t steam, which is crucial for getting those lovely crispy bits. If you cram too much onto One Pan, you’ll end up with soggy cauliflower, and nobody wants that!
Step 2: Mix Dry Ingredients
In a large bowl, this is where we’ll coat our cauliflower. If you’re using garlic powder, add it now along with your salt and pepper. Giving them a quick whisk together ensures they’re evenly distributed before they hit the cauliflower. This little step might seem minor, but it helps prevent clumping of the seasonings, so you get flavor in every single bite.
Step 3: Mix Wet Ingredients
You don’t really have “wet ingredients” in the traditional sense for the roasting part, but this is where we’ll add the olive oil. Measure out your extra virgin olive oil. A good drizzle is what we’re going for. Make sure it’s a good quality olive oil if you can; it really does contribute to the overall flavor profile.
Step 4: Combine
Now for the fun part! Add your prepared cauliflower florets to the bowl with the seasonings. Drizzle the olive oil over the top. Use your hands (the best tools in the kitchen, in my opinion!) to gently toss everything together. Make sure every single floret is coated in the oil and seasonings. You want to see a nice, even sheen. Don’t be shy with the coating; this is what gives us that delicious roasted flavor and helps them crisp up.
Step 5: Prepare Filling
For this particular roasted cauliflower recipe, there isn’t really a “filling” in the traditional sense, but if you’re thinking of adding some extra flair, now’s the time to get your optional ingredients ready. If you’re doing the lemon juice and red pepper flakes, have those nearby. Chop your parsley finely so it’s ready to go. This is also where you might consider adding other things like a pinch of smoked paprika for smokiness, or a dash of cumin for an earthy flavor. I’ve even tossed in some chopped garlic cloves in here before, but they can burn if you’re not careful.
Step 6: Layer & Swirl
Spread the seasoned cauliflower florets in a single layer on your prepared baking sheet. This is super important for even roasting and browning. Don’t overcrowd the pan! If your cauliflower is piled up, it will steam instead of roast, and we’re after that delicious, slightly crispy texture. If you have too much for one pan, use two! It’s worth it.
Step 7: Bake
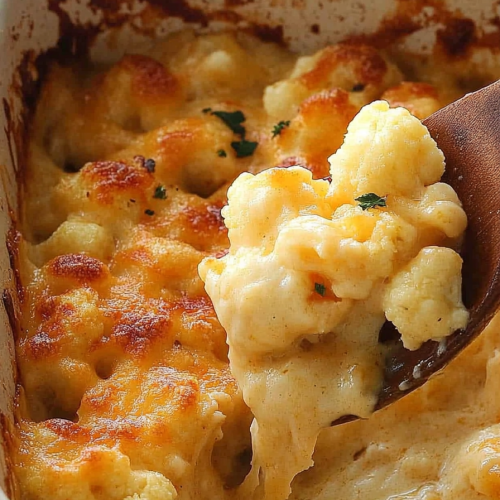
Pop the baking sheet into your preheated oven. Roast for about 20-25 minutes. The exact time will depend on your oven and the size of your florets, so keep an eye on it. You’re looking for them to be tender when pierced with a fork and to have those beautiful golden-brown, slightly crispy edges. Give them a toss or flip halfway through for more even browning.
Step 8: Cool & Glaze
Once the cauliflower is perfectly roasted, take it out of the oven. If you’re adding the optional finishing touches, now’s the time! Drizzle with fresh lemon juice, sprinkle with red pepper flakes (if using), and toss with the chopped fresh parsley. This final step adds a burst of freshness and a little zing that really elevates the dish. It’s like the cherry on top, but for roasted cauliflower!
Step 9: Slice & Serve
Serve your glorious roasted cauliflower immediately! It’s best enjoyed hot, right out of the oven. It’s fantastic on its own as a snack, or as a side dish with pretty much anything. The aroma alone is enough to make your mouth water. Enjoy the delicious, caramelized goodness!
What to Serve It With
Honestly, this roasted cauliflower is so good, it’s practically a meal in itself, but it truly shines as a side dish. For breakfast, I love serving it alongside some fluffy scrambled eggs or a perfectly poached egg. The savory, slightly crispy cauliflower is a lovely contrast to the soft eggs. For brunch, it’s a sophisticated addition to any spread. Imagine it next to some smoked salmon and a dollop of crème fraîche – so elegant! It also holds its own beautifully against richer brunch items like pancakes or bacon. When we’re looking for a satisfying dessert alternative, a small portion of this, perhaps with a touch more chili flake for a sweet and spicy kick, can be surprisingly satisfying. It’s also fantastic for those late-night cravings when you want something a little warm and comforting but don’t want to go overboard. Just a small bowl of it can hit the spot perfectly. And of course, as a classic side dish, it’s a dream. It pairs wonderfully with grilled chicken, pan-seared fish, roasted pork, or even a hearty lentil shepherd’s pie. My kids actually love it with simple baked chicken nuggets, which is a win-win in my book because they’re eating their veggies and actually enjoying them!
Top Tips for Perfecting Your Roasted Cauliflower
Over the years, I’ve picked up a few tricks that make this roasted cauliflower recipe consistently amazing. For the cauliflower itself, make sure you’re trimming off the tough core and any bruised parts. Cutting it into roughly equal-sized florets is key for even cooking. Don’t be afraid to get a little messy when you’re tossing it with the oil and seasonings – you want every nook and cranny coated! If your cauliflower is looking a bit dry, just add another splash of olive oil. When it comes to mixing, I always recommend using your hands. You can get a much better feel for the coating and ensure everything is evenly distributed, which is crucial for flavor and texture. I’ve made the mistake of using a spoon before, and you end up with dry spots and oily spots. Trust me on this one! For that beautiful browning, the single layer on the baking sheet is non-negotiable. If you cram the florets together, they’ll steam, and you’ll miss out on those delightful crispy edges that make this dish so special. If you have to use two pans, do it! For ingredient swaps, if you don’t have extra virgin olive oil, a good quality olive oil or even avocado oil works well. If you’re out of sea salt, regular table salt will do, just use a little less as it’s often more potent. And for the garlic powder, it’s truly optional, but it adds a wonderful depth of flavor. If you have fresh garlic, you can mince a clove or two very finely and toss it with the oil, but be aware that it can burn at high temperatures, so watch it closely! Baking is where you can experiment a bit. My oven tends to run a little hot, so I sometimes dial it back a touch. The best doneness test is simply piercing a floret with a fork – it should be tender but not mushy. If you want them extra crispy, you can even pop them under the broiler for the last minute or two, but watch them like a hawk because they can go from perfectly browned to burnt in seconds!
Storing and Reheating Tips
This roasted cauliflower is best enjoyed fresh, but it does store surprisingly well. If you have any leftovers, let them cool completely before storing. You can keep them at room temperature for a couple of hours, but for longer storage, pop them into an airtight container in the refrigerator. They’ll stay good for about 3-4 days. The texture might soften slightly upon refrigeration, but they’ll still be delicious. When it comes to reheating, there are a few ways to go. My favorite is to pop them back into a preheated oven at around 375°F (190°C) for about 5-10 minutes. This helps them regain some of that lovely crispness. You can also reheat them in a skillet over medium heat with a little extra olive oil, stirring occasionally, until heated through and slightly crisped. The microwave is the quickest option, but it can make them a bit soft, so it’s not my top choice if you’re aiming for crispiness. If you’re planning to freeze the roasted cauliflower, I’d recommend doing it before you add any fresh herbs or lemon juice. Let it cool completely, then spread it in a single layer on a baking sheet and freeze until solid. Once frozen, transfer it to a freezer-safe bag or container. It should last for about 2-3 months. When you’re ready to use it, thaw it overnight in the refrigerator and then reheat as you normally would. For any glaze, it’s always best to add it fresh after reheating to maintain its vibrancy and flavor.
Frequently Asked Questions
Final Thoughts
So there you have it – my absolute favorite way to make roasted cauliflower. It’s truly a testament to how simple ingredients, a little heat, and a whole lot of love can transform something ordinary into something extraordinary. I hope this recipe becomes a regular in your kitchen too. It’s the kind of dish that brings a smile to my face every time I make it, and seeing my family devour it makes it all the more special. If you’re looking for other simple yet flavorful veggie preparations, you might also enjoy my balsamic roasted Brussels sprouts or my honey-glazed carrots. They’re all about bringing out the best in fresh produce with minimal fuss. I can’t wait to hear how your roasted cauliflower turns out! Please leave a comment below and let me know your favorite tips or any delicious variations you try. Happy cooking!
Roasted Cauliflower
Ingredients
Main Ingredients
- 6.5 cups cauliflower florets about 1 large cut small
- 3 garlic cloves chopped
- 2 tbsp olive oil
- kosher salt and fresh pepper
- 0.25 lemon juice
- 2 tbsp Parmigiano Reggiano freshly grated
Instructions
Preparation Steps
- Preheat oven to 450°F.
- Combine cauliflower, olive oil, lemon juice, garlic, salt and pepper well so all the florets are coated and seasoned.
- Place in a large shallow roasting pan and place in the center of the oven.
- Roast for about 25-35 minutes, turning florets occasionally so they are evenly cooked.
- Remove from oven and top with cheese and some lemon zest and additional salt and pepper if needed.