There’s something about the smell of chocolate baking that instantly pulls me back to my childhood kitchen — the warm, cozy scent wrapping around me like a soft blanket. These chocolate cupcakes have been a staple in my family for years. I remember sneaking extra spoonfuls of the batter, trying to resist that irresistible cocoa kiss before it even hit the oven. They’re not just cupcakes; they’re little pockets of happiness that never fail to brighten a day. Unlike your usual chocolate cake that sometimes feels a bit heavy, these cupcakes strike that perfect balance of fluffy yet rich, making for a delightful treat. If you ever thought chocolate cupcakes couldn’t have more personality than just plain old frosting on top, wait until you try this one—the secret filling is what’ll have everyone asking for seconds before the first one’s even finished.
What is chocolate cupcake?
Think of chocolate cupcakes as the charming little cousins of chocolate cake — all the indulgence but in a perfectly portioned, hand-held size. They’re essentially mini cakes baked in cupcake tins, usually topped with frosting or glaze, and often packed with a little surprise inside, like a creamy filling or a swirl of chocolate ganache. The name is pretty straightforward—chocolate-flavored cupcakes—but what makes a great one has as much to do with the texture and that lovely balance of sweetness as it does with the deep chocolate flavor. I love to think of chocolate cupcakes as tiny celebrations wrapped in a paper liner, making them approachable and easy to share, whether it’s a random Tuesday or a big family gathering. As a home baker, they’re my go-to when I crave the joy of homemade chocolate without the challenge or commitment of making a whole cake.
Why you’ll love this recipe?
What I love most about this chocolate cupcake recipe is how it manages to be incredibly moist and decadent while still being insanely easy to throw together. No need to worry about complicated techniques or weird specialty ingredients — we’re talking simple pantry staples here, which means it’s totally budget-friendly for those days when you want to treat yourself without breaking the bank. The flavor itself is wonderfully rich but never overwhelming; that’s thanks to using real cocoa powder paired with a bit of espresso powder to deepen the chocolate notes (trust me on that one, it’s a game changer). Plus, the cupcake’s texture is just right — fluffy with a little springiness that makes every bite a delight.
Another thing that makes these shine is the versatility. You can fill them, glaze them, frost them, or just enjoy them plain, and they’ll feel just right every single time. I’ve experimented with fillings like salted caramel, peanut butter cream, and even raspberry jam, and each variation brings something new but keeps that comforting chocolate base. Compared to other sweets like brownies or thick cakes, these cupcakes are light enough to enjoy right after a meal but satisfyingly indulgent when you need a little pick-me-up. My kids actually ask me to make these for special mornings or when they have friends over, and I love that they’re crowd-pleasers no matter the crowd.
How do I make chocolate cupcakes?
Quick Overview
Making these chocolate cupcakes is simple and straightforward, which means you get that comforting homemade vibe without spending hours in the kitchen. The magic is in prepping your dry ingredients separately from the wet, gently folding them together to keep the batter light, then adding the luscious filling at just the right time before baking. Plus, finishing them with a smooth glaze just takes them from everyday to special occasion status. You don’t need fancy equipment or endless steps — just a good mixing bowl, an oven, and a little love.
Ingredients
For the Main Batter:
- 1 cup all-purpose flour – fresh and sifted for that feather-light crumb
- 1/2 cup unsweetened cocoa powder – use Dutch-process for a richer taste
- 1 tsp baking powder – helps them rise up nice and fluffy
- 1/2 tsp baking soda – balances the acidity for tenderness
- 1/4 tsp salt – trust me, salt brings out the chocolate flavor big time
- 3/4 cup granulated sugar – standard sweetness, but you can tweak it if you want
- 1/2 cup whole milk – I sometimes swap this for almond milk and it’s surprisingly creamy
- 1/4 cup vegetable oil – keeps things moist, don’t skip it
- 1 large egg – room temperature is best for even mixing
- 1 tsp pure vanilla extract – because vanilla makes everything better
- 1 tsp instant espresso powder – optional but highly recommended for chocolate depth
For the Filling:
- 1/2 cup cream cheese (softened) – for that dreamy tanginess
- 1/4 cup powdered sugar – to sweeten the filling just right
- 2 tbsp cocoa powder – to complement the filling with chocolate love
- Optional: a splash of vanilla or a pinch of cinnamon for extra warmth
For the Glaze:
- 1 cup powdered sugar – to keep it smooth and sweet
- 2 tbsp unsweetened cocoa powder – more chocolate, yes please
- 2-3 tbsp milk – adjust for the perfect pourable consistency
- 1 tsp vanilla extract – infuses a lovely aroma
Step-by-Step Instructions
Step 1: Preheat & Prep Pan
First things first: preheat your oven to 350°F (175°C). Line your muffin tin with cupcake liners — I like the colorful ones, but plain white works just as well. A neat trick I learned is to tap the pan gently after placing liners to get rid of any wrinkles — helps them look smooth! Set this aside while you prepare your batter so you can move quickly once the mixture is ready.
Step 2: Mix Dry Ingredients
In a large bowl, sift together the flour, cocoa powder, baking powder, baking soda, and salt. Sifting here is key to avoid lumps and ensure the cupcakes end up tender and airy. Give it all a gentle whisk—this step combines flavors evenly and primes your cupcake for baking magic.
Step 3: Mix Wet Ingredients
In another bowl, whisk together the sugar, egg, milk, vegetable oil, vanilla extract, and espresso powder until smooth and slightly frothy. I usually use a fork or small whisk here to keep it light. Mixing the wet ingredients well first helps them meld into the dry ones seamlessly.
Step 4: Combine
Slowly add the wet mixture to the dry ingredients, gently folding them together with a spatula. The trick is to move quickly but carefully—don’t overmix because that’s a recipe for dense cupcakes. When the batter looks just combined and smooth but still has a touch of fluffiness, you’re golden.
Step 5: Prepare Filling
In a small bowl, beat together the softened cream cheese, powdered sugar, and cocoa powder until creamy and smooth. If you want a little flair, stir in a splash of vanilla or a pinch of cinnamon—it adds a lovely warmth that pairs beautifully with the chocolate base. You want a thick but spreadable texture here; if it’s too stiff, add a teaspoon of milk to loosen it up.
Step 6: Layer & Swirl
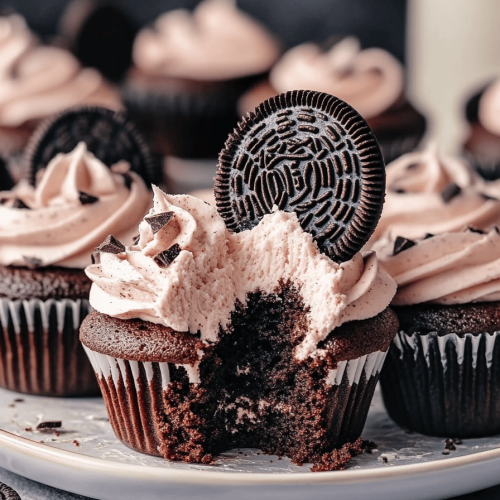
Fill each cupcake liner halfway with the chocolate batter. Then, dollop a teaspoon of the cream cheese filling right in the center of each. Top with a little more batter until the liners are about 3/4 full. For a fun touch, swirl the filling gently through the batter using a toothpick or skewer—this step gives you those beautiful marbled insides that pack a surprise in every bite.
Step 7: Bake
Pop the pan into your preheated oven and bake for about 18-22 minutes. Start checking at 18 — stick a toothpick into the cupcake’s edge (avoiding filling) and if it comes out mostly clean with a few moist crumbs, they’re done. The tops should look set but not dry. Oven temps vary, so keep an eye around the finish line!
Step 8: Cool & Glaze
Let the cupcakes cool in the pan for about 5 minutes, then transfer them to a wire rack to cool completely. While they cool, whisk together your glaze ingredients until silky and smooth, adding more milk if it’s too thick. Once cupcakes are fully cool, carefully drizzle the glaze over the tops—don’t rush this part! A slow drizzle helps the glaze form little pools that harden just enough to give a shiny finish.
Step 9: Slice & Serve
These chocolate cupcakes are best enjoyed fresh and slightly chilled, but if you really want to show off, slice one in half to reveal that luscious filling. I like serving mine with a cup of rich coffee or a cold glass of milk—comfort food at its best. A sprinkle of sea salt on the glaze adds an unexpected but addictive pop of flavor. Trust me, it’s the little stuff that makes these cupcakes unforgettable.
What to Serve It With
For Breakfast: Nothing beats the start of the day like one of these chocolate cupcakes paired with a strong, black coffee or a creamy latte. The slight bitterness of the coffee perfectly offsets the sweetness, and the aroma is just heavenly. Add a side of fresh berries or banana slices for a little brightness, and you’ve got a breakfast that feels like a treat without any guilt.
For Brunch: Arrange these cupcakes on a pretty platter with fresh whipped cream on the side and perhaps some sliced almonds or chocolate shavings sprinkled on top. Serve alongside sparkling cranberry or a mimosa to elevate the vibe. They’re perfect for an afternoon with friends or a leisurely weekend catch-up when you want to impress without sweating it.
As Dessert: Finish a cozy dinner by warming up these cupcakes for 10 seconds in the microwave. Serve with a scoop of vanilla ice cream and drizzle a little raspberry sauce over the top for a rich, celebratory feel. The contrast of warm cake, cold ice cream, and luscious sauce is downright magical.
For Cozy Snacks: On a quiet afternoon, these cupcakes make the perfect companion to a steaming mug of chai or hot chocolate. Layer a comfy blanket, your favorite book, and you’ve got the ultimate comfort combo. My kids will often nab one and curl up, asking for “just one more, please.”
Top Tips for Perfecting Your Chocolate Cupcakes
Cocoa Powder Quality: Don’t skimp here — I’ve found that using a good Dutch-processed cocoa deepens the chocolate flavor and eliminates any bitterness or dryness in the crumb. Natural cocoa works too, but the taste can be sharper.
Mixing Advice: When combining wet and dry, gently fold rather than whisk. Overmixing develops gluten and makes cupcakes tough — it’s a mistake I made more than once before learning! Aim for a batter that still has a few tiny lumps but no streaks of flour.
Swirl Customization: If you want your filling swirl to be more dramatic, try dolloping larger spoonfuls and swirling with long, slow strokes. For a subtler look, smaller dabs and quick circles do the trick. This little detail makes your cupcakes look like you spent hours mastering presentation (which you didn’t!).
Ingredient Swaps: Out of milk? No problem—almond, oat, or even coconut milk can work, and I’ve tested these with delicious results. For oil, light olive oil or melted coconut oil will also keep things moist but add a slight flavor twist. Just avoid any strong-tasting substitutions.
Baking Tips: Position your cupcake tray in the middle rack for even heat, and avoid opening the oven door too often to keep them from sinking. If your oven runs hot, lower the temperature by 10 degrees and extend the baking time by a few minutes.
Glaze Variations: You can add a pinch of cayenne or cinnamon to the glaze for a little kick, or swap some cocoa powder for melted chocolate for a thicker, fudgier finish. For a lighter glaze, just thin it out with more milk or a splash of coffee.
I remember the first time I tried skipping the filling, thinking it was just extra fuss. Big mistake! The cream cheese center totally changes the game—adds a surprise burst of creaminess that elevates these cupcakes from tasty to unforgettable. So don’t skip it, okay?
Storing and Reheating Tips
Room Temperature: Store these chocolate cupcakes in an airtight container on the counter for up to 2 days. I usually cover them with a cake dome or plastic wrap to keep the glaze from drying out. They stay soft and moist, perfect for a quick grab-and-go snack.
Refrigerator Storage: Since there’s cream cheese filling, it’s best to refrigerate if you’re keeping them longer than a day. Use a sealed container and bring cupcakes back to room temperature before serving so the frosting and cake soften beautifully. They stay good for up to 5 days this way.
Freezer Instructions: Wrap each cupcake individually in plastic wrap, then place in a freezer-safe bag. Freeze for up to 3 months. When ready, thaw in the fridge overnight and let come to room temp before eating. If you want, you can refresh the glaze slightly after thawing by drizzling a touch more sweetened cocoa drizzle.
Glaze Timing Advice: If you plan on freezing or refrigerating, it’s best to add the glaze right before serving to keep it fresh and glossy. On the other hand, for same-day serving, glazing right after cooling is perfect.
Frequently Asked Questions
Final Thoughts
Honestly, these chocolate cupcakes hold a special place in my kitchen and heart. They’re one of those recipes that bring family and friends together without stress or fuss, offering a moment of sweet comfort amid our busy lives. Between the moist crumb, the rich, slightly tangy filling, and the glossy glaze, they hit all the right notes for a treat that feels both indulgent and down-to-earth. If you’re a fan of homemade desserts that remind you of cozy afternoons and cheerful smiles, give these a whirl. And hey, don’t be shy — share your own twists and tricks in the comments, or let me know how they turn out! Happy baking, and may your kitchen be filled with the irresistible smell of chocolate cupcakes!
chocolate cupcakes
Ingredients
Main Ingredients
- 18 count Super Moist Low Fat Chocolate Cupcakes
- 2 cups confectioners' sugar
- 0.25 cup light butter (Land O Lakes*) melted
- 1 tsp white vanilla extract
- 1 tbsp boiling water
- 36 count m&m's
Instructions
Preparation Steps
- Start with my basic Super Moist Low Fat Chocolate Cupcakes recipe, without the chocolate frosting.
- When cooked and cooled, decorate cupcakes with vanilla frosting.
- For the frosting: combine confectioners' sugar, melted light butter, vanilla, and enough boiling water to achieve frosting consistency, starting with 1 tbsp and adding more if needed.
- Place frosting into a piping bag, cut the tip off, and pipe onto cupcakes. No need for a fancy tip unless desired.
- While frosting is still wet, press 2 m&m's (letter side down) of the same color on each cupcake to create the eyes.