There’s something about the smell of butter melting into a golden crust, the sweet thud of shredded coconut, and the crunch of chopped nuts that instantly transports me back to my childhood kitchen. This recipe for magic bars is one I’ve cherished for years — it’s that comforting, slightly gooey treat that disappeared in minutes whenever I brought it to family gatherings. If you’ve ever loved blondies or seven-layer bars, these magic bars will feel like a warm hug wrapped in a caramel drizzle. Honestly, they’re a lifesaver when you want something sweet but can’t face a full-on cake. I still remember sneaking one (or two) straight from the pan before they even had a chance to cool down. You’re going to want to make these your new favorite, trust me.
What is magic bar?
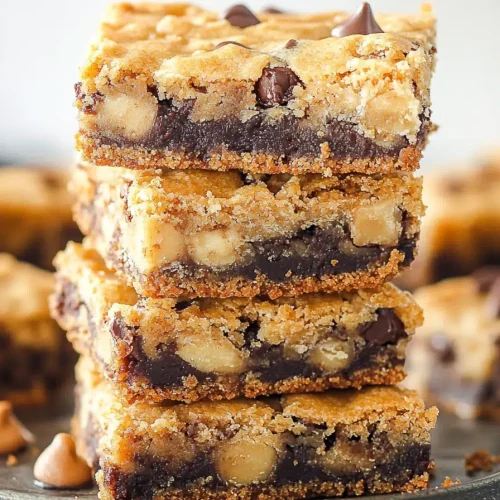
Think of magic bars as a layered dessert bar that’s basically the lovechild of a cookie base and a candy bar. It’s essentially a quick and easy sheet-pan treat where you start with a buttery graham cracker crust, then pile on layers like chocolate chips, shredded coconut, and chopped nuts, all bound together with sweetened condensed milk that gives it that irresistible gooey magic. The name “magic bars” sounds mysterious but really, it’s about how effortlessly these simple ingredients transform into something totally addictive by the time they come out of your oven. It’s approachable and forgiving, so even if you’re not usually a baker, you can pull this off — which is probably why it’s become a classic in so many homes, including mine.
Why you’ll love this recipe?
What I love most about magic bars is that they hit every sweet spot — literally. The flavor is a nostalgic burst of buttery graham cracker warmth mixed with the sweet chew of coconut and that little crunch from nuts. Plus, the chocolate chips melt just enough to make each bite feel indulgent without being overly rich. It’s like the grown-up version of a candy bar, but homemade and way better.
Also, they’re crazy simple to make — if you can pour, sprinkle, and bake, you’re already halfway there. And because the ingredients are pantry staples (seriously, you probably have everything already), it feels like such a steal for how satisfying it is. Compared to, say, baking brownies from scratch, magic bars assemble quickly and don’t require a fancy mixer or tons of bowls. Plus, they’re incredibly versatile. I’ve added white chocolate instead of traditional chips, swapped in pecans for walnuts, or even tossed in some dried cranberries for a tart surprise.
One of the best reasons this recipe holds a special place in my heart is my family’s reaction — these bars vanish so fast I’ve been known to hide the pan just to save myself a piece. My kids actually ask for seconds on busy school nights when I don’t have time for anything complicated. So whether you want a quick coffee-break treat or a crowd-pleaser for the holidays, this one always comes through.
How do you make magic bars?
Quick Overview
Magic bars are all about layering and letting the oven do its magic. You start with a buttery graham cracker crust pressed into your pan, sprinkle on all your favorite fillings – chocolate chips, shredded coconut, and nuts – then pour sweetened condensed milk over the top to bring it all together. After a quick bake, the layers meld into a glossy, chewy, and crunchy treat that’s impossible to resist. Honestly, it takes maybe 10 minutes to put everything together and then you just wait, which makes this recipe a perfect quick fix with minimal fuss.
Ingredients
For the Main Batter:
- 1 1/2 cups graham cracker crumbs (freshly crushed are best for extra crispness)
- 6 tablespoons unsalted butter, melted (go for real butter here — it really makes the crust shine)
- 2 tablespoons granulated sugar (balances the buttery crust)
For the Filling:
- 1 cup semi-sweet chocolate chips (you can mix in white or butterscotch chips for variety)
- 1 cup shredded sweetened coconut (the finer shredded the better for even layering)
- 1 cup chopped nuts – walnuts or pecans work beautifully (toasted for deeper flavor if you have time)
For the Glaze:
- 1 can (14 oz) sweetened condensed milk (this is the magic that melds the bars together; go for sweetened, not evaporated)
- Optional: 1 teaspoon vanilla extract (adds a nice warmth to the glaze)
Step-by-Step Instructions
Step 1: Preheat & Prep Pan
Set your oven to 350°F (175°C) and grease an 8×8-inch baking pan lightly with butter or line it with parchment paper for foolproof removal. I always pop my pan in the fridge while prepping to keep it cold, just a little trick for a firm crust base later on.
Step 2: Mix Dry Ingredients
Combine your graham cracker crumbs with sugar in a bowl. Use a fork or your fingers to make sure the sugar is well distributed and the crumbs feel evenly coated. This helps the crust stay strong without becoming soggy once the wet ingredients hit.
Step 3: Mix Wet Ingredients
Pour the melted butter over the graham cracker mixture and stir until all crumbs get a nice shine and hold together when pressed — it should look like wet sand. If you want, this is the time to add your vanilla extract to the sweetened condensed milk for the glaze layer.
Step 4: Combine
Press the buttery crust mixture firmly and evenly into the bottom of your prepared pan. Don’t skimp here — I do this step with the back of a spoon and my fingers to get it as compact and even as possible. This way your bars hold together perfectly once baked.
Step 5: Prepare Filling
Sprinkle your chocolate chips evenly over the crust first, followed by the shredded coconut, then the chopped nuts. Don’t worry too much about perfect distribution — if you have a few clusters, it only adds to the charm!
Step 6: Layer & Swirl
Pour the sweetened condensed milk slowly over the entire pan, making sure it’s spread evenly. The milk will soak into the layers, creating that gooey texture. If you’re feeling fancy, you can swirl in a little peanut butter or caramel on top with a toothpick before baking, but I usually keep it simple so the layers shine.
Step 7: Bake
Bake for about 25 to 30 minutes, or until the edges are golden brown and the center looks set but still a little soft to the touch. Oven temps vary, so start checking at 25 minutes. The bars will firm up as they cool, so resist the urge to bake until fully hard!
Step 8: Cool & Glaze
Once out of the oven, let the bars cool completely before cutting. This cooling step is so key — it helps everything set so your bars slice cleanly instead of sticking or crumbling. I skip adding any extra glaze on top because the condensed milk creates such a beautiful shine and texture, but if you’re after a drizzle of melted chocolate or a sprinkle of sea salt, go for it!
Step 9: Slice & Serve
Use a sharp knife (warm the blade with hot water and dry it before slicing) for clean edges. Cut into squares or rectangles depending on your mood. These bars are best served at room temp or slightly chilled if you prefer a firmer bite. Grab a napkin and get ready because these disappear fast!
What to Serve It With
For Breakfast: Pair a magic bar with a strong cup of black coffee or a creamy latte. The sweet richness brightens up the morning and gives you a little indulgence to start your day, especially on weekends when you’re taking it slow. My go-to is pairing them with a splash of almond milk in my coffee — the combo feels just right.
For Brunch: Present your magic bars alongside fresh berries and a light fruit salad for an elegant spread. They’re a great contrast to savory eggs or avocado toast. Try a sparkling citrus mocktail or a chilled iced tea with lemon to cut through the sweetness.
As Dessert: Warm these bars slightly and add a scoop of vanilla ice cream — the cold and warm combo is a family favorite. Drizzle with caramel sauce for a richer finish. They also hold up well alongside freshly whipped cream and a handful of toasted pecans for extra crunch.
For Cozy Snacks: There’s no better afternoon pick-me-up than a magic bar with a glass of cold milk or a cup of tea while curled up with a book or binge-watching your favorite show. I always keep a pan in the fridge for these moments — the bars keep their chewy texture and sweetness fresh for days.
My little secret? At holiday gatherings, I gift-wrap small stacks of magic bars for friends and family. They always comment on how homemade and special they taste — which makes me smile every. single. time.
Top Tips for Perfecting Your Magic Bars
Crust Prep: Make sure the graham crumbs are finely crushed and mixed well with sugar before adding butter. This helps create that sturdy, buttery base that supports the gooey layers. If your crumbs are coarse, the crust won’t hold together as well.
Mixing Advice: Don’t overmix once you add the butter — you want just enough to moisten the crumbs. Overworking the crust tends to make it tough rather than tender. Light, gentle mixing is the name of the game.
Swirl Customization: If you want to get a little fancy, swirl in melted peanut butter, Nutella, or caramel ribbons on top before baking. Use a toothpick or skewer to gently swirl and spread out the flavors evenly. Visually, it makes the bars look more inviting, and the flavor combos are fun to experiment with.
Ingredient Swaps: I’ve replaced standard semi-sweet chocolate chips with dark or even white chocolate — each brings a slightly different rhythm to the sweet-salty combo. Toasting your nuts beforehand amps up the flavor, but be mindful not to burn them; a light toast for 5 minutes will do. For the coconut, unsweetened shredded coconut works if you want less sweetness, but the bars won’t be as rich.
Baking Tips: Oven temperatures vary, so watch the last 5 minutes carefully. The bars should be golden around the edges but still a touch soft in the middle. If you overbake, they’ll dry out and lose that signature gooey magic. I usually rotate my pan halfway for even baking, especially if my oven has hot spots.
Glaze Variations: Sometimes, I add a splash of vanilla or almond extract to the sweetened condensed milk to deepen the flavor. If you’re in a pinch, you can swap out sweetened condensed milk for sweetened coconut milk for a tropical twist. Just expect a slightly lighter, less dense texture.
Over the years, I learned that letting the bars cool fully before slicing is non-negotiable. I once tried to cut them warm and ended up with caramel rivers everywhere — delicious, but messy! Now, I’m patient and it pays off every time.
Storing and Reheating Tips
Room Temperature: Magic bars can happily sit covered at room temp for up to 3 days. I like to keep mine under a cake dome or wrapped tightly with plastic wrap to avoid drying out or absorbing other fridge smells.
Refrigerator Storage: For longer freshness, store the bars in an airtight container in the fridge up to a week. They firm up nicely chilled, and I actually love the texture cold. Just bring them to room temp for softer bites or pop them in the microwave for 10 seconds if you want that warm gooey feel again.
Freezer Instructions: These bars freeze beautifully if wrapped tightly in plastic wrap and foil or stored in a freezer-safe airtight container. Freeze for up to 3 months. When ready to eat, thaw overnight in the fridge or leave out on the counter for a couple of hours before serving. Avoid microwaving frozen bars — you want to keep that texture intact.
Glaze Timing Advice: I always add the sweetened condensed milk glaze before baking because it really melds the layers together and creates that luscious finish. Adding any chocolate drizzle or toppings is best done after baking and once the bars are fully cooled.
Frequently Asked Questions
Final Thoughts
Magic bars are one of those recipes that make you feel like a kitchen wizard without any complicated steps. The mix of textures and flavors somehow hits that sweet spot between cookie, candy, and cake — all wrapped up in one buttery bite. I can’t stress enough how many times this recipe has saved me when I needed a quick dessert or a way to brighten a Sunday afternoon. Plus, it’s flexible enough to customize with whatever fillings you love or have on hand, which is why it stays a family favorite year-round.
If you’re already a fan of layered bars or blondies, I know you’ll enjoy playing around with this and making it your own. Don’t forget to drop a comment telling me your favorite combo or any tweaks you made — sharing these kitchen moments is what makes baking even sweeter. Happy baking, and I can’t wait to hear how yours turns out!
magic bars
Ingredients
Main Ingredients
- 1.5 cups graham cracker crumbs
- 0.5 cup unsalted butter melted
- 1.5 cups white chocolate chips
- 1 cup peanut butter chips
- 1 cup sweetened shredded coconut
- 1.5 cups candy corn
- 14 ounce sweetened condensed milk
Instructions
Preparation Steps
- Preheat oven to 350°F. Line a 9x13 inch pan with foil and spray with cooking spray.
- Mix graham cracker crumbs with melted butter until combined. Press mixture firmly into the bottom of the prepared pan.
- Evenly sprinkle white chocolate chips, peanut butter chips, shredded coconut, and candy corn over the crust.
- Pour the sweetened condensed milk evenly over the top of the layered ingredients.
- Bake for 25 minutes or until edges are golden. Allow to cool completely before cutting into bars.