Oh, hello there! Come on in and have a seat. I’ve been so excited to share this with you. You know, there are some recipes that just… stick with you. They become part of the family lore, the ones you make again and again, and each time feels like coming home. This peppermint cake? It’s absolutely one of those for me. It’s got that delightful little zing of peppermint that just screams holiday cheer, but honestly, I make it year-round because it’s just *that* good. Forget those dry, crumbly cakes you might have tried elsewhere; this one is incredibly moist and has this wonderful, tender crumb that just melts in your mouth. It’s like a soft cloud infused with the perfect amount of refreshing peppermint. If you’ve ever loved a classic chocolate cake but wished for a cool, minty twist, you are going to adore this peppermint cake. It’s the kind of cake that makes people ask for the recipe immediately, and the kind that disappears from the plate faster than you can say “frosting!”
What is Peppermint Cake?
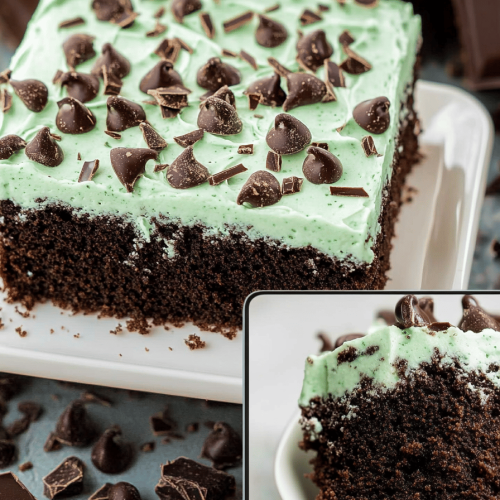
So, what exactly *is* this magical peppermint cake I can’t stop raving about? Think of it as your favorite vanilla or white cake, but with a fantastic, cool peppermint infusion. It’s not overpowering, mind you – it’s just that perfect hint that wakes up your taste buds. The “peppermint” usually comes from peppermint extract, which is readily available in most grocery stores. Sometimes people add crushed candy canes for a bit of texture and an extra burst of flavor, especially around the holidays, but the extract is key for that consistent, delicious minty note throughout the cake. It’s essentially a celebration cake, a dessert that’s bright, refreshing, and just a little bit special. It’s not a complicated layered affair with a million steps; it’s more of a comforting, home-baked treat that happens to look and taste absolutely stunning. It’s the kind of cake that feels both familiar and excitingly new, all at once.
Why you’ll love this recipe?
Why do I love peppermint cake?flavor is just out of this world. That subtle peppermint dance with the sweet, tender cake is pure bliss. It’s not too sweet, not too minty – it’s just perfectly balanced. It’s like a breath of fresh, cool air in cake form. Then there’s the simplicity. I know, I know, baking from scratch can sometimes feel intimidating, but I promise you, this recipe is surprisingly easy. Even if you’re a beginner baker, you’ll find this straightforward and forgiving. It comes together pretty quickly, which is a lifesaver on busy weeknights when a craving strikes. And let’s talk about Cost-efficiency: What is the best way to measure cost-efficiency?. The ingredients are all pretty standard pantry staples, so you likely have most of them on hand already. No need for fancy, expensive ingredients that you’ll only use once. This cake is budget-friendly without compromising on taste or appearance. Plus, it’s incredibly versatile. While it’s fantastic on its own, you can easily dress it up or down. I’ll get into some serving ideas later, but the point is, it’s not just a one-trick pony. What I love most about this recipe is that it brings so much joy without demanding a ton of effort. It’s the perfect example of how simple ingredients and a little bit of love can create something truly magical. It’s also a wonderful alternative to heavier, richer cakes if you’re looking for something a little lighter but still want that decadent dessert experience.
How to Make [Recipe Name]
Quick Overview
Making this delightful peppermint cake is a wonderfully straightforward process. We’ll start by creaming together our butter and sugar until it’s light and fluffy, then incorporate eggs and vanilla. The dry ingredients get whisked together separately, and then we alternate adding them with our liquid. The star ingredient, peppermint extract, is added to the wet ingredients, ensuring that lovely flavor is distributed evenly. After a gentle mix to avoid overworking the batter, we bake it until it’s perfectly golden and springy to the touch. The final touch is a simple, luscious glaze that hardens just slightly, adding another layer of sweet pepperminty goodness. It’s all about combining good ingredients and a few simple techniques for a show-stopping cake.
Ingredients
For the Main Batter:
2 and 3/4 cups all-purpose flour: I always use unbleached flour for the best texture. Make sure to spoon and level it out, rather than scooping directly from the bag, to avoid packing too much in.
1 and 1/2 teaspoons baking powder: This gives our cake that lovely lift.
1/2 teaspoon baking soda: Works with the acid (if you use buttermilk, which I sometimes do!) to create a tender crumb.
1/4 teaspoon salt: Balances the sweetness and enhances all the other flavors.
1 cup (2 sticks) unsalted butter, softened: Make sure it’s truly softened, not melted. This is key for that fluffy texture when creaming with the sugar.
1 and 3/4 cups granulated sugar: For sweetness and structure.
2 large eggs: Room temperature eggs incorporate better. Just pop them in a bowl of warm water for 5-10 minutes if you forget to take them out ahead of time.
2 teaspoons pure vanilla extract: Always use pure extract if you can; it makes such a difference!
1 teaspoon pure peppermint extract: This is where the magic happens! Start with this amount, you can always add a *tiny* bit more to the glaze if you want an extra punch.
1 cup buttermilk, room temperature: Buttermilk adds incredible moisture and a slight tang. If you don’t have buttermilk, you can make a substitute by mixing 1 cup of milk with 1 tablespoon of white vinegar or lemon juice and letting it sit for 5 minutes.
For the Filling:
*Actually, this recipe doesn’t have a separate “filling” in the traditional sense because the peppermint flavor is infused throughout the batter itself. This keeps things super simple! If you wanted to add a different kind of filling, like a cream cheese frosting or a berry compote, you’d do that after the cake has cooled completely.*
For the Glaze:
2 cups powdered sugar, sifted: Sifting is important to avoid any lumps in your glaze.
2-3 tablespoons milk (or heavy cream for extra richness): Start with 2 tablespoons and add more gradually until you reach your desired drizzling consistency.
1/2 teaspoon pure peppermint extract: Or a little more, to taste!
Optional: A few drops of green food coloring for a festive look, or crushed candy canes for garnish.
Step-by-Step Instructions
Step 1: Preheat & Prep Pan
First things first, get that oven preheating to 350°F (175°C). I usually use a 9×13 inch baking pan for this recipe because it’s so easy to serve from. Grease it really well with butter or baking spray, and then give it a light dusting of flour. Tap out any excess flour. This step is crucial for preventing your beautiful peppermint cake from sticking. You want those clean edges when you slice into it, right?
Step 2: Mix Dry Ingredients
In a medium bowl, whisk together the flour, baking powder, baking soda, and salt. Whisking them together ensures that the leavening agents are evenly distributed, which means a consistent rise and texture throughout the cake. It also helps to aerate the flour a bit, contributing to a lighter cake. Just a good, thorough whisking will do the trick.
Step 3: Mix Wet Ingredients
In a large bowl, cream together the softened butter and granulated sugar. Beat them with an electric mixer (a stand mixer or hand mixer works great) for about 3-5 minutes until the mixture is pale yellow and fluffy. This is called the “creaming method” and it incorporates air into the batter, which is essential for a light and tender cake. Next, add the eggs, one at a time, beating well after each addition. Then, stir in the vanilla extract and the peppermint extract. Make sure everything is well combined.
Step 4: Combine
Now it’s time to bring it all together. With your mixer on low speed, gradually add the dry ingredients to the wet ingredients, alternating with the buttermilk. Start and end with the dry ingredients. So, add about a third of the dry ingredients, mix until just combined, then add half of the buttermilk, mix, add another third of the dry, mix, add the remaining buttermilk, mix, and finally, add the rest of the dry ingredients and mix until just combined. Be careful not to overmix! Overmixing develops the gluten in the flour too much, which can lead to a tough cake. A few streaks of flour are okay; they’ll disappear when you pour the batter into the pan.
Step 5: Prepare Filling
As I mentioned earlier, this recipe’s peppermint goodness is infused directly into the batter, so there isn’t a separate filling step for the cake itself. However, if you were planning to add something like a swirl of cream cheese frosting or even some chocolate chips *into* the batter, you’d do that right after step 4, before pouring into the pan. For this classic version, we just move on to pouring!
Step 6: Layer & Swirl
Pour the batter evenly into your prepared 9×13 inch pan. Smooth the top with a spatula. If you were adding a swirl, like melted chocolate or cream cheese mixture, you would dollop it on top now and then gently swirl it through the batter with a knife or skewer. For this straightforward peppermint cake, we just want an even layer of batter.
Step 7: Bake
Bake for 30-35 minutes, or until a wooden skewer or toothpick inserted into the center comes out clean. The top should be golden brown and spring back lightly when you gently press it. Oven temperatures can vary, so it’s always good to start checking around the 30-minute mark. If the top starts to brown too quickly, you can loosely tent it with aluminum foil.
Step 8: Cool & Glaze
Once baked, let the cake cool in the pan on a wire rack for about 15-20 minutes. This allows it to set up a bit before you remove it from the pan, or in this case, before you glaze it right in the pan. While the cake is cooling, whisk together the sifted powdered sugar, 2 tablespoons of milk, and the peppermint extract for the glaze. Add more milk, a teaspoon at a time, until you get a nice, drizzle-able consistency. It should be thick enough to coat the back of a spoon but thin enough to pour. Drizzle the glaze over the slightly warm or completely cooled cake. For a more opaque glaze, let the cake cool completely before glazing. For a slightly drippier, more translucent glaze, pour it while the cake is still a little warm. If you’re using food coloring, add a drop or two now and stir until you get your desired shade.
Step 9: Slice & Serve
Allow the glaze to set for at least 15-20 minutes before slicing. This makes for cleaner cuts. I love using a sharp knife for this. This cake is delicious served at room temperature or slightly chilled. You can cut it into squares or even use cookie cutters for fun shapes if you’re feeling playful! Enjoy the refreshing peppermint flavor!
What to Serve It With
This peppermint cake is truly a chameleon when it comes to pairings. For a delightful breakfast treat, especially on a weekend, I love serving a modest slice with a steaming mug of hot chocolate or a strong cup of black coffee. The richness of the coffee cuts through the sweetness beautifully. For a more elegant brunch spread, I’ll cut it into smaller, bite-sized squares and arrange them on a tiered stand. A glass of bubbly prosecco or a light mimosa complements the cake’s freshness. It’s also wonderful alongside a fresh fruit salad with berries and melon. As a festive dessert, especially during the holidays, it’s a showstopper on its own. But if you’re feeling extra indulgent, a scoop of vanilla bean ice cream or a dollop of whipped cream is divine. A drizzle of chocolate ganache is also a fantastic addition. For those moments when you just need a little something sweet for cozy snacks, a warm slice with a glass of cold milk is pure comfort. My kids absolutely adore it this way after school. My personal family tradition is to serve it with a sprinkle of crushed candy canes around Christmas time. It adds a lovely crunch and an extra festive touch. I’ve also found it pairs surprisingly well with a sharp cheddar cheese if you’re looking for a sweet and savory contrast – don’t knock it till you try it!
Top Tips for Perfecting Your Peppermint Cake
I’ve made this peppermint cake more times than I can count, and over the years, I’ve picked up a few tricks that I think really elevate it. For the Zucchini Prep, well, this recipe doesn’t actually use zucchini! I think you might be thinking of a different recipe. This peppermint cake is all about the smooth, creamy batter. When it comes to Mixing Advice, the biggest thing I can stress is not to overmix once you start combining the wet and dry ingredients. Mix until *just* combined. A few small lumps are perfectly fine and actually better than overmixing. Overmixing develops gluten, which will make your cake tough and chewy instead of light and tender. If you see streaks of flour, that’s okay; they’ll disappear as you pour the batter into the pan. For Swirl Customization, if you decide to add a swirl of something – say, melted chocolate or a dollop of cream cheese frosting – do it *before* you pour the batter into the pan, or dollop it on top of the poured batter and then gently swirl with a knife. You want to create ribbons, not just a muddy mess. For Ingredient Swaps, if you find yourself without buttermilk, remember that milk with a tablespoon of acid (vinegar or lemon juice) is a perfect substitute. It mimics the acidity that helps tenderize the cake. If you’re out of peppermint extract, a good quality vanilla extract can be used, but then you’ll just have a delicious vanilla cake, not our special peppermint cake! When it comes to Baking Tips, always know your oven. If yours tends to run hot, you might want to reduce the temperature by 25 degrees Fahrenheit. Also, avoid placing the cake directly in the center rack if your oven has “hot spots.” Rotating the pan halfway through baking can help ensure even cooking. For checking doneness, the toothpick test is classic, but I also like to gently press the top of the cake; it should spring back slightly. And for Glaze Variations, don’t be afraid to play with the consistency. If it’s too thick, add a tiny bit more milk or cream. If it’s too thin, whisk in a bit more powdered sugar. You can also add a touch of corn syrup for a glossier finish, or even a pinch of salt to balance the sweetness. And remember, a little bit of green food coloring can make it look extra festive!
Storing and Reheating Tips
This peppermint cake is pretty forgiving when it comes to storage. If you’re planning to enjoy it within a day or two, leaving it at Room Temperature is perfectly fine. Just make sure it’s covered tightly with plastic wrap or stored in an airtight container. It usually stays fresh and moist for about 2-3 days this way. For longer storage, I definitely recommend Refrigerator Storage. Wrap the cake tightly in plastic wrap, and then place it in an airtight container. This will keep it fresh for up to a week. The glaze might soften slightly in the fridge, but it firms back up once it returns to room temperature. If you want to get ahead of the game or have leftovers you want to save for a while, this cake freezes beautifully. For Freezer Instructions, I like to glaze the cake *after* it’s thawed if possible, but if you need to freeze it with the glaze on, make sure it’s fully set. Wrap the cooled, un-glazed or glazed cake very well in a couple of layers of plastic wrap, followed by a layer of aluminum foil, or place it in a freezer-safe container. It should last in the freezer for about 2-3 months. To thaw, remove the plastic wrap and foil and let it come to room temperature on the counter for a few hours. For Glaze Timing Advice, if you’re storing it at room temperature or in the fridge, glazing it just before serving or the day before is ideal for the best texture. If you are freezing it with the glaze on, make sure it’s completely hardened before wrapping. When reheating, I usually just let it come to room temp. If it feels a little dry, a few seconds in a very low-heat microwave (like 10-second bursts) can help, but be careful not to overheat it.
Frequently Asked Questions
Final Thoughts
There you have it – my absolute favorite peppermint cake recipe! It’s a recipe that brings me so much joy, and I really hope it does the same for you and your loved ones. It’s proof that sometimes, the simplest things are the most delicious. The way that cool, refreshing peppermint flavor mingles with the tender, moist cake is just magical. It’s perfect for a casual treat, a holiday gathering, or anytime you need a little bit of sweet, minty happiness. If you love this recipe, you might also enjoy my [link to another festive cake recipe, e.g., Gingerbread Loaf] or my [link to a chocolate dessert, e.g., Easy Chocolate Mousse]. They’re both family favorites! I can’t wait to hear how your peppermint cake turns out! Please feel free to leave a comment below with your experience, any tips you discovered, or even how your family enjoyed it. Happy baking, and may your kitchen always be filled with delicious aromas!
peppermint cake
Ingredients
Main Ingredients
- 0.75 cup unsalted butter room temperature
- 1.5 cups white sugar
- 0.75 cup sour cream room temperature
- 1 tsp vanilla extract
- 1 tbsp peppermint extract
- 6 large egg whites room temperature
- 2.5 cups all purpose flour
- 4 tsp baking powder
- 0.5 tsp salt
- 0.75 cup milk room temperature
- 0.25 cup water room temperature
- 1.5 cups salted butter
- 1.5 cups shortening
- 11.5 cups powdered sugar
- 4.5 tbsp water for frosting
- 1 tsp vanilla extract for frosting
- 1 tbsp peppermint extract for frosting
- 0.75 cup peppermint pieces for frosting
- 5 oz white chocolate chips
- 4 tbsp heavy whipping cream for ganache
- red gel icing color
- Candy cane Hershey kisses
- Peppermints
- Cadbury chocolate balls
- White chocolate peppermint M&Ms
Instructions
Preparation Steps
- Preheat oven to 350°F (176°C). Prepare three 8-inch cake pans by greasing and lining with parchment paper.
- In a large bowl, cream together butter and sugar until light and fluffy, about 3-4 minutes.
- Add sour cream and vanilla and peppermint extracts; mix until well combined.
- Add egg whites in two additions, mixing well after each; scrape bowl as needed.
- In a separate bowl, combine flour, baking powder, and salt. In a small cup, mix milk and water.
- Alternately add dry ingredients and milk mixture to batter, beginning and ending with dry ingredients, mixing well after each addition.
- Divide batter evenly among pans; bake 21-23 minutes or until toothpick inserted comes out with a few crumbs.
- Cool cakes 2-3 minutes in pans; remove to wire racks to cool completely.
- For frosting, beat butter and shortening until smooth. Gradually add half powdered sugar, mixing well between additions.
- Add water, vanilla extract, and peppermint extract; mix until smooth. Add remaining powdered sugar gradually and mix well.
- Add more water if needed for smooth consistency; fold in peppermint pieces.
- Trim cake domes flat. Place first layer on serving plate; spread 1 cup frosting evenly on top.
- Add second cake layer and spread another cup of frosting. Top with last layer and frost entire cake.
- For ganache, microwave heavy cream until boiling. Pour over white chocolate chips and let sit 2-3 minutes.
- Whisk ganache until smooth, microwaving briefly if necessary. Add red gel food coloring to desired shade.
- Let ganache thicken slightly. Use a squeeze bottle or spoon to drizzle ganache around edge of cake, leaving center open.
- Pipe ring of frosting around cake edge and decorate with candy canes, Hershey kisses, peppermints, chocolate balls, and peppermint M&Ms.
- Refrigerate cake until serving. Serve at room temperature for best flavor. Add candy decorations just before serving to prevent softening.