You know those nights, right? The ones where the clock is ticking, everyone’s hungry, and the thought of chopping, sautéing, and making a huge mess feels absolutely overwhelming? Yeah, I’ve been there more times than I can count. That’s exactly why I’m so thrilled to share this recipe with you today. It’s my go-to for a reason. Imagine all the incredible, savory goodness of a classic Philly cheesesteak, but ready in a fraction of the time, with way less fuss, and using that magical appliance we all love – the Air Fryer! Seriously, these Air Fryer Philly Cheesesteaks are a game-changer. They’re every bit as satisfying as the original, bursting with flavor, and honestly, they’re almost foolproof. Forget greasy pans and long cooking times; this is how we do comfort food now. If you thought making a decent cheesesteak at home was a chore, prepare to be amazed. This recipe makes me feel like a kitchen superhero, even on the busiest weeknights.

What is an Air Fryer Philly Cheesesteak?
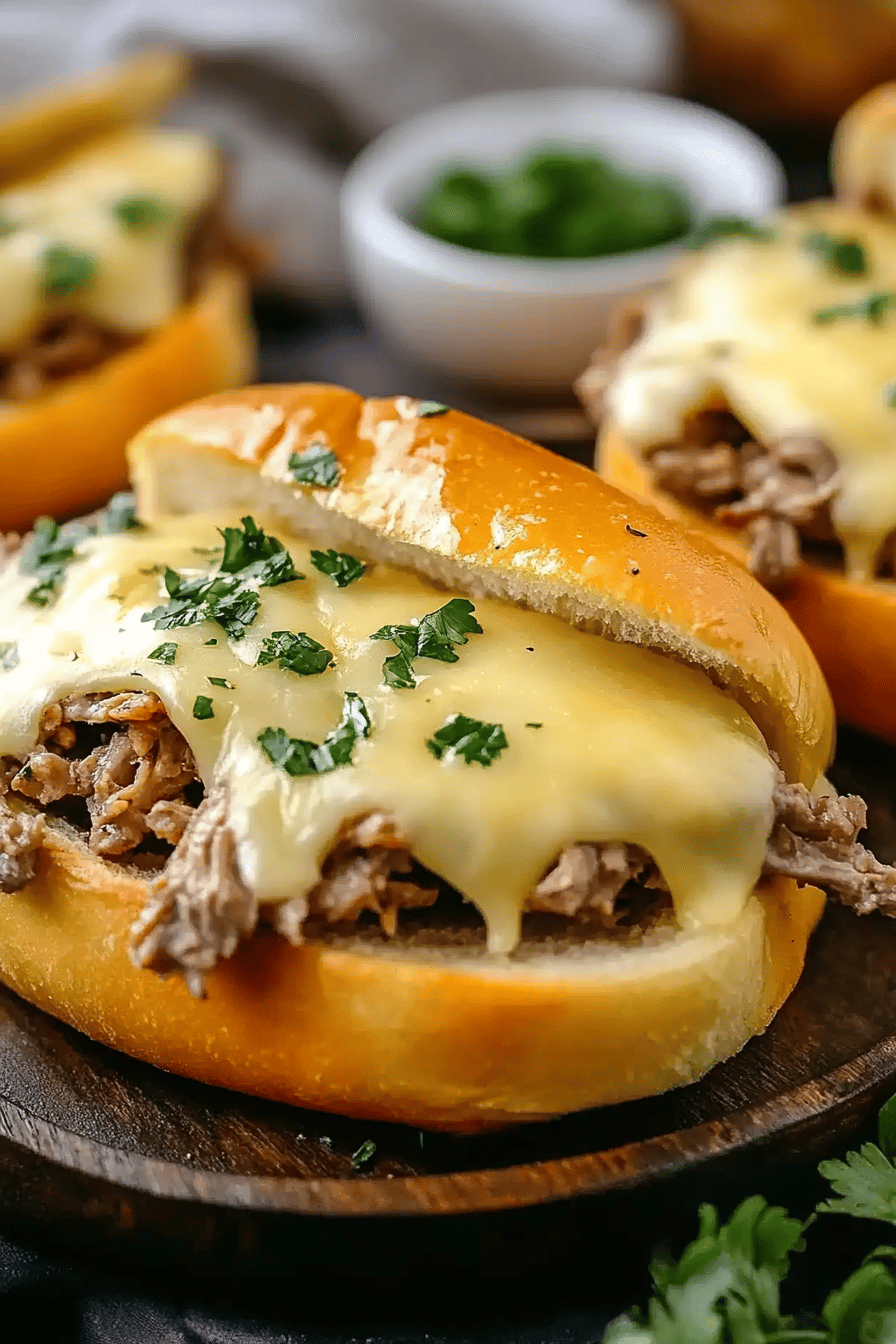
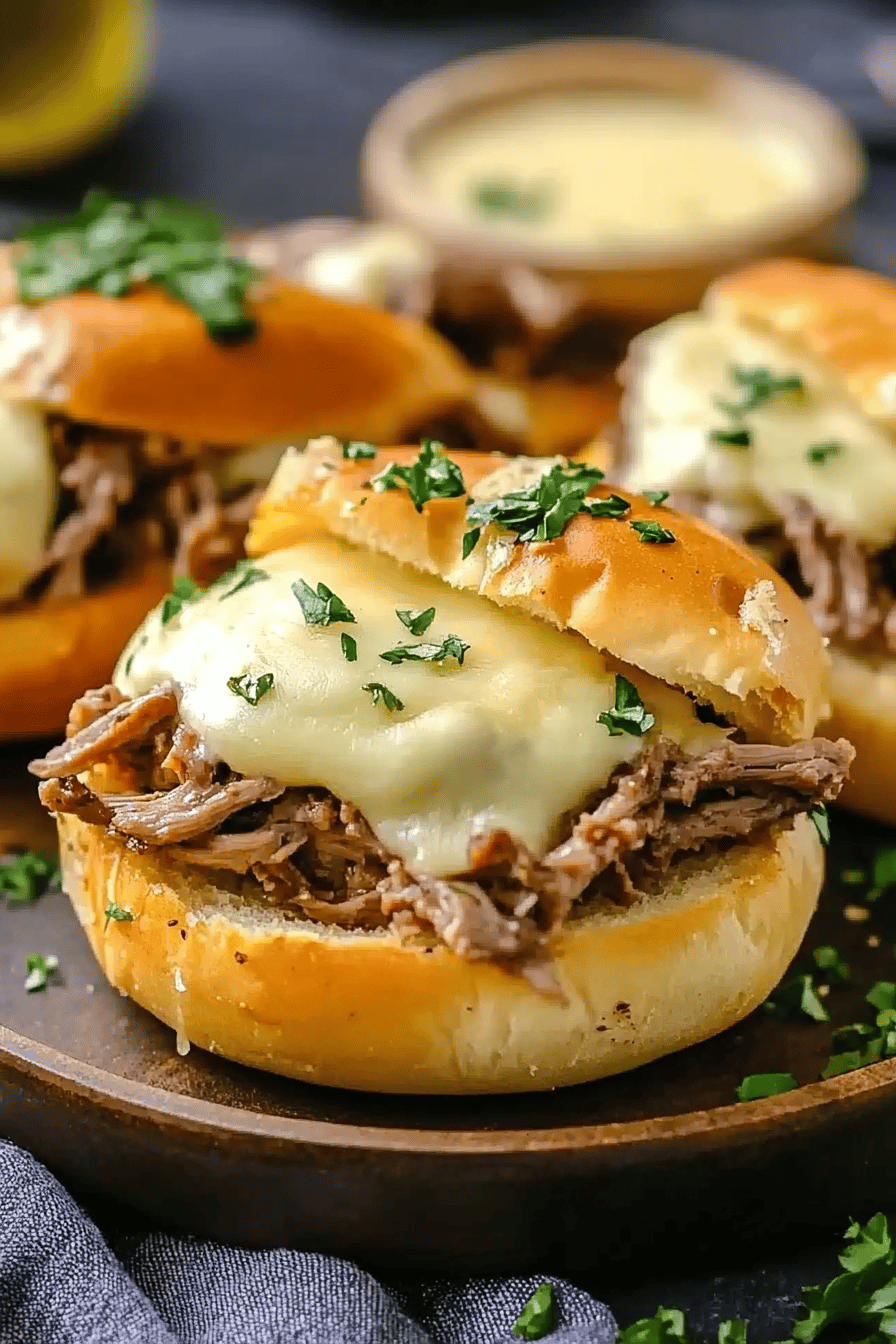
So, what exactly are we talking about when I say “Air Fryer Philly Cheesesteaks”? Think of it as taking the soul of a beloved sandwich – that irresistible combination of thinly sliced, savory beef, melty cheese, and caramelized onions – and giving it a modern, speedy makeover. Instead of the traditional stovetop method, we’re letting the air fryer work its magic. This isn’t just about speed; it’s about achieving a fantastic texture. The beef gets wonderfully tender and slightly crisped, the onions sweet and soft, and the cheese? Oh, the cheese gets perfectly gooey. It’s essentially all the delicious components of a classic cheesesteak, expertly cooked in your air fryer basket, ready to be piled into soft hoagie rolls. It’s the classic flavor profile we all crave, streamlined for today’s busy kitchens. It’s your favorite sandwich, made remarkably simple and incredibly delicious.
Why you’ll love this recipe?
There are so many reasons why this Air Fryer Philly Cheesesteak recipe has become an absolute staple in my kitchen, and I just know you’re going to fall in love with it too. Let’s start with the flavor, because, wow. You get that deep, savory beef taste, the sweetness from perfectly cooked onions, and that glorious, stretchy cheese. It’s pure comfort food bliss in every single bite. But beyond the taste, the sheer simplicity is what truly sets this apart. I’m talking minimal prep and maximum flavor payoff. You can whip these up on a whim, making it a lifesaver on those nights when you’re rushing or just don’t have the energy for a complicated meal. And the cost? It’s incredibly budget-friendly! Using common pantry staples and affordable cuts of meat means you can feed a crowd without breaking the bank. I also love how versatile it is. While it’s phenomenal stuffed into a hoagie roll, you can totally use it as a topping for fries or even mix it into a pasta dish. Honestly, what I love most about this recipe is that it delivers all the satisfaction of a traditional cheesesteak without any of the fuss. It’s the perfect balance of quick, delicious, and economical, making it a win-win-win in my book. It’s a recipe that just *works* and always brings smiles to the table.
How do I make an air fryer Philly cheesesteak?
Quick Overview
Get ready for pure sandwich magic! This method simplifies the classic Philly cheesesteak by letting your Air Fryer do most of the heavy lifting. We’re talking about quickly cooking thinly sliced beef and onions until they’re tender and flavorful, then melding it all with gooey cheese, all within minutes. It’s a hands-off approach that results in an incredibly satisfying meal without the usual stovetop mess. You’ll be amazed at how easily this comes together, proving that gourmet-tasting comfort food doesn’t have to be complicated.
Ingredients
For the Main Filling:
1 lb thinly sliced ribeye steak (or sirloin, flank steak thinly sliced against the grain) – look for good marbling for tenderness!
1 large yellow onion, thinly sliced
2 tablespoons olive oil (or any neutral oil you have)
1/2 teaspoon salt
1/4 teaspoon Black Pepper
Optional: A pinch of garlic powder for an extra layer of flavor
For the Cheese:
4 slices Provolone cheese (traditional and melts beautifully!) or use your favorite mild cheese blend like mozzarella or a cheddar/provolone mix.
Optional: A sprinkle of shredded cheese for extra cheesiness.
For Serving:
4 soft hoagie rolls or sub rolls, split lengthwise
Optional: Ketchup, mustard, mayonnaise, sautéed mushrooms, bell peppers, or a drizzle of steak sauce.
Step-by-Step Instructions
Step 1: Preheat Air Fryer & Prep Ingredients
First things first, let’s get that air fryer ready! Pop it on and set it to 375°F (190°C). This preheating step is crucial for even cooking. While it’s heating up, grab your thinly sliced steak and your sliced onion. If your steak isn’t already sliced super thin, pop it in the freezer for about 20-30 minutes until it’s firm but not frozen solid. This makes slicing it paper-thin a breeze. I usually like to slice it against the grain for the most tender result. Toss the sliced steak and onions in a bowl with the olive oil, salt, pepper, and garlic powder if you’re using it. Give it all a good mix, making sure everything is evenly coated. This little bit of seasoning upfront really makes a difference to the final flavor!
Step 2: Assemble the Filling
Now, it’s time to load up the air fryer. You can either cook the meat and onions in batches directly in the air fryer basket, or if you have a smaller air fryer, you might need to do this in two rounds. Line your air fryer basket with parchment paper (this makes cleanup a dream, trust me!) or a perforated liner. Spread about half of the steak and onion mixture in a single layer in the basket. Don’t overcrowd it, or things will steam instead of getting that nice slight crisp. If you’re cooking in batches, do the same for the second batch.
Step 3: First Cook for the Filling
Slide that basket into your preheated air fryer and cook for about 5-7 minutes. What we’re looking for here is for the steak to start browning and the onions to soften up. Give the basket a good shake halfway through to ensure everything cooks evenly. You want that beef to lose its raw pinkness and start getting a little bit caramelized. Once the first batch is done, carefully remove it to a plate or bowl and repeat the cooking process with the second batch of steak and onions.
Step 4: Combine and Add Cheese
Once both batches of the steak and onion mixture are cooked, bring them all back together. You can either return them all to the air fryer basket if it’s big enough to hold it all relatively flat, or just mix them together in the bowl you used earlier. Now for the best part: the cheese! Lay the slices of Provolone (or your chosen cheese) directly over the top of the meat and onion mixture. If you’re using shredded cheese, sprinkle it generously over the top. You want that cheese to melt and get all gooey and delicious!
Step 5: Second Cook for Melting Cheese
Now, pop the basket back into the air fryer. This time, we’re cooking for a shorter duration, just about 2-4 minutes, or until the cheese is completely melted and bubbly. Keep an eye on it so it doesn’t burn! The goal is perfectly melted, gooey cheese that clings to every bit of that savory filling. The heat from the cooked meat and onions will melt it beautifully.
Step 6: Warm the Rolls
While the cheese is melting, you can quickly warm up your hoagie rolls. You can do this in the air fryer for about 1-2 minutes at 350°F (175°C), or toast them lightly in your oven or toaster. Just until they’re warm and slightly soft, perfect for holding all that delicious filling.
Step 7: Assemble and Serve
Carefully remove the air fryer basket. Spoon the cheesy, meaty, oniony filling generously into your warmed hoagie rolls. Add any of your favorite toppings like ketchup, mustard, or some sautéed mushrooms if you’re feeling fancy. And there you have it! A fantastic, flavor-packed Air Fryer Philly Cheesesteak, ready in minutes. It’s seriously that easy and so, so good. Serve immediately and enjoy the deliciousness!
What to Serve It With
These Air Fryer Philly Cheesesteaks are stars all on their own, but they also pair wonderfully with a variety of sides that can elevate your meal depending on the occasion. For a classic breakfast or brunch feel, serving them alongside some crispy home fries or a simple fruit salad adds a lovely contrast. My kids actually love having a mini cheesesteak bite with a side of scrambled eggs on a weekend morning – it’s a fun twist! If you’re going for a more substantial brunch spread, think about serving them with a light coleslaw or a potato salad. For dessert, these don’t really need much, but if you’re having a gathering, a light, refreshing option like some berries or a lemon sorbet would be perfect after such a savory dish. For those cozy snack moments, which is often when I make these, a side of crunchy dill pickles or even some seasoned tater tots really hits the spot. Honestly, they’re so versatile that you can really customize the accompaniments to whatever you’re craving. I’ve even served the filling over a bed of rice for a different kind of meal, which my family devoured!
Top Tips for Perfecting Your Air Fryer Philly Cheesesteaks
Okay, let’s talk about making these *absolutely perfect* every single time. I’ve made these so many times that I’ve picked up a few tricks that I think you’ll find super helpful. First off, the steak quality really does matter here. While you don’t need to break the bank, opting for a ribeye or a well-marbled sirloin will give you the most tender and flavorful result. When you slice it, aim for paper-thin. If you struggle with slicing raw meat thinly, freeze it for about 20-30 minutes until it’s firm but not frozen solid – this makes a huge difference. For the onions, I always slice them thinly and evenly. This ensures they cook down nicely and caramelize without becoming mushy. Some people like to sauté the onions separately first, but I find the air fryer does a great job of softening them while they cook with the meat. When it comes to cooking the meat and onions, the key is not to overcrowd the air fryer basket. If you pile it too high, you’ll end up steaming the ingredients instead of getting that delicious, slightly browned edge. Cooking in batches is a small extra step that guarantees a much better outcome. I usually use parchment paper in my air fryer basket for easy cleanup; it’s a total game-changer! For the cheese, Provolone is traditional for a reason – it melts beautifully and has a fantastic tangy flavor. However, don’t be afraid to experiment! A mix of Provolone and mozzarella is divine, or even some sharp cheddar for a different kick. If you find your cheese isn’t melting as much as you’d like, you can always pop the lid back on the bowl after you take it out of the air fryer for a minute to let the residual heat do its thing. And remember, the bread! A good quality, soft hoagie roll that can hold up to the filling without falling apart is essential. Lightly toasting or warming them makes all the difference in texture. Lastly, don’t be afraid of the optional additions. A dash of garlic powder in the mix, some sautéed mushrooms or bell peppers added at the end, or even a splash of Worcestershire sauce can really take your cheesesteak to the next level. These are just little tweaks that elevate the whole experience!
Storing and Reheating Tips
One of the best things about this recipe is how well the filling stores, which is a lifesaver for busy weeks. If you have any leftover steak and onion mixture (with or without cheese), store it in an airtight container in the refrigerator. It should stay fresh and delicious for about 3-4 days. I often make a double batch of the filling just for this reason! When you’re ready to reheat, you have a few options. For the best results, I highly recommend reheating the filling in the air fryer again. Just spread it out in the basket, and heat at around 350°F (175°C) for about 5-7 minutes, or until heated through. If you prefer, you can also reheat it gently in a skillet over medium-low heat, stirring occasionally, until it’s warm. Microwaving is also an option, but I find it can sometimes make the steak a little less tender. If your filling lost some of its cheesiness during storage, you can always add a fresh slice of cheese on top during the reheating process and let it melt. For the rolls, it’s best to toast or warm them fresh. If you store them separately, they’ll stay softer and less prone to getting soggy. I usually don’t add the cheese to the filling if I know I’ll be storing it for more than a day, as melted cheese can sometimes get a bit greasy when reheated multiple times. Instead, I’ll add the cheese right before the final melt when I’m ready to serve. It ensures that perfect gooeyness every time!
Frequently Asked Questions
Final Thoughts
So there you have it – a truly fantastic way to enjoy the classic comfort of a Philly cheesesteak, made incredibly easy with your air fryer. I really hope you give this recipe a try. It’s become such a go-to for me because it delivers maximum flavor with minimal effort, which, let’s be honest, is the dream for busy home cooks. It’s perfect for a quick weeknight dinner, a fun lunch, or even a crowd-pleasing appetizer. The aroma alone as it cooks is enough to make everyone’s stomach rumble! If you loved this recipe, you might also enjoy my [Link to another recipe, e.g., “Easy Air Fryer Buffalo Chicken Sandwiches”] or my [Link to another recipe, e.g., “Sheet Pan Sausage and Peppers”]. They share that same spirit of simple, delicious comfort food. I can’t wait to hear what you think after you make these Air Fryer Philly Cheesesteaks! Let me know in the comments below how yours turned out, if you tried any variations, or your favorite way to top them. Happy cooking, and happy eating!

Air Fryer Philly Cheesesteaks
Ingredients
Main Ingredients
- 0.75 lb Thinly sliced ribeye steak
- 1 medium Onion, sliced
- 1 medium Green bell pepper, sliced
- 4 oz Provolone cheese slices
- 2 hoagie rolls Hoagie rolls
- 1 tablespoon Olive oil
- 0.25 teaspoon Salt
- 0.25 teaspoon Black pepper
Instructions
Preparation Steps
- Preheat your air fryer to 400°F (200°C).
- In a bowl, toss the sliced onions and bell peppers with olive oil, salt, and pepper.
- Place the onions and peppers in the air fryer basket and cook for 5 minutes, or until slightly softened.
- Add the sliced steak to the air fryer basket, spreading it out in a single layer. Cook for 3-5 minutes, or until the steak is cooked to your liking.
- Top the steak with provolone cheese slices and cook for 1-2 minutes, or until the cheese is melted.
- Toast the hoagie rolls if desired. Fill the rolls with the steak, onions, peppers, and melted cheese. Serve immediately.


