I can still remember the first time I smelled them baking – the warm, spiced aroma filling every nook and cranny of our kitchen. It was a crisp autumn afternoon, the kind where you can practically taste the change in the air, and my grandma was pulling these little beauties out of the oven. These aren’t just any treats; they’re pure fall magic in miniature form. If you’ve ever fallen head over heels for a classic Apple Cider Donut, prepare yourself, because these Apple Cider Cups are like that comforting hug in cake form, but even easier to whip up. They’re surprisingly moist, packed with all those cozy spices, and topped with a dreamy glaze that just melts in your mouth. Honestly, they’re my go-to when that craving for something sweet hits but I just don’t have the energy for a full-blown cake. They’re little pockets of pure joy, and my family devours them faster than I can make them!
What are Apple Cider
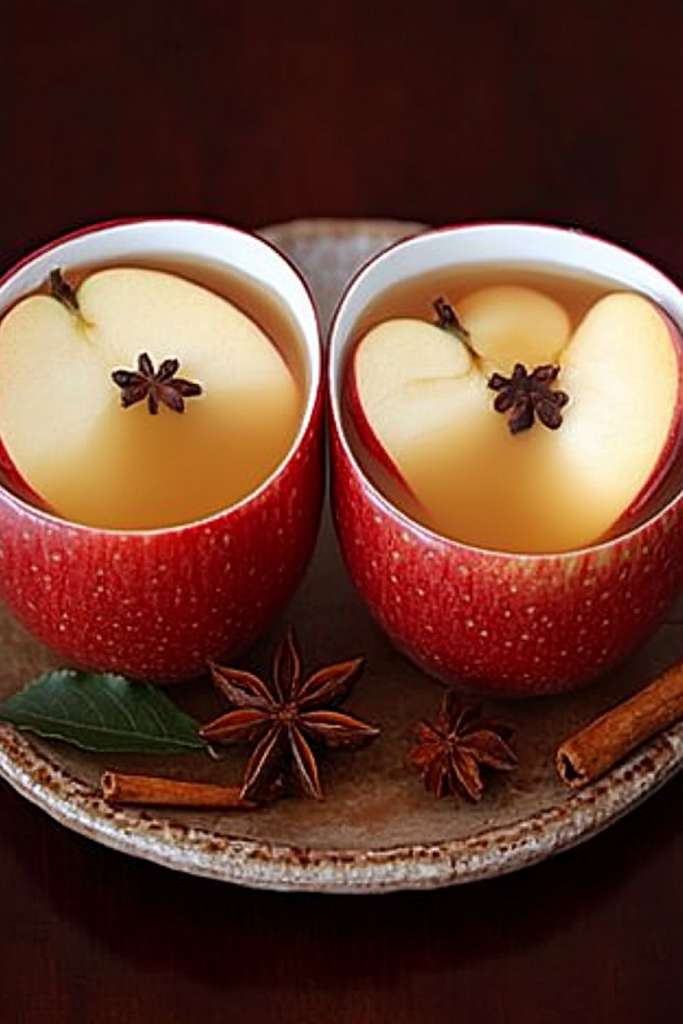
So, what exactly are Apple Cider Cups? Think of them as your favorite fluffy, spiced muffin that’s been kissed by the essence of a warm apple cider. They’re essentially individual cakes, baked in muffin tins, bursting with the flavors of fall. We’re talking real apple cider, cinnamon, nutmeg, and a touch of warmth that just screams cozy season. The name itself is pretty straightforward, but the experience is anything but ordinary. They’re not quite as dense as a Pound Cake, nor as light as a chiffon. They land in that perfect sweet spot of moist, tender crumb that’s sturdy enough to hold up to a sweet glaze, but still incredibly tender. It’s like a perfectly brewed cup of hot apple cider transformed into a delightful, portable treat. They’re my shortcut to that incredible, comforting flavor without all the fuss of rolling out dough or waiting for a big cake to cool.
Why you’ll love this recipe?
Oh, where do I even begin with why you absolutely *need* to try these Apple Cider Cups? Let’s start with the flavor, because it’s simply out of this world. Imagine biting into something that tastes like a warm hug, with the sweet tang of reduced apple cider and just the right amount of spice – cinnamon, nutmeg, and a whisper of clove. It’s the quintessential taste of fall, bottled up and baked to perfection. And the texture! These cups are unbelievably moist and tender, thanks to a few little tricks I’ll share with you. They’re not dry or crumbly, just soft, yielding goodness. What I also adore about them is their sheer simplicity. You can literally whip up the batter in about 10-15 minutes, and then they bake up while you’re doing other things. It’s a lifesaver on busy afternoons or when unexpected guests pop by. Plus, they’re incredibly budget-friendly. Most of the ingredients are pantry staples, and a carton of apple cider is usually quite affordable, especially this time of year. They’re also wonderfully versatile. Enjoy them as a sweet breakfast treat with your coffee, serve them at a fall brunch, or present them as a delightful dessert after dinner. They’re like a more refined, yet equally approachable, cousin to the humble muffin. Compared to baking a whole apple pie or even a Layer Cake, these Apple Cider Cups are a fraction of the effort but deliver a huge flavor punch. They truly are my favorite way to capture the essence of autumn.
How to Make Apple Cider Cups
Quick Overview
The magic behind these apple cider Cups is how simple they are to bring together. You’ll start by reducing some apple cider to intensify its flavor, then whisk together your dry ingredients, followed by your wet ingredients. Everything gets combined gently, spooned into muffin tins, and baked until golden. A simple glaze finishes them off, making them utterly irresistible. It’s a foolproof method that guarantees delicious results, even if you’re not a seasoned baker.
Ingredients
For the Main Batter:
This is where all the goodness starts! For the best flavor, I always recommend using a good quality, unfiltered apple cider. You can find it in most grocery stores, especially during the fall season. Avoid apple juice; we want that concentrated apple cider flavor. For the flour, all-purpose is perfectly fine, but I’ve also had success using a good quality gluten-free blend if needed. Don’t skimp on the spices – they are key to that warm, cozy taste. Make sure your baking powder and baking soda are fresh, as they help give these cups their lovely lift. A little bit of salt actually enhances all the sweet flavors, so don’t skip it!
For the Filling:
This isn’t a separate, complicated filling, but rather what we infuse *into* the batter to make it extra special. The star here is that reduced apple cider. You’re basically concentrating all that apple goodness and sweetness. We’ll also incorporate Brown Sugar for a lovely caramel note and a touch more spice. Some folks like to add a bit of finely chopped apple, but I prefer to let the cider flavor really shine on its own for this recipe.
For the Glaze:
This is the crowning glory! It’s a simple mix of powdered sugar, a splash of milk (or for a more intense apple flavor, more apple cider!), and a hint of vanilla extract. The key here is getting the consistency just right – thick enough to coat, but thin enough to drizzle beautifully. We want it to be glossy and sweet, but not so much that it overpowers the cake itself.
Step-by-Step Instructions
Step 1: Preheat & Prep Pan
First things first, get your oven preheating to 375 degrees Fahrenheit (190 degrees Celsius). This is a pretty standard baking temperature and works like a charm for these cups. While the oven is heating up, grab your muffin tin – you’ll need about 12 cups. I like to give them a good spray with non-stick baking spray, or you can use muffin liners if you prefer. If you use liners, a light spray on the inside of the liner can sometimes prevent sticking, especially if you’re using paper ones. Make sure the oven rack is in the center position so they bake evenly.
Step 2: Mix Dry Ingredients
In a medium-sized bowl, whisk together your all-purpose flour, granulated sugar, baking powder, baking soda, cinnamon, nutmeg, and salt. Whisking them all together thoroughly ensures that the leavening agents (baking powder and soda) and spices are evenly distributed throughout the batter. This means you won’t get any surprising pockets of baking soda taste or uneven spice distribution. You want everything to be well combined and light, with no visible clumps of flour or spice.
Step 3: Mix Wet Ingredients
In a separate, larger bowl, whisk together your eggs and melted butter (make sure it’s cooled slightly so it doesn’t cook the eggs). Then, stir in the vanilla extract and your reduced apple cider (I’ll explain how to reduce it in a bit!). Whisk until everything is just combined and you have a nice, smooth liquid mixture. The butter provides richness, the eggs bind everything together, and the vanilla adds that lovely aromatic sweetness. The apple cider is our flavor powerhouse!
Step 4: Combine
Now, it’s time to bring those wet and dry ingredients together. Pour the wet ingredients into the bowl with the dry ingredients. Using a spatula or a wooden spoon, gently fold them together until *just* combined. It’s really important not to overmix here! A few small lumps of flour are perfectly okay. Overmixing develops the gluten in the flour too much, which can lead to tough, dense cakes. We want tender, tender cups, so stop mixing as soon as you don’t see any more dry streaks of flour.
Step 5: Prepare Filling
Actually, for these Apple Cider Cups, the “filling” is really the concentrated apple cider flavor baked right in. To get that incredible, deep apple taste, you’ll want to take about 2 cups of your apple cider and simmer it in a small saucepan over medium heat until it reduces by about half, leaving you with about 1 cup of syrupy liquid. This concentrates the apple flavor and sweetness beautifully. Let it cool slightly before adding it to your wet ingredients. This step is crucial for that authentic, bold apple cider taste!
Step 6: Layer & Swirl
This step is actually more about filling the muffin cups. Spoon the batter evenly into your prepared muffin tin, filling each cup about two-thirds full. Don’t overfill them, or they’ll overflow as they bake. You should get about 12 lovely cups from this batter. A cookie scoop can be super handy here for ensuring even portions.
Step 7: Bake
Pop that muffin tin into your preheated oven. Bake for about 18-22 minutes. The exact time will depend on your oven, so start checking around the 18-minute mark. They’re done when a toothpick inserted into the center of a cup comes out clean, or with just a few moist crumbs attached. The tops should be golden brown and they should spring back slightly when gently touched. Don’t overbake them, or they’ll lose that wonderful moisture!
Step 8: Cool & Glaze
Once they’re baked, let the Apple Cider Cups cool in the muffin tin for about 5-10 minutes. This allows them to set up a bit more. Then, carefully transfer them to a wire rack to cool completely. It’s really important that they are completely cool before you glaze them, otherwise, the glaze will just melt right off and become a runny mess. While they’re cooling, whisk together your powdered sugar, a tablespoon or two of milk (or apple cider!), and the vanilla extract in a small bowl until you reach a smooth, drizzle-able consistency. If it’s too thick, add a tiny bit more liquid; if it’s too thin, add a bit more powdered sugar.
Step 9: Slice & Serve
Once the cups are totally cool, it’s time for the best part! Drizzle that luscious glaze over the tops of each Apple Cider Cup. You can be as neat or as messy as you like – I usually go for a rustic drizzle. Let the glaze set for a few minutes, and then dig in! They are absolutely divine enjoyed at room temperature, or you can even warm them up slightly if you like. They’re perfect on their own, but even better with a cup of hot coffee or tea.
What to Serve It With
These Apple Cider Cups are so versatile, they fit into almost any occasion! For a lovely breakfast treat, I love pairing them with a steaming mug of strong black coffee or a creamy latte. The coffee’s slight bitterness is a perfect counterpoint to the sweet, spiced cups. For a more relaxed morning, they’re wonderful with a glass of chilled milk, especially for the kids. When it comes to brunch, these add a touch of homemade charm. I like to arrange them on a pretty tiered stand, perhaps with some fresh fruit like berries or sliced apples on the side. A sparkling cider or a mimosa pairs beautifully too, making it feel extra festive. As a dessert, they’re a lighter option than a heavy chocolate cake. Serve them slightly warmed with a small scoop of vanilla bean ice cream or a dollop of whipped cream. The contrast of warm cake and cold ice cream is pure bliss! And for those cozy evening snacks? Honestly, they’re perfect just as they are, enjoyed with a good book and a mug of herbal tea. My family also loves to have them with a glass of that same apple cider we used in the batter – talk about doubling down on deliciousness!
Top Tips for Perfecting Your Apple Cider Cups
I’ve made these Apple Cider Cups more times than I can count, and over the years, I’ve picked up a few little tricks that really make a difference. First, regarding the apple cider reduction: don’t rush it. Simmering it gently on medium heat allows the flavors to concentrate without burning. You’re looking for a syrupy consistency. If it gets too thick, just whisk in a tiny bit of regular apple cider or water. For the batter, remember my mantra: do NOT overmix! Seriously, as soon as you don’t see dry flour streaks, stop. A few little lumps are fine; they’ll bake out and ensure you get that tender, moist crumb that everyone raves about. Overmixing leads to tough, rubbery cakes, and we definitely don’t want that. When it comes to baking, ovens can be tricky! If your oven tends to bake hotter on one side, you might want to rotate the muffin tin halfway through. A toothpick test is your best friend for checking doneness – clean means done. If you’re feeling adventurous with the swirl, you could technically add a little cinnamon-sugar mixture swirled into the batter before baking, but I find the reduced cider gives us all the warm spice we need. For ingredient swaps, if you don’t have butter, a neutral-flavored oil like canola or vegetable oil works too, about ¾ cup. And if you’re out of regular milk for the glaze, a splash of cream or even a dairy-free milk like almond or oat milk will do the trick, though the flavor might be slightly different. My biggest “lesson learned” moment was when I accidentally used apple juice instead of cider – HUGE mistake! It lacked that depth of flavor, so always use real apple cider. Another tip: make sure your baking soda and baking powder are fresh. Expired leaveners are the silent killer of fluffy baked goods!
Storing and Reheating Tips
These Apple Cider Cups are quite forgiving when it comes to storage, which is part of why I love them so much! If you’ve got a few leftover (which is rare in my house, but it happens!), you can absolutely leave them at room temperature for a day or two. Just make sure they’re in an airtight container or well-covered with plastic wrap. They’ll stay nice and moist. For longer storage, the refrigerator is your best friend. Pop them into an airtight container and they should keep well for up to 4-5 days. The texture might firm up slightly in the fridge, but don’t worry. If you want to freeze them, this is a fantastic make-ahead option! I like to freeze them *before* glazing. Wrap each individual cup tightly in plastic wrap, then place them in a freezer-safe bag or container. They’ll keep wonderfully for up to 2-3 months. To thaw, just bring them out to room temperature for a few hours. If you want to reheat them, I usually pop them in a 300°F (150°C) oven for about 5-10 minutes, just to warm them through. This makes them taste like they just came out of the oven! For the glaze, it’s always best to add it *after* the cups have completely cooled, whether you’re serving them right away, refrigerating, or even before freezing (though it can get a little sticky when freezing). If you do glaze before freezing, make sure the glaze is fully set first.
Frequently Asked Questions
Final Thoughts
Honestly, these Apple Cider Cups are more than just a recipe to me; they’re a memory, a feeling, a taste of home. They’re that perfect blend of cozy and convenient that makes them a winner every single time. Whether you’re looking for a sweet breakfast addition, a charming brunch offering, or just a simple way to brighten your afternoon, these little cups deliver. The way the warm spices mingle with that concentrated apple cider flavor is truly something special, and the moist, tender crumb is just heavenly. If you’ve enjoyed this recipe and are looking for more ways to bring the flavors of fall into your kitchen, you might also love my Spiced Apple Crumble Bars or my Pumpkin Spice Pancakes. They capture that same cozy, comforting essence. I truly can’t wait for you to try these Apple Cider Cups. Please, if you do make them, let me know how they turn out in the comments below! I love hearing your feedback, and I’m always curious to see if you have any fun variations or personal twists you’ve added. Happy baking, my friends!
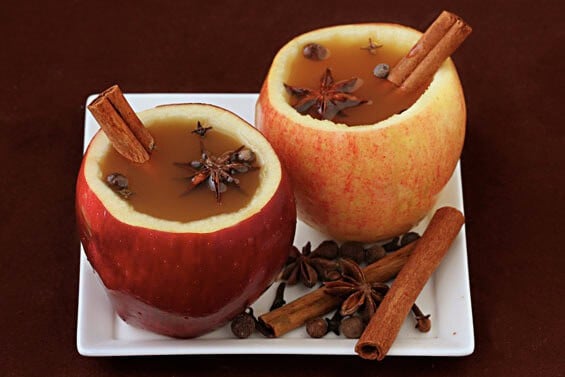
Apple Cider Cups
Ingredients
Main Ingredients
- 6 medium Apples
- 2 cups Apple Cider
- 0.25 cup Brown Sugar
- 0.5 teaspoon Cinnamon
- 0.25 teaspoon Nutmeg
- 1 tablespoon Butter
Instructions
Preparation Steps
- Preheat oven to 375°F (190°C). Core the apples, leaving the bottom intact. Place in a baking dish.
- In a saucepan, combine apple cider, brown sugar, cinnamon, and nutmeg. Bring to a simmer.
- Pour the cider mixture into the cored apples. Top each apple with a small pat of butter.
- Bake for 25-30 minutes, or until apples are tender.
- Serve warm.


